Click link to return to main post on Starts Without Ends.
Divided braid loop start #3:
This is the way I usually make a divided-braid loop start. You can do this start with simple 3-loop braids up to very complex ones like this letterbraid.

this loop start is just a “divided” braid, can be made on any braid that can be made “divided” (see 5 and 9-loop braid tutorials)
To me, this method seems quicker to set up than other methods, but it is harder to describe. It’s ideal for an even number of bicolor loops of the same two colors. But it can work for anything, and makes a nice beginning loop to hang over the C-clamp and braid from.
Twist one double-length loop to make 2 loops:
The first step is to make up your loops: doubly long loops, as for the previous method (Divided Loop-start #2), but individually twisted and mounted as described below. Any odd loops of a single color are made as separate, single loops.
Update – I usually do this with all the loops (except for a remaining odd loop), but this start will work even if only one loop is double-length (and twisted to form a figure-8). The other loops can all be separate, single-length loops. They will eventually ‘lock’ into the one double-length loop after several braiding moves. (However, the join at the top of the braid will be stronger and longer-lasting if there is more than one twisted double loop.) There must be at least one twisted, double-length loop. Otherwise, the separate single loops would continually pull through each other as you tried to braid. Even if they temporarily stuck together for braiding, they would later gradually pull through each other and undo from the top of the braid down.
Twist once, or twist twice:
If your double-length loop is a single color, you can twist it just once, like a figure-8, to form two single-color loops.
But twisting a bicolor loop only once will result in two neighboring loops with opposite colors in up/down positions. If you want the two neighboring loops to have the same colors in upper and lower position, twist each double-length bicolor loop twice. This will give it a full twist—a 360° rotation, forming a link in the middle of the loop, like Jean Leader’s diagram below.

Diagram by Jean Leader, showing a double-length bicolor loop twisted at the center to form two linked loops, with red as the upper shank for both loops.
Then bend the above figure-8 loop in half at the link. NOTE: for the loop shown above, place the two red sections together and the two blue-green sections together.
This creates two loops out of one, connected together at the top. This pair of two connected loops will interweave separately in the braid, so all the other loops will end up firmly locked in with them at the top of the braid.
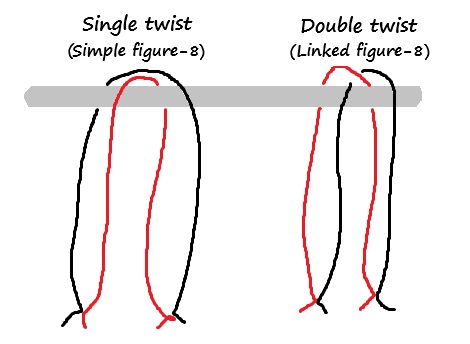
A single twist will result in a ‘red-shank-up’ loop next to a ‘blank-shank-up’ loop. A double-twist will result in black shanks being ‘up’ in both loops.
How to suspend the loops:
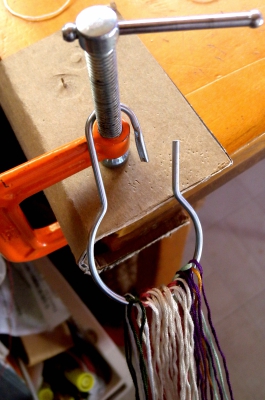
For a support bar, I generally use the horizontal handle of a C-clamp, with the clamp mounted upside-down on my table, so that bar is above the table. (When using a large number of loops, I then transfer them to a large ring before braiding, see below.)
The support bar must go through each of the resulting single loops. In other words, don’t hang a double loop over the top of a support bar! Instead, insert the bar through the two single loops you have created. See the diagram above. While or immediately after suspending a pair of loops, place their ends onto your fingers, starting with the left index and middle fingers (I’m assuming you are right-handed, and are mounting the loops in left-to-right order on the support bar).
Make sure that the upper shanks (the ones hanging in front of the bar) are in upper position on the fingers, with no twisting between your finger and the support bar.
While using my right hand to loading successive loops onto the bar, I keep their ends taut on the fingers of my left hand, working from left to right along the bar and my fingers. I park the loops that belong on the left hand at the base of my fingers, and then load the loops that should be on my right hand onto the matching fingers of the left hand, closer to their tips. (I’m still loading from left-to-right along the bar, but now loading right-to-left along the fingers of my left hand!) When I’m done loading, I can then easily pick the “right” loops up off the left fingers, onto their correct hand.
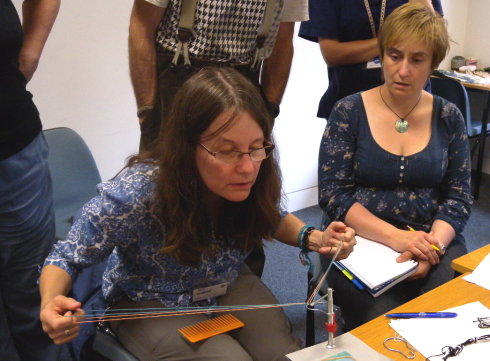
Alternatively, I might “park” each pair of two loops onto the tines of a comb after loading them onto the bar (see photo further down). Take care to set them on the comb precisely – with the upper and lower shanks in a consistent arrangement, so they can be loaded correctly onto the fingers later. Also take care to always keep the comb tipped away from the C-clamp, so the loops don’t slide off the comb! Stretch a rubber band around the comb to keep the loops from slipping off while you get the next pair of loops ready, or if you want to take a break (see photo).
I always avoid parking loops on the thumb, even if I will be holding loops there when I braid. So for 10 loops, I park the first two left loops low on the index finger, and the last two right loops high on that finger. If that’s too crowded and confusing, use a comb instead.
I usually braid directly from that horizontal bar on the C-clamp, but the first few braiding cycles are a bit tricky because you must tighten very widely and firmly (to get a neat start with no loose gappy threads), which for the first few moves is hard to do without losing a loop off the end of the horizontal bar. To avoid that problem, see my photo below showing loops mounted onto a rigid and closable ring (like the shower-curtain ring in the photo), rather than directly onto the bar of the c-clamp. The first few cycles of braiding can be done from that ring, which securely prevents any loops from sliding off. (You can keep braiding the whole way from the ring, but I find it a bit clanky, so I usually replace the loops onto my C-clamp after the first few cycles have ‘knit’ the loops together at the top.)
Your first several braiding moves must be “divided” braiding (no turning any of the loops). That’s in order to braid a short loop at the top of the braid (it will form around the bar), before starting the regular braiding moves, which will join the loop. Braid a loop that is long enough to loosely surround the bar, not be clenched tightly onto it.
The first few cycles of braiding can feel a bit awkward, because in the beginning the two loops of each doubled pair will tend to slip ‘shorter and longer’, changing length on your fingers. But after a few braiding cycles, they lock into place and don’t slip anymore.
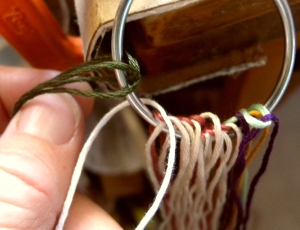
Shower-curtain ring holder: For more security, you can load the loops onto an open shower-curtain ring instead of the C-clamp bar – see new photos below. Be sure to load them onto the ring in the same way as onto the bar – the ring must extend through each loop, with all the upper shanks in front and all the lower shanks behind. With braids of “too-many-loops” I almost always start braiding with the loops on a shower-curtain ring (itself suspended from the C-clamp), but you can do this for braids of any number of loops, since it does hold them very securely. Never let the lower end of any loop hang loose! It may twist, which could spoil the divided loop start to your braid. If you need to take your fingers out of the loops, first place the loops onto a comb, in the correct order and without twists, and then secure the top of the comb with a rubber band to prevent the loops from sliding off.
I close the ring after the loops are all loaded onto it, and let that ring hold the top of the braid for the first several braiding moves. The first several braiding moves interlock the loops at the top of the braid. After that there’s no more danger of loops falling off the end of the bar when I spread them apart to tighten, so at that point I usually take the braid off the ring and put it back onto the horizontal bar of my C-clamp. However it would be fine to keep braiding from the locked ring, too.
Measuring and cutting tips: If you need both bicolor and single-color loops, it’s easier to measure out and cut all your strands one length, and make all your double-length loops from two lengths of yarn (even the single-color loops – make them out of two lengths of the same color). This way any single-color loops will end up the same length as the bicolor loops.
Single loop: Measure and cut any singleton loop this same length as well – one strand the same length as each of the others – which you then bend in half and tie it at one end. It will end up exactly the same length as all the doubled-in-half loops.
Single bicolor loop: If you are using divisible yarn like embroidery floss, divide two full, doubly-long lengths in half (so each length is 3-strand instead of a full 6-strand), then use two of the 3-strand lengths to make a double-length bicolor loop. Make the same twist-link shown above. But instead of treating this as two linked loops, join the two loops into one single loop with same colors together, now doubled back to 6-strand floss. There will be no knot at the top of the loop, only a neat link.
Open shower-curtain ring. Each twisted double-length loop was loaded onto the ring, left-to-right. The ends of the loops do not hang loose. The end of each loop was secured onto a comb (see photos below) before the next loop was loaded onto the ring. Before braiding, I close the shower-curtain ring, so the loops will not slip off during the first tightening moves.
Odd number of loops: If your braid has an odd number of loops, you will have at least one single-length ‘singleton’ loop to hang onto the ring. In these photos there is one single all-white loop — the third loop from the left:
One loop is a single all-white loop. Most of the other loops are double-length, twisted into a link at top, each one forming TWO loops at the fingers. All upper shanks are hanging over the front side of the ring, all lower shanks are in back. Ends of loops are organized on a comb with all the upper and lower shanks arranged the same way on each prong, they are not hanging freely! (see photo below)
Singleton bicolor loops:
My singleton all-white loop above leaves no ends at the top. If this single loop were bicolor, though, it would leave a knot and two ends protruding from the top of the braid (unless you divide your lengths of yarn and make a bicolor loop with no ends at the top, see “Single bicolor loop” above, under my measuring and cutting tips – this was called a “departed” loop in medieval manuscripts.).
Allow extra length for those two ends and you can hide them later by “sewing” them deeply into the braid, after untying their knot.
If I must have a singleton bicolor loop that will leave two ends at the top, I usually add that loop into the braid later, just below the braided upper loop at the top of the braid, when I’m about to start my main section of braid. That way, the two ends from the bicolor loop are easier to hide into the main body of the braid. (for how to add a loop below the start of a braid, see Tip 3 back on my main page on Starts With No Ends)
After you start braiding, any singleton loops will eventually get firmly locked into the double-long loops. Always start by making a divided braid — two separate layers that form around the ring or bar of the C-clamp.
Again, never let the ends of any loops hang free after they have been set up. The ends of the loops are always securely on my fingers (or on a comb) starting from as soon as I make the twist-link. If there are too many loops to hold the ends conveniently on my fingers while setting up – say, 10 or more loops – I set the ends onto the prongs of a comb with a rubber band above them for safekeeping, with upper shanks to one side of the prongs and lower shanks to the other side. (See my You can put your loops down post.) With 10 or so I just keep them on my fingers – I might double up and temporarily hold the right loops on the tips of the left fingers, with the left loops further down toward the palm.
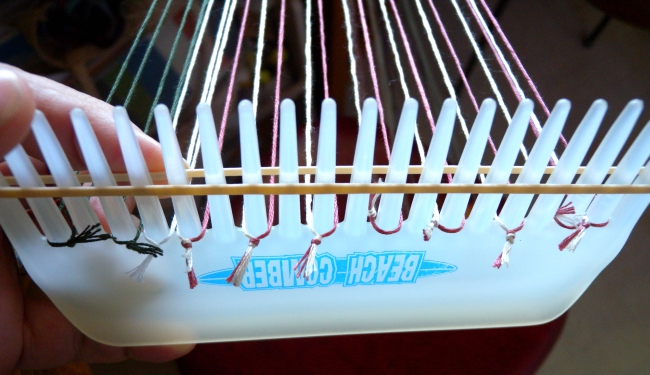
I set each UPPER shank down on the left side of a ‘tooth’ and each lower shank on the right. (for the loops that will be on my left hand – right hand’s loops would be set down oppositely.) This was a “too-many-loops” braid, and most of the the right loops were actually on a second comb…. From the left: 2 dark green loops (originally one double-length green loop), a singleton all-white loop, then 8 bicolor loops (originally 4 double-length bicolor loops).
When I’m ready to braid, I then load the loops onto the correct fingers, taking care that each upper shank passes over the top of its finger, and goes cleanly to the upper side of the bar or ring without twisting, and with no lower shanks crossing above any upper shanks. There must be a clear open area between the upper shanks and lower shanks all the way between the bar and each loop on the fingers.
Start braiding with DIVIDED braiding moves
Don’t turn any of your first loop transfers until the growing loop at the top is long enough to surround the bar with room to spare. As your braid grows, it will form its own braided loop around the bar (or curtain ring, or header cord loop) that it is suspended from.
Warning: Loops will tend to slip and get too long and too short at first!
Braid extra-slowly and carefully for the first few loop transfers. During the first braiding moves the doubled loops tend to slip and get unevenly longer and shorter on your fingers. Adjust them by pulling them even during the tightening move. After a few transfers, the loops lock into place at the top, and you can braid normally. (Approx. five transfers for a 5-loop braid, 7 for a 7-loop braid, etc.) At this point, fussy-tighten to make sure the top/ start of the braid has no gappy threads, while pulling evenly on all the loops to re-adjust them so they are all about the same length before you continue braiding.
Start your main braid when colors have returned to the correct set-up positions:
When the braided loop at the top is long enough to surround the bar, AND when the loops are in the correct color-order for your main braid pattern’s starting setup, begin braiding your main braid – the flat, square, or whatever braid you happen to be making. At that point the braided loop will close together and your main braid will start.
Stub start It’s easiest to braid a no-ends start with a loop at the top of the braid. But it is also quite possible to start with no ends and no loop at the top – what I call a ‘stub start.’ Below is one way to do this (lately I use another variation of this where I start by suspending doubled loops from a safety pin, and braid only the first few cycles from that pin before removing it, fussy-tightening the top, and then inserting the pin through the braided section after the gappy bits have been tightened away. It’s too much to describe here, but if the loops are loaded in a very unintuitive manner, a safety pin lacking a circular ‘hinge’ at its base can also be used to start a tubular braid as a totally open tube, not constricted at the top, or to start a flat braid so that it will have a straight (non-folded) horizontal selvedge at the the top of the braid):
Make the same double-length linked loops, but instead of a thick cord, prong or curtain ring, suspend the loops from a very fine but strong header-thread. As always, this thin header thread must be tied into a large open loop, not cinched tightly around the braiding loops. The braiding loops must be able to slide freely on the header thread in order to tighten well at the top of the braid. Switch to braiding a ‘solid’ braid after a just a few cycles of divided braiding. A stub start is trickier than starting with a loop, because if you aren’t careful, there can be some loose, baggy threads at the sides of the stub top after you remove the header cord.
Re the divided braiding – I’m not 100% sure, but I suspect it’s still necessary to start with a very short section of ‘divided’ braiding even when making a stub-start, maybe only one or two cycles. Otherwise the first turn of a loop might undo the link at the top of its combined double loop… I’m not sure, as I’ve never risked it! Just a couple of cycles of “no turns” will not create a visible loop at the top of the braid.
Here’s a diagram drawn by Jean Leader after she learned this method. She lays each loop down on a table, gives it a full twist as shown, and then loads it onto a bar (or header-cord, curtain ring, etc). In her diagram the red strand will form the upper shank of both loops, and the blue-green strand will form the lower shanks. As shown in the lower, expanded detail of Jean’s diagram, the header bar or cord is inserted through both newly-created loops, such that the two red upper shanks will end up on the same side of the bar (upper shanks are shown on the left of the bar in Jean’s diagram), and the two blue-green lower shanks will be side-by-side on the lower side of the bar (to the right of the bar in the diagram):


The arrows in the first diagram indicate the direction to spread the newly-created loops a bit more open, so you can see the link. The second diagram is a close-up of just the central twist, showing how the bar is inserted—lengthwise to the overall doubled loop, going through both new loops. (the two diagrams have the same orientation, neither is rotated relative to the other.) The red strand forms the upper shanks of both new loops, and the blue-green strand forms the lower shanks of both loops.
*I mount the clamp upside-down, so the horizontal bar that you turn to tighten the clamp is at the top. That bar is great for braiding from—especially once there is a loop at the top of your braid. You can slide the loop at the top of the braid over the bar, and remove it just as easily.
I used to just use the bar/ handle of my C-clamp to braid from. But now if I’m using a lot of loops I often suspend the loops from a simple metal shower curtain ring for the first few cycles of braiding — this makes it easier to spread the loops all the way apart when doing the first tightening moves. After braiding the first centimeter or so, I usually remove the braid and place it over the straight bar at the top of my C-clamp, though, because it’s quieter and feels more solid than the wiggly curtain ring.
Using a shower-curtain ring to hold the loops for a divided-braid loop-start with no loose ends. Photo by Jean Leader.
Click link to return to main post on Starts Without Ends.
Last updated Jan/26/2025
© 2011–2025 Ingrid Crickmore
See full copyright restrictions and permissions at the bottom of the sidebar (if you are on a small screen device, the ‘sidebar’ may be hidden, or appear somewhere other than at the side of the screen).

