I’m still working on this page. Please leave comments, corrections, and suggestions in comment field below…
Two parts:
1. Terms I use in instructions (immediately below), and
2. Structural and other terms used in describing braids (“weaves,” etc.).
1 – Terms I use in my instructions:
Move:
Any movement of loops by the fingers.
(Loop) transfer:
A very specific kind of move—a move in which a loop is interlaced with or through another loop or loops. A square braid has two loop transfers that repeat over and over again. One is on the left and the other on the right. In each of these loop transfers, a loop is pulled through all the one or more loops between its starting point, and its new finger on the other hand. There are more moves than this in each cycle, but only 2 transfers.
(Loop) shift:
A move that rearranges the loop or loops on the fingers, without interlacing them through any other loops. Ideally, this move is performed by the finger that the loop is shifting onto, not by a “helping” finger of the other hand. It’s usually done in order to put the loops back into their correct starting-position set-up after a loop transfer occurs.
In the 15th C. loop braiding manuscripts, shifting loops was called “walking the bows,” which is how it feels, a very reflexive and easy motion that looks complex – like a centipede walking. It was also called to “hi” or “low” the bows, depending on which direction the loops were being shifted.
Loop exchange:
A move that connects the two halves of one braid—traditionally done in team braiding. Typical example: After each of the individual braiders has finished the moves of one braiding cycle, the two (or more) partners then exchange their closest loops to connect the individual braids into one larger braid.
Noémi Speiser also uses the term “loop exchange” for one particular type of loop transfer: in which a loop on a finger of one hand is exchanged with a loop on a finger of the other hand, one of the two loops passing through the other in this process. The Spiral braids (video links at the bottom of my Tutorials page) are made with this type of loop transfer, as are several other known loop braids.
(Braiding) cycle, or row:
One repetition of all the braiding movements, after which the same exact movements are repeated.
Square braids have two loop transfers in each cycle of braiding, one on the left hand’s loops and one on the right. Spanish braids and double braids have 4 loop transfers in each braiding cycle. The 8-loop spiral braid—or ‘lace bend round,’ also has 4 loop transfers to each braiding cycle, before the same sequence of moves repeat. (Their loop transfers could also be called “loop exchange moves”.) The letterbraids have 8 loop transfers in each cycle / row – 2 transfers on each hand if made by two co-operating braiders (the traditional method), or 4 transfers on each hand if a single braider uses my work-around methods to braid these braids.
‘Braiding cycle’ only refers one repetition of the hand movements, not to a repeat of the pattern on the braid, or to all the loops returning to their original finger-positions. (That usually takes several braiding cycles.)
In a pattern chart, each braiding cycle is shown on a separate row of the chart, so in my pick-up tutorials I tend to use the word row rather than cycle, but they mean the same thing.
(Pattern) repeat:
This is the term for the length of braid, or of braiding, that it takes before all the colors return to the original color-arrangement on the fingers. This will equal one full expression of the color pattern on the braid, after which that same color-sequence will repeat again, in the braid and on the fingers.
For a 5-loop square braid, it takes 5 braiding cycles (= 10 loop transfers) before all the loops return to the fingers where they started. So the pattern repeat for a 5-loop braid is usually five braiding cycles; seven cycles for a 7-loop braid, etc. However, if the braid has a very limited number of colors, the pattern repeat might be shorter: the few colors might return to the original color-arrangement on the fingers sooner than each particular loop comes back to the finger where it started.
Bicolor loop patterns add another factor. Depending on how often the loops are turned, it might take twice as many cycles before the the loops come back to their starting fingers with all the colors in their original upper and lower positions on the fingers. For example, in the flat version of a square braid, the first time the loops return to their starting fingers, each loop has only been turned once, so the colors of any bicolor loops are now in reverse on the fingers (and in the braid). A full pattern repeat for a 5-loop flat braid with any bicolor loops may take 10 braiding cycles (= 20 loop transfers).
Or a pattern repeat might be as short as only one cycle (as with an “Edge” -type of bicolor pattern in a square or double braid). In an “edge” pattern braid, the colors return to the same set-up on the fingers by the end of each braiding cycle.
Turned loop transfer (same thing as Reversed or Crossed loop transfer):
Turning or not turning a loop over while transferring it can make a huge difference to how a braid turns out. Doing one or the other, or mixing the two types of transfers, is how you make a braid square, flat, or divide into two braids. ‘Turning’ the loop means taking it off its previous finger in such a way that it gets rotated by 180 degrees (a half-turn) as it moves onto its new finger. This makes the upper and lower shanks of the loop switch positions and cross each other, on the finger and in the braid. In the case of a bicolor loop, this creates a color-change in the braid as the two colors of the loop switch positions on the finger and in the braid.
Reversed (vs unreversed) were the 15th C terms for this; Turn was used in the 17th C loop braiding manuscripts; Crossed (vs open) are Noémi Speiser and Masako Kinoshita’s terms. To me, ‘turned’ (vs ‘not turned’ or ‘straight’) seems clearest, and when I teach, students seem to understand it more easily. In writing and in my tutorials I usually cite all three terms because people have different backgrounds in loop braiding.
Linking:
Two types of linking for color effects are possible with loops. Both these linking techniques were used in fingerloop braids described in 15th and 17th C. English manuscripts, as well as in old Japanese “kumihimo” braids and pre-Incan Andean flat braids which were made with hand-held loop braiding [Old Japanese braids are known to have been loop-braided, while ancient Andean flat braids are assumed by some – including me – to have been loop-braided, however this is not corroborated by written records from that time-period. Linking strands for color effects is also done in many other braiding traditions, not just loop braiding.]
(1) Linking the two shanks of one loop (“turn twice”).
With bicolor loops, an optional way to turn a loop is to turn it twice (ie turning it a full 360 instead of 180 degrees). This has a negligible effect on the shape of the braid compared to turning the loop once, but creates a very different color effect, since the colors of the upper and lower shanks of the bicolor loop will not switch positions. When a loop is turned twice, its upper and lower shanks become linked around each other, instead of crossing each other. At that point in the braid, each shank links around the other shank and goes back to braiding on the same layer of the braid where it had been, rather than the two shanks crossing each other to each emerge on opposite sides of the braid (as when a loop is turned only once). This can create lengthwise columns of the two bicolors, for example in a flat braid (where lengthwise columns of color would not be possible otherwise). I teach this in a few posts: 1 (see third video), 2 (see third and 6th videos), and as a pick-up patterning technique in Pick-up 2: Rock Your Square Braid, and Pick-up 3: Flat Braid Pick-up.
‘Turning twice’ can be very useful when braiding pickup patterns, as an alternative to not turning a loop to keep a particular color “up” in the pattern, in a situation where not turning the loop would create a problem with the structure of the braid.
(2) Linking two loops (“exchange twice”/ “transfer twice”).
A different kind of linking can be done as part of one or more of the loop transfers of a braid, or during the loop-exchange in a Double braid, to create interesting color effects (as in the braid in my sidebar →). This type of linked color-effect doesn’t require using bicolor loops. In this case, two loops of different colors are linked together, where otherwise they would normally cross each other in the braid. The two loops do not link around each other as a single link (the two loops do not wrap around each other). Rather, each shank of a loop ends up linked to the equivalent shank of the other loop. Linking the two shanks of two loops results in each loop turning back from its ‘normal’ course, back in the direction it just came from (each loop now heading where the other loop would normally have gone). It’s a way to prevent selected colors from migrating all the way across the braid, instead keeping them within certain portions of the braid. This type of linking is done by exchanging (or transferring) the loops two times in immediate succession as part of one loop exchange (or loop-transfer) move. Linking for color-effects can be done between any two adjacent loops that have just – or are about to – pass by each other. I show video examples of this in three posts:
1 Linking loops at the loop exchange of a flat double braid (see the second 8-loop video and the second 10-loop video)
2 Linking loops during loop transfers of a 7-loop flat (square-type) braid (videos and text)
3 Linking loops during loop transfers of a 13-loop flat (square-type) braid (video and text)
“Loop braiding” vs. “Finger loop braiding”
I usually use the more general term “loop braiding”, unless I’m contrasting finger-held loops with hand-held loops (say, comparing a European braiding method to a Japanese hand-held loop braiding method), in which case I specify “finger loop braiding”.*
However, many online searches are for fingerloop braiding. So I try to use that term at least once in every post.
2 – Structural terms (‘weaves,’ etc)
Terms and concepts covered (in approx order):
Braiding element
“Fingerweaving”
Braiding machines
Loop Braiding (loop-manipulation braiding)
Loop, shank, braiding element
Shed
Weaves/ Interlacing
Oblique Interlacing (= braiding)
Fell, a.k.a. “point of braiding”
Fell contours (A-fell, V-fell, etc)
A-fell, V-fell, and Slentre loop braiding methods (a.k.a. Method 1, Method 2, and Method 3)
Warp/ Weft
Plain weave (tabby)
Simplest possible braid structure
Balanced, warp-faced, repp (types of plain weave)
Twill (2-layer) – Square, spanish, double braids, etc
2/2 twill
3/3 twill
Float
Twining
SCOT – Single Course Oblique Twining
Twined repp
POT – Plain Oblique Twining
Combinations of twining and interlacing
(Oblique) Countered Twining (Counter-twining)
Unorthodox braid structures
L-M (as seen on the website L-MBRIC)
F-H L-M (as seen on the website L-MBRIC)
H-H L-M (as seen on the website L-MBRIC)
Unequal floats in loop-braided 2-layer twills
Alternating twist for plain weave
Noémi Speiser’s track-plan diagrams for loop braids (on separate page, click link)
Many of the descriptions and definitions below will only make sense after you’ve had some concrete experience with whatever is being defined.
Please help me correct any errors by leaving a note in the comment field below – or email me through my contact form. (Hover over the “About” tab in the upper menu to find my email contact form)
Braiding interlaces strands (the braiding elements) on a diagonal, often called oblique slant, as compared to weaving, in which strands interlace on horizontal/ vertical axes. Plaiting means the same thing as braiding – it seems to be a regional or slightly old-fashioned synonym, often used in the context of braiding hair or straw. Traditionally pronounced “platting”. A plait (pronounced “platt”) is a braid.
(Some braids are obliquely twined rather than interlaced – see Twining further down page. Other braids don’t fall neatly into either category, such as the Spiral Braid a.k.a. Lace Bend Round.)
Braiding done as a textile technique, and without tools or a braiding stand, has often (confusingly) been referred to as finger weaving. This is probably because people tend to associate the word “braid” with hairstyles rather than textiles. When they see yarn or thread being intricately braided, they might correctly notice that the technique is a type of over-under interlacing like weaving, but done by fingers alone, rather than on a loom. The fact that the strands interlace on the diagonal / obliquely may not be noticed or considered especially important – even by the braider. So far, every time I have read or heard the term “finger weaving” it has been used for some form of braiding, rather than weaving.
Braiding machines are quite different from weaving looms, and not as well-known. Here’s a video showing the simplest possible braid, a 3-strand braid, being made on a braiding machine. (youtube links will open in a separate tab.) Here’s a much more complex braiding machine, which still operates by basically the same mechanism (horn gears): youtube example Braiding machines were invented in the mid-1700’s, and they proliferated in the 1800’s (youtube video of antique examples), first powered by hand-crank or water-wheel, but soon afterward machine-powered. More about the history of braiding machines, and how they work can be found in the beginning and end of this post.
Loop Braiding* is a type of braiding in which the individual braiding elements (strands) are connected into pairs (loops). These are held and manipulated by the braider at the ends of the loops, rather than close to the braided area. The two strands that form a single loop are sometimes referred to as the two shanks of the loop, whether the loop was formed by one strand bent in half, or by two strands tied together. Loops are held near the tips of the fingers, or less commonly over the hands. The top/ starting section of a loop braid must be attached to a firm fixed point. (The braider’s big toe has been a frequent choice worldwide, but I don’t find this very comfortable, myself!) Tightening is usually accomplished by spreading the left and right loops apart in a broad stretching motion.
However for certain twined loop braids, tightening can be done by ‘beating the fell’ somewhat like a weaving. When braiding ancient Andean-type flat braids, I usually tighten this way – beating the fell with the edge of one hand held between the upper and lower shanks of several loops, completely within an area that looks similar to an opened ‘shed’ of warp threads on a loom.
Advantages: Loop braiding has some inherent technical advantages over free-end braiding.
1. It allows braiding complex braids faster and more easily than free-end braiding. In simply holding the loops, the fingers or hands form a shed [an opening] in each loop. The braider moves (and thinks about) each loop as if it were a single braiding element. In some loop braids, the whole loop does function as a single braiding element (this is the case in only one of my tutorials so far). But, because of the separation of the two shanks of each loop by the finger holding it, they can also interlace as separate braiding elements in the braid, creating structures that are twice as complex as the number of loops might suggest. A 5-loop square braid has 10 separately interlaced braiding elements, yet can be learned by most adults and older children as a first loop braid. Once learned, that 5-loop braid is fast work to braid, and fingers can perform the moves so automatically that it isn’t even necessary to look at the work. This while braiding 10 separate strands into one strong square cord or flat braid of 2/2 twill interlacing.
2. Very fine threads can be braided as easily as thicker ones, since the effective working size of any loop is the thickness of the fingers, rather than the thickness of the thread.
3. Tightening/ tensioning can be accomplished with a few large simple motions, rather than many fussy small ones near the fell, regardless of the fineness of the threads being used. Tension can be maintained more easily during the process of braiding, since all the strands can be held under tension.
Limitations: The limitations of loop braiding are in the length of braid that can be made by a single braider (usually less than the length that the braider’s arms can spread apart, or the tension will be too loose), and in the possible number of braiding elements (usually 14-20 strands, which equals 7-10 loops) that one braider can manage easily.
These are only limitations when a braider works alone. Historically, loop braiders have worked in teams of two or more, allowing an almost infinite number and length of loops. A Chinese bronze about 2 thousand years old shows several figures doing textile work, including a team of two loop braiders in position to make an extra-long braid.
This blog teaches various work-arounds for a solo loop braider to braid longer braids, as well as braids that have more loops than there are fingers to hold them.
Braids – including loop braids – can have some of the same types of interlacing as weavings. There is a difference, of course, since in braids that interlacing is on a diagonal, not straight across as in a weaving. But weaving terminology can sometimes be useful for braids as well.
To be very exact, for braids you would use the term “oblique interlacing” instead of “weave.” “Plain oblique interlacing” is the more technically correct term for “Plain-weave braid”.
Braiders are sometimes very adamant that weaving terminology should not be used for braiding. But even though I don’t call braiding “finger weaving,” I do use some weaving terminology in the context of braids. Braiding and weaving have much in common structurally, and this can be helpful in describing and understanding braided structures.
Fell: The fell is the “growing” edge of an in-progress braid or weaving – usually this is the edge closest to the maker. Weavings usually have a straight, horizontal fell. Braids usually have variously-shaped diagonal fells. Kumihimo braiders using a marudai (circular braiding table), or a slotted card, often refer to the fell as the point of braiding.
A braid in which the outermost strand on each edge of the braid is alternately (left and right) brought/braided all the way to the center of the braid will have a V-shaped fell contour. Here’s an example (in-progress kumihimo braid being made on a takadai):

Takadai braid with a V-shaped fell, by Clairecassan, Wikipedia, public domain.
A braid in which the central strands are braided all the way to the outer edges of the braid (alternately toward the left and right edges) will have a fell contour like this: ∧. This could be called an A-shaped fell.
If it’s always the left-most (or always the right-most) strand that is interlaced all the way across to the opposite side of the braid rather than only to the center, then the braid will have an Oblique fell contour, in either a / or \ -shape.
The actual “over-under” structure of the interlaced strands may be identical, regardless of the shape of the fell. The same end-result braid structure can be obtained with any of these 3 working methods, or even several others.
For example, the braider might interlace the strands by working straight across the piece horizontally, interlacing each pair of adjacent strands at an oblique angle. (I believe this is what Noémi Speiser calls a “transverse fell”). In that case the the fell might be thought of as a saw-tooth W to multiple-W (or multiple-M) shape: \/\/\/. Any of these working strategies can produce plain, twill, or twined structures.
When I braid the wide, flat types of braids that are known from ancient Andean burial sites, I use hand-held loops and usually braid and (‘beat the fell’ to tighten) in straight horizontal rows of work, even though the strands themselves all slant at an oblique angle.
Neither the color-pattern, nor the braiding structure / “weave,” are necessarily dependent on the order or direction in which the threads are interlaced (which is what determines the contour of the fell).
The “A-fell” and “V-fell” loop braiding methods are names for two of the three common loop braiding methods for braiding 2-pass square (and other) braids. Noémi Speiser came up with these names as a way to distinguish between the two methods based on the distinctive, opposing directions of their braiding moves. (A-fell braiding pulls central loops to the outer edges of the braid, whereas V-fell braiding pulls edge loops to the center of the braid).
However, these fell-shapes are common to many other braiding methods, even other loop braiding methods. For example, the Slentre loop braiding method – the third common method for for making 2-pass square braids – also moves loops from the edges to the center of the braid, and results in a V-shaped fell.
This (I believe) is why Masako Kinoshita prefers to use the terms Method 1, 2, and 3 for the A-fell, V-fell, and Slentre loop braiding methods. The method I teach in this blog is the so-called “V-fell” method, or “Method 2.” More about all three methods in this info page: A-fell, V-fell, Slentre, Hand-held loop braiding, and more
Warp and weft are the two sets of strands in a weaving. Warp threads are the ones laid lengthwise onto the loom before weaving. Weft threads are woven back-and-forth – through, and usually at a right angle to the warp threads.
Most braids, however, do not have two sets of strands that move consistently in different directions throughout the piece. Instead all threads take turns being ‘warp’ and ‘weft,’ as one by one they reach the edge of the braid and turn back at a 45 degree angle (or greater) to head diagonally down the braid in the opposite direction, interlacing with the other strands in the braid that they are preceding or following, all of which are following a similar pathway.
Tubular braids (including many so-called square braids) are an exception to this – most tubular braids do have two separate sets of strands, one moving consistently clockwise and the other counterclockwise, in two downward spirals all the way down the braid. Each set interlaces only with the other set, like warp and weft on a loom (see the info page on Track Plans for more details). However, both sets of strands perform the same type of movements, unlike the warp and weft strands on a loom.
Even though it isn’t completely analogous to “warp” and “weft” in a weaving, in a braid, the thread or loop that is being moved/transferred by the braider may be referred to as weft; while the more passive loops it is being moved or interlaced through may be referred to as warp elements. In a balanced plain-weave braid (see below) this is a somewhat arbitrary distinction, as all the intersecting threads are passing over and under each other identically in the finished structure. However, in many braids this distinction between any two intersecting braiding elements is not a completely arbitrary analogy. In some braids – like my plain weave repp braids here, and very similar-looking single-course twined braids (described below) – the ‘traveling’ element (the so-called weft strand or loop) is carried a long distance within a shed, meaning a space or opening between upper and lower warp strands. This is very analogous to warp and weft in weaving, and I don’t see a need to invent new and opaque terms to be used in braiding when well-known and equivalent weaving terms already exist. I follow Rodrick Owen’s example in occasionally using the terms “warp” and “weft” for braiding elements, when it seems to be the clearest choice of terminology.
Plain weave or tabby are weaving terms for the simplest type of interlacing:
(Again, in a braid, the interlacing occurs at an oblique angle relative to the left and right edges of the work; compared to a weaving, in which the interlacing is perpendicular and parallel to the edges of the work.)
Each strand passes over one strand, then under the next, then over the next, etc. Over 1, under 1. In a weaving, the next row will be UNDER 1, over 1 – opposite of the first row. (I remember doing this with strips of colored paper in kindergarten.)

Plain weave, close-up view of a woven fabric.
A plain-weave braid has the same over-under structure, but tipped on the diagonal. Each (diagonal) row in the diagram below starts with an “over” passage on the left edge of the braid. Yet, just as in the woven example above, all the strands pass alternately over-under-over-under the other strands, in both directions. That is the essence of plain weave, as opposed to twills or other types of weaves.

6-strand plainweave braid.
(Oblique plain interlacing – 6 elements)
Here’s a link to a nice clear photo-tutorial for making a 6-strand plain-weave braid (not loop braiding, she is braiding with free ends). The braid in the tutorial is actually the mirror-image opposite of the structure in the diagram above – in the video, each row on the left edge of the braid starts with an “under” passage, and on the right edge each row starts with an “over” passage.
The braid that almost everybody knows how to make is a 3-strand braid, like the most common hairstyle/ pigtail braid. This is the simplest possible braid structure. A 3-element plain-weave braid: Over 1, under 1 again and again.
The most technically correct way to describe it would be:
a 3-element braid of plain oblique interlacing.
Plain weave can look very different depending on how it is spaced/ tightened, as well as other factors. In braids, the most common types of plain-weave are: Balanced, Warp-faced, and Repp
In balanced plain weave, the warp and weft threads are equally spaced/ equally visible in the finished piece.
In warp-faced plain weave, the warp threads are much more closely-spaced than the weft threads, to the point that only the warp threads show on the surface, while the traveling threads – the ‘weft’ threads – are completely hidden, except at the very edge of the piece. Since only the closely-set warp threads can be seen, they create all the color-patterning. Tablet weavings and backstrap weavings are usually warp-faced, and so are many braid types.
The opposite type of plain weave is weft-faced, in which the weft threads are much more closely spaced than the warp, so all the color-patterning is created by the weft threads, and the more widely separated warp threads are not seen on the surface. Tapestry weaving is weft-faced, and so are many types of woven fabrics, but I don’t know of any examples in braids. I doubt it would be possible with loop braiding, because of the tension between the fixed top of the braid and the ends of the loops, which results in the two edges being pulled together.
Balanced and warp-faced are actually two points along a continuum…A braid or weaving might be slightly to strongly warp-faced, depending on how closely the warp threads are set, or packed together in braiding.
In a “repp*” weave, the weft – the “traveling” threads – are thicker than the warp threads, so they form bulging, horizontal rows (in a weaving), or somewhat shallowly-slanted ridged rows in a braid, resulting in a ridged texture to the fabric. Repp is usually warp-faced. (The woven rag-rug might be considered an exception: the thick fabric-strip weft elements do form horizontal bulging ridges, yet are clearly visible as they tunnel between the widely-spaced and much narrower warp threads).
In typical repp fabrics, the thicker weft element is completely covered and hidden by the close-set, thinner warp threads that it tunnels through, so only the bulge it creates is visible – the actual weft threads cannot be seen. In a braid, these bulging rows are slanted, not straight across. See the “repp-like” slanted, bulging rows in the braids below. I’m referring to the textural rows, not to some of the much more steeply-slanted color-patterns that cross over the ridged rows.

Plain weave (Plain oblique interlaced) repp braids of 12-16 loops, fingerloop braiding, cotton embroidery floss, by Ingrid Crickmore
In these plain-weave repp braids, every ‘weft’ is a whole loop – two threads – making the ‘weft’ elements twice as thick as the ‘warp’ elements they tunnel between. The upper and lower warp elements are single threads (the two shanks of each warp loop are held apart in opposite directions, forming a shed for the weft loop to go through).
This produces a thick, flat, ridged, single-layer braid, looking similar to single-course twined braids (described below), which can also be described as repp braids. Twined repp braids are taught in the 15th C. European loop braiding manuscripts – they are the ones often called Bends or Chevrons. Plain-weave repp braids apparently were not traditional in Europe, though they were made by ancient Andean braiders (perhaps with loop braiding*).
I use a method I haven’t seen described anywhere else for braiding plain-weave repp with loop braiding, see footnote*.
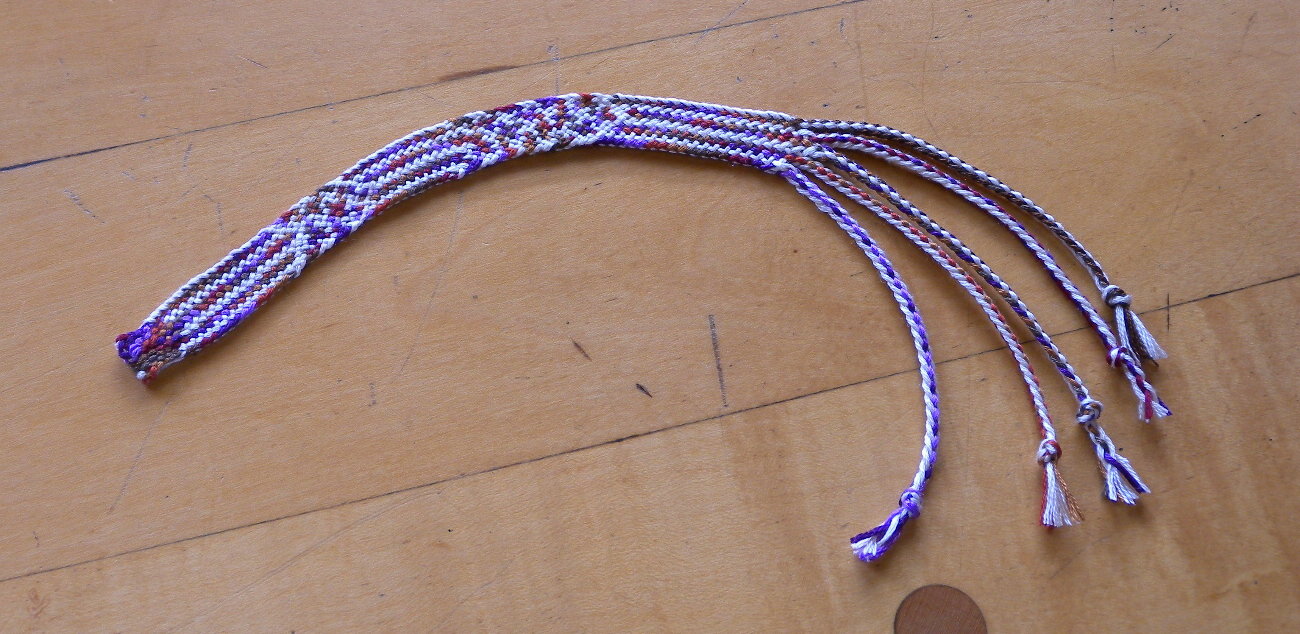
Repp braids are flat overall, but they are much thicker than the flat twill braids I teach in my Start Here, Continue Here, and flat double braids tutorials, or the flat plain-weave braids in my header photo above – the widest 4 braids in the header photo. (Those thinner flat braids are braided as two layers joined along one long edge. After braiding, the two layers are spread open like a book to form a thinner, broader single-layer ribbon-like braid.)
Twill – Square braids (of more than 3 loops), Spanish, Double braids (of more than 6 loops), the 14- and 18-loop Letterbraids, etc
These braids are all two-layer braids of twill interlacing, or a combination of twill and plain weave.

2/2 twill: Over 2, under 2, each successive row offset by 1 strand. Braided here on a braiding machine with 4 ‘horn gears’ (1 per ridge) and 9 strands. Very similar to the flat version of a 5-loop square braid (4 ridges, and 10 strands). Drawing by Elkagye, public domain
[Examples below assume V-fell/ Method 2 braiding moves. A-fell/ Method 1 braiding motions produce an identical structure, but in the opposite direction.]
2/2 twill: 2/2 twill means 1. Each strand passes first under 2, then over 2 of the strands traveling in the opposing diagonal direction; and 2. In the subsequent row of braiding immediately below, these pairs will be offset by one strand – in other words, two adjacent strands that were both passed over on the first row will not both be passed under on the next row – the second of the two strands will be paired with the next adjacent strand and so on.
The basic 5-loop square or “rounde” braid is (in general) 2/2 twill.
A square braid is a very minimal twill structure. It has only 2 twill ridges (lengthwise columns of slanted thread passages) on each layer, so 4 in all around the braid. It is strongly warp-faced. On the sides of the braid facing to and away from the braider only the “warp” loops are visible. These are the passive loops that braider sticks his/her finger through to fetch the traveling “weft” loop. On the two side surfaces of the braid – the ‘edges’ – each loop forms a V as its two shanks (upper and lower) meet and dive into the braid, changing from passive “around” loops (warp) to active “through” loops (weft).
In a 5-loop square braid, each loop goes first through two loops, then around two loops in its trip across the braid. In each successive row, the pair of passive loops (that an active loop is pulled through) is shifted over/offset by one loop – which is what makes the structure a twill.
The active “weft” loop is always pulled through the two “warp” loops on the middle and ring fingers. After that it becomes a passive “warp” loop on the other hand (and at the center of the braid), where it gradually inches closer to the other edge of the braid as successive loops are pulled though it from that side.
Considering just the single upper strand of a traveling active loop: It passes under two strands (the upper shanks of the middle and ring finger loops) to the middle of the braid, then over 2 strands to the other side of the braid. There it changes direction, and dives into the side of the braid again; goes under 2 and then over 2 strands back to the side where it started, now 5 strands lower down in the growing braid. (This describes V-fell braiding, in which outer loops are pulled to the center of the braid. I am ignoring any turning of the loop while transferring it, so this most closely describes making the divided form of a square braid.)
It doesn’t do all this in one or two moves. In the first move, the thread comes (as one part of a loop) from the left halfway across the braid (through two loops). In the next move, this traveling loop becomes a passive “warp” loop as a loop from the right is brought to the center, through 2 loops, including the loop we are tracking. (This creates our loop’s first “around”, as it inches one short step rightward.) Now another loop from the left follows our loop halfway across. Finally a second loop from the right comes halfway across, through our loop and the one following it. (This is our loop’s second “around” move.)
At this point our loop has made it all the way across the braid and is ready to be the next loop taken through the braid from the right side.
From where it started on the left, it will take 5 full braiding cycles (10 loop transfers), before our loop will arrive back where it started
During this time, the upper shank of each loop is doing its own “unders” and “overs,” while the lower shank is doing mirror-image “unders” and “overs” on the other side of the braid. That’s what makes it a two-layer braid. The two parts of each loop move in parallel, but they don’t stay together in the braid, even though the braider moves them as one. The loops are divided into an upper and a lower braided layer by the consistent, repeated pulling of loops through loops.
A 7-loop square braid is (in general) 3/3 twill. Each loop is always pulled through 3 loops, after which 3 loops are pulled through it (over the course of three successive braiding cycles) before it reaches the other side of the braid and is ready to be an active ‘through’ loop again. After seven braiding cycles, the loop will be back on the same edge where it started, now 7 rows further down.
Double braids have twice as many twill ridges as a square braid, so 4 on each layer of the braid, while my 18-loop “letterbraid” has 4 times as many twill ridges – 8 on each layer of the braid. The traditional letterbraids also have 8 ridges, but these are partly to mostly plain weave rather than twill, like a 3-loop ‘square’ braid.
Ridge, or Column:
Ridges are the vertical/lengthwise columns of threads in a twill or plain-weave braid – the visible stacked columns of slanted thread passages (regardless of their colors). The thread passages of side-by-side ridges usually have opposite slants (Doug’s Braid is one exception).
4 ridges:
/ \ / \
/ \ / \
/ \ / \
/ \ / \
/ \ / \
/ \ / \
/ \ / \
Above is a poor representation of the 4 ridges/ columns of a flat ‘square’- type braid – with all the thread-slants spread apart so the columns are more apparent. The slashes represent every visible float (thread passage) in a short length of the braid. In a real braid there are no spaces between them, either vertically or horizontally. Each ridge’s visible column of floats (the “overs”) covers another column of floats having the opposite slant (the “unders”). The “under” passages can be seen by simply turning over a flat braid, and in doing so, you can see that the passages in the columns on the two sides of the braid have opposite slants.
The square version of this braid has the same 4 ridges, wrapped around the two layers of the braid. Only two ridges are clearly visible on any one side of the braid. Each ridge forms one of the four corners of the square braid. Only one face of each ridge is visible – the “overs”. The “under” passages are hidden within the braid.
Twining
Like other terminology definitions on this page, these descriptions will probably only make sense after you’ve actually done some twining!
Twining can be done on horizontal/ vertical axes like weaving, or obliquely, as braids. Twining is not the same thing as interlacing (i.e. “weaves” like plain weave and twills), so strictly speaking, twining is not considered to be either weaving, or braided “oblique interlacing.”
In twined textile structures, a pair of strands (each pair can obviously be a loop) is twisted a half-twist after which another strand or loop is passed between them – or the pair is twisted before being passed around another strand or group of strands, as is often the case in ‘woven-type’ twining done on a horizontal or vertical axis. A twisting pair of strands in general stays together as a pair, twisting continually in the same rotational direction, each twist encircling the opposite course of non-twisting strands.
Twining on a warped loom can only be done across the horizontal axis (weft twining), but both warp-twining and weft twining are possible off-loom, in many different variations. Twining can actually be done with up to three or possibly (?) even more elements twisting around and encircling the opposing course of strands. However, in loop braiding the twining elements are always in pairs.
Braided twining is twining done on diagonal axes. It’s often called oblique twining, to differentiate it from horizontal/vertical twining, and from oblique interlacing.
Single Course Oblique Twining (often abbreviated as SCOT, especially by ply-split braiders) is the most common type of twining in European loop braiding, and was also used in other loop braiding traditions (kute-uchi and ancient Andean). For example, the many Medieval braids called “bends” and “chevrons” at the last portion of Cindy Myers’ Fingerloop Braids by Type page. The directions for any of these braids will include the following step: “Twist all loops (on a hand) 180°.” After that step a loop is then drawn through all the twisted loops. All the loops on one hand are usually twisted in the same direction.*
In loop braided twining, the traveling course – the weft – is usually at least one whole loop (2 strands) or more. Unlike the loops of interlaced 2-layer braids, these traveling ‘weft’ loop strands do stay together in the braid’s structure while they are “weft” – they cannot separate into an upper layer strand and a lower layer strand. Meanwhile, the alternating upper and lower warp elements that the weft loop tunnels through are alternating single strands. The resulting overall texture is repp (also spelled rep) – very similar in appearance to a repp plain-weave braid (described above, under plain weave)*.
Plain Oblique Twining (POT) is another, more intricate type of twining. (Irene Emery called this “Double Oblique Twining” as opposed to “Single Oblique Twining” – now known as Single-course Oblique Twining – in her Primary Structures of Fabrics. I understand that it was Peter Collingwood, in consultation with Noémi Speiser, who subsequently came up with the newer terms when writing his book on Ply-Split Braiding, because there are in fact many more types of oblique twining, and other braid types, than Emery describes.) In loop-braiding POT, a loop is twisted before going through one loop, and then passes untwisted around the next loop (which itself gets a twist) and so on across the braid. Here is a photo illustrating POT, showing a very open, meshlike example, in which the twists and passages are easy to see:

Plain oblique twining (POT), photo from L-MBRIC issue 10
When POT is tightened, its twined structure is not very visible. My Rainbow Girl braid was fingerloop braided in plain oblique twining:
Well tightened loop braid of plain oblique twining (POT). “Rainbow Girl” braid, cotton embroidery floss.
When POT is tightened firmly, the surface color-patterns usually look similar to plain weave patterns. However, the fabric is twice as thick as a regular plain weave would be.
The first page in this article by Peter Collingwood shows some examples of Plain Oblique Twining done with ply-split braiding.
Oblique Countered (or Counter-) Twining, common in ancient Andean flat braids (as well as in some Japanese braids, as Rodrick Owen has just informed me!) is a type of twining in which two adjacent loops are turned in opposite directions, before another loop or loops is passed through them as the traveling or hidden course.
In pre-Incan Andean braiding, it’s usually another pair of loops that is passed through the countertwined pair, so each ‘stitch’ is an interaction of two pairs of loops. If these two pairs of loops are of different colors, the braider can choose which of the two colors will show in that particular stitch / “pixel” of the braid! The braider does this by selecting (in each stitch) which color goes through, and which goes around. Either choice is equally possible with each stitch. The color of the ‘around’ pair will be the color of that stitch.
This allows the braider to plan intricate color patterns that change along the braid. The wider the braid, the more complex the color pattern can be. Some ancient Andean flat twined braids were made with over 50 to hundreds of loops, and several colors. Below is a reproduction of one Andean braid of countered twining, made by Nora Rogers, with this type of selective color-patterning. I think this piece may have been made with 160 loops (that would be 320 individual strands for a braider working with free ends), but that’s just from a quick, rough count, not a detailed analysis:

Countered twining by Nora Rogers. Reproduction of Andean flat braid in the Textile Museum, WA DC registration no. 1965.40.19. Braid and photo © Nora Rogers.
Each pair of counter-twining loops typically stays together throughout the braid, the right loop of the pair always turning in a clockwise direction and the left loop counter-clockwise. [Yes, this can result in under- and over-twisting of the yarn in longer pieces!]
There are many examples of counter-twined braids in my Halloween post last year – Rodrick Owen and the Braids of the Mummies
Combinations of twining with interlacing:
Oblique twining and oblique interlacing are not mutually exclusive. They were often combined in many ways for decorative effects in Andean flat braids, for example. In the two photos of POT braids further up, if the braider kept braiding with essentially the same braiding motions but ceased turning any of the loops, the braid would change seamlessly to a plain double-weave (two separate layers of plain oblique interlacing). The short, solid-colored section at the top of the “rainbow” braid is in fact such a section, although the two layers are lying flat and don’t show as separate layers in the photo. If instead, the loops were braided as whole over-under elements (so, two strands per element), the piece would change to a single-layer plain weave of doubled elements (“basket weave”). Many other combinations of twining and interlacing are possible, not only in sequential sections, but also diagonally crossing each other.
Below is a detail of an Andean-type flat braid made with hand-held loop braiding. It combines countertwining (strips of navy with gold chevrons) and two-layer plain interlacing (solid orange and light blue areas). I based it on one of Rodrick Owen’s reproductions of Andean braid museum artifacts, but it’s not an exact copy:

Andean-type flat braid made with hand-held loop braiding. Oblique countered twining, and oblique 2-layer plain interlacing, wool, by Ingrid Crickmore
Unorthodox braid structures
These are not simple twills. As far as I know there are no corollary woven structures to compare them to. These are structures that are easy to make with loops held on fingers, but don’t lend themselves to being made by other braiding methods, including hand-held loop braiding. (Noémi Speiser apparently never found any “unorthodox” braids that were made by any method other than fingerloop braiding, to the point that she considers such a structure proof of it having been made by fingerloop braiding.)
This is because a “passive” loop held on one finger can be braided around – as if its two strands were a single element; while the passive loop held on an adjacent finger can be braided through – its two strands treated as separate elements forming a shed comprising an upper and a lower strand. This “shed” is not equivalent to one of the alternating sheds that heddles create on a loom. Rather, that upper and lower separation marks a division between an upper braided layer and a lower braided layer.
Imagine that the loops on the second and third fingers are consistently “woven around” as if each of those two loops were single units – each pair of strands worked as a single bundle. (A braid with this type of braiding throughout is a single-layer structure of doubled braiding elements). Yet in the same braiding move/row/cycle/pick, the loop on the fourth finger is consistently treated as a shed of one upper layer strand and one lower layer strand, which the traveling loop (also one upper layer strand and one lower layer strand) is brought between. (If all the passive loops were treated this way, the braid would be a double-layer braid in which the upper strands of all the loops are interlaced separately from the lower strands of the loops.)
With each successive row, however, the loops on the fingers shift over by one loop – this might seem similar to a twill, but the “upper” and “lower” separately interlaced strands of the fourth finger’s loop adds a whole different dimension to the structure. See my info page on unorthodox braids, and see Noémi Speiser’s Old English Pattern Books for Loop Braiding for a more detailed analysis (you may have to learn her “track-plan” diagram system to follow her analysis).
Notes:
*Rather than loop braiding, Masako Kinoshita and Noémi Speiser prefer the term loop-manipulation braiding, and within that, use the terms finger-held loop-manipulation braiding as opposed to hand-held loop-manipulation braiding. Masako Kinoshita usually shortens these terms to L-M (loop manipulation), f-h l-m and h-h l-m. (Hand-held loop braiding is explained on my info page A-fell, V-fell, Slentre, and Hand-held Loop Braiding.)
To me, the word ‘braiding’ already includes the sense of “manipulation”, so I don’t see a need to add it. Likewise with “-held”. Noemi Speiser and Masako Kinoshita prefer “finger-held loop braiding” because they feel that “fingerloop” or “finger loop” has a childish/ baby-talk connotation that they want to avoid. I totally appreciate this, since loop braiding often seems to be considered a childish trick rather than a true textile technique! However, to me ‘fingerloop’ sounds like a normal English compound word, rather than a childish combination. I usually use the term “loop braiding,” and reserve “fingerloop braiding” for distinguishing it from “hand-held loop braiding”. The “held” in “hand-held loop braiding” is unfortunately necessary, because in speech (or without a hyphen) “hand-loop braiding” sounds as if it means “loop braiding done by hand” (rather than by machine).
I’ve occasionally seen the word “braiding” dropped altogether, leaving “loop manipulation” alone (I see this mostly within the Braid Society). To me, this omits a very important word! ‘Loop manipulation’ could describe knitting, crocheting, many Chinese decorative knots, a popular type of potholder-weaving, or even linking rubber bands together. Please call it braiding, whether loop braiding, loop manipulation braiding, or fingerloop braiding!
*update on definition of repp (also spelled rep): I just found out from Richard Sutherland, who researched this while writing his book Takadai Rep Braids, that the term repp doesn’t have a consistent structural definition, and is used for plain weave or twined fabrics.It just refers to a ridged texture (in horizontal or diagonal rows) in a woven or braided piece.
*The lengthwise columns or ridges in loop braids often have a slightly different number of floats from each other, even if each transferred loop was always pulled through the same number of ‘passive’ loops. So when I describe a square or double braid as having 2/2 twill it may be an oversimplification. My intended meaning is that each transferred loop was always pulled through two adjacent loops. However, one or more of the braid columns in such a “2/2 twill” braid may in fact not be 2/2 twill. For example, whenever a loop is turned while being transferred through another loop or loops: in being turned, one of the transferring loop’s own shanks inevitably crosses over its other shank. This adds an extra float to the ridge being created on one layer of the braid, while not adding a float to the equivalent ridge being created on the opposite braided layer. That’s why square braids (with turns on both edges of the braid) come out slightly wider on one face than on the opposite face – more of a trapezoid than a square in cross-section. If loops are turned ‘from below,’ the upper face is wider; if loops are turned ‘from above,’ the lower face is wider. Other factors skew the size of the ridges as well. Noémi Speiser explains (and understands!) this much better than I do.
*Alternating the twist direction with each successive row results in plain weave rather than single course twining:
After learning how to do single course twining using hand-held loop-braiding, I realized that if I reversed the direction of the twist with each successive row of braiding, the result would be plain weave rather than twining.
Since that epiphany, I have occasionally used this ‘alternating turning direction’ as a plain-weave braiding strategy, both with hand-held and finger-held loops. It is a very efficient method for braiding warp-faced, plain-weave repp.
With fingerheld loops, it isn’t even necessary to actually turn the loops on the fingers – on alternate rows (braiding cycles), the active finger can simply reach in an “upside-down” manner through each loop on the way to fetching the traveling loop. This means reaching under the lower shank and then over the upper shank of each loop, on the way to fetching the traveling loop. This is much quicker, yet has the same net result as first turning every passive loop over on the fingers, then braided through them, then turning them all back again (undoing the previous twist) to do the following row.

Plain weave (Plain oblique interlaced) repp braids of 12-16 loops, fingerloop braiding, cotton embroidery floss, by Ingrid Crickmore
[See my post In the works for helpful tips and color-pattern info for making some of these braids.]
With hand-held loops, in one row (or pick/ partial row) I turn all the loops in a clockwise direction before passing the weft loop through; but in the row directly below, I turn those same loops counterclockwise before passing a weft loop through. That undoes the previous twist to the warp loops, and results in plain weave. This usually gives a warp-faced repp texture, much like the equivalent twined braid you would get if you continually turned loops in successive rows in the same direction. Successive rows may be worked left-to-right, or right-to-left, or back and forth. The same rotational direction of turn – say, clockwise – can be accomplished either by grasping the upper shank of the loop as you pull it off the left hand, or by grasping the lower shank of the loop if you are pulling it off the right hand. I usually think of the sequence of actions as: “Pull the weft through, turn the loops, beat the fell.” (I use the edge of one hand to beat upward within a row of several turned loops on the other hand).
I suspect this was the method used to make the wide, flat, repp-like plain-weave braids known from pre-Incan cultures – a hand-held loop braiding technique, as Mary Frame and Noemi Speiser have suggested for the twined flat braids also produced by these cultures. (At first Rodrick Owen disagreed with me on this but he may be coming round!)
I would love to know whether all or most of those ancient Peruvian plain weave repp braids have weft passages of even numbers of strands. If so, that might confirm or at least suggest that they were braided with loops rather than free ends…
Posted Apr 30, 2012. Last updated Oct. 2, 2025
© 2012–2025 Ingrid Crickmore
See full copyright restrictions and permissions at the bottom of the sidebar (if you are on a small screen, the ‘sidebar’ may appear somewhere other than the side of the screen). Content of this website may not be posted or “reposted” online, sold, or used in fee-based workshops without my permission. It may be shared off-line with certain restrictions – see full copyright info.
Info pages (these can also be accessed through the “About” tab in my upper menu):
Page 1: About Loop Braiding
Page 2: About Me
Page 3: Contact form
Page 4: A-fell, V-fell, Slentre, and hand-held loop braiding
Page 5: Too-Many-Loop Braids
Page 6: Unorthodox Braids
Page 7: Old English Pattern Books for Loop Braiding
Page 9: Alphabet braids of the 17th Century
Page 10: Terminology
Page 11: Guide to L-MBRIC (Masako Kinoshita’s Loop-Manipulation Braiding Research and Information Center News site)
Page 12: Braids in my header photo
Page 13: Mystery of the ‘Broad Lace’s sisters
Index to tutorials
Index to posts


Pingback: Braiding Interlaces and Tethers a Bridge Between Worlds - Cuzco Eats
Pingback: Braiding Interlaces and Tethers a Bridge Between Worlds – Cuzco Eats