Part I (directly below) is on ways to braid longer loop braids. Skip here to my solo-braider workarounds for longer braids, following the historically documented methods below.
Part II (skip to Starts with No Ends) covers several ways to start a braid with a loop/ eyelet, and with no visible ends of thread at the top of the braid. [plus a way to start and end with a tassel of matching ‘minibraids’]
Part I – Longer loop braids:
Traditional 2-worker method:
The tried and true traditional way–worldwide–to braid longer loop braids is to cooperate with another braider. This is not hard to do. One of you braids, and the other holds the start of the braid, or stands near where the start is fastened, and does the actual tightening. This can be done by beating the fell with an implement, or by using one’s hands (as in the video of two Wayuu braiders).
A Chinese bronze from the first century BC of various textile workers shows two loop braiders doing this. (See images in LMBRIC: Here’s a working link to L-MBRIC issue 1 on L-MBRIC’s current site, another photo of the bronze is in L-MBRIC issue 3 on the Internet Archive [the current site’s issue 3 lacks the photo]. Click on images to enlarge.)
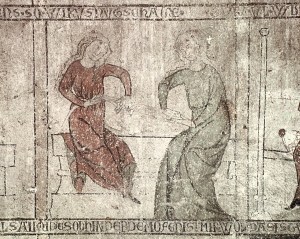
Below, a 13th C. frieze in Germany (from the above link to issue 1 of LMBRIC) shows a team of two loop braiders using the same strategy for braiding an extra-long loop braid: the woman on the right braiding while the woman on the left holds the braided section and beats the fell with her left hand. The script near the image apparently says (in Middle German) “We are not ashamed to braid” or “No shame in braiding” as if it is considered a very humble activity!
The video below is about the Wayuu people of Columbia and their textile crafts. It should start up right where two women are cooperating in loop braiding an extra-long braid – using the same technique on yet a third continent, here in the present-day. (If it doesn’t start there, slide the timeline “bubble” below the video to 2:25.)
Video above @ 2min, 25sec shows 2 braiders co-operating to braid an extra-long braid.
(There are two main ways to tighten a braid – in the video, the tightener stretches the two bunches of loops apart, in the mural the tightener beats with her hand between the loops, and neither is specified in the bronze sculpture.)
New addition to this post: Beater-stands
Here’s another known historical method to allow a solo braider (with no helper) to make longer loop braids. This is for all you equipment geeks and builders out there!
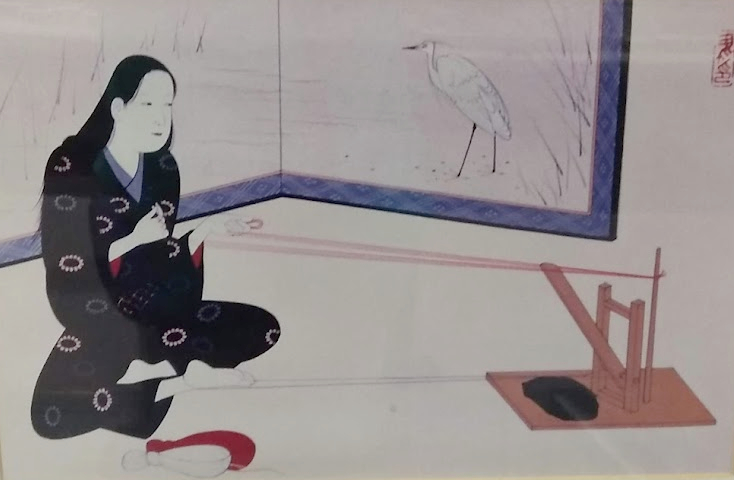
Masako Kinoshita was the first one to notice and understand the significance of surviving illustrations of this type of stand in a few Japanese pieces of art. In her online annual journal and website L-MBRIC she published images of 3 different braiding stands in use – from Japan, Egypt and Bulgaria, as well as an eyewitness report of one by a (then) current observer in Morocco. (See my recent post.) The beater-stand in the image above is on the small side, some others are much larger, and have a tall back where the growing braid can hang down with a weight attached to keep it taut and steady.
Years ago in an email communication with Masako, she shared with me that she had a foot-operated beater specially made for her. She said that it did allow her to make long braids solo, but that it was difficult or impossible to unbraid while using it – which is how you go back to undo and fix a mistake when braiding. I unbraid almost every time I braid, so I figured I would stick with the methods I describe below. But lately, I’m thinking about it! How bad is a mistake in a square braid, anyway? Often they hardly even show. A beater stand might be great for making simple, extra long braids! Please let me know how it works if you make one!
My solo braider strategies for braiding longer loop-braids
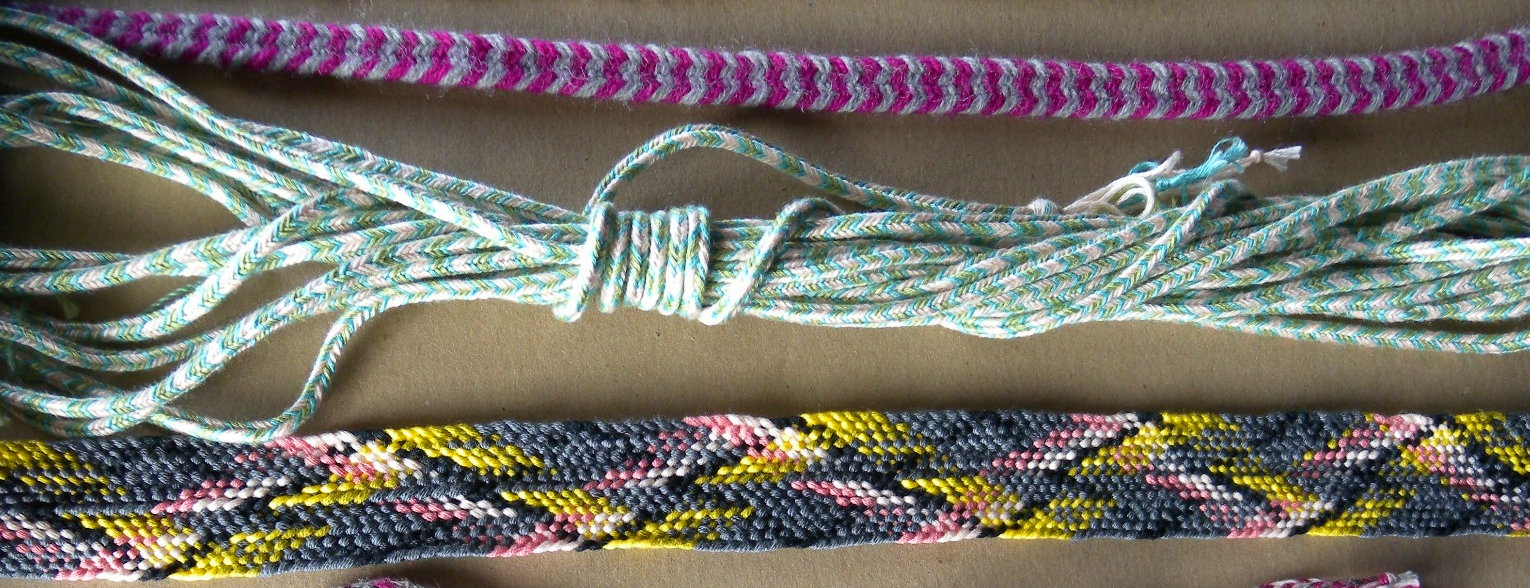
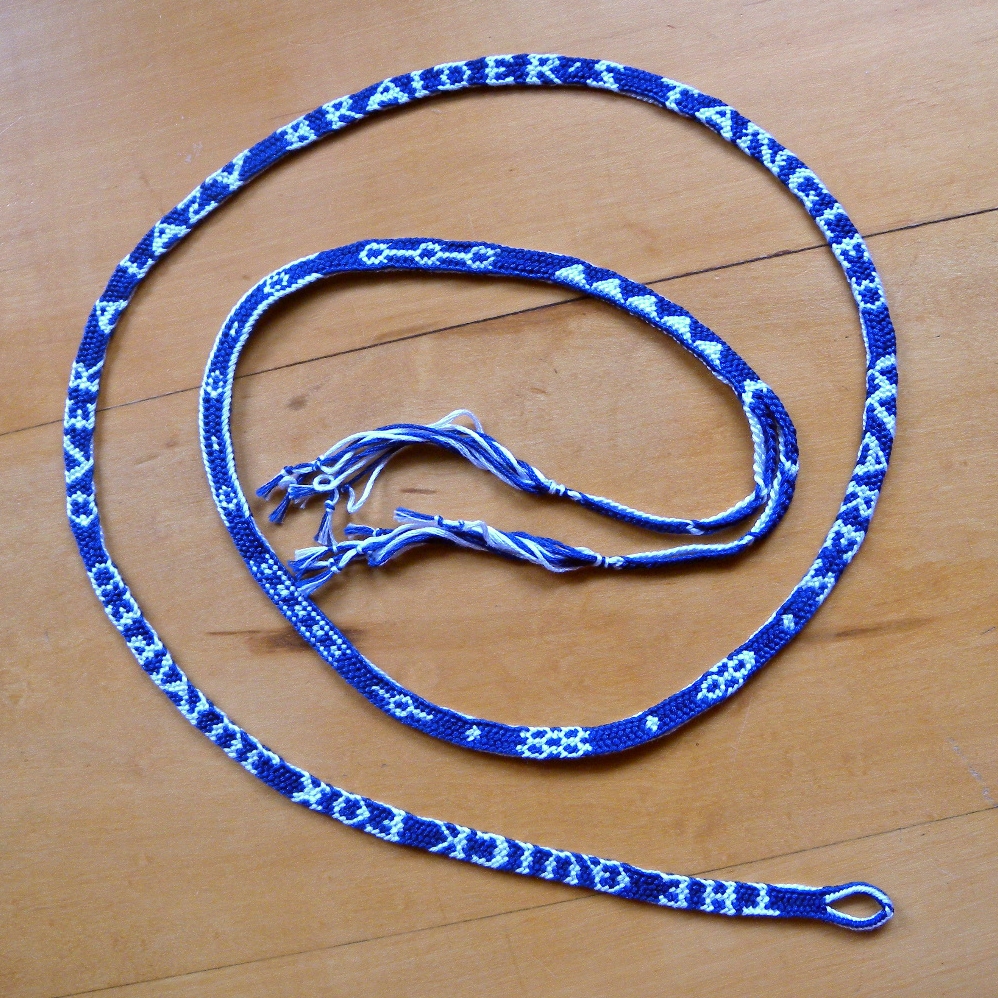
I use two workaround methods for making longer braids without a helper (or a beater-stand). In the photo of three braids near the top of this post, the center braid – wound up into a hank – is 22 feet, or 6.7m long. It’s a 7-loop square braid that I made back in 2007, just as a test to see if it was possible. I used the same two workarounds I describe below, with 9 yards of thread, the total length of the floss in my skeins–I made each loop from two skeins of floss tied together. I call that braid my “Whole 9 Yards” braid, although the finished braid ended up shorter, due to take-up. I think I got the first half of it done in a day, but by then was so tired of it that finishing the rest dragged out into several days! (remember, you CAN put your loops down to take breaks!)
My two work-arounds for making longer braids:
First and easiest, start braiding from the midpoint/ center of the loop-bundle. This can double the length of your normal maximum-length braid. Secondly — only if necessary — shortening the ends of the loops temporarily into what I call caterpillars, preferably on only one (the longer) half of the start from the center, or for a very long braid, on both halves. This can add a lot of length, but the start-from-the-center gives quite a bit of extra length for much less extra set-up time than caterpillars, so I always start with that.
step 1. The center-start
This is the first strategy because it is the quickest and easiest—always start with this one and only add step 2 (‘caterpillars’) if this alone will not be enough. Below I describe 3 different ways to start from the center: Handshake, Exact, and the one I use most: Basic (described below).
Basic Center-Start This is the method I use most often, it seems quickest and easiest to me. The center point might not end up at the exact center-point of the braid. In fact, I sometimes purposely place the ‘center-point’ way off-center, if I’m planning to use my “caterpillar” loop-shortening technique on only one end of the braid.
Short version:
Begin braiding at the approximate center-point of an extra-long loop bundle of loops. Do this by aligning all the separate loops together, and tying them into a big slip-knot at the center of the bundle. The loops are only connected together at that central knot – at each end of the bundle all the individual loops are free – not connected to each other.
Braid to one end, starting from the center. Then undo the slip-knot at the middle of the braid, and start braiding again from the center, but now in the opposite direction. Don’t tie anything around the braid at that new starting point! That is very important. Instead, only tie onto (or with) the already braided section of the braid. That way, when you start braiding in the other direction, you’ll be able to tighten up the ‘join’ (the center-start point) so there won’t be any loose gappy strands at the center of the braid when you are done.
‘caterpillar’ method.
Click for more details, including how to make a seamless version of this Basic Center-start that involves mounting the ends of the loops onto two combs.
The “Handshake Center-start” I don’t use this method very often, but it’s a great way to start if you want half the length of the braid to be in different colors than the other half—though they don’t have to be in different colors. This start leaves a distinctive but not bad-looking ‘join’ at the center point. It’s also a guaranteed way to locate your join at the exact center of the finished braid (unless you happen to braid one half tighter or looser than the other half.)
I don’t have a current example of a braid with this center-start in the middle of the braid. However, in the braid below, this ‘handshake’ start was used to start the braided loop at the top of the braid. (This is one of many ways to start a braid with a loop at the top, see second half of this post.) Click on the photo below to see the “handshake” join area at the top of the loop more clearly. Looking only at the loop, imagine it spread out as a long, thinner braid with that handshake join at its center. The right half of the braid would be gray, and the left half would be pink and purple.

Click for a photo-tutorial showing how to set up a handshake center-start.
[new! another way to locate and start from the exact center of the loop bundle]
Exact center-start
This method will place your center-start at the exact center-point of your loop-bundle. The join area here will be almost invisible, not obvious like the “handshake join” above. (The most seamless-looking join is the Seamless/ Two Combs variation of the Basic Center-start above.)
step 2. Shorten the loops (Caterpillars). I use this trick whenever I want more length than I can get from the “center-start” method alone. However I still start from the center, since that adds a lot of length for almost no extra effort, whereas caterpillars require more set-up time, and very long ones require even more, because you’ll need to redo them after braiding the first section (explained further down).
Short version: I shorten each loop to a manageable length by tying/ crocheting a chain of slip-knots (ie a crochet chain) with the “extra” length. A caterpillar-like chain dangles below each loop as I braid, and pulls easily through the other loops. This adds time to preparing the loops for braiding, but doesn’t add time to the actual braiding procedure.
When I have braided all the way down to the caterpillars, I park the loops on a comb, undo the caterpillars, and (if the remaining loop-length is now workable) finish braiding to the original ends of the loops. If the loops are still too long to braid with comfortably, I knot up a second set of caterpillars and repeat this process.


Click here for more details on making and using caterpillars
Part II – Loop starts, with or without ends
I almost always start braids with a loop (buttonhole-type opening), as in the tall braid photo in my right sidebar → ↑.
In my introductory tutorials I teach a simple way to set up a loop bundle and start braiding: You make an overhand knot at the top of the loop bundle, which forms a tassel of ends on one side of the knot, and the working loops on the other. If you want a braided loop at the top of the braid, you then start braiding with “divided” braiding moves (no turning the loops) for the first half-inch or so. This creates a loop-type opening near the top of the braid, with an upper knot and tassel of ends just above it. You might end the braid with another overhand knot and trim the ends into a tassel that matches the starting knot and tassel. Or you might finish in various other ways, such as braiding a tassel of thin ‘mini-braids’ at the bottom of the main braid, with a small knot at the bottom of each mini-braid and no big knot like the one at the top.
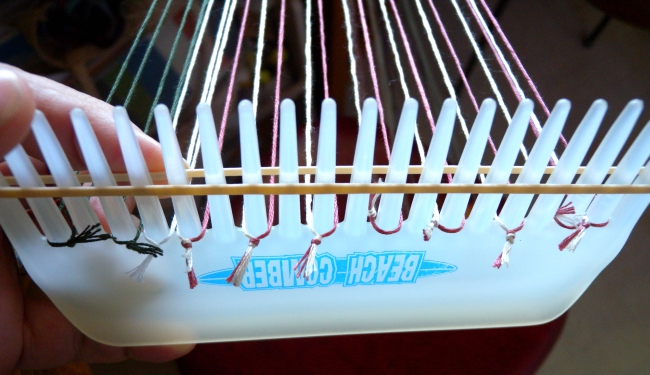
Tassel of mini-braids at both ends of the braid:
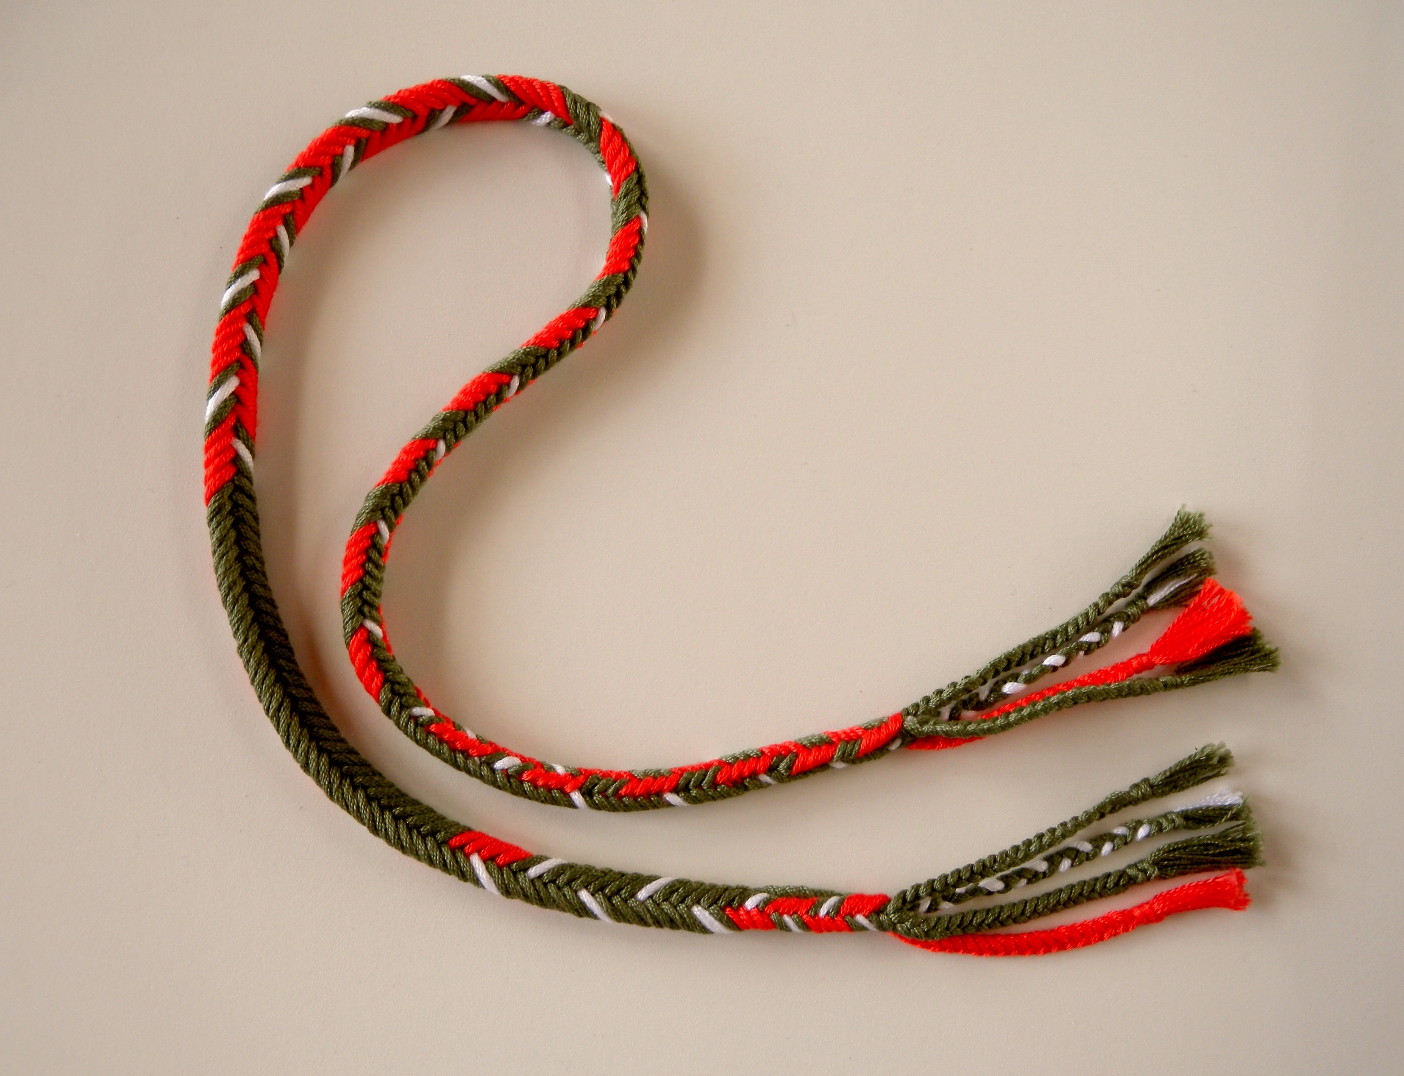
This is a nice way to finish both ends of the braid in the same way: Cut the loops longer, to allow for fringe at both ends plus some extra length for your fingers. Tie the initial overhand knot several inches below the top of the loop bundle, leaving at least a 5 or 6-inch-long “tail” of ends above the knot. Braid. Finish the last several inches as an ending tassel of ‘mini-braids’—(see 3rd video in Bracelet with Chevrons post).
Then finish the top of the braid to match: Untie the overhand knot at the top of the braid, tie those loose ends into loops if they are not already joined as loops, and braid them to match the mini-braids you’ve already braided at the other end of your braid.
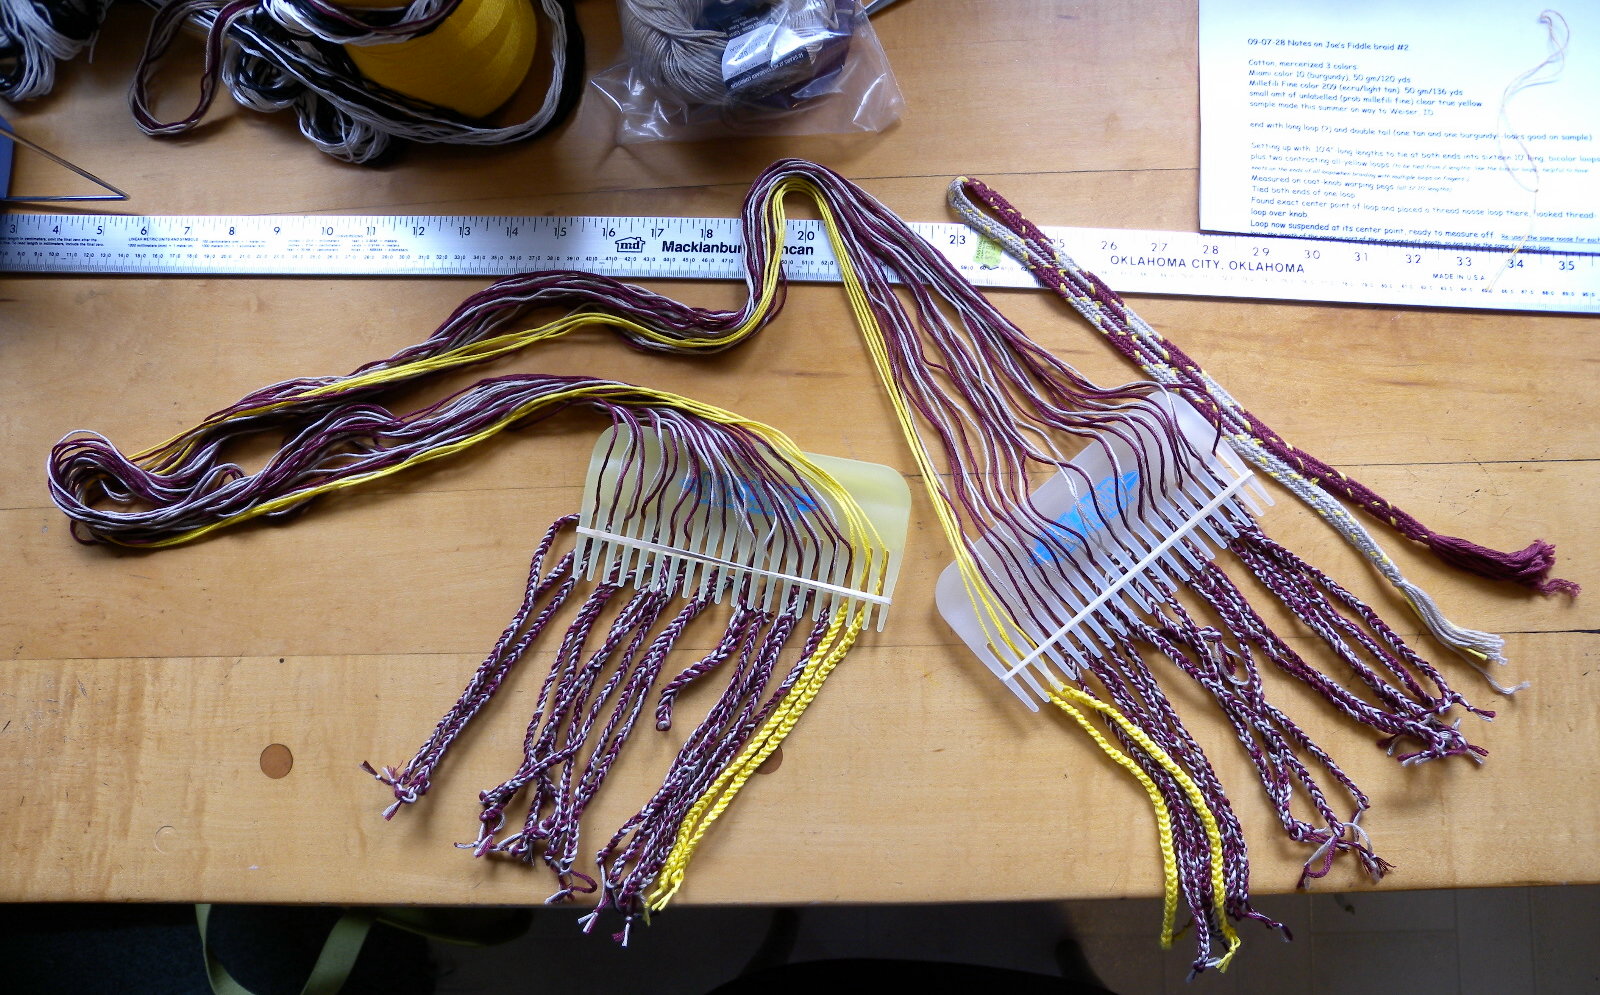
See the photo at left. At each end of this 7-loop braid I finished by braiding a divided 4-loop braid and a divided 3-loop braid – so at each end I braided twice (without turning any loops) to get four mini-braids. After braiding a pair of divided braids, I cut the bottom of the loops to separate the pair into 2 completely separate mini-braids. Then I used one strand from each mini-braid to tie off the bottom, before trimming all the ends to the same length. Always remember to allow for 2 or 3 inches of extra loop length beyond the length of the braided mini-braids, since you won’t be able to braid all the way to the ends of your loops, and to ensure you have long enough ends to be able to use one to tie off the mini-braid.
No ends at the top:
I often make a braided loop at the top of my braid without leaving any ends or fringe at the start of the braid. (You can’t avoid ends at the bottom other than by hiding them inside an end-cap or other type of covering.)
Any way this is done, it’s the center-point of each strand that forms the top of the braid. There are several ways to do this. The various strategies that I’ve used all fall into one of two types:
A. Divided Braiding at Top:
Fold all the loops in half in some way that they will all stay connected to each other at the top of the braid – that is the crucial part. (You could of course use a separate header-cord to tie them all together at the top, but that or some substitute will have to remain a permanent part of the braid – if you take it out later, the top of the braid will start to ‘unravel’.) Start braiding a divided braid (don’t turn any loops). Braid a short section of divided braid for the loop, then begin the braiding moves of your main braid, which will join the two parts of the loop. Below I show 3 different ways to start braiding with a divided-braid loop and no ends at the top. (The difference between them is how the folded strands connect to each other at the top/ start of the braid.) #1 is the easiest to learn, #3 is the method I use the most.
B. Center-start Section at Top: Braid a very short section at the center of an extra-long loop-bundle (with all loops free at both ends of the bundle, so neither end of the bundle is tied together). Then bend the whole bundle in half, with the short braided section at the top. Suspend that braided section over something, and start braiding with all the loops of both (original) ends held all together over the fingers. A twice-as-thick braid will start to form, with a loop at the top formed by the first short braided section. There are a few ways to do this – all are based on the various center-start methods I described above in the section on Longer Loop Braids. Click here to skip down to the Center-start loop starts, or keep scrolling down past the Divided loop starts below.
Divided-braid start #1:
This start can only be used for single-color loops. If using any bicolor loops, try the next variation: Divided-braid loop-start #2, or use the completely different Divided-braid loop-start #3.
This is probably the easiest no-ends start method to learn – it’s definitely the easiest one to teach. The video and pdf tutorial show it with 3 loops, but it can be used with any number of loops. (I made them for my Easy 3-loop Braids tutorial). You can download my pdf 3-loop photo-tutorial, which includes this start. In the video, I use a header cord to hold the loops, while in the photo-tute I use the handle of my C-clamp. (You can also substitute a shower-curtain ring, as shown in the Tips section further down – it combines the benefits of both methods). Either way, it’s basically the same start. Click link for more tips and details, as well as the video.
Divided-braid start #2, using Double-length loops:
This variation of the above method is good for bicolor loops.
When you set up your loops, cut out doubly-long bicolor loops, and only make half as many loops as your braid requires. All the left-hand double-long loops will be bent in half – in a U-shape – so that each loop forms two loops. The right hand loops are then also bent in half, and linked around the whole bunch of the left-hand loops. Each of the two bunches of loops will be in a U-shape, linked onto the other U-shaped bunch of loops. You can easily add a single loop to the rest of these doubled loops (if your braid has an odd number of loops), just make sure the U-shaped bunch of loops of the other hand goes through the single loop as well as around the doubled loops. If that single loop is bicolor, see Tip #2 further down page for a way to form a bicolor loop with no ends or knot at the top of the loop.
Click for more details – It wouldn’t work to just plop this bundle of interconnected loops over a header cord or bar and start braiding (well it would ‘work’ but would make a very messy-looking start). It’s important to carefully mount each loop around the bar or ring, with every upper shank over the top of the bar, and every lower shank under the bar.
Divided-braid start #3:
This is the way I usually make a divided-braid loop start. It’s quicker to set up than my other methods, but it’s a lot harder to describe.
This loop-start has a flatter join than the previous divided start methods. It’s great for an even number of bicolor loops of the same two colors, but it also works for an odd number of loops and a mix of colors. Loops start out double-length (except for any “odd” ones), as in Divided Loop Start #2 above. But here, you separately twist each double-length loop at its mid-point, so that each long loop forms two linked loops, and you end up with several pairs of linked loops (plus any single ‘odd’ loops), none connected to their neighbors. None of the pairs of loops is connected to any of the other pairs of loops at the start of braiding – they become connected after you start braiding. The twists at the top of the double loops will ‘catch’ and hold all the loop into a smooth, cohesive join at the top of the braid.
The first few cycles of braiding can feel awkward because the two loops of each pair tend to slip and change length on your fingers, and you have to guard against this. But after a few braiding cycles, the loops lock into place and don’t slip anymore.
This start can be done with simple 3-loop braids up to very complex ones like this letterbraid.
The first step is to make up your loops: doubly long loops as described above, but twisted and mounted as described below.
[Update – this method will actually “work” even if only one loop is a twisted double-length, the others can all be separate, single-length loops. They will eventually ‘lock’ into the one double-length loop after you start braiding, though it will take a few braiding moves. At least one double-length, linked loop is necessary, or all the single loops would continually pull through each other as you braid, and the top of the braid wouldn’t hold together after being taken off its header. However, if your braid has more than just a few loops, the top will be much stronger and longer-lasting if it has more than one twisted double-length loop to hold it all together at the top.]
To form two loops from a double-length single loop, make a link in the middle of the double-length loop. Hold both ends of the loop, twist it once so it forms a figure-8, and then twist it once more so it has now received a full twist—a 360° rotation. After the second twist, the loop will still look like a figure-8, but at the center the two long strands are now linked to each other, rather than simply crossing each other. Each strand bends around the other strand. (This two-twist ‘link’ is necessary if you are using bicolor loops and need the two loops of a pair to both start out with matching colors in upper and lower positions. Otherwise you can optionally just twist the loop once.)

Three ‘center-start’ loop starts
These are all related to the various methods for starting a braid at the center of the loop bundle — described above in the section on Longer Loop Braids.
1. the Handshake Loop-Start:
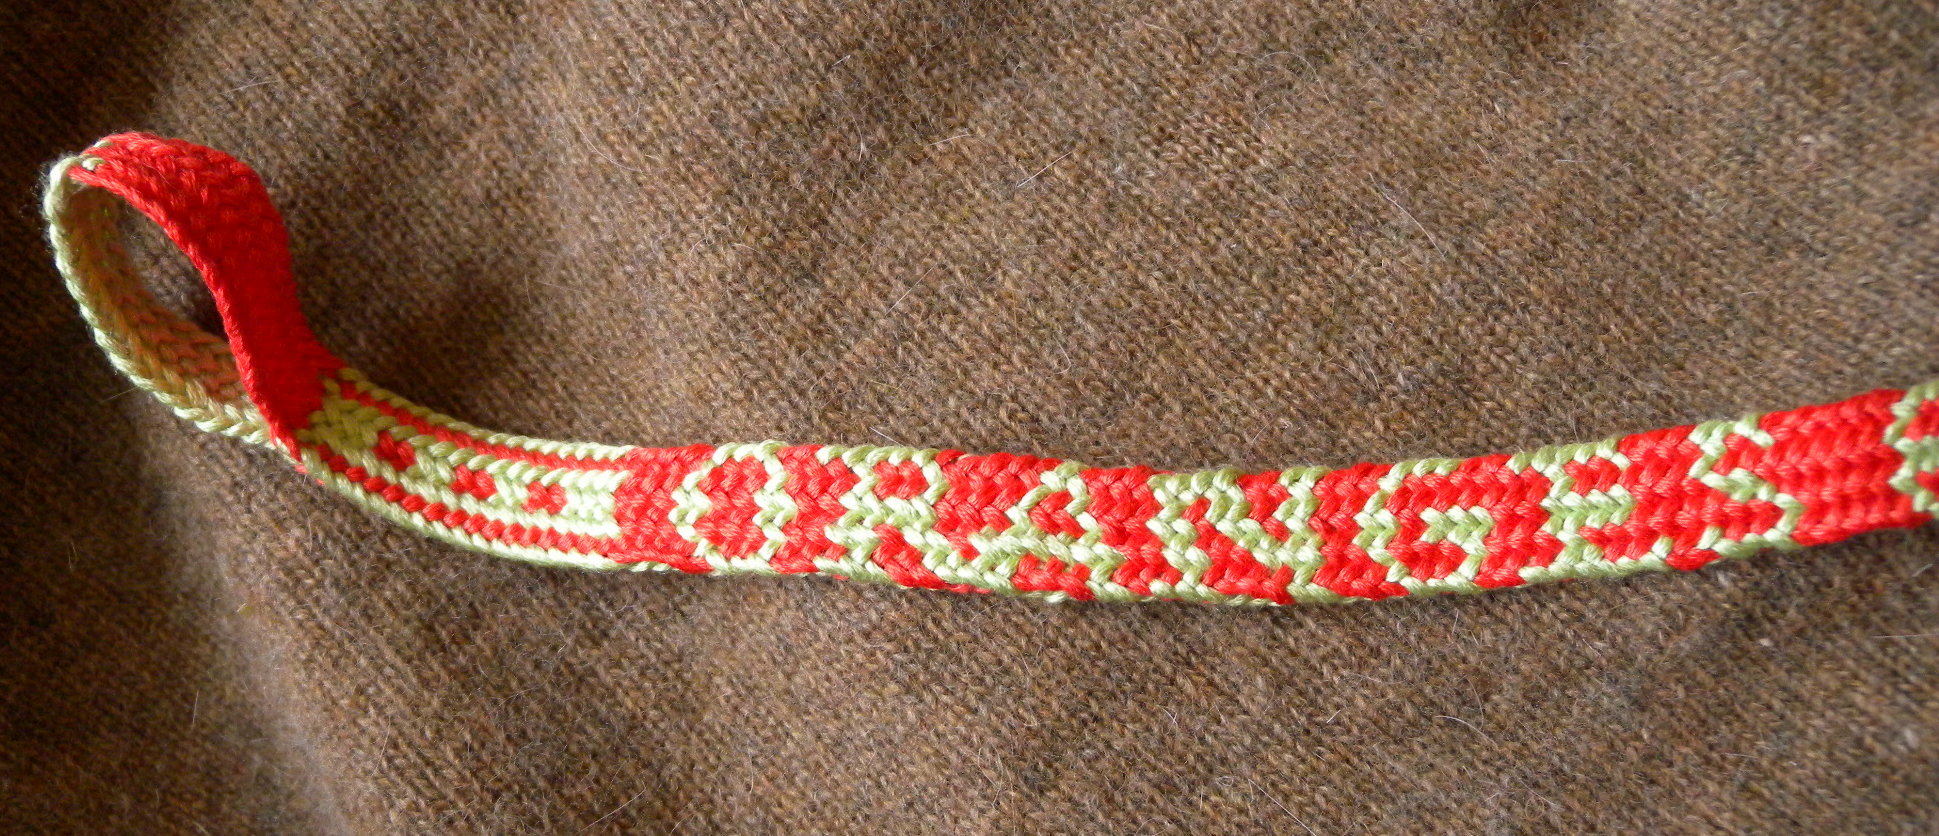
I used the Handshake loop start for most of my Sudarium braids, because it emphasizes the two different “halves” of those braids:
Below is a Spiral Braid with the same Handshake loop-start (still with a red header cord attached):

2. Handshake variation for Bicolor loops:
A handshake start using bicolor loops has to be done differently. When making the bicolor loops, make HALF as many loops as you need, but make each loop twice as long as your desired loop-length. (In the braid, each loop will be bent in half to form two bicolor loops.) Then double the left loops over—bend them in half—and suspend them through/ around the bent-in-half right loops, so that each set is linked around the other. Each doubly-long loop will end up forming two bicolor loops, held by different fingers of the same hand. (You can do this with single-color loops, too.)
Like the regular Handshake start above, you suspend one set of loops onto a firm, fixed point and braid a short distance with the other set of loops, then switch and braid an equal distance on the unbraided loops, then join both sets in braiding the main braid.
This works with an even number of loops. If you have an odd number of loops, the single “odd” loop is not double-length. It is suspended a bit differently. If your one “odd” loop is a single-color loop: Thread one of the two sets of bent-in-half double-length loops through the single odd loop, and include it with the other set of doubled-in-half loops. Make sure its single knot at the bottom, where you will insert your finger.
An odd bicolor loop will (likely) have two knots, one at the top of the loop and one at the bottom, so you’ll have to live with two ends sticking out of the handshake join at the top of the braid.
(Cut those two ends extra long, and you can hide them later by using a needle to bury them within the braid).
Or, see my tip #2 below for making a bicolor loop that only has a knot at one end of the loop (requires using divisible thread or yarn, like embroidery floss).
In either of the two cases above, another option is to add the singleton loop into the braid below the loop at the top, when you are joining the two halves of the braid together. It’s not hard to add an extra loop or loops just below the braided loop at the upper end, and that way the loop looks more even, because it is made with the same number of loops to each side. See tip #3 further down this page.
The Handshake looped start is really just a variation of the more basic Center-start looped start below. In some ways the Handshake version is easier because it automatically and accurately locates the center-point that you start out braiding from.
3. the “Basic Center-start Looped Start”:
This makes a very nice-looking loop-start.

I’ve heard that this method is commonly used to start a kumihimo braid with a loop. I rarely use it myself, though. It’s easy to do in theory, but in practice your centrally braided loop area rarely ends up being in the exact center. So after you join up the two halves into one braid, the right and left loops are likely to be two slightly different lengths, and you’ll have to shorten the longer ones to match the others. This isn’t difficult, just a little time-consuming, so this is not the method I use for making a quick sample braid with a loop at the top (which is most of what I make, to tell the truth!) It makes a very attractive loop start, though, so I would probably do it more often if I made more ‘finished objects’.
Start with half as many loops as your braid needs, but make them twice as long as you would normally make them. So, 3 doubly long loops for a 6 or 7-loop braid.
Find the center of this long bundle and braid only the center one or two inches of the bundle–this will be a narrow 3-loop braid at the mid-point of your loops. Then bend that short braided section in half, tie a header cord around its mid-point and fasten that to a fixed point, join all 6 loop ends together (you can add a 7th single loop into the join area at this point if you will be braiding a 7-loop braid – see tip #3 below for adding an extra loop into the braid after the start) and braid with all the loops. Your 3-loop braided section will form a loop at the top of the braid. At this point, you may have to retie the ends of your loops on one side of the braid to make them the same length as the loops on the other half.
[Update: my new exact center-start method in the first half of this post is a great way to locate the exact center of a loop bundle. You will need to make one of your double-length loops a bit differently than the others. As with the Handshake start method, you would braid a short distance both ways from that center-point before joining the braid to form a loop.]
Tip 1 – Using a shower-curtain ring instead of a header-cord when braiding a divided-start, upper loop at the top of the braid:
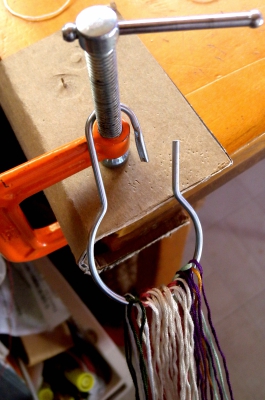
I usually just hang my loops from the horizontal bar of the C-clamp, but it can be a little tricky to spread the loops widely apart for tightening – during the first few moves some loops can easily get pulled completely off the end of the bar, until a few more moves have ‘knit’ the loops at the top of the braid together. So this type of ring below is a great solution – it’s firm and solid like the bar, but loops can’t fall off it, no matter how widely you spread them. I now use this type of ring whenever I’m making a braid of way “too-many-loops”, but it would be fine to use for braids of any number of loops.
(To manage a lot of loops while setting up, I also park their ends onto a comb-and-rubber band holder until I am ready to start braiding. With braids of fewer loops, I just use the fingers of my left hand to temporarily hold the ends of all the loops while loading the upper parts of the loops onto the header bar: My right hand loads the top of the loops onto the bar or ring, and places the end of each loop onto a finger of my left hand – ‘left’ loops lined up close to the knuckles, and ‘right’ loops lined up closer to the fingertips.)
The upper shank of each loop must pass over and in front of the bar or curtain-ring, and the lower shank must pass over and behind the bar. Both must go straight to the finger with no twist in the loop. For the first half-inch or so of braiding do not turn any loops. If you have set up the loops correctly, a divided braid will form in a big open loop around the curtain ring. If it forms clasped onto the ring or bar, you have made a mistake and should start over – the loops must not clasp onto the bar. That would result in loose, gappy threads at the top, once the braid is removed from the bar.
This set-up will only work if at least some of your loops are connected at the top (see my various divided loop-start methods above). If all the loops are single, unconnected loops, the braid would end up falling apart at the top, as loop pulls out of loop pulls out of loop, etc.
I never let go of the end of a loop while setting it up on the shower-curtain ring or C-clamp bar. I keep the ends in their correct order, with no twist to the loop below the bar, no loop passing over or under another loop, and all held securely by fingers or on a comb. (See You can put your loops down.) The advantage to a comb is that it can dangle freely while still keeping the loops in their correct order (if a rubber band is in place).
When I’m ready to braid, I snap the ring shut, and then load the loops from the comb onto my fingers, taking care that each upper shank passes over the top of its finger, and goes cleanly to the upper side of the ring (or bar of the C-clamp) without twisting, and with no lower shank crossing above any upper shank, and no loop passing over any other loop(s). Any of those possibilities would tie the loops together just under the metal bar after you start braiding, and result in a messy start to the braid.
Tip 2 – To make a no-ends-at-the-top bicolor loop: If you are using a divisible yarn like embroidery floss, you actually can make a single bicolor loop with no knot or loose ends at the top (only at the bottom): Cut each length twice as long as the loop will be. Then divide each length in half – so 3 strands of floss instead of the full 6 strands – and make a bicolor “departed” loop. See the first two illustrations on this linked section of a page on fingerloop.org. (Ignore the third/ lowest illustration.) This ends up doubling the thickness of the strands, which will double them back to normal size, while leaving no loose ends at the top of the resulting bicolor loop.
Tip 3 – Adding an extra loop (or loops) to the braid below the braided loop at the top:
You can do this with any type of start. There’s more than one way to do it, especially when adding several loops below the braided loop start.
Below I’ll describe a couple of ways to add a single ‘odd’ loop into any braid after you have braided a divided loop at the top, right at the point when you are joining the loop together to be one cohesive braid.
When the braided loop section is long enough, and you are about join it together in starting the main body of the braid, at that point add the extra loop into the braid. (Make sure the knotted end of the new loop is at the bottom, where a finger will be inserted.)
If the extra loop has no ends at the top: A single-color loop should only have ends at the bottom of the loop, not at the top. Make that extra loop a bit shorter than the others, since it will be added below the start of the braid. When it’s time to add it (after the upper loop/ buttonhole has been braided), suspend that new loop from its own separate header thread – put a thread through the top of the loop, make it into a short loop and hang it from the same attachment point holding the main braid. Suspend the new loop just low enough that the top of the new loop is hanging at the level where it will enter the braid. I usually get this loop and its short header loop ready in the beginning when I am getting all the loops ready for braiding, but then hang it into place only when I’m about to include it into the braid.
It doesn’t matter where the new loop hangs – it’s fine to hang it on the outer edge of all the other loops, even if you will be adding it into the center of the braid. It’s the finger you place the end of the loop onto that determines where it will enter the braid, not the position where you hang it.
The header thread should suspend the new loop low enough that the top of the new loop is about level with the point where you want it to join the braid. Place the bottom of the new loop onto a finger where you know that the first braiding move will pull a different loop through the new loop, and not on a finger where the new loop itself would be the first loop pulled.
After a few more loops have been braided through the new loop, cut and pull out the temporary header thread. Then you can gently tighten the new loop down into the braid – just enough to prevent any loose bits from sticking up where it joined the braid.
If the extra loop is bicolor, and has a knot and two ends at the top: A separate header cord is not necessary if the extra loop has a knot and 2 ends protruding from the top. (After the braid is done, you will hide those two long ends inside the braid). Cut the length for the loop longer than your other loops. Tie it into a loop with extra-long ‘tails’ beyond the knot. It’ll be easier to undo that knot later if you tie it as a slip-knot. From the end of the loop to the knot, the extra loop should be the same length as all the other loops. The extra length is all in the two ends beyond the knot, because you’ll need that extra length to sew the ends into the braid when you’re done. Suspend the extra loop from whatever the rest of the braid is attached to. Its upper knot will be far above the point where it enters the braid, and its bottom knot should be level with the bottom of the other loops of the braid. Read and follow the info in the previous paragraph regarding which finger to place the new loop onto, etc. After the braid is done, untie that upper knot, and thread those two long ends onto a needle to sew/ bury them down inside the braid to hide them. Bring the needle out, and clip off the extra thread close to the braid, leaving the ‘tails’ inside the braid where they won’t show.
Why I don’t have videos for all this:
Because nit-picky setting-up procedures are so hard to video! It’s very different from making a braiding video – when I do that the camera sits in one place on the table (mostly blocking my own view of my hands) and I explain what I’m doing while I’m doing it, because the moves are so automatic. That doesn’t work for filming things like measuring out long strands, then focusing on close-up little procedures, plus trying to talk about it at the same time. The few set-up procedures I’ve tried to video required so many retakes that I just gave up. I’m not a professional videographer or youtube how-to-er, as you can probably tell by my videos! Plus my only room with decent natural light and a table is my kitchen, which is not great for long shots.
So instead, I just keep adding tips to this big grab-bag post of text and photos.
How do you braid longer braids or other types of starts and finishes? I’d love to hear your ideas and strategies!
*Take-up refers to the length lost while braiding. Loops don’t travel in a straight path down the braid, they travel diagonally back and forth across the width of the braid, as well as over and under the other strands, so the finished braid will be noticeably shorter than the loops you started with. Take-up varies, you lose more length with wider braids (more loops, and/or thicker thread). Probably tightness or looseness of tension would also affect take-up. Don’t forget to add in a few extra inches for the knot and tassel at the top, and even more for the end, as you won’t be able to braid all the way to the ends of the loops.
You really need to do a test swatch with your chosen material and braiding method to find out how much extra length to allow for a braid. I give some examples below, but your results may vary:
My 7-loop “Whole Nine-Yards” square braid made with embroidery floss started out as a 9-yard-long loop-bundle, and finished as a 7 yard, 1 foot braid.
A 5.5 foot long, 18-loop flat double braid made with sport-weight cotton yarn (about twice the thickness of embroidery floss) started out as a loop bundle that was 10 feet long plus a few inches extra, though I did cut off some extra inches of unused loop-length after finishing the braid (maybe 5 or 6 inches?).
If you are making a short braid, say bracelet-length, even for a 5 or 7-loop square braid you might want to use loops almost twice as long as your desired finished length, because proportionately there will be a lot more length needed for the fringe and for the ends of the loops that can’t be braided, compared to the length of the main part of the braid
When you finish braiding, the braid will probably be a bit longer at first and gradually shorten over the next few days or with any use, because during the whole process of braiding you were stretching it lengthwise. Eventually it will relax and shorten, so bear that in mind if you are making a bracelet for example, so it doesn’t turn out to be too short for your wrist. Washing a braid may also result in a slight loss of length, so that should also be taken into account.
*For A-fell square and flat braids:
The same loop-rearranging trick works for an A-fell center-start braid: At the start of the second half of the braid, loops will be coming out of the center-start in V-fell configuration. So on each hand’s loops, one-by-one pull the inner loops through the outer loops, til they are all in proper A-fell order.
In an A-fell braid, the loops on any one hand all cross each other as they head down from the braid to your fingers. Each loop passes through and/or around other loops of that same hand. In contrast, the loops of a V-fell braid do not pass through or around any loops (of the same hand) on their way from the braid to the fingers.
Pause your braiding sometimes, and take a look at the loops coming out of the fell – the bottom of the braid – to get used to how they should look. This can be a big help later when trying to replace a dropped loop correctly, as well as for doing this (optional) center-start rearranging… In an A-fell braid, the loop that heads out from the middle of the braid will end up on an index finger – an outer finger – after passing through all the loops of one hand. The loop that starts from an outer edge of the braid will end up on your ring or little finger as one of the two innermost loops, passing around all the the other loops of one hand. The other loops will also pass through and/ or under loops in their path from the braid to your fingers, all in a very clear sequence.
For DOUBLE braids and others:
The rearranging tips above are for square (or flat) braids. Other braids don’t necessarily have an A or V-fell.
Double braids for example: Their loops can also be rearranged back into the correct starting arrangement after the turnaround point of a center-start braid, but it will look different than the simple A or V -fell loop arrangements for square braids. After you get familiar with how loops should look at the fell, you’ll be able to figure out how to undo or redo the loops back to that same arrangement after the center-start turnaround point.
* Wayuu braiding traditions include loop braiding, ply-split, and sprang. They also weave, and now crochet (probably a modern addition to their textile crafts)
Update: Rodrick Owen has just informed me that the technique shown at 30secs into the video is weft twining, which has been documented in the Americas (from Andean/ Paracas culture burials) from thousands of years BCE…(Not sure if it is known from anywhere in the Americas NOW other than the Wayuu people of Columbia?)
Last updated Feb/13/2024
© 2011–2024 Ingrid Crickmore
See full copyright restrictions and permissions at the bottom of the sidebar (if you are on a small screen device, the ‘sidebar’ may appear somewhere other than at the side of the screen).


Hi, I have been living on your site for the last few weeks. Just stumbled onto finger loop braiding while researching patterns for kumihimo and am in love! But I’m wondering if there’s a way to use the little plastic buckle clips for bracelet closures? I can start the bracelet but can’t figure out how to end it. Do you have any tips? Or do you know if it’s possible to make a flat braid around a central line like in paracord braiding? Thanks for any help!!!
“Paracord braiding” – you must be a mind reader! Yes, it really is possible to use loop braiding to braid a tubular “skin” around a pre-made core – either another braid or a string or any flexible material. I used to think this wasn’t possible with loop braiding, but turns out I was wrong. It’s not hard to do but it’s a little hard to explain. I learned it maybe a couple of years ago, but so far I still haven’t taught it or posted about it here. The reason you’re a mind-reader is that after months of not thinking much about braids, just yesterday I was was thinking about this exact thing, and idly writing up a possible workshop description for it, thinking titles like “Make a braid around that” or “Braid your own Paracord”!
Re tips for ending braids, I don’t yet have a whole post on this, but I can refer you to this reply of mine to a similar question, with ideas and links to other sites:
https://loopbraider.com/tutorials/#comment-909
(If that link doesn’t bring you directly to Lan N’s question and my reply, just scroll down to it in the comment field below the post.)
I am so jazzed to hear you are enjoying this site! Especially since I haven’t been posting at all lately. I’m still around, but have been busy with work and other things. I do have two or three half-written-up posts on “standby”, so those will be up before too long.
–Ingrid
When I need to shorten long lengths, I do start chaining at the ends. I tie a slipknot at a good starting length in all the loops together and secure it with a paperclip or a stitchmarker or something. Then I can safely chain from the end towards the slipknot and all the loops will end up the same length. I secure each crochet chain by pulling a lark’s head knot through the last link with a short piece of scrap yarn.
When I need to undo it, I can just pull out the lark’s head knot and undo part of the crochet chain without having to redo all of it. If the caterpillars are a bit long, I’ll slipstitch into the first chain stitch to turn them into loops instead of tails 🙂
Hi Katia – Thanks for this great idea! Sorry to take so long to reply 😦 I’ve been on vacation from this blog lately and I must have missed the email notification I usually get when someone leaves a comment.
I can’t wait to try your idea! Unfortunately I do have to wait as I have a looming deadline and won’t have time to braid until June. I remember having a lot of difficulty getting the loops to end up the same length if i started chaining at the ends of the loops. I’m having trouble visualizing how a slipknot at the top would help since each slipknot would take up a lot of length in itself, so would again be hard to have them all match on all the different loops? Unless tightening the slipknot onto a stitchmarker would solve that! I usually braid with a lot of loops, often more than I have fingers, and it just doesn’t work at all to hold two or three loops on the same finger if those loops are even slightly different in length…
Thanks so much for sharing this idea – it sounds very exciting. It would definitely be a lot more convenient to undo the “caterpillars” top-down to only as far as you need to, than the way I do it where you have to undo them to the very end and then rechain the length you still need chained-up…
I’m sorry, I didn’t see your reply sooner as well. 😦
I would tie a slipknot in all the loops bunched together, then chain up to the slipknot and adjust as needed.
I’ve since changed my tactic a bit to skip this step:
– start chaining a caterpillar from the end until you are left with about the right loop length to braid with
– secure the last chain stitch with a paperclip or a safety pin
– repeat for all loops
– hang the loops on your header cord and compare the lengths. Take a few minutes to add or remove a few chains on some of the caterpillars until the loops match.
– once the lengths match, either replace each paperclip with a contrasting piece or scrap yarn, or wrap a small elastic around your caterpillar bundle and the clip so it doesn’t get snagged while you’re braiding.
Tiny safety pins work best for me, they don’t snag as easily so you can leave them in and don’t need to bother with scrap yarn. And you can even use the safety pin to shorten really long caterpillars: before closing the pin, poke the end of the caterpillar on it as well.
Every time you need to undo a bit of the caterpillars, you just have to take a few minutes again to compare the loops until they all match up and you can continue braiding 🙂
I’m so glad you like the idea, your website is amazing, thank you so much!
Loop braiding confused me until I found your video tutorials 🙂
I know what you mean about “I’ve since changed my tactic” – I’m always doing that, and then I have to decide whether to go back in a tutorial and say Oops, I do it differently now, or just leave it as it was!
Ok, it was always that last bit about “comparing the lengths, and adding or removing a few chains until the loops match” that I could never get to come out right years ago when I tried doing it this way. One crochet stitch seems to take up a LOT of loop length.
Now that I know it’s worked for you, I’ll give it a shot the next time I need a long braid.
Thanks for the tip, and for writing!
I wonder if it’s because I tend to crochet quite tightly because I make a lot of plushies and I don’t like the stuffing showing at all. So when I pull on the braiding loops, not much of the caterpillar thread slips back out. If you crochet too loosely, the last few stitches slowly tighten as you start loop braiding and a lot of thread can slip out. Maybe if you make sure the last few chain stitches of your caterpillar are pulled very snug before you start braiding?
I hope it works for you!
Thank you for the video on Colombian techniques detailing how two people can work together in longer fingerloop projects. At ~3min 20-30 what kind of ply-split work is this woman doing? Do you know anything more about it? It resembles at first glance a kind of Peruvian twining that Roderick Owen teaches but here she is using the tool used in ply-split work. I had no idea ply-split technique that could create such colorful patterned bands.
Hi Lausanne! Isn’t that a fun video?! I’ve only done a teeny bit of ply-split braiding myself, but have friends who do it and I’ve seen lots of colorful examples. My guess is that the woman in the video is doing single-course oblique twining (a.k.a. SCOT) using ply-split braiding. Long-ago Andean and Japanese braiders also made this same type of braided twining using hand-held loop braiding (though in the Andes loops were often turned in “countered” directions rather than turning all the loops of the single course in the same direction). There are other types of braided twining as well… In the Andes they also made non-twined braided structures with loops, and did a lot of mixing it up with different structures within the same braid.
Whereas I think ply-split braiding is all and only twining.
But in any case, yes, it’s definitely possible to create the same braided structure using very different braiding methods and tools! The resulting “look” of identical structures can seem different because of tensioning differences. Ply-split can be done a lot tighter than the typical loop-braiding, because a lot of tension can be put into the initial plying of the “rope” that the braider then splits.
It’s nice to hear from you! I just took a workshop fr Laverne btw (boy, was I rusty!)
[edited to be clearer — I hope!]
could you make a video demonstrating the way you start most of your braids?
Hi Justin,
Sorry, but no [see my new disclaimer above]. My usual start is too fussy, I can’t do it with a camera in between me and the threads. But check out my 3-loop tutorial video above—it demos a divided-braid loop-start that’s very similar to my usual one, and can be used for any number of loops.
Another loop start that I call the “Handshake” loop start is demo’d in a video in my Bracelet with chevrons tutorial — the second video in that tutorial.
[edited to add new info]
Thank You for this marvellous website! I’m just making my first steps in learning the fingerloop braiding.
You’re welcome, and thanks so much for the note. I hope you have fun braiding!
Have you tried winding a butterfly bobbin with the extra length instead of crocheting it up into a chain? When I make them, I wind them around my thumb and forefinger so they stay fairly small.
I tried that early on and it didn’t work for me–when you try to braid, the butterfly bundles get stuck in the loops or even pull the loops off the fingers. Plus, just hanging there they would sometimes hook around / tangle up around each other. A chain pulls through the loops completely smoothly, and they never tangle up with each other. You can certainly try it! Maybe if you then tightly wrap each butterfly so it’s really like a tight ‘cocoon’ it would come through the loops easily. But the caterpillars work so well that I have no incentive for trying anything else myself.