If you are already comfortable braiding 7-loop square braids, this beautiful 7-loop “Spanish” braid (known from a few cryptic 17th C. English manuscripts) might be fun to try next. It has twice as many loop transfers as a square braid – done a little differently than you might expect! Video and text instructions below.
5-loop Spanish braid: A 5-loop version of this 7-loop braid can be made as well, jump to instructions further down page.
This post also has information about braiding the doubled version of this braid: a 14-loop Spanish braid, also known as a ‘letterbraid’ when braided with letters of the alphabet forming words or sayings in the braid! I don’t have a video on this, but I do give tips for making it in the traditional manner (two braiders working together, each braiding the 7-loop Spanish braid taught here, and connecting their two braids into one as they work), as well as a text how-to on my own solo-braider method (7 loops held in each hand).
[Video tutorial below; Click links to skip down to text instructions for the 7-loop braid and the 14-loop (2-braider) braid; to my 14-loop solo-braider method; my Why “Spanish”? ramblings about the structure and history of the so-called Spanish braids, and an explanation of the Giving-Taking loop-exchange that can be used with odd-number-of-loop Double braids.]
Slide the bubble under the video to the point you want to see.
0:00 Intro and setup (overly long! Skip to 5:45 for braiding moves for a divided braid)
5:45 Basic braiding moves, making a divided version of the braid (loops are not turned over while being moved). This creates a divided-into-two-layers braid, which will form a loop/ buttonhole at the start of the braid.
17:47 Beginning of braiding a “solid” braid: each loop is turned over when it is moved. This connects the upper and lower layers of the braid, making a solid, rectangular braid, twice as wide as a square braid.
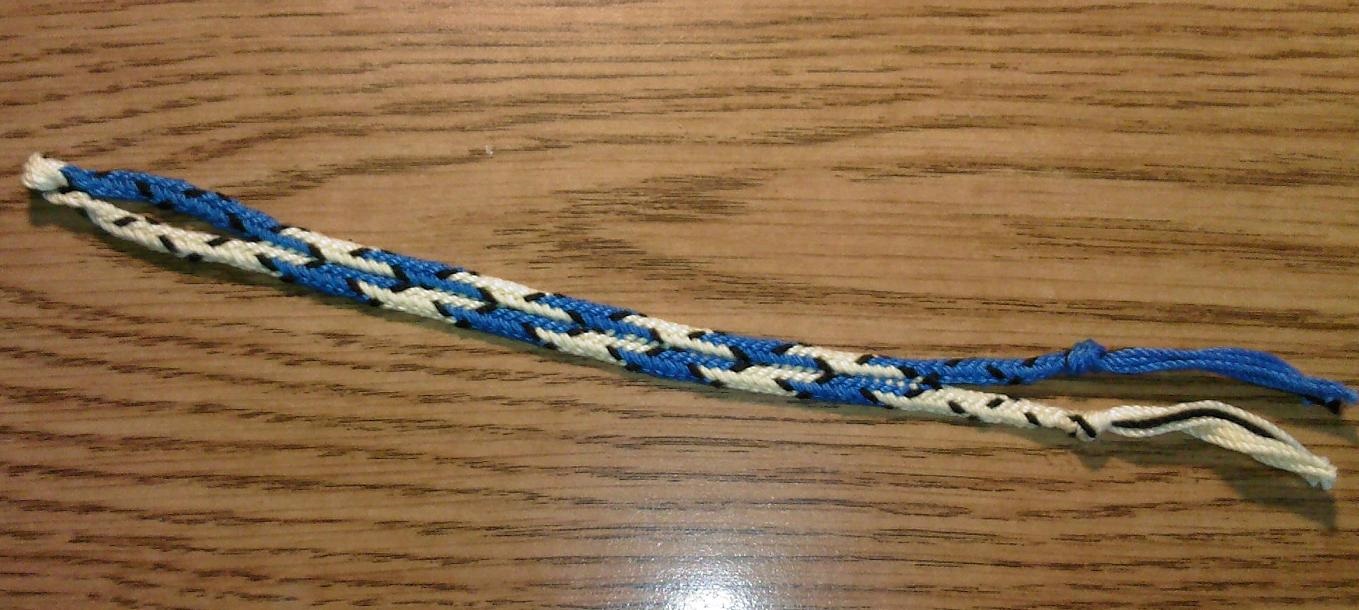
In the video I am braiding a color pattern that I call “Lopsided Crowns”. In the picture of the two sample braids below, the lowest braid has an example of the “Lopsided Crowns” pattern: At the far right (upper) end of the braid, beside the biggest bunch of loop-ends.

7-loop ‘spanish’ braids, these are pattern samplers made using bicolor loops (embroidery floss). Click 2 times to see the braid structure.
This post now has instructions for making all the color-patterns in these two sampler braids.
Text instructions for 7-loop “Spanish” braid, demo’d in video above. I learned this braid from Speiser/Boutrup’s Instructions for Letter Braids in 17th c. Manuscripts (I do the first loop transfer slightly differently than Joy Boutrup describes it, but the result is the same.)
See notes below braid instructions for info on color set-up. Give all loops a half-turn when transferring them (for a solid braid), or no turn for a two-layer, divided braid (both shown in video). Other combinations will make different braid shapes.
L=left; R=right.
La, b, c, d = left index, middle, ring, little finger, or the loop on that finger.
This is similar to most loop braiding notation systems, goes back to the 15th C. manuscripts.
In these instructions, La= the left index finger; La =the loop on that finger
Start with:
3 loops on the left hand: 1 each on La, b, d (no loop on the Lc-finger)*2
4 loops on the right hand: 1 each on Ra, b, c, d
1. Ra (operator finger for this move) goes through Lb, takes La and places it onto Lc. First left-side transfer done.
2. Lb shifts up to La.
3. New operator finger Lb goes through Lc and Ld, takes Rd. Second left-side transfer done.
4. Rc shifts down to Rd, leaving the Rc finger empty. Loops are now in mirror image of original starting position, ready for the 2 right-side loop transfers.
[TIGHTEN LOOPS]
Repeat above moves in mirror-image fashion:
5. La (new operator finger) goes through Rb, takes Ra and places it onto Rc. First right-side transfer done.
6. Rb shifts up to Ra.
7. New operator finger Rb goes through Rc and Rd, takes Ld. Second right-side transfer done.
8. Lc shifts down to Ld, leaving the Lc finger empty. Loops are now in original starting position, ready for the 2 left-side loop transfers.
[TIGHTEN LOOPS]
One braiding cycle done.
For the 7-loop braid, just keep repeating these steps. Skim through notes below for info on color setup and new info on loop-turns. Most of the rest of the notes are for the 14-loop, doubled version of this braid. After you learn this 7-loop braid, check out the bicolor pattern set-ups below for several fun color patterns.
For the 2-person, 14-loop version of this braid, this is the point where the 2 braiders would exchange their nearest a-finger loops, one through the other, being careful that the loops didn’t get a twist or turn during this process. The shanks that were in upper position on each braider’s hand should end up in upper position on the other braider’s hand with no twist to the loop. This can be tricky, review the photo-sequence on this, and the video, in my 2-person braiding tutorial showing how to do this with a 10-loop braid. However, in this 14-loop two-person braid, the two braiders’ neighboring hands will each be holding four loops when it comes time to exchange loops. Because of this, one of the two braiders (the ‘initiator’) will probably need to temporarily place a loop onto his/her other hand and shift the other loops down in order to free the index finger for the exchange (see suggestion in Joy Boutrup’s letterbraid book, and/or leave me a question in the comment field below for some ideas on this)…
NOTES:
To turn or not to turn: In my 7- and 14-loop braid samples, each transferred loop was turned. (“reversed” –15th C, “crossed” –Speiser and Kinoshita). This interconnects the upper and lower layers of the braid fabric. It also creates a color change if you are using bicolor loops.
For the 14-loop letterbraid, however, all transfers are done without turning the transferring loop. This results in a two-layer braid fabric, the top layer should be one color, the separate bottom layer another color. The top and bottom layers are not connected at all unless loops are turned over on the fingers (before the loop transfers occur) to change colors for the letter-shapes. This has the side benefit of connecting the two layers of the braid. (photo)
In the video I am turning the loops from below, unlike the way I showed in my square braid videos—in those I turned the loops from above. Either way works fine, but you should stick to one way within a braid
New info 2-14-12: Au contraire! ~ The following is not necessary in making this braid, and was apparently not traditional, but it turns out that this type of braid will be much straighter and flatter in cross-section if you turn the first and third transfer from above, but turn the 2nd and 4th transfer from below. (Outer transfers from above; inner transfers from below.) Or vice versa. Thanks to Gary in the Canary Islands for pushing me to confirm this. [I demo this in a video here.]
However, no extant surviving “spanish” type braids or double braids had this type of mixed turns. [Joy Boutrup told me this at Braids 2012, and she has done extensive research on surviving European loop braids]
2-braider method: For making either the 14-loop letterbraid, or my doubled 14-loop samplers in the traditional method, 2 braiders would be standing side-by-side, braiding from one fixed point.
What I described in the directions above are the LEFT braider’s moves—the right braider mirrors everything the left braider does.
For example, the right braider starts with 4 loops on his/her left rather than right hand (and would then begin braiding at steps 5-8, followed by 1-4, since these two sections are the mirror-image of each other).
Bicolor loops set-up: The 14-loop letterbraid, and the 7-loop sampler braids in this post, have all-bicolor loops –each loop is of two colors, having one light and one dark-colored shank. (See my Bicolor Loop Magic tutorial for an introduction to bicolor loops)
For the letterbraid: at the start of braiding, all the dark shanks are in upper (or all in lower) position on all fingers. The color of the upper shanks forms the ground color; the color of the lower shanks will be the color of the letters.
For the 7- and 14-loop sampler color-patterns: each of the various patterns starts out with a different arrangement of dark and light-colored shanks in upper position on the fingers, described below under How to set up…
Of course, this braid can also be made using single-color loops, or a combination of single and bicolor loops, just like square braids. Below are photos that reader Dan Gaiser sent me of his 7-loop Spanish braided bookmarks—most of these are flat versions of this braid, btw. He experimented with color patterns using bicolor loops and fewer or just one contrast single-color loop(s). (Thanks for these great examples, Dan!):
Dan Gaiser’s flat 7-loop spanish braid. 6 bicolor loops and 1 black loop.
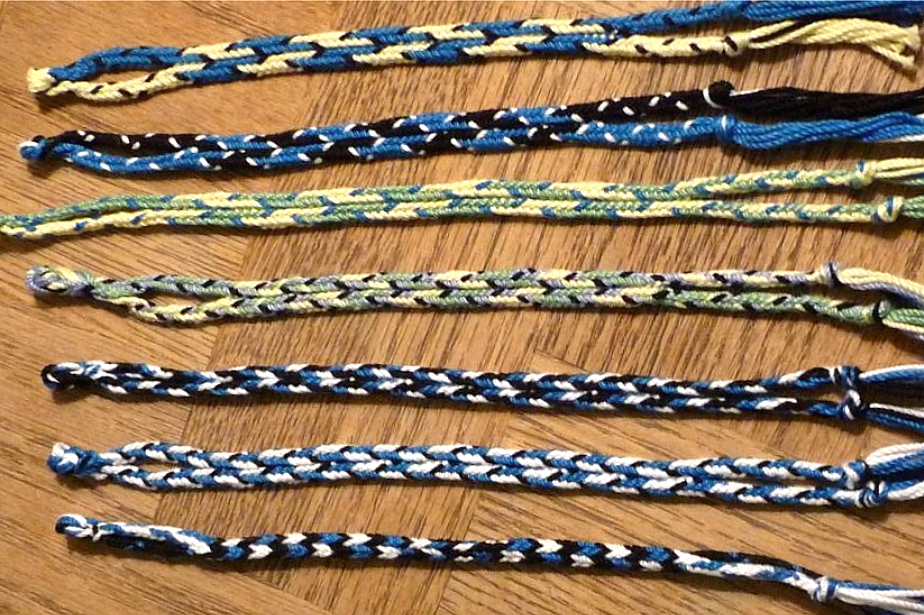
More of Dan’s 7-loop Spanish braids. Most of these are flat (only 1 of the 4 loop transfers is turned). I think (?) the lowest braid may have the shape I teach in this tutorial (rectangular in cross-section – all 4 loop transfers turned). The upper 3 braids have the same color-pattern, but with different colors. The 4th one has a slightly different pattern. The lowest 3 braids have other color-patterns.
Color sequencing: For setting up your own color arrangements, if you want to line up colors in a certain order in this braid, you’ll need to know the loop sequence (the order of how the loops follow each other in the braid itself). Two loops that are next to each other on your fingers might not actually be next to each other in the braid. I describe the loop sequence for the 7-loop spanish braid here in my post on color-pattern planning.
How to set up for the bicolor patterns in my 7-loop sampler braids:
Many other patterns are possible than just the ones I show—try other set-ups; single-color loops; and combining bicolor and single-color loops.
Update: after I posted this tutorial, Gary Mitchell developed an online interactive pattern-planner for this 7-loop Spanish braid! With it, you can plan over 500 different braid designs! I’ve made two posts about his planner – the first post explains how it works, and the second post has a video showing how to follow his planner in braiding a design, either one you’ve made up, or one of the examples in my photos.
See note 2b re (lack of) historically notated color-patterns.
For these patterns, use all bicolor loops. When you are about to start braiding, set the loops up on the fingers as I describe below for each pattern.
In the directions below, “Black” means: dark shank in upper position, whereas “White” means: light shank in upper position on the finger. (All the loops are of the same two colors).
All colors will return to their starting set-up position on the fingers at the end of each pattern repeat—7 full braiding cycles—as long as you haven’t made any mistakes!
The “Edge” pattern is an exception. With this set-up, the loops will return to the same color distribution on the fingers after each braiding cycle (4 loop transfers), so the “Edge” pattern repeat is only one cycle long. That makes it a good pattern to practice the braid with—you can error-check to make sure the color distribution is correct after each cycle, instead of counting 7 cycles before knowing if you’ve made a mistake.
If you’ve made a mistake and (after one full pattern repeat) one loop is in the wrong orientation, the easiest way to fix it is just to turn it on the finger to be in the correct color-orientation, and continue braiding. (The fussy way to correct is to unbraid back past the mistake.)
[new: Gary’s online pattern planner for this braid can show how the loops should look on your fingers after each cycle of any pattern! see note **** ]
a, b, c, d = index–little finger
Two 7-loop samplers, bicolor loops. (click for more detail)
Edge pattern—first pattern in each braid (and repeated between the other patterns)—lengthwise stripe outlining the edges of the braid:
Left hand loops: a-black up, b-black, (no loop on c), d-white
Right hand loops: a-black, b-black, c-white, d-white
a, b, c, d = index–little finger loops. Each loop is bicolor–half light, half dark.
In Gary Mitchell’s new interactive pattern-planner for this 7-loop spanish braid, the Edge pattern’s ID # is 585—if you enter that # into the box on the first page of the planner and click on “submit,” you will see a chart for this color-pattern.


Dom’s Edge-pattern bracelet
“One loop wrong” pattern—the first pattern after the “Edge” pattern, lower right end of both braids:
Start with the Edge setup above, except have one loop—any loop— “wrong” (opposite color than I list). I always turned the La loop to be “wrong”, but it shouldn’t matter which one you choose. [braid ID 586 on Gary’s planner]
Next very busy pattern to the left on lowest braid (black)
(the result of a mistake):
L hand loops: a-black, b-black, d-white
R hand loops: a-white, b-black, c-white, d-black
[braid ID 589 on Gary’s planner]
Lowest braid’s last pattern—upper right end of braid (lopsided “Crowns” pattern):
Start with all white OR all black shanks in upper position on all fingers.
[this is the pattern I am braiding in the video for this tutorial]
[OR, start with the set-up shown in the planner for this pattern—i.d. #595. Different set-up, but same pattern.]
Pattern to the left of that one (after Edge pattern—mottled black and white):
L hand loops: all white shanks upper position
R hand loops: all black shanks in upper position
(white color areas connect, black patches are separated—reverse the colors for the opposite effect. Or turn the braid over after finishing–colors are reversed on the other side.)
[OR, start with the set-up shown in the planner for this pattern—i.d. #590. Different set-up, but same pattern.]
Navy braid, middle pattern on lower half (navy irregular “M’s”):
L hand loops: all black shanks upper position
R hand loops: a-black, b-black, c-black, d-white
[or start with the setup shown in Gary’s planner for this pattern—i.d. #592. Different set-up, but same pattern.]
(for irregular white “M’s”, reverse the above colors)
–I forgot to try doubling this pattern in a 14-loop braid.
Top rightmost pattern in navy braid (sampler photo) is simply the Edge pattern, alternating with the same pattern but with all the colors reversed—switching Whites and Blacks in starting position.
How to switch DARKS & LIGHTS seamlessly:
To alternate between any pattern and its opposite–meaning the same pattern but with the dark and light reversed– do the following:
1st braiding cycle (4 loop transfers): do all 4 transfers STRAIGHT (unturned/unreversed/open)
2nd braiding cycle (4 loop transfers): do the first 3 transfers STRAIGHT, but the last transfer TURNED (reversed/crossed).
After these 2 cycles are done, the colors should be reversed. Check to make sure that they are. Resume braiding normally—turning all the loop transfers—until you want to switch again. For patterns other than The Edge, you will need to braid 5 more normal cycles (with turned transfers) before being able to check that you are in the exact opposite color set-up. That’s because, after making the switch you will be 2 cycles into the pattern repeat, so the colors you see on your fingers will not be in cycle-start position. If you want to be able to check immediately, learn how that pattern’s loops should look on the fingers once they have progressed two cycles from your starting setup. Gary’s online planner can now show this, see note: ****
Do try out single-color loops with this braid, too. As well as combinations of bicolor and single-color loops. I was on a roll with finding bicolor patterns when I made this series of posts, but you can use as many colors as you want, of single or and/or bicolor loops. I would love to see any that you make, either these patterns or your own…
What is a “spanish” braid, exactly???
Several braids were referred to as “Spanish” in the 17th C. English loop braiding manuscripts, not just this particular 7-loop one. Some were single-worker braids and some were multiple worker braids, and they had varying numbers of loops from five to 14. So the term baffled Noemi Speiser at the time she wrote her opus OEPBforLB – she ended up just describing/ defining them as being plain weave or a mix of plain-weave and twill.
But taking the point of view of the braiders themselves, the main thing the braids called “Spanish” all have in common is four loop transfers per braider rather than the more usual two transfers. Basically, just like my solo-braider double braids. And sure enough, Spanish braids made by a single braider can be made in all the same shape variations as double braids made the traditional way by two braiders or by my solo-braider method: Flat, hollow, solid rectangle, divided two-layer, as well as several more that I haven’t taught here (side-slit, half-hollow, humped semi-flat etc).
The 7-loop Spanish braid of this tutorial might seem very different from my solo-braider double braids, because of having an odd number of loops, and no loop-exchange move between the two hands. However double braids can also be made with an odd number of loops and no loop-exchange move, I just haven’t taught that here yet. (see description further down page.) The other difference is in the direction of the loop transfers – I happen to teach double braids with doubled A-fell moves, whereas all the 17th C. Spanish braids I have learned are made with doubled V-fell moves. This isn’t a structural difference, just an ‘operational’ difference, like square braids made with A-fell or V-fell braiding motions.
My assumption is that 17th C braiders in England consistently used the term “Spanish” for any braid in which the braider or braiders each make four loop transfers per braiding cycle, rather than two (the more usual case). Noémi Speiser doesn’t state this anywhere, but going by Joy Boutrup’s instructions for all 3 “Spanish” letterbraids, and from Noémi Speiser’s descriptions of the structure of the braids called “Spanish”, that seems to be one clear thing they all have in common. [update – Joy Boutrup corroborated this when I asked her about it at Braids 2012].
So then there’s the intriguing question: Why did 17th C. English braiders call these braids “Spanish?” Did this braiding method come to England from Spain?
In the few of these “spanish” braids I’ve learned, loops are always transferred in a doubled V-fell direction: “outside→inward”. Yet in England (along with most of Europe and the Middle East, presumably including Spain), the opposite direction of braiding was used in making square braids, including multiple-worker doubled or tripled square braids (the Katheren Wheel braid is an example of a flat variation of a “tripled” square braid): loops were transferred “inward→outside” in direction – a.k.a. the A-fell method.
If European simple square braids eventually led to “spanish” braids – doubled square braids done by one braider – then why didn’t these braids have the typical European A-shaped fell, doubled into an M-(AA) fell? It’s perfectly possible to make them this way, in fact it’s the way I’ve tended to prefer myself after originally trying 4-transfer braids in both directions… (it’s the braiding direction I teach on this blog in my solo-braider double braid tutorials).
However if you look further east, to India and China, the basic braiding direction changes – that’s where the simple square braid was (and still is) made with V-fell braiding moves. To me it seems possible that this 4-transfer “spanish” braiding method – even though we only have records of it from 17th C. England – may have actually had its origins in India or Asia, before eventually being introduced into England sometime in the 17th C. Knitting was also introduced to England from the Mediterranean/Middle East/North Africa around that time. Diseases, ideas, spices, fabric, and technologies were being gradually disseminated on a large global scale, so why not new versions of finger loop braids as well? Braiders in England might have called these braids “Spanish” because Spain-to-England was the only step in their long journey that they were aware of, not because Spain was the actual place of origin for the technique. [new note: Loop braiding has been documented in Asia as long ago as 3 or 4 thousand years, cf Mari Omura.] There is no mention of ‘spanish’ braids in the English loop braiding manuscripts of the 15th Century, that term only appears in the 17th C manuscripts.
Here’s how a team of 2 braiders would make this 7-loop Spanish braid as a two-braider team. This is just a hypothetical example, to show that this braid really is a double braid! As well as to illustrate how double braids can be made with an odd number of loops, and a “Giving-taking” loop exchange, rather than the normal ‘swapping’ loop-exchange move. (This is how two braiders can make a 9-loop double braid, for example – one braider starting out holding 4 and the other with 5 loops):
At the start of braiding, one braider of the team holds 4 loops and the other braider holds 3, yet each braider will (in turn) do all the braiding moves of a 4-loop square braid.
There are at least two ways they can do this.
One way:
The left braider – holding 4 loops – starts the procedure. She braids two loop transfers as for a 4-loop square braid, and then passes her closest index loop over to the right braider.
He has been waiting with only 3 loops – no loop on his closest index finger to the first braider. After receiving her closest index loop, he now has 4 loops. He braids two transfers, and then passes his (new and different) index loop back to the left worker, which completes one braiding cycle.
So there’s no “loop-exchange” swapping move as in regular double braids – instead, the two braiders take turns braiding. Whoever has just finished a pair of braiding moves then passes an index loop to the partner who is about to braid. Each side of the braid is still braided with 4 loops. It’s a very symmetrical braid, in fact it’s structurally more symmetrical than a double braid of an even number of loops.
Noémi Speiser calls this a “giving-taking” type of loop exchange. (after clicking that link, scroll down the L-MBRIC page to 3: The 9-loop 2-person technique) [click here for how to find the broken L-MBRIC link via the internet archive’s Wayback Machine]
Another, more efficient way: (accomplishes same thing)
V-fell version:
The right braider – holding only 3 loops – starts the braiding, and in one of his two loop transfers, his right operator finger goes through both of his own left loops, and takes a loop directly from the left braider’s closest index finger — with the result that he ends up with 4 loops and she has 3 loops. Then the left braider repeats his moves in mirror-image fashion.
A-fell version: In one of his two loop transfers, the Right braider uses his Left operator finger to go through his partner’s right loops, and takes her lowest Left loop (since she’s only holding two loops on each hand, this would be her left middle finger loop).
That’s essentially what’s happening to the left and right hand loops in the 7-loop spanish braid directions above, across the two hands of a single braider instead of the four hands of two braiders. ***
And since this braid only has 7 loops, it’s fine to do it that way – there’s no need for it to be a 2-worker braid. With only seven loops, all four loop transfers can easily be done by one braider.
FOOTNOTES , REFERENCES, & BOOK REVIEW
* European Loop Braiding: Investigations and Results–Part II Instructions for Letter Braids in 17th Century Manuscripts by Noémi Speiser and Joy Boutrup
Parts I through IV are available separately or together. Only Part II deals with letter braids. Available from BraidersHand in the U.S., from the publisher in the U.K.
Please note: The Speiser/Boutrup Letterbraid publication is not an instruction book itself, rather its topic is some instruction books from the 17th C. It is primarily a structural analysis of the letterbraids, not an instruction manual for how to make them. The only instructions in the monograph are a few succinct lines per braid, in the appendices along with the letter-charts. These lines only describe the moves of one of the two braiders, not how the two braiders exchange their loops. No pictures or diagrams of the moves are given. For that reason, I suggest learning the braiding method here first.
The European Loop Braiding series of monographs is a supplement to Old English Pattern Books for Loop Braiding, so it doesn’t duplicate information in the larger book – it assumes that the reader already knows the terminology used in the earlier book, and knows how to make 2-person braids as a team of braiders.
(More info about the Letterbraid monograph here).
*2 Joy Boutrup’s set-up is slightly different from mine—she starts with a loop on the Lc finger which she later moves down to the d-finger. I start with it on the d-finger. (I do that move down from the Lc finger at the end of the previous cycle, as a loop-shifting move). This makes no difference to the braid structure, and might not be any more efficient, it’s just a personal preference. The exact way braiders in the 17th C. did the moves isn’t known–they may well have also had individual differences like this.
*2b No examples of color-patterns for this braid are notated in any known loop braiding manuscript. The only known recorded information about this braid is as a doubled, two-braider structure for making letter (and other) shapes by means of a braided version of complementary pick-up patterning, a very complex color-patterning technique. However, it seems very unlikely to me that the braid itself hadn’t been known and used in its “single-braider” 7-loop form in a wide variety of ‘regular’ braid patterns before charted letter-patterns were developed for it. The particular bicolor-loop color-patterns I teach in this tutorial would be very obvious and easy to come up with for any loop-braider familiar with this braid and familiar with bicolor loops (departed bows).
*2c 5-loop Spanish braid, method based on the one shown in video above for the 7-loop braid:
Start with two loops on Left hand (index and middle); 3 loops on Right hand (index, middle, ring). Perform essentially the same moves as shown in video with this exception: always pull the transferring loop through only ONE loop, never through two loops. You will never be using the little finger – the loop to be taken in the second loop transfer will be held by the ring finger of the other hand.
This is only one of the possible ways to make a 5-loop Spanish braid. The various ways all produce the same physical braid – a (mostly) plain-weave braid of 10 strands. If your goal is to work with a partner to braid one of the known 10-loop letterbraids, it very much matters which order you make the moves, though, so this way may not work. Any set of pick-up pattern letter-shape charts will likely only work with one or a few particular orders of making the 4 braiding moves. This order will not likely work for following the Nun’s Book letterbraid charts. The order of these moves in the Nun’s Letterbraid is very different. I demo them in my Nun’s Letterbraid tutorial but only as a solo-braider technique, so all the moves of one 5-loop Spanish braid occur on a single hand, which is quite different from how they would be done by one braider making a single 5-loop Spanish braid. Leave a comment below if you want to know the order of moves for the 5-loop Spanish braids within either of the two 10-loop letterbraids, I would be happy to write them out, and excited to hear how it goes! (the moves for both are in the appendices of European Loop Braiding, part II Letterbraids by Noemi Speiser and Joy Boutrup)
*3 The unequal loop transfers should be made such that the two “through 1 loop” transfers (plain-weave) are done at the outer edges of the braid and the two “through 2 loops” transfers (twill) are nearer the center of the braid.
*4 Gary’s planner can now show this progression—on any pattern’s chart, click on “cycle +”. With each click, the loop setup shown on the chart’s lower left will change to show the color arrangement on the fingers after one more braiding cycle has been done. This is a really great feature! (thanks, Gary!)
*5 Other spanish braid-shapes (flat, hollow, etc): My more recent series of tutorials on the various possible shapes of double braids apply to ‘spanish’ braids as well.
I would love to see photos of any braids you make! (Email through my contact form up top and I’ll let you know how to send them.) If something isn’t working for any of the braids (above or below) let me know either in the comment field below or via my contact form, and I’ll try to troubleshoot (or fix my instructions!)
My solo braider method for the 14-loop letter braid.
It’s a lot easier and quicker to make this braid as a team of two braiders, the traditional way. (See my instructions above.) This solo method is slower, but it does become automatic and enjoyable. However not without learning and practicing the following braids first:
First of all, the 9-loop square braid for thumb-loops, then the 11-loop square braid for managing two loops on the little finger, 10-loop double braids for team braids as a solo braider, the 13-loop square braid, for managing three loops on the little fingers, and the 10-loop Nun’s letterbraid for 8-loop-transfer letterbraids. Also, the 7-loop Spanish braid above which is the root of this 14-loop letterbraid. Before learning letterbraids, I had also made a lot of 14-18 loop double braids, which I haven’t taught yet on this blog (though if you prowl down my tutorial page, I think there is a demo there of a 12-loop double braid – not a fleshed-out tutorial but shows the braiding moves). Double braids even of 18 loops are easier to learn than this 14-loop Spanish braid, because they have only half the braiding moves – 4 loop transfers in each ‘row’ of braiding, compared to 8 in each row for a letterbraid, whether the letterbraid is made with 10, 14, or 18 loops.
Learning how to make all those braids prepares the fingers, but also helps you (and your fingers!) understand two-layer braids better, which is a big help when learning one with a lot more braiding moves. Even if the moves are new, they will make sense, which makes them easier to learn and remember.
The trickiest parts of this solo method to explain (and probably to learn) are the inner two loop transfers of each hand. These are the loop transfers that involve the three loops held on the d-finger(s).
Practice this 14-loop braid as a divided braid first, keeping the upper and lower layers of the braid completely separate. If you can braid them so they come out as completely separate layers, you can be fairly sure you are doing the moves correctly. The letterbraids are braided as two separate layers except for the pick-up patterned letters, which connect the two layers together.
Start with all dark shanks in upper position.
[nb: the shank that must be considered the upper shank of a thumb loop is not obvious, this is covered in all my tutorials that involve using the thumbs.]
Each time you transfer a loop, make sure it hasn’t turned over—that the dark shank is still uppermost with no twist to the loop. If the two layers of the braid keep getting connected together, you are either inadvertently turning some loops (probably the thumb-loops), or are reaching the wrong way through some loops to perform the loop transfer (probably during the 2nd braiding move – the ‘upward-moving’ loop transfer). In either case, review my solo Nun’s letterbraid video and practice that braid, the loop movements are very similar.
Down vs. Up: Refers to the palms-facing position when braiding. A loop transferring UP is heading ‘thumbward’, a loop heading DOWN is moving toward the little finger/ toward the center of the braid.
Inner loops vs. Outer loops: Turn both hands palms-up to display the loops. Inner loops are towards the little fingers; outer loops are toward the index/thumbs. Usually also applies to the braid itself – outer loops represent the outer edges of the braid, inner are near the center of the braid.
L=left; R=right.
Lth,La, b, c, dLow, dMid, dHigh = left thumb, index, middle, ring, little finger-Low, little finger-Mid, little finger-High (OR the loop on that finger).
Operator finger / fetcher – the A and sometimes the B finger of opposite hand that performs the interlacing move by pulling a loop through another loop or loops.
Starting set-up: Each hand holds 7 loops. Each d-finger holds 3 loops – 1 at each joint – and all the other fingers hold 1 loop each, including the thumbs. Except for d-low, loops should be held at least halfway along the finger for braiding, not down near the palm.
Lth, La, Lb = Traditional left braider’s La, Lb, Ld.
Lc, LdLow, dmid, dhigh = Trad. left braider’s RIGHT d, c, b, a, respectively
4 loop transfers occur on each hand, so 8 altogether in each braiding cycle (‘row’ of braiding), plus a loop-exchange move at the end of each cycle. The “fetcher” (operator) fingers are the a and the b-fingers of the opposite hand. The operator finger always transfers a loop from one finger to another finger – it does not keep the transferring loop, but does temporarily hold it while shifting and/or other moves occur, before setting it down on its new finger. The operating finger holds its own loop low, and carries the transferring loop(s) high.
After all 8 loop transfers are done (both hands), the dHigh loops of each hand are exchanged (the outermost loops on the little fingers).
All 7 loops on a hand perform the same movements, in the same order, that they do when they are held across the two hands of a braider making a 7-loop spanish braid. The braider performs whatever motions are necessary to get the loop to go where it should!
1st move: Left hand’s thumb loop goes through only the loop next to it, the Left index loop. Use your Ra/Right Index finger to fetch it. [this exact move is demoed in my solo nun’s letterbraid video, though in that braid it’s the third transfer. It’s very important to understand which shank is “upper” and which is “lower” on the thumb when transferring or shifting loops to and from the thumb so you don’t inadvertently turn a loop in moving it to or from the thumb! “Upper” does not mean “as it appears on the thumb,” it means the strand in question leads to the UPPER layer of the braid. The upper thumb strand is the one that is nearest to the other hand when palms are facing each other).
Before setting the transferring thumb-loop onto its new finger (the left a/index finger), shift the A-loop up to the now empty Thumb. The transferring thumb-loop stays on the operator finger until that loop-shift is done, then it is set onto its new finger (La). This is what I call a “temporary hold.” Shift index/a-loop to the thumb exactly as pictured in my 9-loop square braid tutorial.
2nd move: Lc/left ring loop transfers “upward” (in the opposite direction of the first move), through 2 loops: Lb and La. It will end up on the index finger (after the two loops it just went through are shifted down one position to make room). Fetcher finger is Ra/right index. Warning: Bring “upward-moving” loops through the other loops in the correct orientation!–watch the first and fourth loop transfers in my Nun’s letterbraid video. For these transfers, the operator finger must reach through the passive loops from “behind” – back to front to fetch the transferring loop – same orientation used in braiding an A-fell square braid, except that the fetcher finger is on the opposite hand. “Upward” means the transferring loop’s direction of movement is towards the thumb/ away from the little finger.
Third move: Left d-High, the tip-most of the left 3 d-loops, goes through only one loop: Ld-Mid. (Structurally, this loop movement is a mirror-image equivalent of the first loop transfer, even though it looks so different on the fingers.)
I do this by using an “outside-around” move. I don’t physically move the “transferring” loop at all. Instead, the fetcher finger (Ra) lifts the middle of the three left d-loops, and brings it over/around the “transferring” tipmost d-High loop, then holds it temporarily throughout the following transferring and tightening moves (it will eventually be placed in D-High position of the same finger). The net result of this move is that the tip-most loop (d-High) “moves” one position toward the thumb through the middle d-loop – even though it wasn’t physically moved. [A recent video of mine shows this type of “outside-around” move, though it’s for a different braid. It’s the first loop transfer shown in the video, at 3min30sec. In the video I lift TWO loops over the outer little finger loop, but here in this 14-loop letterbraid, only ONE loop (the middle loop) is lifted over the outer loop.]
The next (4th) transferred loop will travel in the opposite direction, “downward”—away from the thumb.
Ok, before moving on to the 4th transfer, here’s a crucial part: Keep temporarily holding that Ld-Mid loop on the fetching (Ra) finger for a while!
Use Rb (right middle) as fetcher for the next move.
4th move: Use Rb (R middle) to fetch Lc/left ring loop through the 2 remaining D-loops, then Rb temporarily keeps that transferring loop during the following loop-shifting and tightening moves. (After that the loop will end up as the new middle d-finger loop (Dmid). Fetching Lc through the two Ld loops feels awkward at first, but your hands will get used to it.
1st Tightening move, left loops:
The two ‘left’ loops that are being temporarily held on Right A and Right B are stretched away from, and tightened against the rest of the left loops on the left hand. Stretch the two hands apart to tighten all the left loops.
Last left loop-shifts and setting down Ld-loops:
You are already temporarily holding two left loops, one on Ra and one on Rb.
Now use the tippy-tip of Rb to temporarily hold yet another loop: the outermost loop on Left d, so the lowest loop on Left d can shift up to (vacant) Lc (L ring).
Set all 3 temporarily-held loops of Right B and Right A onto the Left D (little) finger, as one move. Left-to-right: tip-most Right B, then next Right B, then Right A.
They will end up as Ld-Low, Ld-Mid, and Ld-High, respectively. This can be done in one simple set-down move.
Left half is done.
Repeat all moves in mirror-image for the right loops.
Finally, exchange Rd-high through Ld-high, give a slight tug to tighten.
(Exchange: Set Rd-high onto the tip of Ld. Then use Rd to lift the original Ld-high up and around the new Rd-high loop, and off the left d-finger, to be the new Rd-high loop.)
I do two main tightening moves in this braid, after the 4th transfer of each hand. I only do a slight tightening, just a little tug, after the final loop exchange. I keep my eye on the fell – the just-braided section — every time I tighten, and adjust the tightening accordingly. The letters have a tendency to slip into a slant one way or the other if you don’t keep an eye on the braid when tightening, and do it with conscious attention, rather than automatically. If I need to re-tighten after the final loop exchange, I tighten first the left and then the right loops. I lift the left d-loops off the left d-finger (using Right index/Ra) and stretch the two hands apart, then replace the loops. And repeat in mirror-image with right d-loops.
This braiding method is cumbersome to write out but not to do, after you are used to it. It amounts to two pairs of braiding moves on each hand: a ‘down’ and an ‘up’ transfer with the outer loops, followed by an ‘up’ and a ‘down’ transfer with the inner loops; then a tightening move, then the same thing done in mirror-image on the other hand. The last move is the loop-exchange move between the two hands (d-high little-finger loops are exchanged, right loop through left).
As I noted above the main tightening move should not be after the loop-exchange, but after the left loops are braided and then again after the right loops are braided.
Leave a note below or send a mssg thru my contact form if you are trying this braid and want more details. Btw, there are always other ways of accomplishing the same loop movements. I used to do them slightly differently than I described above. For any of these loop transfers, you may find a way that works better for you than the particular method I use.
The lettershapes:
These are made by turning certain loops on the hands before performing a row of braiding moves (described above). The charts of each letter-shape show which loops to turn before each row. Actually, they don’t in fact say which loops to turn, they show whether the dark or light shank of the loop should be uppermost on the finger, for eight of the finger-positions:
Thumb, A – Dmid, Dhigh of both hands (equivalent to the A and B loops of all four hands of two braiders co-operating as a team).
If the correct shank color is already uppermost, you don’t turn the loop; if it isn’t uppermost, you do turn it. Only the loops in 8 of the 14 positions on the hand are turned (or not turned) when following the charts. If you are a team of two braiders, each braider only has to turn (or not turn) 2 loops of each hand in following each row of the chart. For my solo method there are 4 loops on each hand to check against each charted row.
This process is taught in simpler braids in my recent series of tutorials on pick-up patterning. (The difference is that with simpler braids, it is much easier and quicker to turn the loop while doing the loop transfer, rather than ahead of time, so that is how I teach it in in this series. In contrast, for most of the letterbraid methods, the chart is checked and loops are turned on the fingers before the braiding moves of each ‘row’/ repetition.)
[Note: A pattern-chart can only be used with ONE of those two methods of turning loops! A different pattern chart would be required if the braiders were to turn their loops while doing the braiding moves from the chart that would be used if the braiders were to turn their loops before doing the braiding moves.]
last updated Dec 24, 2022
© 2011–2022 Ingrid Crickmore
See full copyright restrictions and permissions at the bottom of the sidebar (if you are on a small device, the ‘sidebar’ may appear somewhere other than at the side of the screen).


I want to do the 10 loop letter braid with a friend. You said you could tell us the sequence we would need to do that. Also is there a different sequence we would need for the 14 loop letter braid.
Debbie
[Edited/shortened since posting Joy Boutrup’s instructions for the traditional 2-person method for making the 10-loop Nun’s Book letterbraid]
I just posted instructions for the 10-loop Nun’s Book letterbraid, from Joy Boutrup’s 2009 publication of her reconstruction of that method (after getting her permission to post it here). I have no video for this two-person method, but it is based on a relatively simple solo-braider 5-loop Spanish braid, which I could possibly make a video for. But Joy’s instructions seem fairly clear on how to braid it… (? readers may disagree with me on that, please let me know. If prodded I might consider finally making another how-to video! It’s been a long time…)
If you have any questions, email me through my contact form (hover on the About tab in the top menu on a laptop – it should be under the 3 bars on a cell phone screen), and I’ll reply via email. Or leave it in the comment field for that new post, it might help others if I answer it there. Either way is fine!
Yes, after you do the 10 loop letterbraid, the 14-loop one could be next. Same concept, but different moves and different charts, and a few more loops. Each braider doing the moves of the 7-loop Spanish braid that I already have a tutorial for.
I’m jealous, it’s really fun to braid as a team!
Pingback: Braids 2025 Workshop! | Loop Braiding
Hi Ingrid you are amazing Do you know have a tutorial for letter braiding also. Inspirational you are.
Yes, for one of the two 10-loop letterbraids, the one called the Nun’s Book letterbraid – this site now has a two-part tutorial for how to braid it as a solo braider. Not one for the traditional way it would be done by two people working together with 5 loops each, though.
It’s probably best to learn 10-loop double braids as a solo braider first. Both have the same number of loops, but the letterbraid has twice as many moves as a double braid. Then on top of that, to make the letter-shapes you also have to turn various loops differently in each row, following a chart for each letter, so it gets even more complicated.
All my tutorials are listed on my Tutorials page, click on the menu tab that says Tutorials on my website (loopbraider.com)
There are text directions for how I make the 14-loop letterbraid, at the bottom of the 7-loop Spanish braid tutorial. If you learn how to make the 10-loop letterbraid first, these text directions would probably make a lot more sense!
Hi there, is this braid possible starting without ends? I also don’t get how you do 7 bi-colour loops, because if you fold 3 you get six bi-colour loops but then you can only add a single colour for the 7th?
Yes, the spanish braid can also be started with no ends. To make that single “odd” bicolor loop: Start with a length of dark and a length of light, each length TWICE as long as you want your loop to be. Then, split each length in half lengthwise, so that each length is half the normal thickness. This is easiest to do with embroidery floss, it is meant to be divisible, but can be done with some other yarns as well. You will only use one half-thickness of light and one of dark – discard the other halves.
Then fold each of those two strands in half, and link them together at the top (where the fold is), so the two lengths are linked around each other at the top. Tie the ends (all four of them) together at the bottom. Keep the two dark strands together as if they are one strand, and the same with the two light strands. Since they are all half-thickness, each doubled strand will now be as thick as a normal strand, and the two colors will be linked together at the top with no knot, and tied together at the bottom. Just add it into the braid’s starting setup alongside the other doubled loops.
Ok, if your threads are NOT divisible: In that case, I make one single “odd” bicolor loop, with extra- long ends at the top, above the top knot, say 3 inch long ends… I tie the knot at the top as a slipknot, so I can undo it easily later. After the braid is done, I pull out that slipknot at the top, and then I thread the two ends onto a needle and sew them down inside the braid to hide them. Don’t just cut them short at the top or they will eventually unravel down the braid.
It may be that even if your thread isn’t divisible, you could try making a linked bicolor loop for the extra loop without dividing the strands first – it would be a double-thick loop, and see if it made any difference to how the braid turned out. Dominic did that for a letterbraid and reported that it looked fine. (I can’t remember why he needed to do that for a letterbraid, since they all have an even number of loops…)
Good luck!
And now a second question –
In this blog you comment that you make a 14-loop braid with 3 loops on your d fingers and that you do 4 exchanges on each hand – what’s your secret to this?
I curious because I don’t have anyone else to help me make letterbraids…
edit 3-31-13: I recently added more info about exactly how I do this. See above, under “My Solo Braider Method“. I’ve also edited my reply below to add links to my new double braid tutorials…
Hi Doug,
Thanks for being so interested!
The secret to doing the 14-loop letterbraid as a solo braider (my method–there may be others) isn’t a trick, it’s a progression of skills:
1st. Get comfortable using thumbs as well as fingers.
2nd. Learn how to making braids that have more than 2 loop transfers in each braiding cycle, like the 7-loop Spanish braid above—it has 4 loop transfers, like a double braid. (The letterbraids have 8.)
3rd. Learn how to braid holding 2 loops and then 3 loops on the d-finger.
(It doesn’t matter which order you learn no.2 and 3…) At that point, you’d be able to learn how to braid double braids of 12 to 18 loops. After that you could put it all together with the 14-loop letterbraid. It’s basically two 7-loop double braids side-by-side. Each hand holds all the loops of one 7-loop Spanish braid. The other hand’s A-finger performs the loop transfers (and helps a bit with the loop-shifting).
However, there are two other letter braid methods that require only 10 loops–both are described in Joy Boutrup’s book (as 2-braider methods). You could learn my solo-braider method for those right after step #2, since you would only be holding one loop per digit, no doubled or tripled loops.
Btw, all three steps are fun and rewarding in themselves—they represent a lot of great braid possibilities aside from the letterbraids!
If you have already made 9-loop braids, I’m sure you could learn this stuff pretty fast, but it will be a while before I can tackle writing up those tutorials. I can teach you in person, if you are ever in the San Francisco bay area (California). To form the letters you would also need to get Joy Boutrup’s book—whether you make them with her 2-braider method or my solo-braider method you would use the same charts—there’s one for each letter.
Thanks again for commenting!
Thankyou Ingrid Im just reading up on all the posts. I’d love to visit however i live in New Zealand. x
Yes, I’m on the other side of the world in California! Thanks for reading and commenting!
Hello!
Firstly, what a marvelous blog!
Secondly, i have been asked by a friend of mine to make a fingerloop braid incorporating a bird-shape (her last name is Crowe) and I don’t want to disappoint, any suggestions? Skill-wise, the most I have worked is a 9-bowe lace, but I understand the theory of multiple bowes per finger, so as long as it’s not 18+ bowes, I should be OK.
Doug
Thanks!
Hmmm, a bird-shape, that might be possible with the 14-loop letterbraid. Besides the letter-shapes, several non-alphabet symbols were described in the 17th C. manuscripts that Joy Boutrup recently decoded–including a spider and a not-very-realistic fly. No bird, but that doesn’t mean it wouldn’t be possible to come up with one, and it’s a great idea…I did come up with an “&” symbol by fiddling around with the “E” and “C” shapes but haven’t tried any other original shapes, and I’d like to try more. (someday! I can’t start on it now, there’s too much piled-up stuff I need to catch up on now that I’m home). The funny thing is that I just bought a large bead in the shape of a crow (at a bead store in Port Townsend, WA)–so what I would do myself would be to thread that onto a braid, that’s the only idea I can come up with on the spur of the moment…
I’ll keep it in mind, though–if I run across anything or come up with a bird design I’ll let you know. (and if you come up with a bird braid yourself, send me a picture or a link if you can, I’d love to see it!)
Hi again, Doug–do some of the braids in my recent post look like they have bird-patterns to you? They are all 8-loop double braids, no thumbs, just one loop on each finger…Only occurred to me after I loaded the picture that 2 or 3 of the patterns looked a bit bird-like.
–Ingrid