Click link to return to main post on Longer Loop Braids
Details on the Basic ‘Center Start’ method for making an extra-long fingerloop braid (below), and
‘Seamless’ / 2-combs version of the Basic Center-start (further down page)
The Basic Center-start is the center-start method I use the most. The ‘center’ might not be at the actual center-point of the braid. In fact, I sometimes purposely place the ‘center-point’ way off-center, if I’m planning to use my “caterpillar” loop-shortening technique on only one end of the braid.
Short version: Begin braiding at the center-point of an extra-long loop bundle of loops. The loops must be free at both ends of the bundle (the bundle should only be tied together at the middle). Braid from the middle to one end, then untie the knot in the middle, and start again from the center – but in the other direction – to braid the other half of the braid. Make sure there is no knot or string cinched around the center-start when you begin braiding the second half, or the braid will have a loose, gappy area there. Tie or connect the already braided section of the braid onto your attachment point, don’t attach at the join/ midpoint or onto any of the loose unbraided strands.
Details:
I start by making all the loops I will need as separate, individual loops, not all tied together into a bundle. I make the loops longer than I want the finished braid to be – I allow a lot of extra length for take-up, as well as a few extra inches for both ends of the braid, since it’s not possible to braid all the way to the ends of the loops. If I don’t intend to use my second longer-length strategy as well (‘caterpillars’–see step 2 back on main post on Longer Loop Braids), I make sure that the total loop bundle length is no longer than the width I can spread my arms apart. (This is twice my normal maximum length for a braid).
I align the loops side by side, and then at the mid-point I make a big fat slip-knot of all the loops together. (A slip-knot is a knot you can pull out easily later—like a single crochet-chain stitch.) I make this knot at the approximate center of the loop-bundle, not at either of the two ends.
NOTE: I don’t tie a string around the loop bundle for this, it wouldn’t hold the loops securely enough. Even a constrictor knot probably wouldn’t be tight enough if there are a lot of loops. Instead I tie a big slip-knot using the whole loop-bundle itself.
Then I use a length of string to form a “hangman’s noose” / header cord to suspend the bundle of loops for braiding. I fasten the noose/header below the big center-knot, surrounding only the loops I will be braiding with (not catching onto the other half of the loop lengths—I let those fall free of the header string). I use this header cord exactly the way I demo in my Start Here 5-loop braid photos—treat that big slip-knot at the center of the loop bundle just like the top-of-the-braid overhand knot in my 5-loop tutorial photos. Tie this header cord onto a firm, fixed point, and you are ready to braid one half of the braid, outward from the big center-point slip-knot.
Unless even the loops on that half are already too long to braid with. In that case I add my other longer-loop-braid technique: step 2 Shortening the loops into caterpillars (described in main post on Longer Loop Braids).
After braiding to the end of the first half, I remove the header string, and pull out the big slip knot at the center of the braid. Then I use the already-braided section to tie onto my fixed point, and begin braiding the second half—outward from the center point again (the center-point should now have no knot or cord encircling it). I tighten carefully at that second start from the center, to prevent a loose area, or any loose threads at the center-point/ join between the two halves of the braid.
That’s the type of center-start that I use the most. For a braid of more than 9 loops, or one that is more complex than a square braid, I also often use two big-tooth combs while setting up: I park the loops at each end of the loop bundle onto a comb (and secure them with a rubber band) before tying the center slip-knot. But there are pros and cons to doing it that way! described below.
The Seamless Center-Start
Note: this start may be the only way to have a flat braid stay completely flat at the center-start area between the two directions of braiding – other center-start strategies will result in a constricted, thicker area at the join.
These days, when I’m setting up for a Basic center-start braid, I always mount my loops onto two combs (one comb at each end of the loop bundle). I do this first, before I tie the big slip knot in the center of the loop bundle. Each loop is mounted in parallel between matching teeth on the two combs, with no twists in the loop between the two teeth it is resting on, see photo further down.
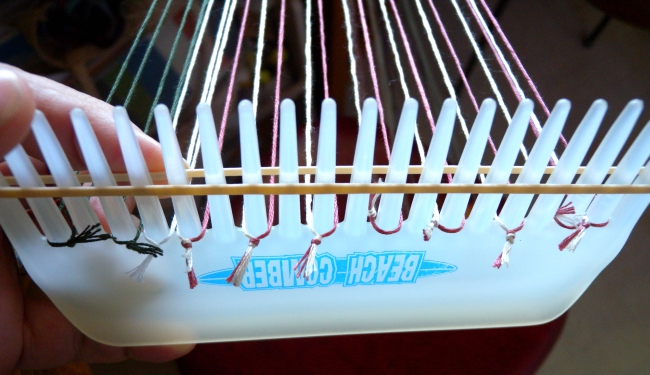
Closeup of loops on a comb. Other end of each loop would be mounted on a second comb, in parallel fashion. Loops do not need to be stretched tight like this between the two combs.
I put a rubber band around the comb to keep the loops secure. The rubber band encircles the comb above the loops, and acts as a barrier that keeps the loops from falling off. (This is also how I lay loops down to take breaks while braiding.)
I don’t try to lay the loops stretched out straight and parallel between the two combs while mounting them—there’s not enough room on my table for that. As long as each loop has been correctly loaded, it’s fine for them to lie together in what looks like a jumbled heap.
I load one end of a loop onto the first comb, then run my finger along/ through the whole length of the loop before placing the other end onto the second comb. That way, I can be sure that there is no twist in the loop, even if it looks like a tangled mess lying on the table.
I do stretch out and straighten all the loops between the two combs before tying the big center slip-knot that I will be braiding from. To find the center, I usually hook the loop bundle around my C-clamp, and then back up holding the two combs side-by-side.)

Warped and ready to tie a center-start knot. NOTE: knotting up ‘caterpillars’ at both ends of the braid to begin with was a mistake! Its best to only knot up the side you are about to braid (after tying the slip knot at the center). Braid is an 18-loop flat double braid
Note: It made a nice photo, but shortening the loops of both ends of the braid into caterpillars before braiding was a big mistake! Now I know better: After tying the center knot, it’s best to shorten only the loops of one end into caterpillars – the end you are about to braid. For the braid in the photo above, I had to spend a lot of extra time undoing and redoing several of the caterpillars on the second half, because the lengths of their shortened loops had become very different by the time I got around to braiding that half of the braid. It’s awkward for any braid to hold loops of different lengths on the fingers, but it’s impossible when there is more than one loop on a finger, as with this 18-loop braid.
With this 2-combs set-up, the loops on the other end of the braid are in perfect (reverse) order when I pick them off their comb to braid the second half of the braid.
However, this is not necessary! If it seems like a pain, don’t bother with the two combs. I braided center-start braids for ages without using two combs to set up the loops. After finishing braiding the first half, I would use the braided part itself to tie it onto the C-clamp, undo the center slip-knot, pick up the loose, unbraided loops of the second half, separate them into their correct left and right halves, and continue braiding. As I continued braiding, a small, god’s-eye-like ‘blip’ would form at the center-point between the two halves of the braid, nothing very glaring, especially if I made sure to tighten well at that center-point. In fact, you may find this preferable to dealing with the double-comb set-up, especially for 9 or fewer loops.
The problem with the “perfect” loop set-up on the two combs:
If you did it perfectly, when you start braiding the second half, your regular braiding moves will start UNBRAIDING your braid!
That’s because your already-braided section is essentially positioned upside-down at the center-start point, and at that end of the braid the loops are in the opposite order – in A-fell order if you braided the way I teach here using the V-fell order of braiding moves.
In fact, for braids of 7 loops or fewer, you could now switch to braiding with A-fell moves, and have a completely seamless join between the two halves of the braid! (In doing this, however, I found that my A-fell braiding is inevitably looser than my V-fell braiding, so the two halves of the braid had visibly different tension.)
On the other hand, if you now continue braiding with your original V-fell moves on this perfectly set up and reversed 2nd half of the braid, you will start to undo what you just braided! Remember, the two methods unbraid each other. (I’ve even unbraided at this point on purpose, if the beginning of the braid had a mistake, or if I wanted the midpoint to be at a different point in the pattern repeat.) This never happened to me back in the days when I didn’t put my loops on two combs. It could have happened, though, if just by chance I had ever picked all the loops up in exactly the right order, and with none of them turned.
Turning the braid over—making the upper surface the lower surface for the second half—may solve this(?). I haven’t tried this, but it seems likely. Another solution might be to turn some or all of the loops over once on your fingers before starting on the second half. Assuming this works in preventing the braid from undoing, both solutions would result in that symmetrical gods-eye-like “blip” I mentioned earlier.
My preferred solution:
To continue the 2nd half of the braid with the same V-fell braiding moves, and with an almost-seamless midpoint, I first undo the loops from their A-fell order, one hand at a time.
In an A-fell braid, if you examine the path of a loop from the fell (bottom of the braided area) down to the finger it is held on, every loop on a hand passes through or around the other loops of that hand, on its way to the finger. This is not the case in a V-fell braid—in a V-fell braid, each loop comes straight from the fell to its finger, without passing through or around any of the other loops of that same hand.
So, undo these loop crossings! Do this on one hand’s loops at a time, without moving any of them over to the other hand. You will undo the loops of each hand into an order that is more “V-fell-like.” You simply pull them through each other, in sequence, replacing them onto other fingers of that same hand. (see note re doing this in the opposite direction, for an A-fell braid.*)
When you are done, on each hand the loops should be in the opposite order on the fingers than they were before. (This will not be a problem for the braid’s color pattern!) Check along each loop from the finger all the way up to the fell of the braid to make sure that no loop passes through any other loop of the same hand. That is how the fell of a V-fell loop braid should look.
Now, when you continue braiding with V-fell moves, the braid won’t undo. And amazingly, there will be (almost) no visible irregularity at the junction between the two halves of the braid, even though the angles of the threads will reverse themselves at that point. For a flat braid, you need to be sure that you are making the one turned transfer on the correct side – this might well seem like the opposite side than before, because the braid will probably be turned around, now, so if you were turning the left transfers before, now you will be turning the right transfers. There will be a symmetrical float of two threads at the join—see photo below. (I suspect those centerpoint floats would have been less glaring if I had made the turnaround point in a white/orange area instead of at the one all-black loop.) But there won’t be a bump or round god’s-eye-like section at the join, and a flat braid will still open out to be perfectly flat there at the midpoint join area.

The center-start of this flat 7-loop wool braid shows as a wider v-shaped black float, upper left in photo. On either side of this center-point, slants of the pattern are reversed. Color pattern setup available here.

In progress. Starting the 2nd half of Joe’s braid. 18-loop “double braid”, flat version.*
Here I have just started the second half of Joe’s braid—you can see the finished first half hanging down on the left and heading towards my lap. The bits of colored string hanging from the loops are color codes I attached to the ends of the loops. I tied a piece of embroidery floss onto the end of each loop—in color-wheel order (red, burgundy, purple, blue etc)—to help me keep track of their correct order on my fingers. I rarely do this, but would again with a long complex braid, especially if most of the loops were the same color (makes it harder to notice that they are out of order when you make a mistake).
*Double braids have eight ridges, compared to the four ridges of a square braid (‘ridges’ are the lengthwise-to-the-braid columns of stacked diagonal strands). Even though it has 18 loops, Joe’s braid is structurally not much different from a 10-loop flat double braid. In the 10-loop version these ridges are twill passages of “over 2 strands” (for the most part). The 18-loop version has the same eight ridges, just wider—each thread passing over a span of 4 threads.
Click link to return to main post on Longer Loop Braids
*Take-up refers to the length lost while braiding. Loops don’t travel in a straight path down the braid, they travel diagonally back and forth across the width of the braid, so the finished braid will be noticeably shorter than the loops you started with. Take-up varies, you lose more length with wider braids (more loops, and/or thicker thread). Probably tightness or looseness of tension would also affect take-up. Don’t forget to add in a few extra inches for the knot and tassel at the top, and even more for the end, as you won’t be able to braid all the way to the ends of the loops.
You really need to do a test swatch with your chosen material and braiding method to find out how much extra length to allow for a braid. I give the examples below just to show what the range might be:
My 7-loop “Whole Nine-Yards” square braid made with embroidery floss started out as a 9-yard-long loop-bundle, and finished as a 7 yard, 1 foot braid.
A 5.5 foot long, 18-loop flat double braid made with sport-weight cotton yarn (about twice the thickness of embroidery floss) started out as a loop bundle that was 10 feet long plus a few inches extra, though I did cut off some extra inches of unused loop-length after finishing the braid (maybe 5 or 6 inches?).
*For A-fell square and flat braids:
The same loop-rearranging trick works for an A-fell center-start braid: At the start of the second half of the braid, loops will be coming out of the center-start in V-fell configuration. So on each hand’s loops, one-by-one pull the inner loops through the outer loops, til they are all in proper A-fell order.
In an A-fell braid, the loops on any one hand all cross each other as they head down from the braid to your fingers. Each loop passes through and/or around other loops of that same hand. In contrast, the loops of a V-fell braid do not pass through or around any loops (of the same hand) on their way from the braid to the fingers.
Pause your braiding sometimes, and take a look at the loops coming out of the fell – the bottom of the braid – to get used to how they should look. This can be a big help later when trying to replace a dropped loop correctly, as well as for doing this (optional) center-start rearranging… In an A-fell braid, the loop that heads out from the middle of the braid will end up on an index finger – an outer finger – after passing through all the loops of one hand. The loop that starts from an outer edge of the braid will end up on your ring or little finger as one of the two innermost loops, passing around all the the other loops of one hand. The other loops will also pass through and/ or under loops in their path from the braid to your fingers, all in a very clear sequence.
For DOUBLE braids and others:
The rearranging tips above are for square (or flat) braids. Other braids don’t necessarily have an A or V-fell.
Double braids for example: Their loops can also be rearranged back into the correct starting arrangement after the turnaround point of a center-start braid, but it will look different than the simple A or V -fell loop arrangements for square braids. After you get familiar with how loops should look at the fell, you’ll be able to figure out how to undo or redo the loops back to that same arrangement after the center-start turnaround point.
Click link to return to main post on Longer Loop Braids
Last updated Oct/15/2020
© 2011–2020 Ingrid Crickmore
See full copyright restrictions and permissions at the bottom of the sidebar (if you are on a small screen device, the ‘sidebar’ may appear somewhere other than at the side of the screen).

