Part 2 on two-person fingerloop braids done by a solo braider: Flat double braids. (also Color-linking to create borders and other color-patterns)
[ Part 1 introduced the basic instructions for double braids as a solo braiding technique, and taught solidly rectangular, and divided double braids. Part 3 teaches the hollow version of the double braid. See top of Part 1 for links to other Double Braid types. Historical note re flat braids at the bottom of this post.]

This flat, ribbon-like braid is one of the twelve or so shape variations of double braids. The braiding procedure is the same, except that here you will only be turning one of the 4 loops that you transfer.
[See footnote *² for some non-essential fine points about turned loop transfers in solo-braider double braids.]
In my first double braid tutorial, I taught the basic braiding moves, and 2 of the 12 shapes: the divided braid (2 separate layers), and the solid rectangle braid (like two joined square braids). This new shape variation is similar to the flat variation of a square braid. It’s braided as a two-layer braid that opens out to be flat. However, it’s about twice as wide as the the flat version of a square braid – mostly because it’s twice as intricate. A flat double braid has 8 columns (the lengthwise columns of slanted threads that make up the braid) rather than 4.*¹
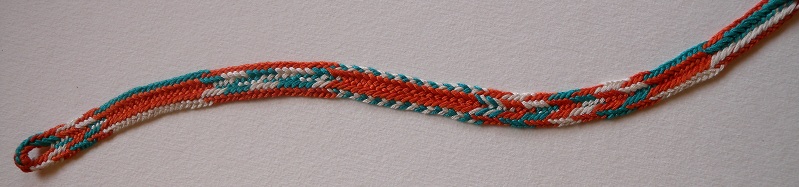
10-loop flat double braid, pattern sampler. (This is the braid I made in the videos. Wishing I had used better colors!) Each pattern is a short sample that could be used for a whole braid – shows how the same color set-up on the fingers can create one of several different color patterns in the braid, depending on how you turn the loops.
I first show how to do the basic braiding moves for a flat double braid. I then also show how to use a technique I call ‘color-linking:’ first for making a contrasting border color on the two edges of the braid, and then for making 4 lengthwise columns of different colors – see the pattern on the far right end of the braid above. I crammed these various color patterns close together in one braid for this video tutorial, but I think each pattern would look a lot better spread out a bit longer, or each to its own braid (and maybe with different colors than I used!). The color-linking technique is not just for double braids, by the way – it can be done with many other types of braids as well.
In this tutorial, I didn’t make a video for 6-loop flat braids. If you’ve already learned the 6-loop double braid from my introductory double braid tutorial, the 8-loop videos below should make it clear what you need to do with 6 loops. The only difference is that (with six loops) the first move on each hand would only go through ONE loop, not through two loops.
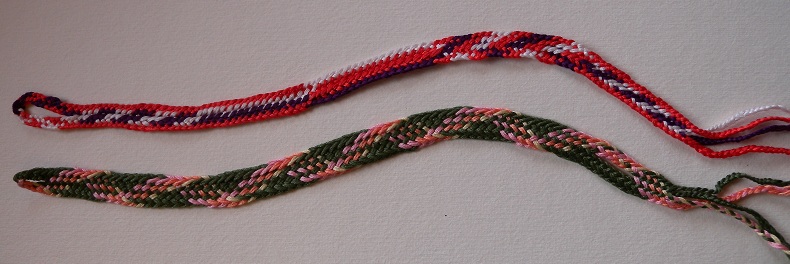
Two 6-loop flat double braids. Lower braid: 6 bicolor loops (each loop green plus one of 3 shades of pink-to-white) – no color-linking moves. Upper braid: 3 orange loops, 3 bicolor white/black loops; “color-linking” moves create the pattern differences (2nd pattern from end has no color-linking; 1st and last patterns are the same). Any of these color-patterns could be done for the whole length of a braid, I crammed them into one sample out of laziness!
One way to get columns of colors in a flat braid is by linking threads of different colors, rather than letting them cross each other. The first video shows one way to link colors (creating a border stripe on both edges of the braid). The second video introduces another way, which here is used to make two central columns of different colors. Color-linking can be done in most types of braids, not just flat ones, but it’s especially dramatic in flat braids! [update – I now also have a tutorial on using color-linking with square-type flat braids of 7 loops – simpler braids than these double braids]
The yellow, orange and gray braid in my right sidebar → is a flat, 10-loop double braid, like the ones I am teaching here. However, it had loop-linking in multiple parts of the braid, which is what created the various patterns. Its loops are all single-color loops — no bicolor loops.
Dan Gaiser sent me these photos of his great-looking flat double braid bookmark of three colors (blue, white and gray). In the lower half of his braid he linked loops during the final loop exchange, creating a blue-and-white patterned border with an all-gray center area:
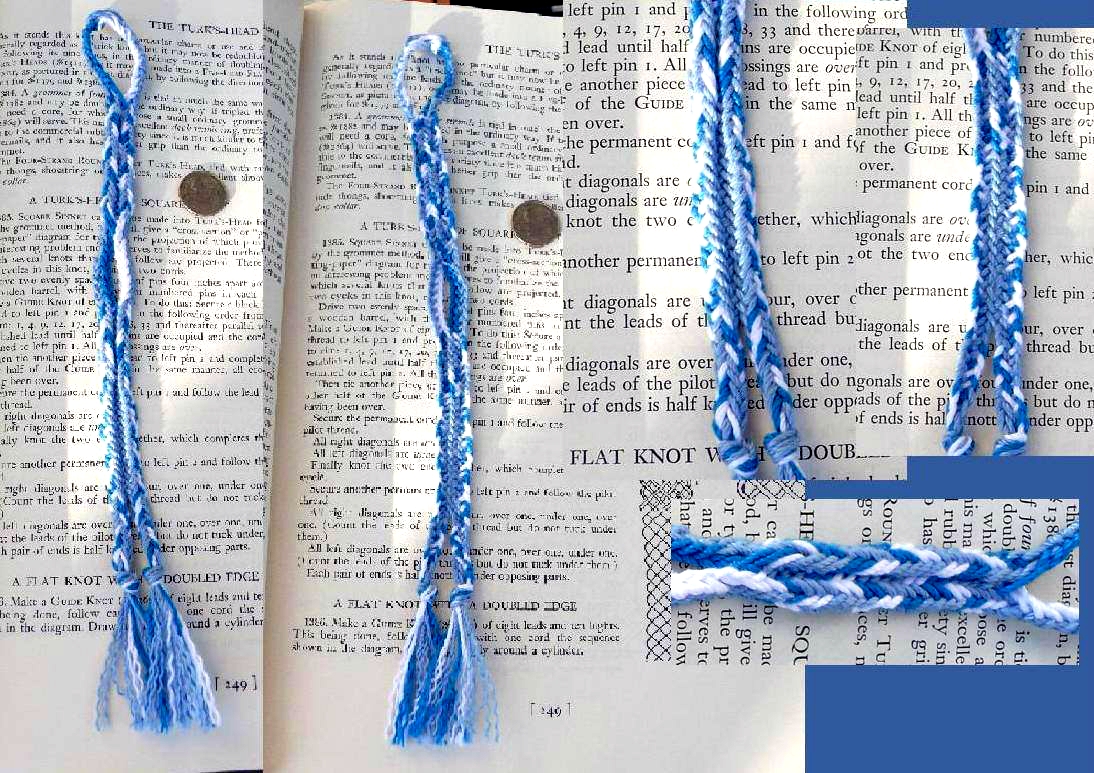
8-loop flat double braid, front and back views, by Dan Gaiser. Click photo for more detail.
His photo-montage shows the top and bottom surfaces of the braid. You might be able to notice in the photo that the braid doesn’t lie completely flat—a ‘cross-section’ of the braid would be humped/curved like a number 3 lying down. There are two lengthwise furrows down the braid. That’s how a flat double braid usually come out after being braided with this solo braider technique. On any of my double braid videos you’ll see that’s how my braid looks as well when I check it during the process of braiding. After braiding my usual practice with any braid is to stretch it across the width of the braid, and then wet-finish it (ie gently wash it in warm water) to help it decompress from the tension of being braided. After drying flat on a towel or hanging over a smooth round towel rod, the braids are full-width, and lie completely flat.
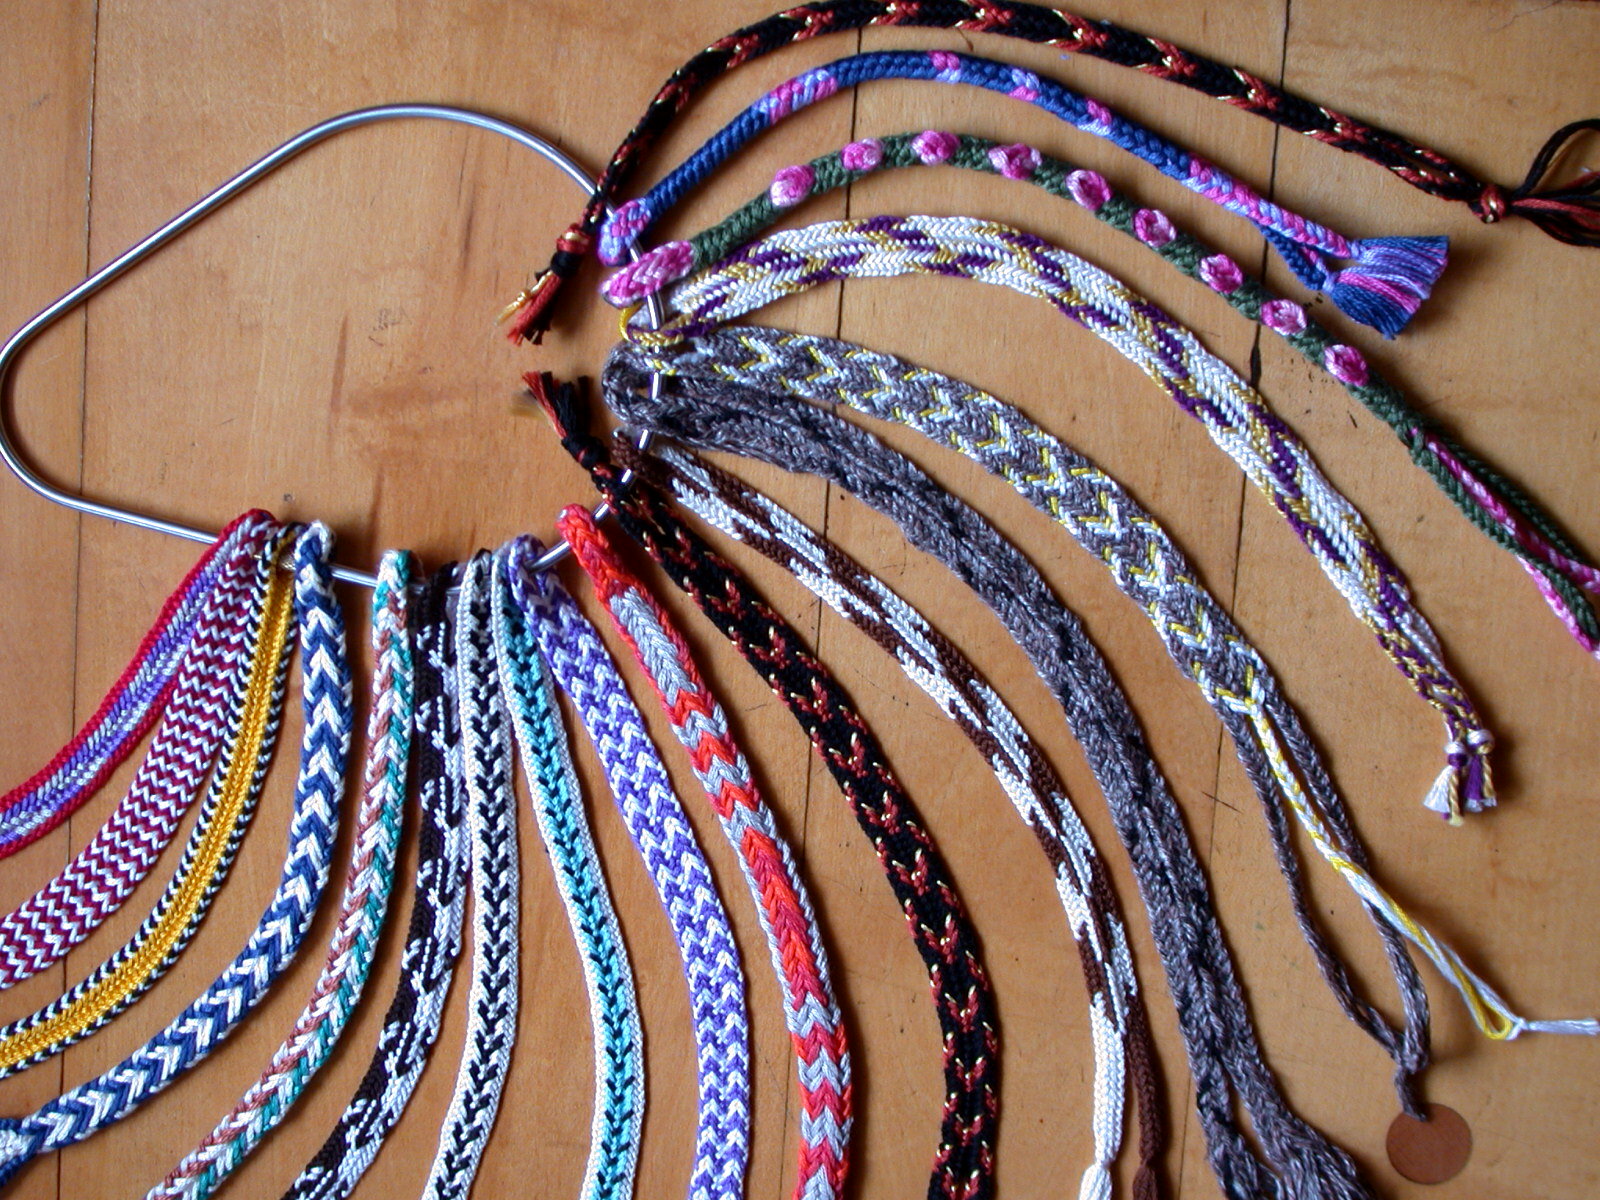
Update:The photo below shows a bunch of 8-loop double braids, many of which are flat braids. I just posted the set-up directions for making the flat and rectangular braids in this photo.
VIDEOS
To watch any of these at a slower speed, click on the “gear” icon at the bottom of the video screen, then on “playback speed” and you’ll be able to set it to slower-motion. (I’ve gotten some requests not to braid so slowly in my videos.)
I made these with no voice-over, so be sure to check any text above and below the videos for pertinent information.
8-loop FLAT double braid:
8-loop BORDERED flat double braid (below):
“Exchange Twice” color-linking: The video above shows how to make the flat braid with a one- or two-colored border on the edges of the braid. This involves a new way to do the loop-exchange (the second-to-last move, just before you tighten the loops). Here, you will do the loop exchange two times in a row, which links the two loops and creates a lengthwise border on the two edges of a flat braid.
With these bicolor loops, it’ll be a two-color border, having one white edge, and one blue edge. For blue on both sides, start with all-blue left hand loops, (no bicolor left loops). For a stripey or other pattern to the border, start with a mix of blue loops and white loops on the left hand, rather than only blue loops.
8-loop 4-COLUMN flat double braid:
The video above shows how to make a flat double braid with 4 columns of different colors. In the video I only used 3 colors for these four columns. If you want columns of 4 different colors, use bicolor loops for both the left and right hand loops—two colors for the left loops, and two different colors for the right loops.
“EXCHANGE TWICE” color linking: The two columns on the outer edges are made by the same method used in the previous video (linking loops at the final loop exchange by doing the exchange move twice).
“TURN TWICE” color-linking: The inner two columns of colors are made with another type of linking: Turning a bicolor loop twice while transferring it with a turn, instead of the normal once. I first show a simple way to turn the loop twice, then later in the video I show a faster way to do it as a single move, rather than two moves.
10-loop FLAT double braid (below):
Watch the left and right thumb transfers closely. The left transfer is “straight” (the loop does not get turned), while the right transfer to the thumb is turned, even though this is hard to see. Turning vs. not turning a loop looks very different when the loop will be placed on a thumb rather than on the index finger, because the thumb holds its loop in a different angle than the fingers do – the thumb holds the loop already bit turned.
10-loop BORDERED flat double braid (below):
“Exchange Twice” color-linking. Done just as in the 8-loop version.
10-loop 4-COLUMN flat double braid (below):
Below, in the single turned loop transfer (right middle finger to right thumb), the loop will receive TWO turns instead of one (“turn twice” color-linking).
I first show a simple way to do this, then later in the video I show a faster way. The faster way is actually easier for 10 loops than for 6 or 8 loops, because of the way the thumb holds its loop.
I also demo a two-color border (“exchange twice” color-linking), white on one edge, black on the other–not a great look on this particular braid! Just good for a demo, go ahead and pick better colors for your own braid.
P.S. I followed the advice of a reader/ viewer and made all the videos with no talking. This works fine for these videos as each one adds only one small new thing to the introductory double braid videos. I made a separate video for each of the different “tricks” for pattern variations, rather than cramming them all into one video, so I hope that makes them more digestible!
I’ve been staying with a sick family member who is computer-free, and unfortunately I don’t have a laptop to take along with me. I can only be home a few days here and there. So I’m making this post quick and barebones, without many photos. I had to make the 10-loop videos at night, which is why they are blurrier and yellower. It’s on my list to redo them at some point, but that might be a while…
If you want to watch these videos at a slower speed, click on the “gear” icon at the bottom of the video screen, then on “playback speed” and you’ll be able to set it to slower-motion.
In case you wondered why the ends of my loops were shortened into what I call “caterpillars” in one of the 10-loop videos (see my post on how to braid lengths longer than your arm-span): I had already braided the first few inches of that demo braid (braiding where I normally braid–off the edge of the table, not over the top of it). But when I moved the braid onto the table in front of the camera for filming, it turned out that the loops were too long for the space available in front of the camera-tripod setup. I didn’t want to cut the loops shorter, because of all the videos I was planning make using the same demo braid. So instead I slip-knotted the ends up into caterpillars for filming that segment. In the next video segment I filmed I had undone the slip-knots to let out the length, and tied the finished section of the braid onto the C-clamp to shorten the length from the top. (That’s why the ends of my loops are so wrinkled in that video!)
*¹ Unlike the simpler square braid, this double braid’s flat form will tend to look like a tall, narrow C-shape as you are braiding it—before you open it out to be flat. (This is not necessarily the case when this braid is braided by two braiders as a team braid, because their tightening process is quite different.) If you experiment further with other shapes of the double braid, you’ll notice that the hollow rectangle double braid will braid up in this tall shape as well. This is due to the tightening method I use for making double braids as a solo braider – tightening the whole braid as the last move, rather than tightening each half separately. With hollow and flat braids the two sides of the braid are pulled inward during the tightening moves. After being finished, flat braids unfold out to be flat regardless. With hollow braids, the final shape of the braid can be manipulated into whatever round or rectangular configuration the braider wants, but I usually prefer the “tall” rectangle shape (more about it in the hollow rectangle double braid tutorial).
You can see pictures of—and learn how to make—all twelve of these shape variations in my chapter in the Braids 2012 conference proceedings, obtainable through the Braid Society in England, or BraidersHand in the U.S. [update – I just repaired that broken link, it should work now!]
*² In the videos, I demo the moves in only one of several possible ways. The way I demo it, the single turned transfer is the right side’s outer transfer (the last loop transfer). The braid could just as well be done by turning only the left side’s outer transfer (the second loop transfer). In fact that’s the way I usually do it – on the left side. I demoed it on the right because I thought it might be easier to remember / learn if it were the last of 4 transfers rather than the second of four transfers. (Again, the order of those transfers is arbitrary too! Though you should stick to one particular order for the whole braid – if you switch the order of the 1st and 2nd or the 3rd and 4th transfers partway along the braid, it will create a mar in the braid and potentially change the color pattern.) If you turn both these two outer transfers (2nd and 4th transfers), you will get a hollow two-layer (rectangular) braid, not a flat, single-layer one.
I turn the loop in one of two possible rotational directions—I call the turn that I demo a turn ‘from above’.
It does not look like a turn from above! I only call it that because, if two braiders were making this braid together—which is the traditional way to make it—a braider (holding across both her hands the same loops I am holding on one hand) would turn the loop from above the loop to make the same exact turn I demo. I am holding the loops completely differently, though, so the phrase “from above” might seem very odd. Done by a solo braider, the move doesn’t look like a turn from above, because of the odd, backwards way you are reaching down to get the loop. But since there are always 2 possible directions to turn a loop, I want to accurately reflect the equivalent move that two braiders would be doing (the traditional double braiding method). The direction(s) you turn the loops can sometimes make a significant difference to the braid (though not with a flat braid).
In a 6 or 8-loop double braid, it would be just as easy to turn the loop in the other direction (a turn ‘from below’).
However, when you get up to a 10-loop double braid, it’s a lot simpler to turn the loop from above, because of the way the thumbs hold loops. In fact, it might not even be apparent that you are turning the loop at all when you move it to the thumb with this ‘turn from above.’ When you learn the 10-loop version of this braid from my video, pay close attention to the the two different ways I transfer the loop to the thumbs—on the left hand the loop does not get a turn, whereas on the right hand it does. (It’ll help if you bear in mind that the inner shank of the thumb-loop is like the upper shank of a finger-loop—it goes to the upper layer of the braid. Photo #3 in my 9-loop square braid tutorial shows this…)
The direction of the turn makes no real difference to this braid, the flat one, since it only has one turned transfer. You can do it in either direction, but be consistent—turn only in the same direction for the whole braid.
Update on historical background: Imo, flat double braids can be logically inferred to be known/made by the 15th C. in Europe, but they are not specifically mentioned in the 15th C. manuscripts. (They are described in the 17th C. manuscripts, in fact the Catherine Wheel braid is a flat “triple” / 3-worker braid). But flat double braids may not have been made before the 15th C. Noemi Speiser and Joy Boutrup’s research into extant historic European braid specimens found that double (and even 3 and 4-worker) braids from before the 15th C. seemed to only have been made with a loop exchange method that precluded the possibility of flat or hollow braids. Solid rectangle and Side-slit rectangle double braids can be made with that more archaic loop exchange method, though they would have a slightly different structure and appearance along the center-line of the braid. 2-or-more-worker braid artifacts with that archaic loop exchange method were noted from the 12th C. all the way up into the 20th C., including braids from the 15th C., so it didn’t disappear in the 15th C even though it’s not described in the 3 known loop braiding manuscripts from then. Both loop-exchange methods can be inferred from braid instructions in the 17th C. manuscripts. (See my recent history post).
Posted Feb 2, 2013. Last updated Dec/12/2022
© 2013–2022 Ingrid Crickmore
See full copyright restrictions and permissions at the bottom of the sidebar (if you are on a small-screen device, the ‘sidebar’ may appear somewhere other than at the side of the screen).


Hi Ingrid,
I really appreciate all the information on your blog, I’ve had a lot of fun learning all these different braids. I really like the patterns on the 10-loop braid you have on the margin of your blog page, the one with orange, yellow, and grey-brown thread, but I can’t for the life of me figure out the set up for it. If possible, could you tell me? I’d love to try and recreate it. Thanks again for all the tutorials and info!
Hi Crow, long answer follows!
(aside: if reading on a small-screen device, the ‘sidebar’ with this yellow, orange, and gray braid photo is way down at the bottom of the page, not on the side margin.)
I don’t know where that braid is at the moment, but I do know it had 10 loops and I’m guessing it was 3 yellow loops, 3 orange and 4 dark gray. You could try an 8-loop version by omitting the thumb loop in my setups below, but it might have very weak yellow and orange stripes. Try using a slightly thicker yarn for the yellow and orange in that case, or thinner for the gray.
This is a flat double braid like the ones I teach in the tutorial above. So you only turn loops on one side of the braid, and for only the outermost of the two loop transfers on that side. I think (?) in the videos above I demo turning on only the right outermost loop transfer (the one where you transfer from the right middle finger to the right thumb – the third loop transfer. But you could just as well turn only the outermost left loop transfer – that would be the the second loop transfer of the braid. (using the same color setup, one way the center lengthwise stripe will be yellow, the other way it will be orange. That center stripe actually forms on the right or left edge as you are braiding, on whichever side has the turned transfer.)
Color setup for the 1st pattern (about an inch long of lengthwise striping) – I’m ignoring the loop / buttonhole at the top of the braid:
Start with all the yellow loops on your outermost left fingers (thumb, index, and middle if using 3 yellow loops); all the orange loops on the matching right outermost fingers (right thumb, index and middle); inner fingers of both hands hold the remaining GRAY loops (left and right ring and little fingers, if using 4 gray loops).
Then, for that 1st inch of braiding you must link loops while doing some of the loop transfers (no linking required during the final loop exchange). I think (?) I demo both types of linking above. (As well as turning twice to link the shanks of a bicolor loop, which you won’t do here!) Essentially transfer TWICE during the first of the two loop transfers of each hand. (If this isn’t demoed in the videos above, it is definitely demoed in my tutorial for linking in a flat 7-loop braid – that’s not a double braid but the concept of linking by transferring twice is the same). This will link the loops instead of letting them cross each other, and keep the yellow (and orange) loops on only the thumb, index and middle fingers (they will rotate between them), while the gray loops stay on the ring and little fingers after each loop transfer is finished.
Note – in the videos above I think I used bicolor loops. Bicolor loops allow for lengthwise stripes of up to twice as many colors, but then you won’t get symmetrical colors on the two halves of the braid like in this sidebar braid. The patterns in this braid require single-color loops, not bicolor.
Other patterns in this braid are done by stopping linking until the colors have migrated to a new position, and then resuming linking.
In the first change of color patterns, I simply stopped linking – did regular braiding moves – until the yellow and orange loops had all switched hands and were now on the OPPOSITE thumb, index and middle fingers than the ones they had started out on. You can see in the braid that the yellow and orange colors switch there – for the first pattern the yellow is on the edges and the orange is in the middle (of the opened out braid) and then after the change, that is reversed in the second pattern. (the sort of cross pattern in between is just from one cycle of regular braiding between the two longer color patterns)
Then to keep the colors in vertical lines, I resumed linking.
(None of the color patterns in this sidebar braid require linking at the loop exchange, only during the loop transfers – for the last move of the braid you never have to exchange the two loops twice.)
The two busier color patterns are harder to teach/describe. The two busy patterns look almost the same, but in one the center alternates yellow and gray, while in the other the center alternates orange and gray.
Basically for those two busy patterns, the initial color setup on the fingers is the same as for the two different lengthwise striping patterns, but the linking strategy was different. I only linked when orange and yellow loops were meeting/crossing each other, NOT when gray loops and colored loops were meeting/ crossing. I never let orange and yellow cross each other, always linked them. However, I never linked gray loops – I let the gray loops transfer across all the other loops without ever linking them. So in the busy patterns, the gray loops migrate freely hand to hand and edge to edge, but the yellow and orange don’t – they intermesh with gray, but don’t pass each other. However, you can also get a very similar nice busy pattern by letting everything cross freely with no linking at all. The yellow and orange would migrate edge to edge like the gray, but the overall dark-light color pattern would look very similar.
I hope that helps.
Wow, thanks for such a detailed reply! I had done a few 10 loop flat braids (and even started drawing some diagrams) while attempting to figure it out, and I’m glad to know I was on the right track with single color loops, but I hadn’t figured out the order and I was getting kind of tired of cutting and retying thread lol. I really appreciate you taking the time to write all this out for me, I will be trying this right away!
Happy to do it, I hope it will help you and maybe others. If anything is unclear or it doesn’t work, ask me! And btw, it’s easily possible I might have gotten something wrong in my long explanation, as it’s been years since I made that braid! After tomorrow I may not be able to answer immediately as I will be on the road a lot the next month, but I’ll keep checking back. (I already see something misleading in my reply that I will edit right now)
Hi! I’m definitely a fan of your site, as I have learned so much. Thank you for taking the time out to create all of your blogs — it’s amazing. My absolute favorite braid is the flat double braid! I’ve been making 8-loop flat double braids, and am ready to conquer the 10-loop (I’ve tried and failed, but will try again very soon). However, it crossed my mind that I would love to see flat double braids of even more strings! I thought of team braiding and thought that it would be the easiest way to accomplish a 16-loop flat double braid. Wouldn’t that be awesome? The only thing is that I don’t know what moves to use for team braiding to get a flat double braid. I saw the blog post of the 10-loop double braid done by two people, but you don’t have the instructions for a flat double braid. Could you please explain it to me? It would be greatly appreciated! Thank you! 🙂
Hi Isaiah, that would definitely be awesome if you and a buddy would team braid some 16-loop flat double braids!
Are you thinking of a team braid where the two braiders would EACH already be making an 8-loop double braid? That would be doubly awesome! It’s twice as complex as what Patrick and Amy were doing in my team braiding video — they were each braiding a “square”-type braid and connecting it together, not a double braid.
If that is what you intend: For a flat version, you and your friend would each braid an 8-loop double braid (two loop transfers on each hand), but the braider on the left would use divided braiding moves – so never turn any of their loops – while the braider on the right would braid as for a flat double braid – and only turn their furthest RIGHT loop. That’s their fourth loop transfer – the last loop transfer on their right hand (for the loop order that I show in my videos)… The braid will come out with its ‘fold’ on the right edge (the edge on the right braider’s right), and will open up there to be a flat braid.
The loop exchange move between the two braiders would be almost the same as the way Patrick and Amy do it in my team braiding post.
There is one difference, though. Both of you will be holding 4 loops on the hand that has to exchange loops with the other braider, which is more loops than Patrick and Amy had. The problem is that the person who is the “initiator” should have his exchanging index finger free of loops in order to do the exchange. (Check out how Patrick and Amy do it in the video, and my photo-tutorial below the video.) The initiator’s index loop needs to move down to the B-finger for the exchange move. With four loops, he might have to first temporarily “park” one of his lower loops over onto his other hand so that he can shift the other loops down a notch.
Good luck, I hope you have a chance to try it! And good luck with 10-loop braids too–btw you can expect to fail at first when you start using thumbs! I kept dropping loops off all my fingers when I first tried it, but it got easier fast. That was with a 9-loop square braid, though…by the time I started making double braids I was used to braiding with thumbs. There’s a lot to think about with a double braid! it might be easier start on thumbs in a square braid.
[I copied and pasted Dan’s comment below and my reply over from another post–want readers here to be able to see his great flat double braid]
from Dan Gaiser June 2, 2013 at 8:23 am
Great tutorial. Really getting hooked. https://fbcdn-sphotos-d-a.akamaihd.net/hphotos-ak-prn1/469087_522011774525793_865729435_o.jpg
reply from ingridcc June 2, 2013 at 11:43 am
Dan, that is a gorgeous flat double braid. Congratulations! Thank you for the link to the photos!!!! Your braid is perfect. Is it 8 loops? You even did color-linking, and a no-ends loop start (did you actually use the method I tried but miserably failed to describe clearly? that works with bicolor loops?)
The braid’s 2 strongly convex vertical columns are normal with firm braiding tension. It’s how my flat double braids always come out right after braiding. It looks great like that, “au natural.” If you want to flatten it completely, wet it in water and lay it flat on a cloth or hang it over a towel rack after gently pulling the edges apart / flattening the braid. It will be even wider when it dries flat.
Thank you for your kind words. I didn’t bother to listen to the part of your video about un-braiding. I started this braid 4 or 5 times. Each time I made a mistake or dropped a loop, I untied all the loops and started over. This final braid I did in a little over two hours without once taking the loops off my fingers.
Wow, you can really concentrate! It’s very hard for me to focus that long…
I am in love with your posts. I have very little time at the moment but, when I am a little liberated from my current occupations I´ll try several of your creations. Thanks for your generosity in letting us benefit from your lessons. Edita
Hi Edita, you’re welcome, and thanks so much for the note!!!
Thanks for the tutorials! I love these double braids.
You’re welcome! I’m really glad you’re enjoying the braids! (If you’d ever like to send photos of your braids, I’d love to see them, just email me through the contact form and I’ll get back to you)
Happy Braiding!