Note: The loop braids that can be represented by track-plan diagrams are braided in two layers, even though you aren’t really aware of that while you are braiding them: square braids, double braids, Spanish braids etc. (Hand-held loop braids can even be braided in four layers! – they too can be represented by track-plan diagrams). Other braids have structures that cannot be diagrammed as track-plans, though – like spiral braids, twined braids, and more. The unorthodox braids I teach on this site could theoretically be represented in track-plans, but not by me! Even a very simple, 5-loop unorthodox braid would have a really complicated track-plan. Noémi Speiser shows some in her books on loop braiding.
Braid Diagrams
Noémi Speiser’s track-plan system, augmented here with two colors for braids whose strands circulate on two separate – though usually interconnected – tracks.
Highlighted terms below link to my Terminology page. Click your back button to return to this page.
A track-plan diagram is both a geometric cross-section of a braid’s shape, and also a map of the pathway (or 2 pathways) that the strands follow in the braid. Track plan diagrams resemble the metal tracks that bobbins of thread follow in a braiding machine, for good reason.
Track plans can be a helpful way to visualize braids if you ever wonder “Why does this even work? Where do the threads go in the braid when I move a loop?”
Noémi Speiser explains this system in slightly different ways in three of her books, using extra details that are beyond my ability to draw – like images of little maypole dancers moving along the track lines and holding ribbons that are being braided together (in The Manual of Braiding), or by connecting the drawn lines of loops on someone’s fingers to the tracks of a track plan diagram (in Old English Pattern Books for Loop Braiding).
Track plans compared to braiding machine tracks:

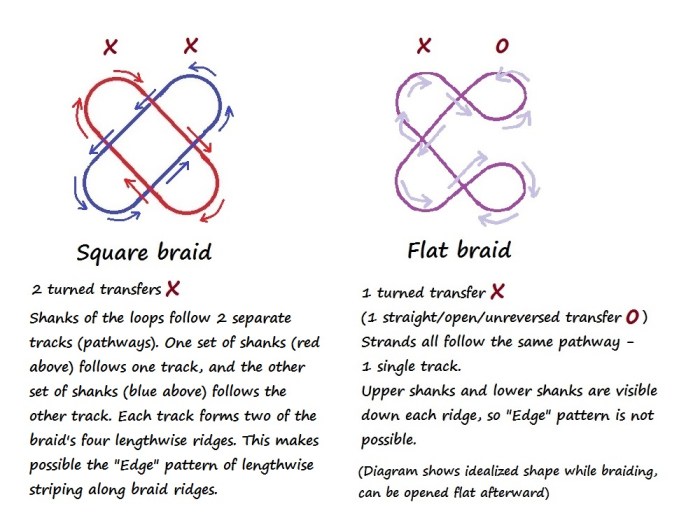
Track-plans for square and flat loop braids. (arrows=direction of movement; X=turned transfer, 0=straight/open transfer)
The flat braid diagram shows (in cross-section) the two layers of the braid as it’s being braided. Right side (of both layers) is held by the right hand, left side is held by the left hand. After the braid is finished, it can be spread flat in one layer, like opening a book.

Patent illustration for a braiding machine for a square braid. A square braid is an example of a “two-track” braid. The pink bobbins of thread and the green bobbins follow two different tracks. (this example would be an “Edge” pattern square braid in pink and green.) Square loop braids follow this same track plan. The strands that start as upper shanks of the loops on the left hand, and lower shanks on the right hand all follow the green track. Their counterparts all follow the pink track. The two sets of threads interweave, but along two different pathways. wikimedia

Drawing of the braiding machine track for the flat variation of a square braid (both are 4-ridge braids – the 4 ridges are represented in these illustrations as if in cross-section, as nodes), also showing the 9 threads being braided. A flat braid is a single-track braid. All the strands in the braid – all the upper and lower shanks in a loop braid – follow each other along the same track during the braiding procedure. Here that pathway is a long double figure-8. A 5-loop flat braid would have 10 strands interlacing along this same track, rather than the 9 shown in the drawing. (drawing by Elkagye.)public domain.
In some braids – flat braids, for example – all the strands follow one track or pathway. In other braids, such as tubular braids and square braids, the strands follow two separate, though interwoven, tracks.
You can prove this to yourself by using your finger to trace the lines in any of the braid diagrams below.
On a diagram of any braid with an odd number of of turned (reversed, crossed) loop transfers, your finger will trace over the whole track-plan before it comes back to its starting point. The whole track-plan is one closed track, intersecting with itself. (In these diagrams, I’ve labeled all the turned transfers with an X. Unturned/unreversed/open transfers are labeled 0.)
On diagrams of braids with an even number of turned transfers, your finger will trace over only half the track-plan, before it comes back to its starting point. In these braids, the two strands of each loop follow two separate but intersecting pathways down the braid. I show those two separate tracks in red and blue to differentiate them. One shank of each loop follows the red track, and one shank follows the blue track.
The red-and-blue diagrams also illustrate in cross-section the particular “Edge” color-pattern for that braid. Only 2-track braids can have an “Edge” color-pattern of bicolor loops, in which the two colors of each loop form lengthwise stripes along the braid’s ridges. In these diagrams, the nodes, or bumps of each color represent a cross-section view of the lengthwise ridges/ columns of the braid. These can be braided as long columns of two colors if you use bicolor loops and set them up on your fingers in the correct up-down color-arrangement for that pattern.
Above are the track plans for square braid and flat variation of a square braid.
The square braid of the left diagram above is actually tubular, like the various braids labelled “hollow” below. Even though there is no obvious open space inside it, a square braid is still tubular in terms of how its two sets of strands circulate around the braid. You can demonstrate this by sticking a darning needle or narrow knitting needle up through the center of the braid (or by braiding a square braid around a flexible core – this is quite possible to do). Noémi Speiser calls this braid a “tubular, 4-ridge braid,” rather than a “square braid.”
Above are track plans for some non-traditional 3-transfer “Square-and-a-half” braids (text instructions here)
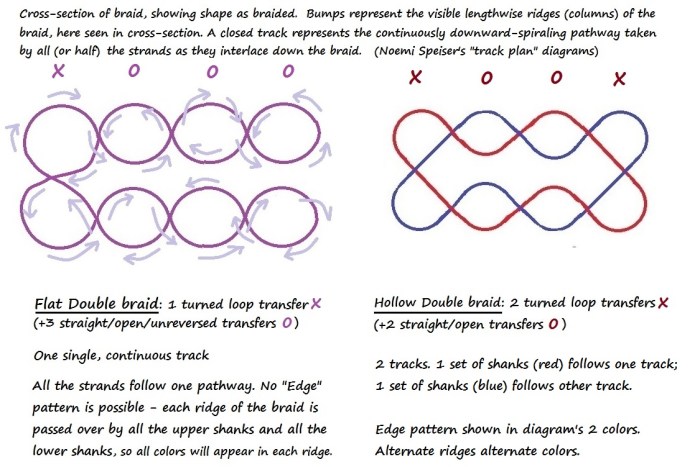
Above and below are Double Braid track plans. Above: Track plans for two double braids: Flat, and Hollow – the hollow double braid is the “Hollow lace of 10 bows, 2 fellows,” of the 15th C. loop braiding manuscripts

Above are several other shape variations of Double braids (4-transfer braids). The “Solid Rectangle” track plan (upper left) shows the color pattern of the 15th C. braid “A thick lace bordered of 10 bows, 2 fellows”.
Note: Track plans for the Double Tubular and Divided double braids are here, further down this page. I show track plans for my 5-transfer “Double-and-a-bit-more” braids within their tutorial (Odd). Spanish braids have the same track plan as the double-braid track plans above. The Hollow lace of vii bowes (taught on other braiding sites – see links in my sidebar) has that same track-plan as well. I haven’t made any track-plan diagrams for letterbraid-type braids, but they would be like two joined double braid track-plans – 8 pairs of nodes/ bumps. However, if braided with actual letters or other pick-up patterns, the braid can’t be represented by a (single) track plan, because pick-up patterned braids don’t have a consistent repeat of turned and straight loop transfers. Each row of braiding might have a different track plan from those of the preceding and following rows.
Details
Loop braiding “overs” and “unders” – how do they happen?
In a two-layer loop braid, when a loop is pulled through another loop or loops, two “under-overs” occur, one on each of the two layers of the braid:
Upper layer of braid
The upper shank of the taken loop goes UNDER the upper shank of the “around” loop or loops. This interaction of upper shanks builds onto the upper layer of the braid.
Lower layer of braid
Meanwhile, the lower shank of the taken loop goes OVER the lower shank of the “around” loop. This interaction of lower shanks builds onto the lower layer of the braid.
The braider doesn’t have to think or even know about all these unders and overs! The braider only thinks about ‘throughs,’ but in actuality, each ‘through’ is creating a pair of under-overs, and building onto a pair of ridges, one on the upper layer and one on the lower layer of the braid.
Track = pathway of strands
The lines in these diagrams represent the undulating pathway (or pathways) taken by the strands, they don’t represent individual strands themselves. Individual strands could be represented by adding dots onto the tracks. That would make a diagram specific to a braid with a particular number of strands/ loops. The diagrams I show here are less specific – they apply to braids of many different numbers of loops. (Each of these braid types requires a certain minimum number of strands, but could have more.) Without dots to specify the number of strands, a square braid diagram could represent a square braid of plain weave (3 loops); of 2/2 twill (5 loops); 3/3 twill (7 loops), etc. [Note: None of these braids are ‘purely’ plain-weave, 2/2 twill etc, due to factors too complicated to get into here.]
Noémi Speiser goes into more detail in her books on braiding:
The Manual of Braiding
Old English Pattern Books for Loop Braiding
European Loop Braiding Part IV: Track Plans as a Tool for Analysis; and Applications of Loop-Manipulation Braids
This last title is one of four separate monographs in Noemi Speiser and Joy Boutrup’s 4-part collaboration European Loop Braiding: Investigations and Results. The first section in Part IV is on track plans as they relate to loop braids, the rest of the monograph is a potpourri about interesting aspects of particular historical loop braid artifacts.
A loop = 2 strands. These two strands are sometimes referred to as the two shanks of a loop. If represented on a track-plan, these would be 2 dots, on opposite layers of the track-plan. If it’s a 2-track braid, the two dots of one loop will also be following different tracks (shown here in red and blue).
Each loop-transfer moves a whole loop: one strand in the upper layer of the braid, and one strand in the lower layer. These two shanks of the loop move in parallel, and separately, along different sections of the track plan, as they do in the braid itself. If the transferring loop is turned, the paths of its two shanks cross each other – forming an ‘X’ halfway between the two layers – as they pass to the opposite layer of the braid. The two shanks move in parallel, but circle around the braid in opposing directions (one clockwise, one counterclockwise) assuming the braid has any turned transfers.
Track bumps = braid’s ridges (in cross-section)
The undulating ‘bumps’ in the diagrams show the over-under pathway taken by the strands, forming the lengthwise ridges (columns of slanted strands) of an actual braid. The diagrams show these ridges in cross-section.
When looking at a square, hollow, or solid-rectangle braid, you can only see the diagonally slanted “overs” passing across every ridge; you can’t see the corresponding path of the “unders” inside the braid (unless you probe around with a darning needle), but they show clearly in the track-plan diagram. With a flat braid, you can simply turn the braid over to see the ‘under’ thread passages, moving across each ridge with the opposite slant of the ‘overs’ on the other side.
Track bumps = loop transfers (turned or straight)
A pair of upper and lower track bumps represent a loop transfer. If the upper bump is connected to the lower bump by 2 lines forming an X directly between the the upper and lower bump, that indicates a turned (crossed/ reversed) loop transfer.
If a pair of upper and lower bumps have no X-like connection directly between them, that indicates a straight loop transfer (open, unreversed, not turned). I’ve also marked every turned transfer with an “X” and every straight/open transfer with an “0” above the charts (these x’s and o’s are my own additions – they are redundant info, you won’t find them on track-plans anywhere else).
2-track vs. single-track braids
The undulating lines in each diagram form either one, or two closed ‘tracks’. Each track closes onto itself like a circle. That closed track represents the continuously repeating path taken by each strand as it interlaces diagonally down the braid, repeating the same cycle of over-unders the whole way down the developing braid.
The number of turned loop transfers in one cycle determines whether the strands will all follow the same track, or whether they will follow two separate tracks.
You can demonstrate this by using your finger to trace the lines in any of these braid diagrams.
On any diagram with an odd number of of turned transfers, your finger will trace over the whole track-plan before it comes back to its starting point. The whole track-plan is one closed track, intersecting with itself.
On any diagram with an even number of turned transfers, your finger will trace over only half the track-plan, before it comes back to its starting point. Strands in those braids are segregated into two different, intersecting tracks/pathways, shown here in in red and blue to differentiate them.
Braids with no turned loop transfers
No turns counts as an ‘even’ number of turns. In braids with no turned transfers the strands follow two – or even four – separate tracks that may not intersect at all.
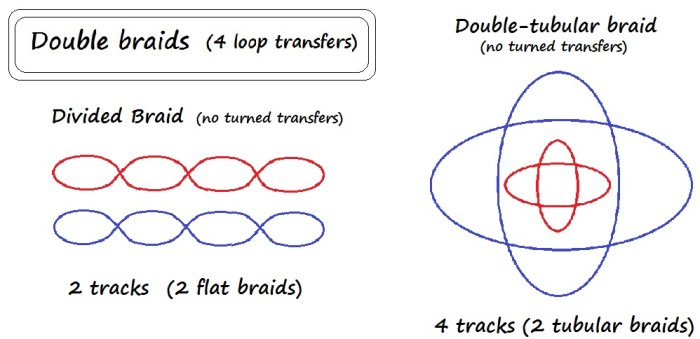
Track plans for two double braids of no turned transfers: Divided (2 unconnected flat braids), and Double-tubular (= one square braid surrounded by another square braid – remember, a square braid is tubular!)
1. Divided braids: In a divided braid – left diagram above – the two tracks followed by the upper and lower shanks are very obviously separate. The upper and lower shanks of the loops form two separate, flat ‘mini-braids;’ or (if done for only a short stretch within a longer braid) a loop/eyelet in one section of an otherwise cohesive braid.
2. Double-tubular braids: (tubular-braid-within-a-tubular-braid, called “Couverte” in the 15th C. braiding manuscripts) The right diagram above represents a double-tubular braid. Looking first at the left chart of the flat, divided braid – imagine bending both the red and the blue line of nodes (together) up and around until their ends meet – red to red, and blue to blue. That is what the right diagram is meant to represent, unfortunately it ended up looking like some kind of atomic diagram!
That ‘meeting’ of the outer ends of the lines of nodes is created by the two cooperating braiders making a second loop exchange when connecting their braids at the end of every row (cycle) of braiding. The first loop exchange is the normal one for any double braid – the left and right braiders exchange their nearest (usually index finger) loops. For the second loop exchange, they then exchange their two furthest apart loops – these are usually on the two braiders’ furthest-apart index fingers. This creates a large tubular braid composed of two separate tubes. I have never made double tubular braids the traditional way as part of a two-braider team, but I know that when braiding them solo, it is best to tighten after each of the two loop exchanges, rather than waiting until after the second one to tighten. When team braiding, though, most of the tightening usually happens before the two braiders exchange their loops (each braider tightening his/her own loops), so this may also hold true for double-tubular braids.
In the case of a solo braider, the first loop exchange is between the braider’s two little fingers – as taught in all my double braid tutorials. The second loop exchange – of the furthest-apart loops – would be between the braider’s own left and right index loops (or left and right thumb loops if thumbs are used). Tighten after both loop exchanges.
Both loop exchanges must be done without turning the loops. If thumbs are not used, this requires a rather time-consuming “turning and unturning” procedure before and after the second loop exchange. If the two braiders – or a solo-braider – were to directly exchange their furthest-apart index loops, the two loops would end up twisting. This turning before, and ‘unturning’ the two loops after the second loop exchange is carefully described in Noemi Speiser’s book and was very confusing to me at first, because I never found it necessary when using thumbs to hold loops.
Note: This “turning and unturning” procedure isn’t necessary if the thumb loops are the ones being exchanged in the 2nd loop exchange! This holds for a team of two braiders as well as for a solo braider. If the index loops are the ones that must be exchanged, simply shifting them to the thumbs first, exchanging directly, and then shifting the thumb loops back to the index fingers accomplishes the necessary “turning and unturning” of the loops. But you must shift the loops as I show in my 9-loop photo tutorial – index and thumb pointing toward each other, not entering the loop in parallel.
As long as no loops are ever turned, the upper shanks will form one braided tube within a separate, unconnected (but closely surrounding) braided tube formed by the lower shanks – or vice versa, depending on whether you exchange loops above the hands or below the hands during the second loop exchange.
The track plan is like the track plans for two tubular “square braids,” one within the other. In this case, there are actually 4 closed tracks, 2 for each tubular braid. In the diagram, the inner braid is red and the outer braid is blue. This is how the inner and outer braids turn out if you use all bicolor red/blue loops, hold the red shanks in upper position on all the fingers, and perform the second loop exchange above the braid rather than below it.
Red or Blue on the outside?
If the second loop exchange is performed above the braid, then the lower shanks (shown here as blue) will form a tube around the upper shanks (red). That’s what I show in the diagram on the right. The resulting braid would look blue, hiding an inner tubular red braid. That’s why these braids were called ‘couvert,’ meaning ‘covered,’ in the old manuscripts.
But if the second loop exchange is performed below the braid, then the upper shanks (here red) would surround an inner blue tubular braid. This is almost impossible to do as a solo braider, but has been done historically by two braiders, (noted in one of the three known sources) as well as what seems to me the easier way – above the braid (noted in the other sources).
Switching the inner and outer tubular braids to change color:
Typically braiders consistently exchange above, or consistently exchange below the braid, they don’t alternate in order to switch the inner and outer colors. Instead, switching the inner and outer colors of a couvert double-tubular braid is done by temporarily turning all the loop transfers during the process of braiding – just until the colors of the upper and lower shanks have all switched places – and then resuming braiding without turning any loop transfers.
In my diagram on the right, the two tubes are represented by a circle of blue nodes surrounding a circle of red nodes. In a real braid, these cross-sectional circles would be tightly appressed: a blue hollow braid stretched tightly around a rather compressed inner red hollow braid. In the chart of this double-tubular braid, I’ve drawn the red diagram much smaller than the blue so the two can be seen clearly – that does not correspond to their relative sizes in an actual braid. With looser tension, the color of the inner braid may be slightly visible between the outer braided strands. With firmer tension, the inner colors can be completely hidden.
When the blue and red divided flat braids are connected into closely-surrounding tubular braids, each tubular braid is structurally equivalent to a square braid (remember, a square braid is tubular!). As a square braid, each of these tubular braids actually has two distinct – though intersecting – tracks. So altogether, the whole double-tubular braid comprises a total of 4 tracks in all. (The two tracks of each tubular braid are not color-coded as such here in my diagram above, but could be if so desired.)
I haven’t made a video tutorial for double tubular braids, this is the most complete information I’ve presented yet on them. I do cover the method briefly in my how-to article on double braids in Threads That Move (see top of sidebar). Even a simple 2-transfer (square-type) braid can actually be made in a “double-tubular” form (in which case the ‘normal’ loop exchange I referred to above is moot!). However, I’ve usually made the double-tubular form with “double braids”- braids of 4 loop transfers – as well as with multi-loop plain-weave braids (1st and 2nd braid from the left in my header photo).
‘Edge’ color-pattern in 2-track braids
In “even” (2-track) braids shown in diagrams above, the one set of shanks that follows the red track, and the other set of shanks that follows the blue track may interlace with each other, but they never follow each other over the same bumps/nodes. In the actual braid these two sets of shanks never pass over the same ridges. That’s what makes “Edge” type color-patterns of lengthwise striping possible in 2-track braids. (With bicolor loops, that is – and only if you begin braiding by holding the two shank-colors of the loops in the appropriate up-down configuration on the fingers for that particular braid’s Edge pattern.)
Of course, even in 2-track braids with no bicolor loops, the two (same-color) shanks of each loop also follow different tracks, and show up on different ridges. But this isn’t apparent by looking at the braid, since in that case the the ridges all look identical.
Each red/blue diagram here is a graphic illustration of the exact Edge pattern possible for that particular “two-track” braid, shown here in cross-section. Each Edge pattern involves lengthwise striping, but it has a different appearance in different braid types.
These color-coded track plans have at least one very practical use: they can be used almost in a direct one-to-one ‘mapping’ onto the fingers when you are trying to figure out the dark/light loop set-up positions for any 2-track braid’s “Edge Pattern”.
Each upper node or bump on a track plan corresponds to a particular loop transfer in the braid – marked x or o on these charts for ‘turned’ or ‘straight’. Furthest left and right bumps correspond to the left hand’s leftmost loop transfer, and the right hand’s rightmost loop transfer. Any inner bumps likewise correspond to any inner loop transfers in between those two outermost ones.
To set up an Edge pattern:
The color of each upper ‘bump’ (ie loop transfer) tells you the necessary upper-shank color of the loops that the transferring loop will go through in that transfer. It does not reflect the color set-up of the transferring loop itself.
The color set-up for the transferring loop depends on whether it will be turned or not in this particular loop transfer:
It must arrive at its new finger with its upper shank matching the color of THAT (other) bump or node on the diagram. So, if it will NOT be turned, the loop must start out with the desired color mounted in upper position on the finger. But if the loop will be turned, then it must start out mounted with the desired color in lower position on the finger.
‘Broken-Edge’ color patterns in Single-track braids
Bicolor-loop braids of only one track can’t have a true Edge pattern, because with only one track, the upper and lower shanks all follow each other down every ridge. ‘Single-track’ braids with bicolor loops have color-patterns with left-right asymmetry, as well as pattern repeats that are twice as long as two-track “even” braids.
However, any of these braids can be set up in a distinctive bicolor pattern which has – along each lengthwise ridge/ column of the braid – the longest possible stretch of all Dark strands, followed by the longest possible stretch of all Light strands. The resulting appearance is usually striking, and is different (I think!) for each structural braid variation. I usually call the resulting pattern in flat braids “50-50 Zig-zags,” but I’ve also called it “Dark-Light Alternations.” I called the equivalent patterns “Broken Edge” and “Stairstep Edge” in the various 5-transfer braids of my recent “Odd” tutorial. (I show track plans for 5-transfer “double-and-a-bit-more” braids within that tutorial, not here.)
Track plans compared to braiding machine tracks:
Square braid, machine patent illustration, wikimedia
Braiding machine tracks, bobbin carriers, and interlaced threads of a 2/2 twill, 9-strand flat braid, by Elkagye, public domain.
Track-plans for square and flat loop braids.
Track plans are very similar to the metal tracks that bobbins of thread follow in a standard braiding machine. In braiding machines, stationary but rotating gears propel the bobbins along the undulating tracks. When loop braiding, your fingers do the propelling, interlacing the strands along the same type of repetitive over-under “tracks” as a braiding machine, or as a braider using either free ends, or ends wound onto bobbins and suspended on a braiding table.
(That is, for these “woven on the diagonal” plain-weave or twill braids – which include most of braids I teach here on the blog. There are other types of braids that can’t be diagrammed with track plans, like twined braids and spiral braids, for example.)

An antique Maypole braider. Maypole braiding machines make tubular braids, though with a slight design modification they can also make flat braids. Photo by Dvortygirl, on Wikipedia
Here are two videos on Youtube from DIY’er Andreas Siegler about his homemade Maypole braiding machine – in the first video he uses a single dummy bobbin to demonstrate how the gears propel bobbins around the undulating track of a braiding machine: DIY Maypole Braider – How does it work? (his videos will open in separate tabs).
In this video, he demonstrates his finished braiding machine with all 16 bobbins installed (equivalent to an 8-loop braid in number of braiding elements), braiding a ‘harness’ – a braided covering around a bundle of electrical wiring. His braid is a tubular braid of 2/2 twill. I’m pretty sure that 8 bobbins (spaced correctly), could be braided by the same machine to make a smaller plain-weave tubular braid. That would be equivalent to a 4-loop braid in total number of strands, but loop braiding would require a minimum of 5 loops (10 strands) to make a braid with a similar structure.
I am still puzzling over a few things about the correlation of braiding machine tracks and loop braided braids. I even pulled this info page off my blog for a while because of this, but after a while I decided to put it back up again. Maybe a reader will notice the anomalies, too, and solve them for me!
Tubular braids: Strands in each track proceed in a “1-way” circle, in opposite rotational directions
A standard “Maypole” braiding machine braids a hollow, tubular braid, not essentially any different from a Hollow Double Braid you would braid with loops. The strands follow two separate, closed tracks: one set of bobbins always proceeding clockwise, and the other set of ‘opposing’ bobbins always proceeding counterclockwise, these two sets interlacing with each other consistently on the same (opposite) sides of each ‘bump’ or node of the track. Each node is occupied by a horn-gear, which revolves in place to send the bobbin-carriers around the metal track.
This creates a tubular braid. If the operator were to set up all the counterclockwise bobbins with dark thread, and all the clockwise bobbins with white thread, an “Edge” color-pattern would result, of dark-light lengthwise striping along the braid.
In loop braiding, the exact same tubular result is achieved by the braider turning one loop transfer on the far left, and one on the far right of the braid, and not turning any other transfers. This sends one set of shanks clockwise around the braid, and the other set of shanks counterclockwise around the braid, interlacing with each other in the same rotational direction for the whole length of the braid. (Trace either the red or blue track of the Hollow Double braid’s diagram above with your finger to see this).
A square braid is a tubular braid:
I tend to think of a square braid as ‘solid,’ since it has no hollow open area in the center – more equivalent to a “solid rectangle” double braid than to a hollow double braid. However, a square braid really is tubular in terms of how its two sets of strands circulate – you can prove this to yourself by inserting a darning needle or narrow knitting needle through the center of the braid (or by braiding a square braid around a premade, flexible core, like another braid or cord – this is quite possible to do!) That’s why Noémi Speiser refers to the square braid as a tubular, 4-ridge braid. (And if loop braided, it’s not quite square, anyway – more of a rounded trapezoid).
Posted July 10, 2019
last updated September 26, 2025, to correct yet another mistake!
© 2019-2025 Ingrid Crickmore

