Click here to return to main post on Longer Loop Braids.
Longer Loop Braids
step 2. Shorten the loops (Caterpillars).
I use this trick whenever I want more length than I can get from the “center-start” method alone. However I still do a start from the center, since the center-start doubles the braid’s length for almost no extra effort, whereas caterpillars require quite a bit of extra effort in setting up, especially if the desired length would require two or more repetitions of shortening the loops.
Short version: I shorten each loop to a manageable length by tying/ crocheting a chain of slip-knots (ie a crochet chain) with the “extra” length. A caterpillar-like chain dangles below each loop as I braid, and pulls easily through the other loops. This adds some time to preparing the loops for braiding, but doesn’t add time to the actual braiding procedure.
When I have braided all the way down to the caterpillars, I park the loops on a comb, undo the caterpillars, and (if the remaining loop-length is now workable) finish braiding to the original ends of the loops. If the loops are still too long to braid with comfortably, I knot up a second set of caterpillars and repeat this process.

Braiding with ends of loops chained into ‘caterpillars.’
More details on making caterpillars:
To shorten each loop, I first tie a temporary slip-knot (like the first stitch of a crochet chain) partway down the loop, at a good length for braiding. I measure each loop against each other to make sure each slip-knot is the same distance from the top – all the loops must be shortened to the same length.
Note: I don’t start chaining/ tying up at the ends of the loops—when I tried doing it that way, the shortened loops ended up being very different lengths. (It’s awkward to braid with loops of different lengths.) However, I’ve heard from a reader, Katia, that she does chain upward from the bottom of the loop, see her notes in the comment field (click to return to the main Longer Loop Braids post – comments are at the bottom of the page)
Note: There are two directions the slip-knot can be tied in—be sure to tie it so the knot will only come undone when you pull below the knot, and not come undone when you pull from within the shortened loop (above the knot).
The knot must be tied at about the same point in each loop. I don’t measure and mark the loops, I just do this by comparison with the previous loop. (If there are a lot of loops, I mount each loop onto the tooth of a comb, with a rubber band above preventing the loops from falling off, but leaving them loose and free to stretch out and work with individually).
Then, to shorten the extra length beyond the slip knot, I make a series of slip-knots onto that first one, using up the excess loop length—this is essentially a crochet chain. You can use a crochet hook, or your fingers alone to make a chain of slip knots.
If you don’t know how to crochet a crochet chain, or make a chain of slip knots using your fingers, google a how-to video. Here’s an animated sequence, and here are a couple of youtube videos for the finger-only method: one, and two. (The youtube video links will open in a separate tab).
After chaining up the excess length, pull the “tail” out through the last slip knot so the chain won’t come undone. (Later on when you want to undo the caterpillars, you undo the last knot where you pulled the ‘tail’ through, then pull on that end to undo the chain of slip-knots in one zipper-like motion.) Remember, it doesn’t matter if your crochet chain is neat or ugly! You will be pulling it out later. It doesn’t have to be especially tight, either, loose links work fine.
This makes a caterpillar-like, dangly object out of the excess loop-length, and reduces it to about 1/4 of its original length (rough estimate). Five-inch caterpillars probably contain about 20″ of extra loop length, or 40″ if you folded the extra length in half before chaining it up, and so on. If you have caterpillars on both halves of the braid, it can add up to quite a bit of extra length, in addition to the extra length you get from using a center-start. It costs some time to make the caterpillars, but they really don’t interfere with the braiding moves. Unlike bobbins and “butterfly” tie-ups, caterpillars trail easily through the loops as you braid.
When you have braided down to the end of the shortened loops, set the loops down in such a way that you can keep them in order. I put them on pegs or a comb, and stretch a rubber band around the comb–above the loops, so they can’t slide off. Then pull out the slip knots, one loop at a time. (I keep all the loops secured on the comb while doing this, including the one I am undoing.)
Then—if the loops are now short enough to braid with—put them back on your fingers and braid the rest of the way to the real ends of the loops. If they are still too long to braid with, leave the loops parked on the comb while you again shorten them to a good length, and tie up another set of caterpillars. I rarely need to use more than one section of caterpillars, but my “whole 9 yards” braid required several sections.
You don’t necessarily have to park the loops onto a comb when chaining up the ends. I didn’t for the braid in the photo above. It’s not really necessary for only 7 loops. I’m not sure what I did – maybe just spread them out carefully? or else took them one at a time off their ruler-and-clothespin holder. Back then I hadn’t even discovered combs, I used to pin my loops onto a ruler with wooden clothespins when I took breaks.
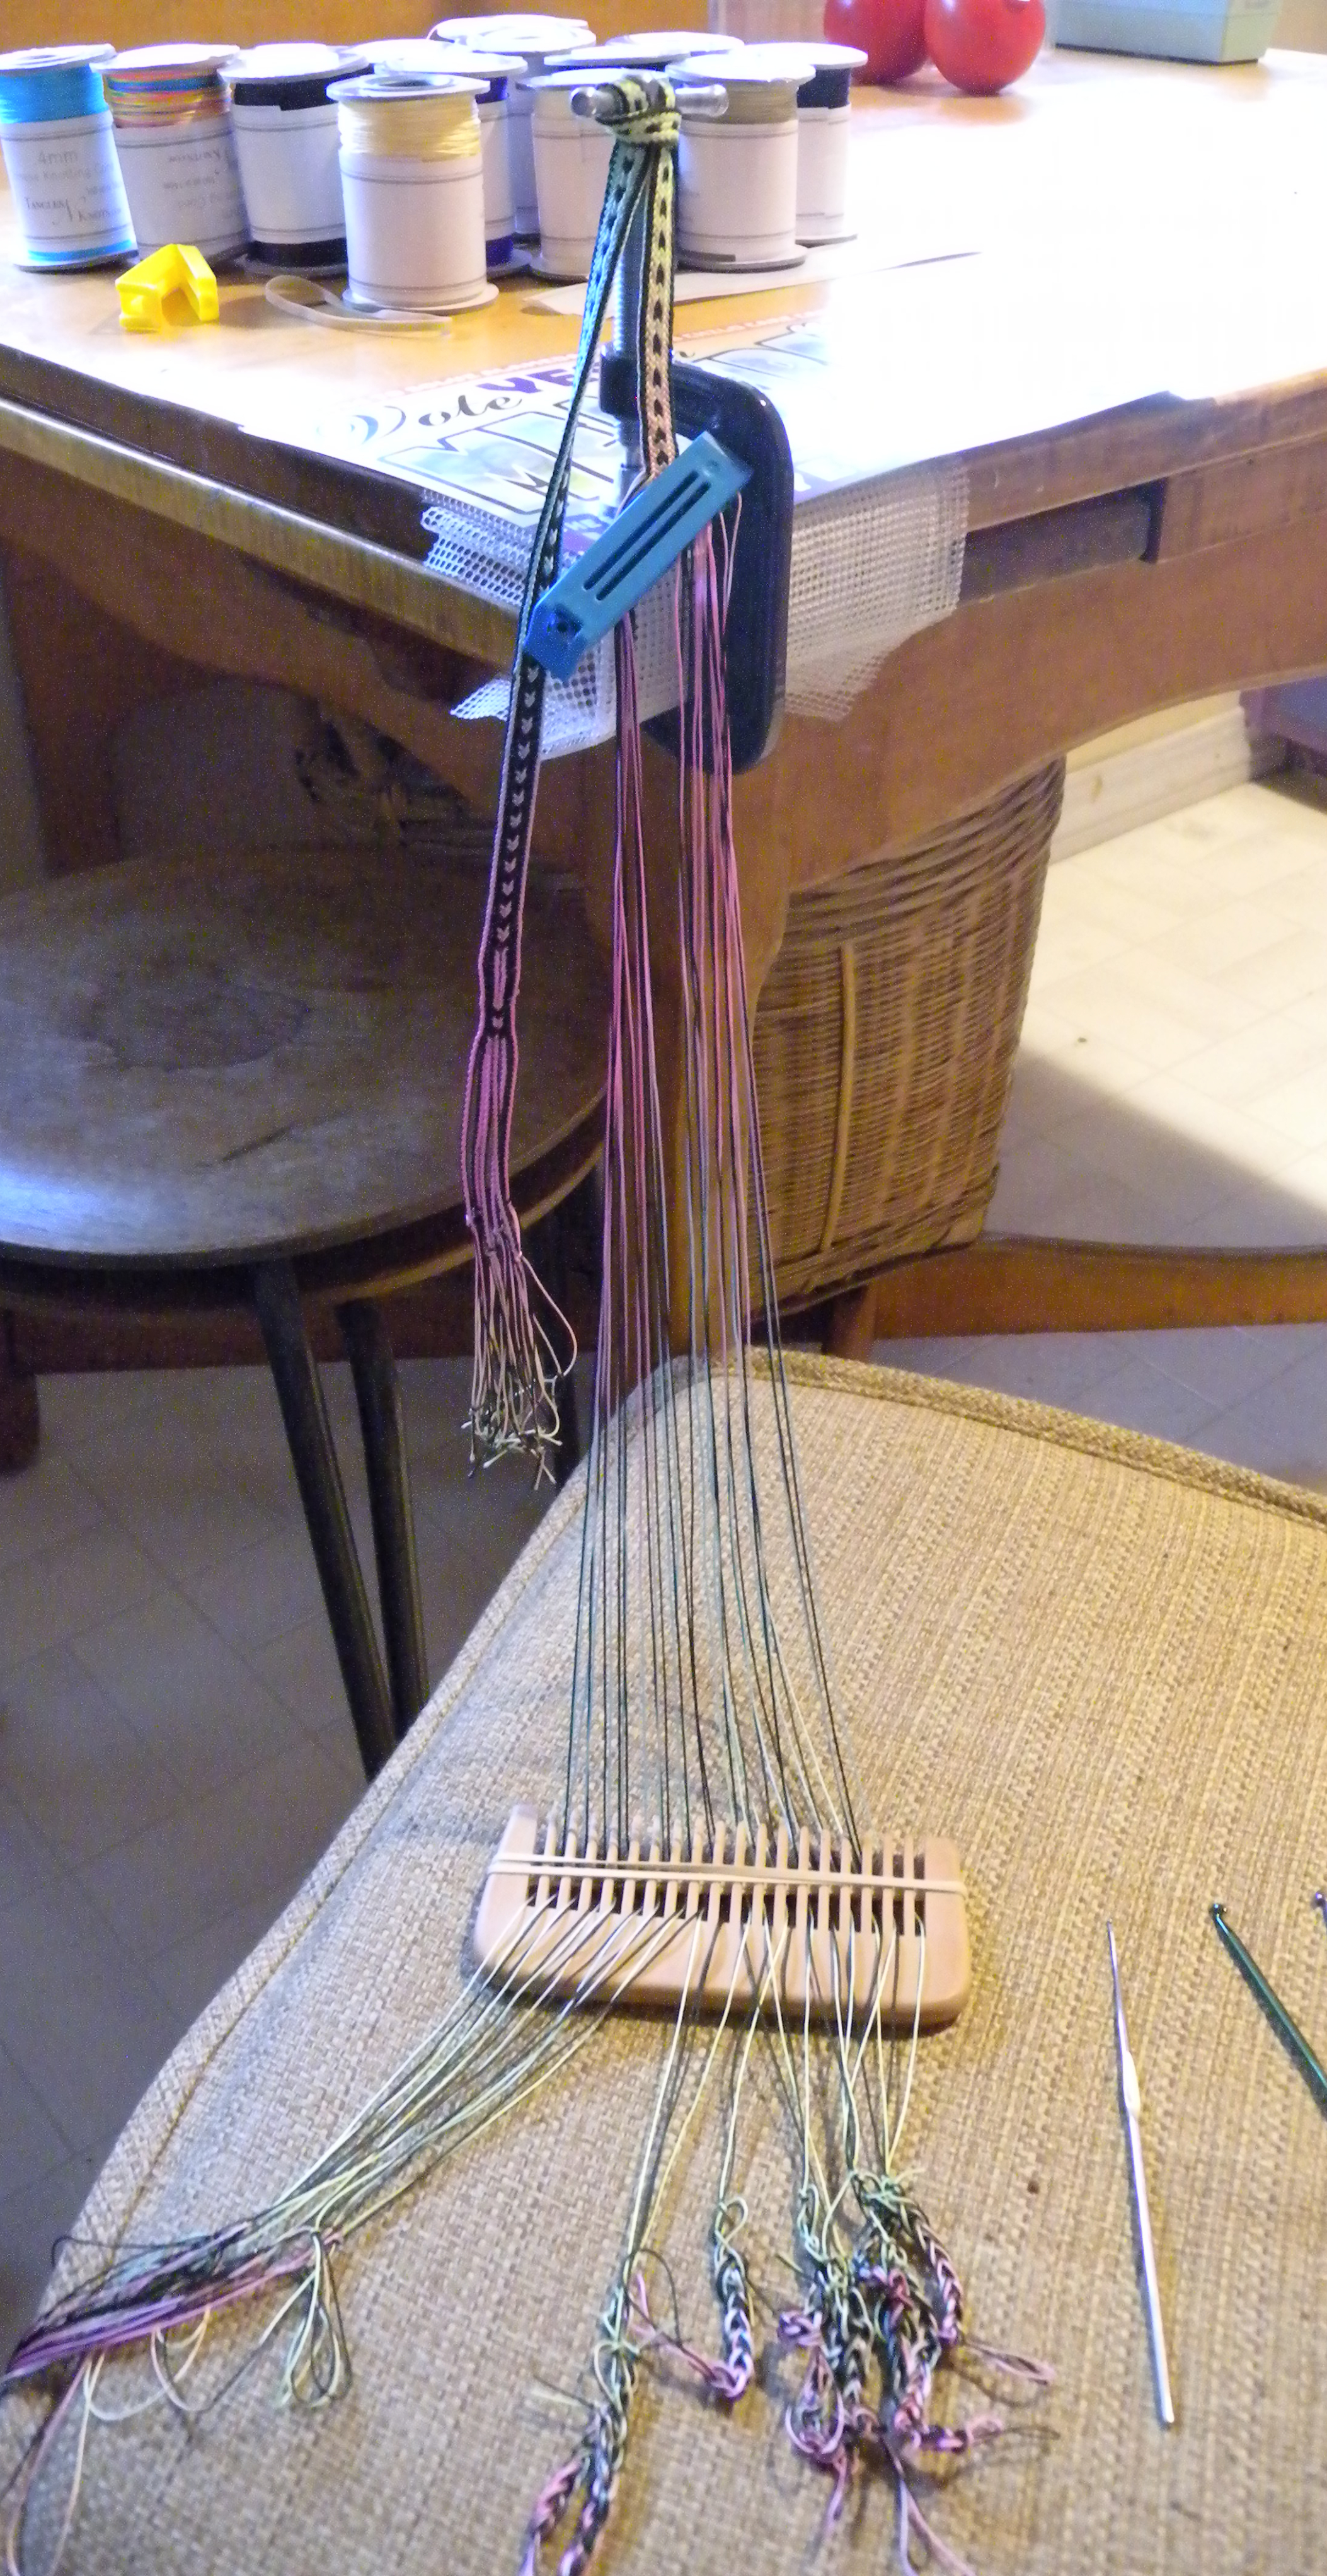
Left 1/3 of braid completed (it was the first and shorter ‘half’ of the start-from-the-center), right half getting prepped. Loops all held loosely but securely on comb, which will be removed before braiding. (Mounting loops onto a comb is not necessary, btw, see details on this further along.)
In the photo above, each loop has been shortened to the same length with a slip knot. Half the loops are chained up, the other half are still waiting to be chained. The blue clip was NOT attached to the fell (base of the braided area) while I was measuring and shortening the loops, btw – any constriction there would have distorted the loop lengths. After the slip knots were all tied, I manually tightened up the fell at the center-start area and placed the blue clip there. This is ultra-slippery nylon thread, so the clip helps keep the braided section from loosening while I crochet up the the ends of the loops one by one.
Loops on right are already shortened into “caterpillars.” They look unequally long because of the way they are lying loosely on the chair, but they are actually all the same working length. Loops on left will be chained up next, starting from the slip-knot and chaining top-down to the end of the loop.
Braiding with ‘caterpillar’ ends on loops:
With the V-fell braiding that I teach, the dangling “caterpillar” at the bottom of the loop trails easily along and through the other loops when its loop is transferred.
A-fell/ traditional European braiding method: If you are braiding with A-fell moves (the way fingerloop.org and other sites teach basic braids) the index finger is the active finger, and it pulls the taken loop through the other loops of its own hand. Because of this, the knotted up “caterpillar” doesn’t necessarily clear all the way out of those loops. Instead it usually ends up lying inside the neighboring loops, along your knuckles. This is not a problem!
It’s just fine to leave those caterpillars lying there, inside the neighboring loops of the same hand! It may seem odd at first, but it doesn’t actually interfere with the braiding moves at all. When it’s time for those loops to be transferred again, their caterpillars will follow them along and over to the other hand, and lie inside those loops. (I’ve done this many times, so I know this from practical experience, it’s not just a theoretical “it ought to work” idea.)
Video showing me braiding with short caterpillars
Start watching @ 45 seconds into the video:
This video shows me braiding with caterpillars, not making the caterpillars. I made the video for my 10-loop flat double braid tutorial. Just before I started, I realized my loops were a bit too long for the space available between the C-clamp and the camera…I wanted to use the same loop-bundle for three mini-videos, so instead of cutting the loops shorter, I tied the ends up into short caterpillars. My loops were only about 6 inches too long, so these caterpillars are quite short.
Caterpillars too long?
If my loops are so long that the caterpillars would be longer than 5 or 6 inches, they would be too long to braid with comfortably. In that case, I tie the first slip knot in the same way, but then I fold the excess loop length one or more times before tying it up into a (thicker) caterpillar chain. Shorter caterpillars are better than longer ones, because you’ll be able to braid further before the dangly caterpillars are longer than the loops (see second photo below).
At the beginning of my Whole-Nine-Yards braid, I had to fold the excess length several times before crocheting the ‘caterpillar’ chains. That’s why they are so thick in the most of the photos below.
Each time I finished braiding one section, I would let out and then retie the caterpillars. As the loops got shorter, the caterpillars grew thinner.

These are enormously thick “caterpillars”—I had folded the excess lengths in half several times before crochet-chaining them up. This was the start of braiding from the center of my “whole-9-yards” warp. I will braid about a foot and a half, and then undo the caterpillars. Blue loop on right d-finger has just been taken from the left index finger—its “caterpillar” is trailing after it, through the left hand’s loops.
It’s not hard to braid with the knotted-up ends hanging down from the ends of the loops. They pull through the other loops as you braid. I suppose the limiting factor would be the thickness of the yarn. The caterpillars probably shouldn’t be a lot thicker than your fingers, or they might not be able to pass through the other loops. With embroidery floss I was able to double and quadruple fold the loops before chaining them up into caterpillars, but if I had been using a thick yarn, the resulting “caterpillars” might be too thick if I folded the loops twice. However I’ve never tried that, maybe it would work fine. Fat caterpillars might slide through the loops ok even if they are thicker than the space in each loop. (let me know if you try it!)

Here I have braided about a foot and a half, close to the ends of my first set of shortened loops. The last loop through is on the left d-finger. Its caterpillar is barely making it through the other hand’s loops, because all the loops are now about the same length as the caterpillars.

My old clothespin holder. Not as easy as pegs, but worked fine.

Half-done. Unbraided half – 13 feet in length – is hanging down in back (the unbraided loops are not chained up into caterpillars for braiding, just loosely chained up together so they wouldn’t get tangled–another use for slip knots)
The method is a little inefficient with mega-long braids, because you will have to undo and then redo the caterpillars a few times before finally braiding down to the real ends of the loops. It is very effective and worthwhile for getting just that extra length that you want for a specific braid, especially if it only involves making one set of knotted-up loop-ends.
Hint: Depending on how much extra length you need, instead of making caterpillars on both ends of the braid, you might choose to locate the “center” start slip-knot at, say ¼ of the way into the loop-bundle, if your excess loop length is short enough that it can be condensed into only one set of caterpillars, which you will make on the longer side of the center-start. Just make sure that the loops on the shorter half are short enough that you can comfortably stretch them all the way apart when tightening them.

1st half is done, 2nd half has been started, braided down to end of one set of knotted-up loops.
Nearing the end of last knotted-up section, only a little bit remaining to braid after this section. These are single-thickness embroidery floss caterpillars, not folded in half before crochet-chaining.

Half-done—best closeup shot of braid
Here are pics of a warped-up and in-progress braid I made a few years ago—Joe’s fiddle braid (you can see him using it on my “About Loop Braiding” page):

Warped and ready to braid. Each loop was mounted across matching teeth on 2 combs, with no twist along the loop. After this I will tie the big center-start knot, between the two combs. NOTE: knotting up ‘caterpillars’ at both ends was a mistake!!! (see below) I should have waited to knot up the second set til I was ready to braid the second half of the braid. (Flat double braid of 18 loops)
The braid was planned to be a little over 5 feet long; it needed a 10 foot warp plus extra to allow both for take-up and for a little extra just in case. (Wider braids have much more take-up than narrower ones.) My sample of how the braid will look is to the right—visible if you click twice on the photo—and my notes for the braid are above it. I haven’t yet tied the big slip-knot in the middle of the warp that I will braid from.
Wait to tie up the caterpillars on the other half!
Crocheting up both ends of all the loops so there were caterpillars on both ends of the warp (as shown in the photo above) turned out to be a big mistake….After I finished braiding the first half of the warp, the loops on the other end were no longer all the same length. I guess when I started braiding the first half, some of the loops got stretched more than the others, shortening that loop on the other half of the braid. I had to re-do at least half the caterpillars on the second half of the braid to equalize the lengths of the loops. So now I just set my loops up on two combs, tie the center-start slip-knot, and then make caterpillars on the loops of only one of the combs—the end I will start braiding. I wait until that first half is braided before I knot up the loops on the other comb into caterpillars, so I can make sure the shortened loops are all about equal in length.
Click here to return to main post on Longer Loop Braids.
Last updated Aug/29/2020
© 2011–2020 Ingrid Crickmore
See full copyright restrictions and permissions at the bottom of the sidebar (if you are on a small screen device, the ‘sidebar’ may appear somewhere other than at the side of the screen).

