
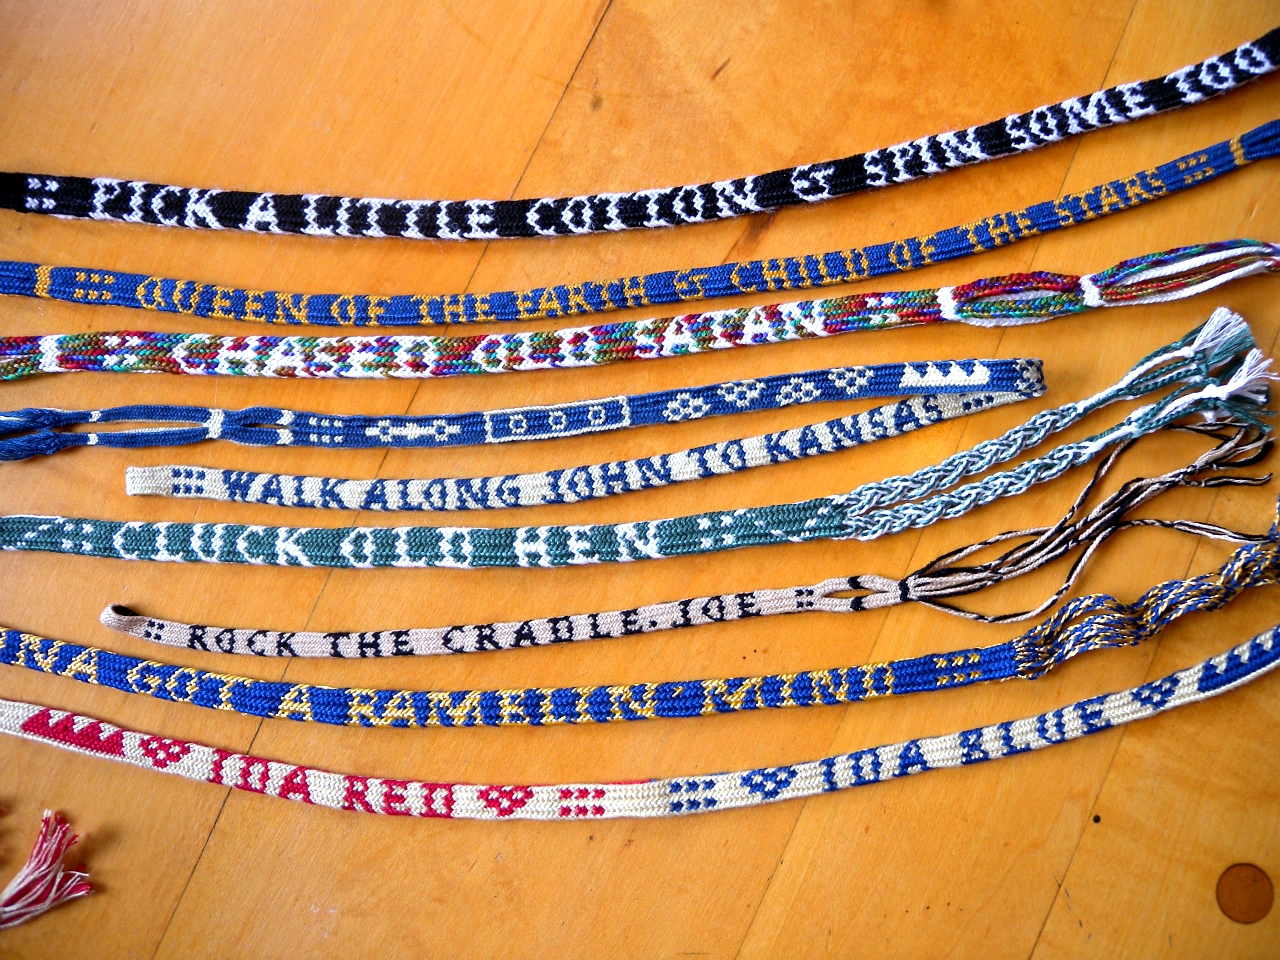
8 tunes, 18-loop letterbraids. [click for more detail]
This is a ‘what I’ve been braiding lately’ post. It’s a letterbraid variation that I came up with last summer on a camping trip—an eighteen-loop version of the 17th Century letterbraid of fourteen loops. *1. (Click on photos for more detail)
8 tunes, 18-loop letterbraids.
I made a few trial braids and two alphabet samplers on that music camp trip, but then the whirlwind of getting ready for Braids 2012 took over, and somehow I never got back to the braid until just recently.

Sample braids from last summer
We’re leaving tomorrow for that same music-camp tour—2 different music camps, with a week to ourselves in between—and I wanted to post this before I disappear for a month. I meant to get a few more of these braids done before posting, but it looks like I’ll be making them in camp. (The other braiding I’ll be doing on this trip will be samples for the next blog tutorials.)
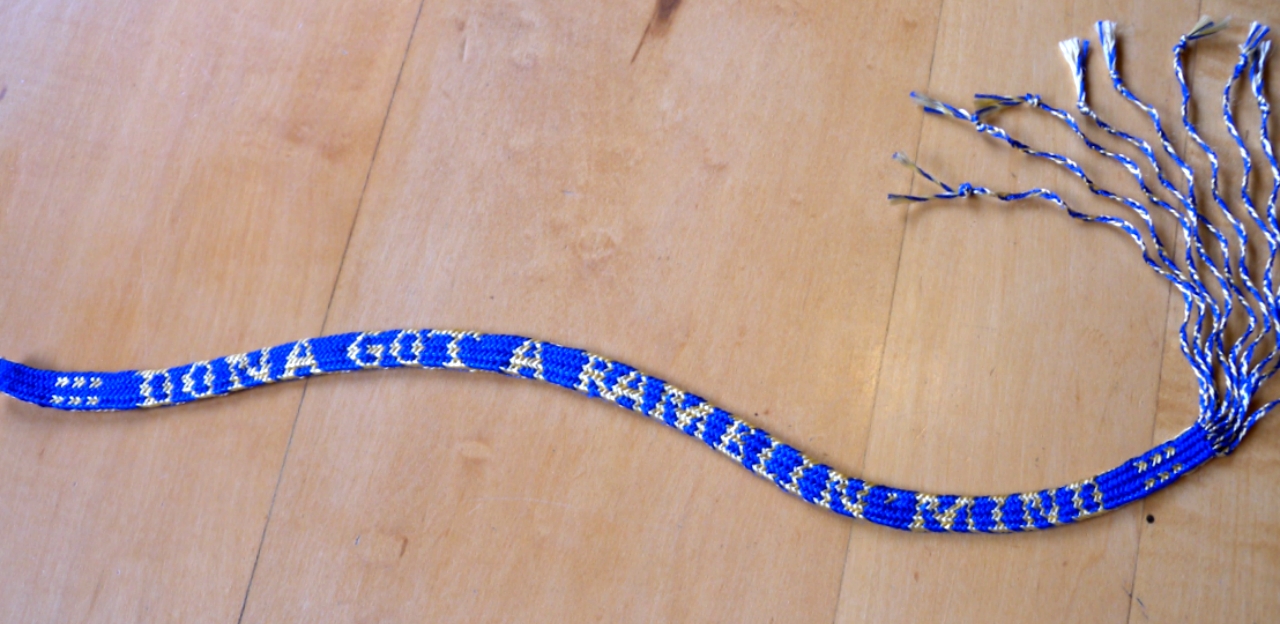
For no particular reason, I’ve been braiding names of U.S. fiddle tunes. I’ll probably hear some of these on our trip. Almost all are old traditional tunes,*2 but “Dona Got A Ramblin’ Mind” was by Joe Thompson, about his dog—I can identify with that dog in both interpretations of the wording!
Blue embroidery floss and gold viscose rayon, 2-loop braid fringe
The most astonishing thing to me about this 18-loop version of the braid, was that the original alphabet charts work with it! This was totally unexpected… Only one slight adjustment is needed when reading the charts—a very minor one: the column for the second loop applies to the third loop rather than than the second one for this braid.
Embroidery floss, 18 loops of 18 different colors with white. (no variegated colors)
I got the idea for these braids while braiding some 14-loop letterbraid bookmarks to take as gifts to Braids 2012. In that traditional 14-loop braid, half of the transferred loops are pulled through 2 loops (=twill), while the other transfers only go through one loop (=plain weave).
Just on a whim, after braiding the bookmarks, I set up for an 18-loop braid. I wanted to try to make an all-twill version of the braid, in which all the transferred loops are pulled through two loops.*3
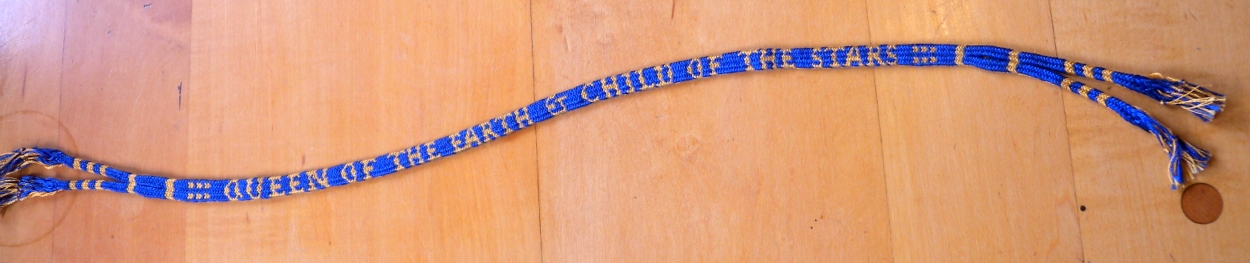
2/3 size embroidery floss. Edden Hammons called this tune “…and Child of the Skies.” “Child of the Stars” seems to exist as an alternative title, though.
[I actually meant to braid “and child of the skies,” but in searching Youtube for audio clips I had seen this “child of the stars” version of the title and it snuck into the braid. (click photo for closer view)]
Once the hurdle of figuring out the moves was over, I started experimenting with various color patterns. I didn’t even consider trying to use the 17th C. charts for the letter-shapes, though…The charts are based on one particular 14-loop ‘spanish’ braid. Joy Boutrup had originally tried a few different versions of 14-loop spanish braids when she deciphered the old manuscripts, and only one of them had worked with the letter charts.

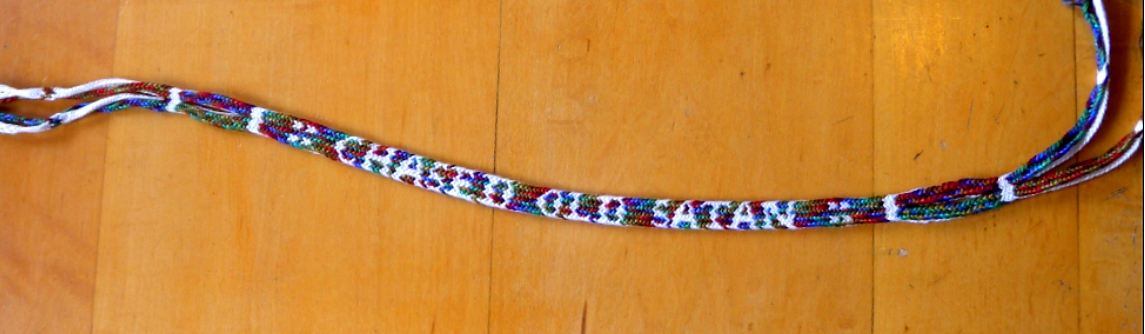
2/3 size embroidery floss. Second half of braid has variations of some of the non-letter charted symbols
After a while, I did try turning a few of the loops “letterbraid-style” in doing the bicolor-loop patterning–i.e. turning loops over on their fingers to change their color before doing the braiding moves, rather than turning the loops while transferring them. I soon noticed that turning the second loop on each hand resulted in a mar to the braid’s weave pattern. It turned out that only the first and third loops inward (from each outer edge of a hand) could be turned for a clean pattern, and not the second loop…whereas in the traditional letter-braid, the first and second loops are the only ones that are turned to make patterns.
That’s when it suddenly dawned on me to try following the 14-loop braid’s alphabet charts after all, but to turn the third loop whenever the chart said to turn the second one. This was a leap of ignorance—I really didn’t comprehend exactly what was happening in the braid.

2/3 size embroidery floss, bicolor loops: For each loop, one strand was white and the other strand was half-red and half-blue, linked in the middle.
It worked!*4 With that one change, the charts produced essentially the same letter-shapes in this 18-loop twill braid that they do with the 14-loop mixed twill-and-plain-weave braid! The letters may be a tad taller and thinner.
Embroidery floss is my usual material for making samples, but for this braid it almost seems a little too hefty… Good for a strap, maybe, or trim for a heavy bag.
For some of these braids I used 4 strands of DMC embroidery floss, instead of the full 6 strands. (That’s what I mean by ‘2/3 size floss’ in the photo captions.) In ‘Rock the Cradle, Joe’ I used even finer thread—fine silk thread that normally I would probably double or quadruple in a braid.

Fine silk threads. Finished with six 3-loop, divided braids.
I liked the way it came out in this braid. (Gotta look around my shelves for more fine thread!) The tan thread was visibly thicker than the black, but it didn’t end up being a problem for the braid. The black thread is a regular spun silk, but the tan is a very different type, that I’m guessing may be Assam silk. I have a whole roll of this that I had never tried braiding with before, so I am very excited about using it now!
On a side note, one of the big advantages to loop braiding is how easy it is to braid small. The moves and the tensioning are just as easy no matter almost how fine the thread. That’s because the loops themselves are essentially the size of your fingers, no matter how thick or fine the thread. And tightening the braid is done with simple, wide arm motions, not by fussing thread-by-thread at the fell of the braid. I doubt that most loop braiders appreciate this—we all seem to start out obsessed with wanting to braid bigger and wider. But small is beautiful too!
I think the most legible braids are the ones that have the widest spacing—‘Rock the cradle, Joe’, for example which as I mentioned was done with very fine thread. I couldn’t afford to put as much space between the letters in “Chased old Satan”, even though it has fewer letters, because the braid was so bulky. The finer the thread, the more letters (or spaces between) you can fit into the braid, given loops of the same length.

6-strand embroidery floss, top braid; fine silk thread, bottom braid.
Spacing the letters evenly apart is very fidgety. The letters are all different shapes and widths, and it doesn’t look right to put the same number of blank rows between all of them.
The longer braids had loops that were too long to stretch all the way apart for tightening. I don’t know how to braid the letters backwards (I bet it’s possible, though!), so I can’t use the “center-start” method to make longer letterbraids. Instead, I used my loop-shortening method for them—I tied the ends of the loops up into what I call “caterpillars” to shorten them temporarily while I braided the first half of the braid, and then let out the caterpillars for the last half (described in my Longer Loop Braids post):

This photo is from my post on Longer Loop Braids – not a letterbraid here, but it shows the crochet-chained ‘caterpillars’ I use to temporarily shorten the ends of extra-long loops.
For “Pick a Little Cotton and Spin Some Too” I used black embroidery floss and a white worsted weaving wool of about the same thickness. A little weird to use wool in a braid about cotton! but I thought the fuzzy wool would give the braid a more homespun look.

Black DMC cotton floss, and white weaving wool
For both Cluck Old Hen and Pick a Little Cotton, I had fun with the ends—I had never done this before: I braided six 3-loop “square” braids, and then braided them into two braids (not loop-braiding this time), then went back to loop braiding and fused each of these braids into a single 9-loop square braid.

6 ending braidlets, themselves braided, then fused into two 9-loop square braids, each of which were finished with 6 mini-braids (divided 3-loop braids).
That’s what I did with Cluck Old Hen, anyway—I went a little overboard with Pick a Little Cotton and kept going with even more crazy braiding:

Overdone ending braidlets–final ends are nine 2-loop braids.
If you have Joy Boutrup’s letterbraid book, you may notice that a few of my letters are slightly different than the ones in the charts. The notes below have some info about altering or creating charted patterns.*5
Well, I managed to get this finished with a little bit of time left to pack! This feels eerily familiar…I’m realizing there’s a pattern here, that I often post just before leaving town, and rush off wondering how many glaring mistakes I’ve made that I won’t have a chance to fix til I get back!
Happy Braiding, and thanks for reading this far down my post!
—————————Notes———————–
1. My video tutorial for the 7-loop Spanish braid teaches the basic braid that two cooperating braiders would each be braiding and combining together in making a traditional 14-loop letterbraid (learned from Joy Boutrup’s monograph).
That same post also describes the way I make the 14-loop braid as a solo braider, which is the basis for how I make this 18-loop version (with 18 loops, I hold 3 loops rather than 1 on each thumb).
——————————————
2. The genre is old-time music, which for a lot of players around here means traditional music from the south-east U.S. That’s where European music and African music met, starting long before there even was a U.S. The African influence is pervasive, not only for the introduction of the banjo, but also in the syncopated rhythms of the tunes themselves, the syncopated “shuffling” bowing strokes of the fiddling, and the flat-foot syncopated step dancing that accompanies the music…almost everything that makes U.S. traditional music different from traditional music of the British Isles. (Bluegrass music isn’t ‘Oldtime’, btw. Bluegrass emerged as a genre around 1940, and now has a very different feeling and sound from old-time music.)
Here are links to random audio or youtube clips of most of the braided tunes:
[music links open in a separate window]
Starry Crown… Chased Old Satan (same tune, 2 versions)
Queen of the Earth and Child of the Skies
Pick a Little Cotton and Spin Some, Too
Music clips of fiddle tunes I haven’t finished braiding yet:
Lazy John
Or maybe the whole line instead of the title –Lazy John, lazy John, why don’t you get your day’s work all done?
Swamp Cat Rag Love this tune-name!
Jenny Run Away in the Mud in the Night (in Japan!)
Hey Little Boy, Where’d You Get Your Britches? There aren’t many fiddle tunes about textiles! after ‘Needlecase’ and ‘Pick a little cotton and spin some too’ all I can think of are various tunes about clothing.
Tea Bag Blues Written by Hank Bradley. (This and Molly Put the Kettle On are the only fiddle tunes about tea that I know of…)
I found these music clips by googling or searching on youtube, after making the braids. (Except for Ida Red–it was only when I happened to hear Karen’s great square dance version that I suddenly thought of making an Ida Red braid that was half red, half blue, with the 17th C. heart symbol, from one of the lines that goes with this tune.) Some of the players are long gone, some are internationally known, some are famous within the oldtime music world, others are probably famous to their close friends… Thank you to all of you who made these videos available online!
——————————————
3. My 18-loop variation can also be made by two braiders cooperating, each one braiding a Spanish braid of 9 loops. Follow the directions for the 7-loop Spanish braid, but add a loop onto each thumb. The first loop transfered on each hand will be the thumb loop instead of the index loop—the operator finger goes through the middle and index finger loops to take the thumb loop. Everything else is the same as the 7-loop Spanish braid.
——————————————
4. Here’s the reason it worked, I think: Even though my 18-loop braid’s ‘weave’ structure is somewhat different, the particular zig-zagging contour of the fell-line is essentially the same as the original 14-loop braid, because the order in which I do the eight loop transfers is the same. Those 14-loop spanish braids Joy experimented with that didn’t work with these charts did not have this same sequence to their eight loop transfers, so the shapes of their fell-lines were different. The letters are plotted onto a particular fell-shape. Joy Boutrup explains and shows this in her letterbraid monograph. Apparently the fell-shape is so determined by the order of making the loop exchanges that even changing the length of half of the floats from “over one” to “over two” doesn’t much alter the contour of the fell. [the fell-line is the lower, growing edge of a braid or a weaving.]
Update: I was wrong in assuming or implying that the several 14-loop variations that Joy experimented with were actually “different” braids—they can all be seen as producing the exact same braid. All have the same structure of “overs” and “unders”—the actual thread passages in the finished braids is the same. It is only the order in which those overs and unders were made that differed, which affects when exactly the braider must turn over a particular loop over to make a color-change in the braid. Different-looking charts would be required for doing the moves in a different order, but the braid and the resulting letters would be identical. The “fell shape” is simply the shape (i.e. contour) of the working edge of the braid—which changes slightly with each braiding move. So the shape, or zig-zagging contour of the fell is a bit different after the “index-to-middle-finger” loop move than it will be after one or two or three more moves have been done…
——————————————
5. I made some simple chart alterations back when I was first learning the 14-loop letter braid. In the 17th Century, J and I were one letter, and V stood for both V and U, but I wanted to have separate letters for all four. I made some little changes to a few of the other letter-charts, too, and managed to come up with an ampersand [&] symbol. Even though I worked from the existing charts, each change still required a lot of trial and error. I am in awe of the original designers of these alphabet symbols!
A weaver may find it hard to believe, but for these loop braids, designing a recognizable pickup pattern like a letter of the alphabet is very difficult. The working charts for making each symbol do not resemble the braided letter-shapes they produce. They show how to arrange the loop-colors on the fingers, not how the design will look on the braid.
To design a pattern, you can’t just plot it out on graph paper. The 8 loop transfers in each braiding cycle create 8 “pixels” across each row of braiding. These pixels are short, slanted dashes of thread, lined up in a zig-zag and slightly uneven fashion. These slanted pixels are of different lengths, and overlap each other in unpredictable ways, ie not always “left over right”. Also, the fell-line of this braid is not a straight horizontal line like the fell of a weaving, nor is it a deep, symmetrical V-shape like the fell of a typical 2-transfer takadai braid. [The term “fell” means the working edge / lower boundary of the braided area.] Instead, the fell-line is an uneven zig-zag across the width of the braid. The designs must be plotted on this complicated fell-line. Yet the braider can’t even see the fell in any given row! —it’s distorted and stretched out in the last several crossings of loops that extend down toward the fingers. You have to braid 3 more rows before a previous row becomes visible, and even then it’s hard to distinguish exactly which zig-zagging connection of slanted floats make up the true grain of the fell. Two red segments that look adjacent may easily have been created in different rows/ cycles of braiding, and therefore not be represented on the same row of a chart.
Luckily, the 14-loop letterbraid charts include several non-alphabet symbols/images as well as all the letters. Joy Boutrup’s letterbraid monograph has photos of all the charted symbols, showing how they look in an actual braid. I found it was easiest to come up with new charted patterns by working from pre-existing charts, while carefully checking exactly how that charted image looked in Joy’s diagrams and photographs of the braid. That way I could visualize more clearly which segments I would be adding or omitting.
I haven’t tried this, but you also ought to be able to plan designs by using the diagram of the fell that Joy Boutrup shows. Her diagrams are like a detailed, complicated “graph paper” for the slanting pixels I described above. They are printed very small and it’s hard to tell which row is which as they aren’t shaded in. Using one would require copying a diagram, enlarging it, and shading in alternate rows of the slanted cells to keep clear which row is which. Then you could plot an image into the cells, and translate that into a working chart. That is probably the most logical way to go if you want to try to design a specific image. (With only 8 cells/ pixels to each row, the image has to be fairly simple.)
Of course the opposite way to design is to experiment without a preconceived goal, starting from something simple. That was how I came up with the simple patterns in this 14-loop sampler a couple of years ago:

In this braid, I didn’t change colors the “letterbraid way” by turning loops over on the fingers before the braiding moves, I just alternated between turning or not turning the loops as I transferred them, but they could be done either way. Turning the loops as they are transferred is not an option when actually following a chart, though, because loops on certain fingers are turned (on the finger) after having been transferred in a previous braiding cycle. [for two braiders: the loops that start out on the B-fingers/ middle fingers in any particular cycle. These loops are “passive” loops that the other loops will go through, they won’t be transferred themselves. Their “turning” can only be accomplished (as part of a transfer move) by turning them while transferring them in the previous row/ cycle of braiding, before they arrive onto the b-fingers.] So the charts would have to be totally redrawn if loops were to be turned while being transferred.
[new note 8/31/2014: OR, the corollary approach: The order in which the braider does the braiding moves could theoretically be changed to a particular order that would work with the charts if turning loops while doing the braiding moves! That is what Joy Boutrup did in her Nun’s Book letterbraid analysis. Its letterbraid section had no braiding instructions at all, so the order of the moves wasn’t stipulated anywhere. Only charts for the color-changes were notated. Joy deduced two possible orders of operations for making the braiding moves, allowing two alternate ways of creating the lettershapes from the original charts: one, the traditional “turn loops on fingers before braiding”, and the other by turning loops AS they are being transferred.]
© 2013–2015 Ingrid Crickmore
See full copyright restrictions and permissions at the bottom of the sidebar (if you are on a small screen, the ‘sidebar’ may appear somewhere other than at the side of the screen).


The two beaded bracelets I wear have fiddle tunes color coded into them so of course I LOVE what you’ve done here, especially since that Joe Thompson tune is one of my favorites! I’m looking forward to watching your beginner videos and experimenting some more. Thanks for the workshops this last week!
Hi Cyndy, I wish I had looked more closely at your beaded bracelets, how great that they have a fiddle-tune color-code! It was really nice to meet you, I hope we can get together and braid again next year!
Hi Ingrid, I am really interested in your letter braid. They are awesome. I am not sure if you are selling these. I would like to buy it.
Hi Trang, thank you for the compliment!!! Sorry, but I don’t sell braids, at least not so far. If I ever decide to do that I’ll let you know, though. Thanks again!
Thanks Ingrid. I hope one day you will have your own business selling these stuffs. 🙂
oh ingrid these are fantastic – you really are a great innovator, even though i’m sure you would deny it!
Thanks Dom! I’m glad you like them. (I just got home, have been away from my computer for the last month.)
Ingrid, thanks for the inspiration. You are so incredibly talented!
Hi Connie! So fun to ‘see’ you here! (I am way NE of you right now, borrowing a fellow camper’s computer.) Thanks for the nice words and for visiting the blog!