I promised a long time ago to make a tutorial here on the braiding method for one of the 10-loop letterbraids*, and have been procrastinating like mad on it ever since…other braiding topics somehow kept popping up that seemed more enticing than going back and relearning the Nun’s Book letterbraid! I hadn’t made this braid for several years, and even back then I only made one or two small samples. Because of my too-many-loops fixation, I abandoned it much too quickly for the 14-loop “Charted letterbraid,” and then my own 18-loop variation.
But finally, on our recent music/ camping trip I buckled down, pulled out Joy Boutrup’s letterbraid monograph*, and worked on some samples of the Nun’s Book* ten-loop letterbraid. Of course, after all that procrastinating, it turned out to be a very interesting and rewarding braid! One of the two ways it can be made is unique to this letterbraid–quite different than either of the other two old letterbraids that Joy Boutrup has decoded. Ten loops braids up a lot faster than the 14-loop letterbraid, and the letters look great.
Boring technical note:
Ten loops, fourteen, or even my eighteen-loop variation — no matter how many loops they have, all the known 17th C. letterbraids have exactly the same number of “pixels” across the braid — segments of potential color-changes that can form designs. All the letterbraids are braided with eight loop transfers across the braid, which creates eight columns of what I refer to very incorrectly as “pixels”. It’s only the length of the pixels that changes with more or fewer loops. (In a braid, the pixels are short, slanted lines of thread, not dots.)
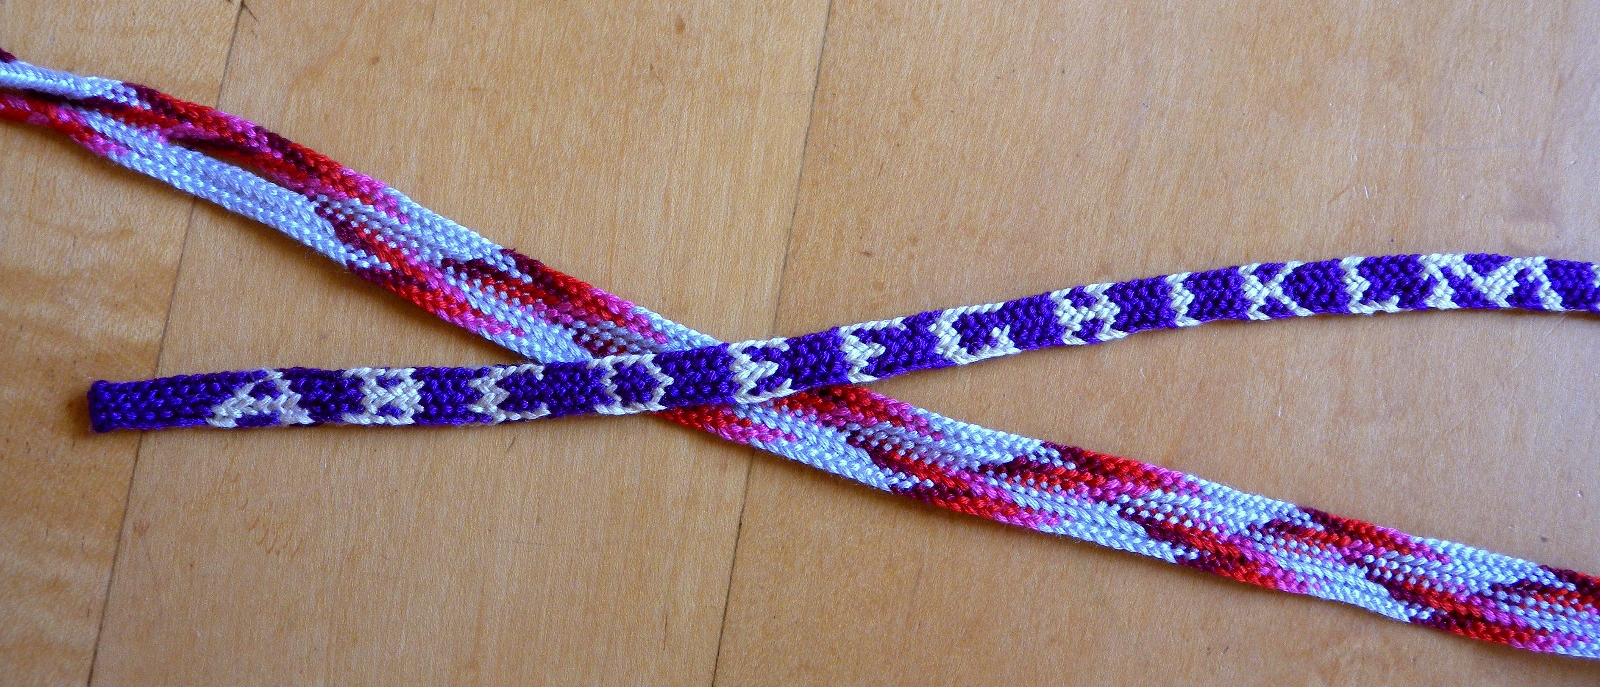
Unfortunately, just when I was all geared up to come home and start working on the videos and photos for this tutorial, a little hitch occurred–I did something very stupid with boiling water at our camp stove. (Youch!) The large burned area is on the back of my hand near the thumb. It’s getting better, but is definitely not ready to appear in a video. In the meantime here’s a preview:

(story to be continued!)
The tutorial will mostly be on my solo-braider method for making the braid using all ten fingers, as in my 10-loop double braid method, but I also plan to make a video demoing how the left braider of a two-braider team does the 5-loop “spanish” braiding moves for the left half of the braid, and maybe a video on how that left braider would follow a chart to turn his/her loops. This is covered in the text of Joy Boutrup’s monograph* on the letterbraids, but without illustrations of the braiding moves.
Update: The solo-braider method tutorial is finally posted!
I decided to make a separate tutorial later demoing how to braid this letterbraid the traditional way as part of a team.
All the letterbraids are a shape I call “divided” (two separate layers), joined only where the two layers of the braid switch sides to form the letters. [see my more recent posts on pick-up patterning]
You can sort of see that in the “quick fox” braid, because the angle of the photo is a bit too much from the bottom of the braid instead of directly above it. That’s why some of the letters seem to have thin strips of white trailing off to the right… That’s really the lower, white layer of the braid showing on the bottom edge.
I’ve only just started exploring some of the non-letterbraid patterns, and other braid-shapes (flat, hollow, etc) that can be made with these same braiding moves. The wider pink/ red/ purple braid next to the alphabet sampler in the first photo is a flat version of this two-layer braid, made with bicolor loops. Each loop has one gray shank and one colored shank. As with flat double braids, the two layers of the braid were connected along only one edge while I was braiding, and after finishing it, I opened the braid out along that fold to form a twice-as-wide, single-layer braid. (In a flat, single-layer version no “letterbraid” type designs are possible, as those require two superimposed layers for substituting colors back and forth between the layers.)
All three braids in the photos are made with the same material – dmc cotton embroidery floss – and essentially the same braiding method.
P.S. The tutorial will show how to do the braiding moves for a non-lettered version of the braid, as well as how to follow a chart in forming one or two letter-shapes that I have made up.
To continue on with making the letter-shapes in the Nun’s Book, you will need Noémi Speiser and Joy Boutrup’s publication on the 17th C. letterbraids*, which has Joy’s instructions and reworked charts for all the letters.
The braid itself is a plain-weave, two-layer braid that can be made with all kinds of great shape and color-pattern variations. It will be easier to learn after learning how to make 10-loop double braids. In numbers of loop transfers per cycle of braiding, a letterbraid is like a doubled double braid!
*For sources and more information, see my upper menu page on the 17th Century letterbraids — in the header tabs, hover on “About Loop Braiding.” The letterbraid tab is at the bottom of the drop-down…
© 2014–2020 Ingrid Crickmore
See full copyright restrictions and permissions at the bottom of the sidebar (if you are on a small screen device, the ‘sidebar’ may appear somewhere other than at the side of the screen).


How do you read the chart on pg 56 when you are working with 14 loops? I could watch your video over and over. I taught my daughter how to do the 10 loop double braid together, we are wanting to try the 14loop team braid.
How great that you and your daughter can be a braiding team!
The charts on p. 56 are not for the 14-loop letterbraid, only for the Nun’s Book letterbraid. The 14-loop letterbraid is a different braid, with a different set of charts. The 14-loop charts are on page 50 in Joy Boutrup’s book. The 14-loop braid directions for just the left braider (who would be holding 7 loops) are on page 49.
My tutorial for the 7-loop Spanish braid has a video for those moves. The right braider would do the mirror-image version of the moves (so that braider would start by moving the loop that’s on his/her right index finger).
In the charts on p.50, S means dark and L means light. Kind of weird, but that’s how the 17th C. manuscript had it – Joy Boutrup thinks S may have stood for “sad”?
The left half of the chart is for the left braider:
1st column represents her left index finger, 2nd column = left middle finger, 3rd column = right middle, and 4th column = right index.
Same for the right half of the chart – it’s for the right braider. “Uppermost” means the index finger, while “second” means the middle finger (left hand, then right hand).
Only the loops on index and middle fingers are turned or not turned – on all 4 hands – to be SAD (dark) or LIGHT before the braiding moves are done. That’s why the other loops/ fingers aren’t represented in the chart. They are involved in the braiding moves but not in the color-changing moves.
Good luck, please ask if anything isn’t clear!
–Ingrid
Oh, wow! That looks cool. I stumbled on your youtube videos recently looking up loop braiding I was looking for a way to make some lacing for a cotehardie.. I made my first attempts at the 3 loop and 5 loop braid this afternoon.
Hi LadyD, thanks for trying these tutorials! Re your cotehardie lace, check out the photos in the 3-loop pdf tutorial for the alternative way to start the braid (with a loop and no loose ends at the start). That’s also a way to braid a twice-as-long braid — you simply KEEP braiding a divided braid and never turn any loops while moving them from one hand to the other. After you finish braiding, cut the tips of your loops and the braid will stretch out to be twice as long as you braided.
Enjoy, and good luck with your cotehardi!
Wow! tried it and it works brilliantly.
Oh and I put image of my first braids on my blog http://stitchintimeandspace.blogspot.co.uk/2014/09/hsf-2014-challenge-17-yellow-fingerloop.html
I’m thinking of trying a flatbraid next and maybe using it for trimming?
I love how your braid looks with the pouch, the neutral color of the pouch really makes the braid pop! Is it a 5-loop square braid? Great colors! Congratulations and thanks for the link! oh, and yes, flat braids make great trim…
Yeah it’s non professional status. I am only allowed to charge for materials and any handout I may make.
Can’t wait for your nun book letter braid. I’m playing around with just the left person moves and not sure it’s working right and that then confuses me how the exchange would work.
And thanks for letting me post a link to this.
Hi Zada – Thank YOU for posting any links to my stuff!
Hey, are you using the directions on page 56 of Joy’s book – a 5-loop spanish braid? If so, the exchange would be pretty much like a ‘regular’ one for a 2-person double braid. I have a video tutorial for that move with a photo-tutorial of the move below the video: Two people Team Braiding. Joy just says to walk the A and B loops down to B and C first (on the hand that will exchange loops). That frees up the index finger – makes the exchange easier.
When you are ready to try turning loops for the letters, be sure to do the loop exchange between the two braiders (or between the 2 hands if you’re doing it solo) from the previous row BEFORE turning loops for the current row.
I haven’t tried the following but I think it might work:
Following just the left half of the chart to turn loops, and just braiding the left worker’s half of the braid alone! No exchange. I’m thinking that ought to end up with a kind of funny-looking mini-letterbraid of just the lower half of the letters. Not legible as letters, but good practice if you are learning this without a braiding partner.
Yeah I’m looking at pg 56 and for a lone braider the half twist for the letters sounds easier for this method instead of the other method on 60 although for free form pattern pg 60 might be fun lol. And thanks for the tips on the exchange back to tangling myself
I am really looking forward to this tutorial! Take care of your hand first, obviously, but know that I am impatiently waiting :p
Thanks! I have been working like mad on the written part and planning the vids. Most of the gross part is over with the burn, there’ll probably still be a color difference when I make the videos, but knowing people are waiting for them is helping me get over my vanity!
Thanks Connie and Lenora! You’re inspiring me to get going. If the burn still looks ugly next week, maybe I’ll just cover it up and do the videos with a bandage.
Can’t wait for this! Thank you!
I look forward to the videos. Great work, Ingrid as always.
Also would you mind me posting a link to your blog on the finger looping group on facebook?
Hi Zada,
Do you mean for this 10-loop letterbraid? Because I haven’t finished that tutorial yet, this post was just to let people know it’s on the way! I hope it’ll be done soon…But sure, if it’s for the rest of the tutorials that I’ve already posted, and if you are not teaching as a business/ professionally (that might be fine too! but in that case please contact me first through my contact tab, upper menu)
Thanks for visiting my blog!
(Oops, I guess I answered your other question here too!)
That would be great if you posted a link there, thanks! I hardly ever go on FB these days, wasn’t able to keep up without spending all my time on it, had to stop. That was back before the blog…
Thanks would you mind me teaching your method with credit to you? It will be as a hand out instead of following you videos but I will list them for people to go to after the classes?