This is Part 2 of my two-parter on planning your own color-patterns!
Color-pattern planning 2: Planning your own color-patterns using bicolor loops.
(Color-pattern planning 1 taught the basic loop-order info for all braid pattern-planning – helpful but not mandatory to read first!)
Flat braid zig-zag patterns are striking and fun to braid. Once you know the 3 rules for setting them up, you can create all kinds of variations – wide zig-zags, skinny zig-zags, multi-color zig-zags, bordered zig-zags, etc, etc. These 3 rules are basic to planning color patterns for any braid of bicolor loops, or of a mixture of both single-color and bicolor loops.
Many of the examples in photos here are 7-loop flat braids (as taught in my 7-loop “Continue Here” tutorial). But the same three zig-zag rules apply to any ‘unfolding’ flat braid of any number of loops – including the flat forms of Double braids, Spanish braids, or ‘Letterbraids’.
(Color set-ups for the 7- and 8-loop braids in photos are provided just below my end-note. If you are new to my blog, check out my home page, and the Tutorials tab in my upper menu!)
Zig-zag pattern in a 10-loop ‘letterbraid,’ braided as a single-layer flat braid:

Rule #1. Use bicolor loops for the zig-zag.
Two-color “50/50” Zig-zag
This is the easiest possible zig-zag pattern to set up. For any flat braid, this basic zig-zag pattern is made by using all identical bicolor loops, with a starting set-up of matching colors ‘up’ and ‘down’ on all fingers. 50/50 Zig-zag patterns can also look a bit like an argyle or ‘tipped tartan.’
Remember, the two ‘sides’ or shanks of one loop are not adjacent to each other in flat or square loop braids! They mirror each other on opposite edges of a flat braid, while crossing each other at the center of the braid. In the braid below, the blue strand of every loop has a white ‘partner’ – the other half of the loop – on the other side of the braid.
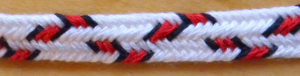
2-color 50/50 Zig-zag pattern in a flat 7-loop braid – 7 bicolor loops of navy/white:

Multi-color 50/50 zig-zags
For a clear zig-zag (or argyle) pattern, all the loops must share at least one shank of the same color. But the color of the other shank can vary, creating a multi-colored zig-zag on a single-color ‘background’. With more than 2 colors, you can vary the zig-zag pattern by varying the initial set-up of the colors on the fingers.
My first photo (above the navy/white braid) is of a flat 10-loop ‘letterbraid’ that has a multicolor 50/50 zig-zag of three reddish colors on a light gray background (3 bicolor loops of pink/gray; 4 of red/gray; 3 of wine/gray). Below are two 7-loop flat braids with multicolor 50/50 zig-zags. Both were made with 3 black/white bicolor loops and 4 red/white bicolor loops.

Rule #2. Place the 1st zig-zag color where it will be the 1st loop to be turned.
This is the left index finger for ‘regular’ flat braids; but the right ring finger for flat double braids (see end-note)
Then follow the appropriate loop order for that braid (given in end-note) to load the rest of the colors in order on the other fingers. Mount the loops with background-color shanks ‘down’ and zig-zag-color shanks ‘up’ on all the fingers of both hands (vice-versa would work, too).
For example, in the photo above, you can see that the zig-zag color-order of the upper braid is: 2 reds, then 3 blacks, then 2 reds. (Click on photo for more detail.)
Since this is the flat variation of a square braid, the loop order in the braid (starting with the first loop to be turned, and using the braiding method I teach here) is:
Left
1 index
2 middle
3 ring
4 little finger
Right
5 index
6 middle
7 ring
[for more about how the loop order affects color-patterns see Color-Pattern Planning]
So before braiding, you would mount the color order of the zig-zag onto the fingers in the order shown above – red on fingers 1 and 2; black on fingers 3,4,5, and red on fingers 6,7. The white shanks of the loops should all be in lower position on all the fingers, red and black in upper position (the opposite would work, too).
In the developing braid, that sequence of 2 reds, 3 blacks, 2 reds will be followed by 7 rows of white after all the colored shanks have turned over and white is uppermost in all the loops.
Rule #3. For a more obvious zig-zag: Add single-color loops

For a more obvious zig-zag pattern, braid a narrower zig-zag, set off against more “background color”. These are non-50/50 zig-zag patterns. The pattern will look less like a tartan, and more like a true zig-zag. To do this, use one or more single-color loops to widen the background color compared to the zig-zag color.
Widening the background:
Pick one of the two bicolors to be the zig-zag, and one to be the “background” color. Then substitute one or more single-color loops (of the same color as the “background” color) for one or more of the bicolor loops.
Above, the navy on white zig-zag braid has 3 all-white loops, and 4 navy/white bicolor loops.
Below, the upper braid has 3 all-white loops, 2 bicolor loops of black/white, and 2 of red/white.
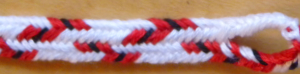
The middle braid has 6 all-white loops, and only 1 bicolor loop (navy/white).
Lowest braid has 2 all-white loops, 4 bicolor loops of red/white, and 1 of black/white.
All of these are 7-loop flat braids (braiding moves are taught in the Continue Here tutorial):

Set-up: Single-color background loops are first (or last) in the loop sequence, counting from the finger holding the first loop to be turned.
When you are setting the loops onto the fingers, place the single-color background loops where they will be the first (or last) loops to be transferred with a turn, followed by the first color of the zig-zag.
Narrowest Zig-zag:
The middle braid above has only one bicolor loop – the rest of the loops are all single-color “background” loops. If there’s only one “foreground” loop and all the rest are background, you don’t have to think about loop order at all! You’ll get the same pattern no matter what finger the bicolor loop starts out on, and the dark shank can start up or down.
Just for fun, I thickened the blue strand in the braid above. I used 6 single-color white loops of embroidery floss, but for the one bicolor loop I doubled the navy floss so it would stand out a bit more. (I didn’t double the white shank of that bicolor loop – it was the same thickness as all the other loops.)
It might be interesting to try a shiny ribbon-type yarn for the single zig-zag shank of the single bicolor loop – or some other contrast, maybe a fuzzy yarn to contrast with the rest of the loops in a smooth yarn…
Zig-zag patterns. I show the necessary set-ups on fingers further down page, but try seeing if you can set these up on your own with the info given here! (Click on photos for more detail.)

7-loop flat braid with a “double-zig-zag” pattern
2 single-color all-white loops, 2 gray/white bicolor loops, and 3 red/white bicolor loops.
One of the all-white loops is placed before (or after) all the reds and grays – slightly widening the ‘background’ to make the zig-zags more prominent. The other all-white loop is set up in between the group of 2 grays and the group of 3 reds. This separates the two colors and creates an impression of two close-together zig-zags – one gray and one red. Placing two all-white loops between the reds and grays would further separate them, and heighten the impression of 2 separate zig-zags. If I were to make this again, I would omit one red/white bicolor loop, and add one more all-white loop in between the two color groups.

8-loop flat double braid – Rainbow 50/50 zig-zag pattern
8 different bicolor loops all with 1 white shank
Zig-zag rainbow braid color sequence:
Red, purple, blue, green, lime, yellow, orange, pink.
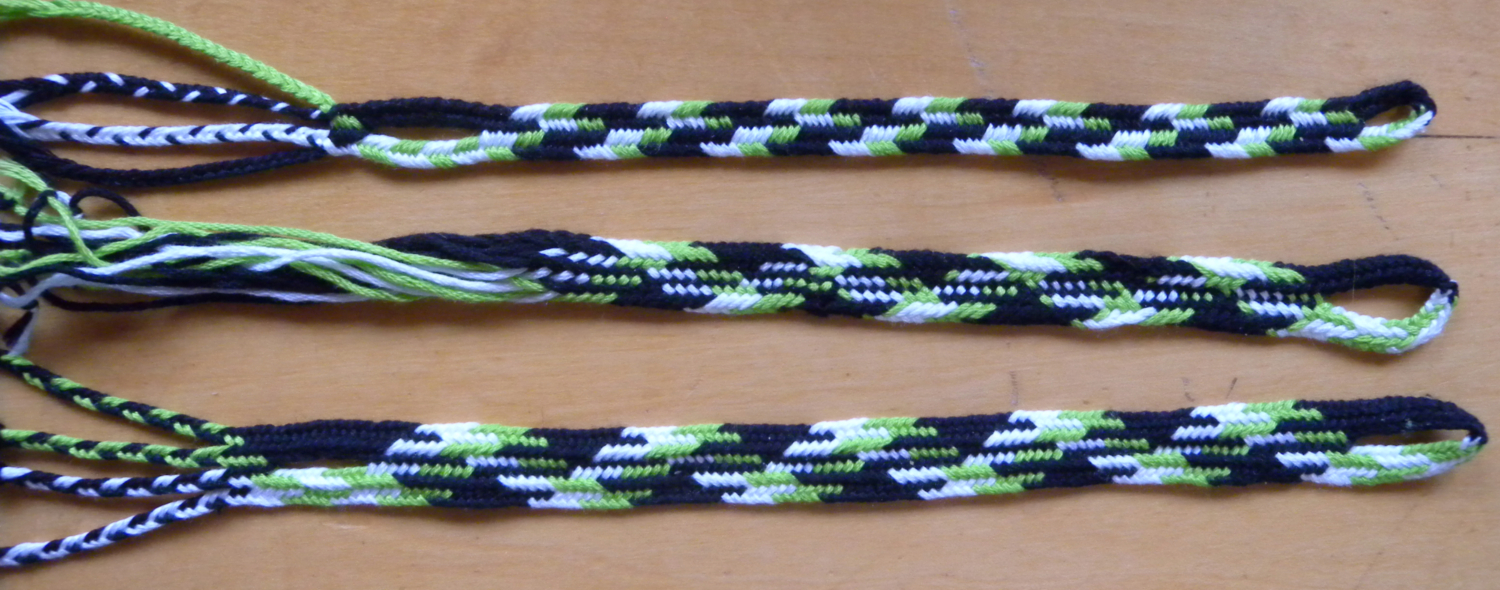
Multi-color 50/50 zig-zag patterns
‘Background’ color is black – all bicolor loops have one black shank.
Top: 9-loop flat ‘square’ braid
Middle: 8-loop flat double braid
Bottom: 10-loop flat double braid
The 9-loop flat ‘square’ braid has 4 green/black bicolor loops and 5 white/black bicolor loops.
The 8-loop flat double braid has 4 green/black and 4 white/black.
The 10-loop flat double braid has 5 green/black and 5 white/black.
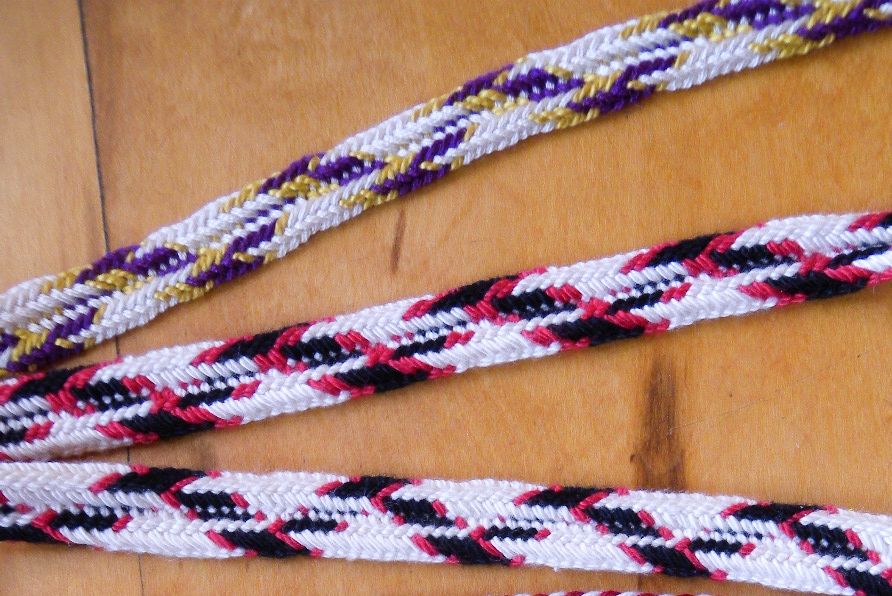
3 Zig-zag patterns in flat 8-loop double braids
Upper braid: 50/50 multicolor – 8 bicolor loops: 4 gold/white loops and 4 purple/white loops. The zig-zag looks like a narrower, non-50/50 zig-zag because the gold color is so pale that it blends into the white of the background.
Middle braid: 50/50 multicolor – 8 bicolor loops: 4 red/white loops and 4 black/white loops
Lower braid: Non-50/50, a narrower zig-zag – 2 single-color white loops, 4 black/white loops, and 2 red/white loops

Multicolor 50/50 zig-zag pattern
Wider braid is the flat variation of the 10-loop Nun’s Letterbraid (the purple braid underneath).
The zig-zag pattern is from 10 bicolor loops of three shades of red for one shank and light gray for the other shank.
(Click photos for more detail.)
Detailed set-up info for 7- and 8-loop braids above is given below the endnotes.
Endnotes
Order of loops on fingers for three types of flat braids:
After placing the first color of your zig-zag onto the finger that holds the first loop that will be turned, continue loading the rest of the loop colors onto fingers in the successive loop-order for whichever braid you are making. That order is very different for each of these three types of braids. (My post on Color Pattern Planning explains this better, but it doesn’t get into some of the complicating factors of bicolor loop pattern planning!) N.b. – the loop-order I give below assumes you are using the braiding methods I teach on this blog – other methods for making the same braid may have a different loop-order.
See below – starting with the first loop to be turned for each type of braid: (finger codes illustrated here)
7-loop square braid (flat variation): Left a, b, c, d; Right a, b, c.
Place loop #1 of your color-sequence on Left A; loop #2 on Left B; Loop #3 on Left C, etc.
7-loop Spanish braid: Left a,b, Right d,c,a,b; Left d,c.
Place loop #1 of your color-sequence on Left A; loop #2 on Left B; Loop #3 on RIGHT D, etc – follow the odd-looking order above!
(This assumes that the 1st loop transfer is the single turned loop transfer for this flat version of the 7-loop Spanish braid. That’s how I tend to braid it myself, but I haven’t actually taught it here on the blog yet.)
8 (and 10)-loop Double braid: Right c,d, Left b,a,(th),c,d; Right b,a,(th).
In a flat double braid, as I teach it here on this blog, the first loop that will get a turn starts out on the right ring finger, Rc. By the time you actually turn the loop, it will have shifted up to the right middle finger, but at the start of the cycle it’s on the ring finger.
When planning bicolor-loop patterns in a flat braid, it’s best to place loop #1 of the color-sequence onto the finger where it will be the first loop to be turned once you start braiding. For some braids that might be a very odd-seeming location! Keep placing the rest of the loops of the color sequence onto the fingers that follow in that braid’s particular loop/finger order.
This is so that matching shanks of the bicolor loops can all start out in upper (or all in lower) position on the fingers.
Other starting setups would require that some of the bicolor loops start out dark-shank-up while others start dark-shank-down, which is easy to get wrong – I’ve found some nice “broken zig-zag” patterns that way!
Once you’ve started braiding, and the pattern is successful, you can always choose a different starting set-up. Just keep checking the loop configurations at the end of each cycle of braiding moves, and pick one you like better than your initial set-up. (When jotting it down, be sure to note down which shanks are up and which are down for all the bicolor loops!)
Flat Zig-zag pattern set-ups
Below are the starting loop set-ups on fingers for some of the zig-zag color patterns in photos above. These are 7-loop flat ‘square’ braids (2 loop transfers per row of braiding moves), and 8-loop flat Double braids (4 loop transfers in each row).
Braiding method for square and flat 7-loop braids here.
Braiding method for flat 6-, 8-, and 10-loop Double braids here.
Finger codes (a, b, c, d) are illustrated here.
Bicolor loops: Black/white means a bicolor loop of black and white, with the black shank in upper position on the finger.
(Braids in photos below are aligned with the start of the braid to the right, so their color-order reads right-to-left – opposite of the way you might expect!)
The set-ups below assume that the single turned transfer is made in the same place I demoed it in the tutorial – if not, the pattern may not come out like the sample in the photo.

Flat 7-loop braid
50/50 Two-color zig-zag:
Set up: 7 bicolor loops, all navy/white, both hands.
7-loop flat braid, Multicolor 50/50 zig-zag
7 bicolor loops: 4 red/white, 3 black/white
Zig-zag color sequence: 2 red, 3 black, 2 red
Set up:
Left A red/white, B red/white, C black/white, D black/white
Right A black/white, B red/white, C red/white

7-loop flat braid, Multicolor 50/50 zig-zag
7 bicolor loops: 4 red/white, 3 black/white
Zig-zag color sequence: 3 black, 4 red
Set up: [note: in photo, braid starts on right, heads left, so black comes before red]
Left A black/white, B black/white, C black/white, D red/white
Right A red/white, B red/white, C red/white
7-loop flat braid
Narrow zig-zag pattern
3 all-white loops; 4 bicolor navy/white loops
Set up:
Left A white, B white, C white, D navy/white
Right A navy/white, B navy/white, C navy/white
7-loop flat braid, Narrow zig-zag
3 all-white loops; 2 bicolor black/white loops; 2 bicolor red/white
Zig-zag color sequence: 1 black, 2 red, 1 black (after the 3 all-white background loops)
Set up:
Left A white, B white, C white, D black/white
Right A red/white, B red/white, C black/white

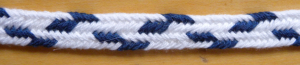
7-loop flat braid
Narrowest possible zig-zag pattern
6 single-color all-white loops
1 bicolor navy/white loop
Set up:
Any starting arrangement of these loops on the fingers.
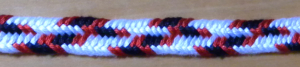
7-loop flat braid, Narrow zig-zag
2 all-white loops; 5 bicolor (1 black/white, 4 red/white)
Zig-zag color-sequence:
2 red, 1 black, 2 red (after the 2 all-white background loops)
Set up:
Left A white, B white, C red/white, D red/white
Right A black/white, B red/white, C red/white

7-loop flat braid with a “double-zig-zag” pattern
2 all-white loops, 5 bicolor loops (2 gray/white, 3 red/white)
Zig-zag color-sequence: 3 red, 1 all-white, 2 gray (preceded or followed by an all-white loop)
Set up:
Left A white, B red/white, C red/white, D red/white
Right A white, B gray/white, C gray/white
One of the all-white loops is placed before (or after) all the reds and grays – slightly widening the ‘background’ to make the zig-zags more prominent. The other all-white loop is set up in between the group of 2 grays and the group of 3 reds – here, that’s the all-white loop on Ra (loop #5 in the loop order of this braid). This separates the two colors and creates an impression of two close-together zig-zags – one gray and one red.
Placing two all-white loops between the reds and grays would further separate them, and heighten the impression of 2 separate zig-zags. If I were to make this again, I would omit one red/white bicolor loop, and add one more all-white loop in between the two color groups.
(In this set-up, remove the red/white loop from Ld, and replace it with a third all-white loop.)

8-loop Flat Double braid
Multicolor 50/50 zig-zag pattern
Background color is black (all bicolor loops have 1 black shank)
4 green/black bicolor loops
4 white/black bicolor loops.
I intended the zig-zag color sequence to be 4 green followed by 4 white. But in the very beginning of the braid, the color-order is 3 green, 4 white, 1 green! I then switched the colors to my intended order, listed below:
Set up: (all loops with black shanks in lower position)
Left: A and B both green/black; C and D both white/black
Right: A and B both white/black; C and D both green/black
Braid according to instructions here. The single turned transfer is the fourth transfer (right b-loop transfers to right a-finger).

8-loop Flat Double braids
3 multicolor zig-zag patterns
Background color is white (all bicolor loops have 1 white shank)
1st loop to be turned in a Flat Double Braid starts out each cycle on RIGHT RING / Rc-finger.
Double braid loop order, starting with that loop:
Right C, D; Left B, A, C, D; Right B, A
The colors in a flat double braid follow each other in the loop-order listed above. That’s the order in which the strands all line up in the braid. But it’s easier for setting up if you rewrite the list into the order you would load those loops onto the fingers: A-D on the left hand, followed by A-D on the right, see below.
Top braid – Narrower multicolor zig-zag
2 single-color loops and 6 bicolor loops – background color is white.
2 all-white loops, 2 bicolor red/white loops, 4 bicolor black/white loops
Zig-zag color-sequence is 1 red, 4 black, 1 red, (2 all-white loops last)
Set up:
Left A black/white, B black/white, C black/white, D red/white
Right A white, B white, C red/white, D black/white
Middle braid – 50/50 multicolor zig-zag
8 bicolor loops, background is white.
4 bicolor loops of red/white; 4 bicolor loops of black/white
Zig-zag color sequence is 2 red, 4 black, 2 red
Set up:
Left A – D all four black/white
Right A – D all four red/white
Lowest braid – 50/50 multicolor zig-zag (50/50, but the zig-zag looks narrower, because the gold is so light it blends with the ‘background’ white, so the 4 purples seem to be the main zig-zag)
8 bicolor loops: 4 gold/white, 4 purple/white
Zig-zag color sequence is 3 gold, 4 purple, 1 gold
Set up:
Left A purple/white, B gold/white, C purple/white, D purple/white
Right A gold/white, B purple/white, C gold/white, D gold/white

8-loop flat double braid – Rainbow 50/50 zig-zag pattern
8 different bicolor loops all with 1 white shank
Double braid loop order, starting with 1st loop to be turned:
Right C, D; Left B, A, C, D; Right B, A
Zig-zag color sequence:
Red, purple, blue, green, lime, yellow, orange, pink.
Set up:
Left A green/white, B blue/white, C lime/white, D yellow/white
Right A pink/white, B orange/white, C red/white, D purple/white
Posted March 6, 2019
Last updated Oct 11, 2020
© 2019-2020 Ingrid Crickmore


Fascinating and intricate!
Thanks, I’m so glad that you find little braids fascinating! I was fascinated by your guitar + tatting avatar and visited your blog, just emerged, but will be back for sure. (I’d say tatting probably beats braids for intricacy!)
You’d be surprised! It’s not as tricky as it looks. Thanks for coming past my corner of the internet. 😉
I’m going to try that braiding when I get a chance…
Good to receive your post. The desert will be green this spring. Hermi
Hi Hermi! so great to hear from you here! I know, I can almost hear the plants popping out!