This video-based tutorial teaches a 7-loop flat braid with an extra move in some of the loop transfers. I call that extra move color-linking. It’s a way to link loops of different colors, so that whichever color or colors you choose will stay within one narrower section of the braid, instead of migrating across the whole braid.

Flat 7-loop braids with color-linking
Color-linking is optional in a braid—it’s a technique that gives you more control over the color patterning. You can choose to do it for the whole length of the braid, or you can stop linking for some sections, or keep linking some of the color groups but not others. I demo linking here in flat braids, but it can be done in other types of braids as well. Linking different-color strands in braiding is not something I invented! It was done in several of the braids notated in the 15th and 17th C. English loop braiding manuscripts, as well as probably every other complex braiding tradition, from kumihimo to sprang to ply-split braiding. It’s an obvious thing to try, if you are into experimenting, which is how I started doing it, but later when I read Noemi Speiser’s book Old English Pattern Books for Loop Braiding, I realized it was the same thing as what the old pattern books called “changing twice” for certain desired color-patterns.
In my header/ banner photo, the 4th [oops!] 5th braid from the left required color-linking to keep the blue strands only on the edges of the braid. The tall braid in my sidebar photo was also made using color-linking for the various patterns. (Neither of those two braids had any bicolor loops.)
In the “Notes” section at the end of this tutorial, there are photos and set-ups for two color-linked 9-loop braids, and a 13-loop version, also a photo of a 15-loop flat double braid with color linking.

7-loop flat braids, two variations of the same color-linked pattern. (set-ups described below videos)
The samples in most of these photos were made with embroidery floss, which makes a small, fine 7-loop braid. In the video, I braided with a thicker cotton yarn (about the same as doubled embroidery floss) – a thickness that seems to be called ‘sportweight’ in the U.S. In photo below, the upper braid is the embroidery floss pattern sampler I showed in the beginning of the video, and the lower braid is the one I made in the video, using cotton knitting yarn (old Elann.com “lara” and similar multi-strand yarns).

In a flat braid, any colors that are not “mirrored” on both sides from the center must be bicolor loops – here the blue and orange strands are bicolor blue/orange loops; the white and black strands are single-color white and single-color black loops.
If you haven’t made “regular” 7-loop flat braids before, learn them first, from my “Continue Here” 7-loop square and flat braids tutorial.
Color-linking adds extra moves to the basic 7-loop square or flat braid moves.*
This 7-loop flat braid has color-linking in only one place in the braid, between the left-hand loops and the right-hand loops. The right (single-color) loops create the blue borders on both edges of the opened-up braid; while the bicolor loops on the left hand create the central blue-and-white pattern. Taught in the “Notes” section below. (no video)
Color-linking, part 1:
Drag the bubble on the timeline under the video to go to the following points:
0:30 Showing the various color-patterns in my sample braid that can be made with the same loop color set-up.
1:07 New technique: Color linking
1:30 How to arrange the loops on the fingers for this braid (2 black, 2 white, 3 bicolor loops)
2:50 Explanation of the braiding moves for a flat braid with color-linking
3:11 Braiding starts
4:25 Braiding moves explained, and continued
8:40 Showing the braid
Color-linking, part 2:
Timeline:
0:00 View of braid sample showing other possible patterns.
1:26 Braiding moves for the 2nd color pattern: no linking on left loops, only on right loops (3-color chevron pattern in the center of the braid, black border on the two edges).
4:15 Bicolor loops have already changed to “turquoise up/ orange down” and are now changing back to “orange up”.
4:55 All colors back in original starting position. Checking for mistakes and looking at pattern in braid.
(I stopped here to hurry on to the next pattern, but this is not enough pattern repeats for a “real” braid! Repeat these moves in your own braid at least several more times to get a good example of this pattern.)
Color-linking, part 3:
0:00 Third pattern–a variation of the second pattern that requires another type of linking: turning bicolor loops twice to keep the same color uppermost.
1:32 How to turn bicolor loops TWICE to keep the same color on top.
2:56 A faster way to make that double turn of the bicolor loops.
5:24 Comparing the last two patterns (taught in this video and previous video-part 2).
7:12 Different appearance of the top and bottom surfaces of the braid
Two types of color-linking
Part 1 introduced the “whole-loop” color linking that I do in all three videos, and Part 3 introduced another kind of linking – “turning twice” – that is only used with bicolor loops. (If you did it with a single-color loop it would have no effect on the color pattern.)
My Terminology page has a description of these two quite different ways to link colors here.
That second type of color-linking I also taught previously, in another color-pattern for a flat 7-loop braid. That was in my Color-Pattern Planning post. It was used in the lower braid in the photo below, to create the two lengthwise columns of dark purple and gray (from the purple/gray bicolor loops). The contrasting orange pattern is formed by two single-color orange loops.

Two 7-loop flat braids (wool). Lower braid has color-linking at the single turned transfer (bicolor loops are turned twice). Upper braid is an example of a typical 7-loop flat braid with no color-linking (and no bicolor loops).
Here are the set-up and instructions again for that braid:
5 bicolor purple/gray loops, 2 orange loops.
Left: A,B orange; C,D bicolor, with purple shanks up.
Right: A,B,C all bicolor loops, purple shanks up.
For this pattern, all the purple shanks should be up on both hands, and should stay that way throughout the braiding procedure.
Flat braid, but each time a loop is to be turned, turn it twice, ie give the loop a 360º turn instead of a 180º turn. (This double turn is optional for the all-orange loops—ok to turn them only once.)
Turning the bicolor loop twice causes the upper and lower colors to link around each other, rather than to cross each other. Each color will stay on separate layers of the braid, as in a divided braid of bicolor loops.
In the upper half of that braid, slightly to the right, there’s a short section in which I did not turn loops twice—that’s the section where the purple and gray colors (of the bicolor loops) zig-zag back and forth across the braid instead of keeping to separate columns. That is what makes color-linking so fun—it gives you the ability to play around with the pattern.
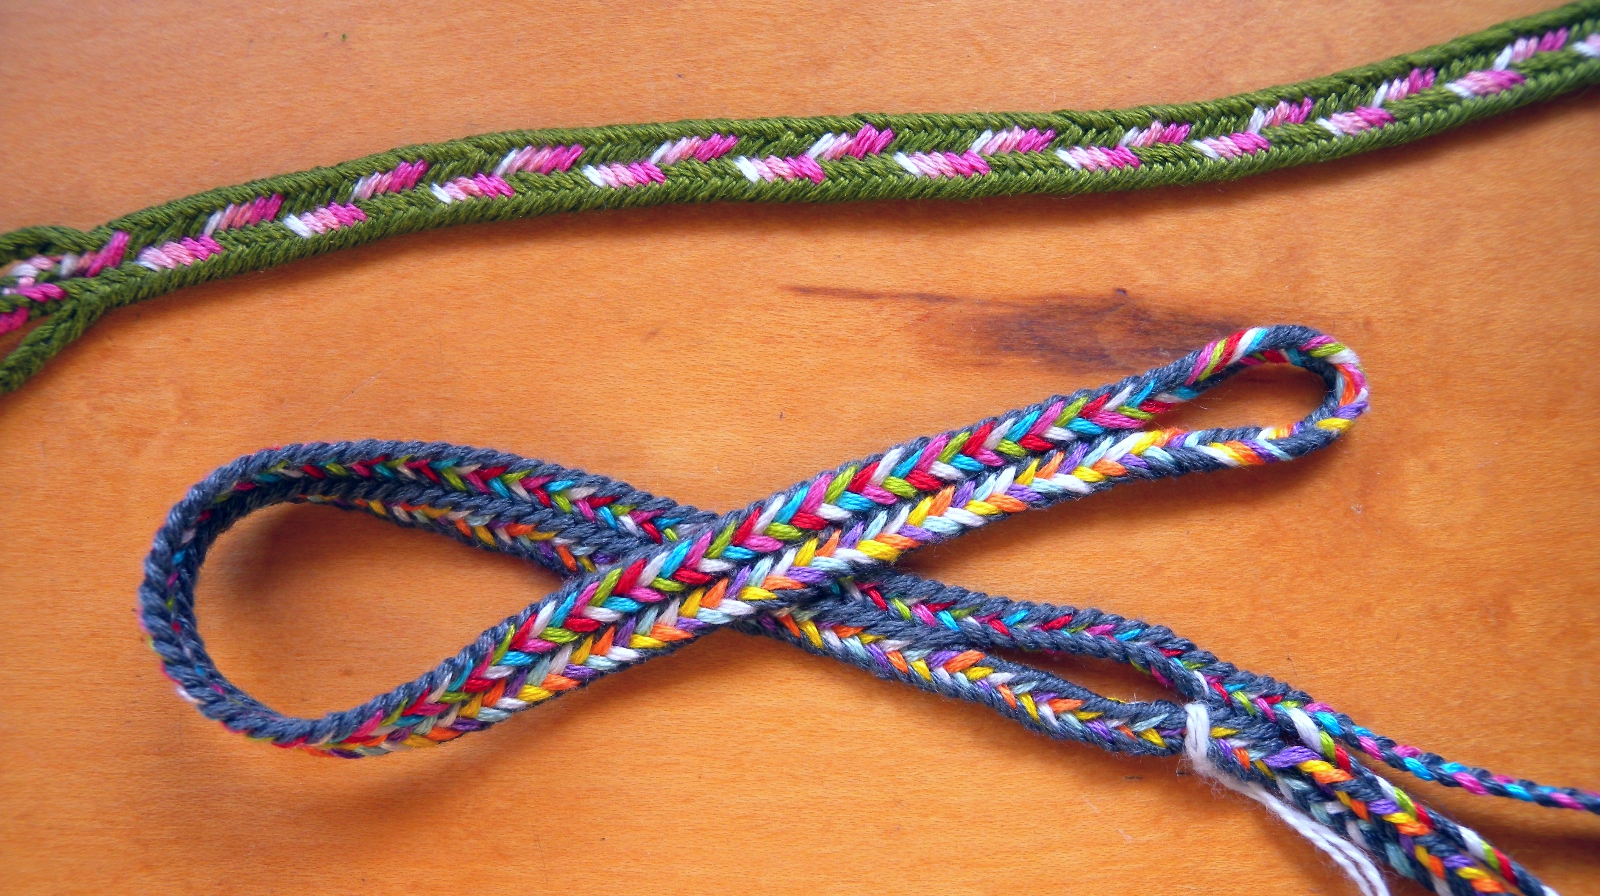
Another possibility is to alternate between 2 patterns in a very regular repetition that itself creates an overall pattern. The two braids in the photo below start out with basically the same color-pattern. But in the black and multicolor braid, I periodically interrupted the color-linked columns with 7 braiding cycles of no linking (those are the somewhat M or W-shaped interruptions of the lengthwise pattern).

Two 7-loop flat braids with variations of the same pattern. In the lower braid, the colors of the two columns switch sides. The M-shaped interruptions in the pattern are the sections where I did no linking, so the colors could switch.
Setup for both braids in photo above:
4 dark loops of the same color, and 3 bicolor loops
Upper braid’s bicolor loops are pink + green.
Lower braid’s bicolor loops are each slightly different, but each one has a pale cool-color shank and a pale warm-color shank.
Left: A,B dark loop; C,D bicolor loop (warm shank up/ cool shank down)
Right: A,B dark loop; C bicolor loop (warm shank up/ cool shank down)
Left index loop always transferred with a turn, no other transfers turned.
Columns of separate colors:
Braided as in the first pattern in the videos.
Zig-zag interruptions:
Stop all linking for exactly 7 braiding cycles. (A cycle is one left and one right loop transfer—one repeat of all the braiding motions.)
It will take 7 braiding cycles for the dark colors to return to the A and B fingers and the bicolor loops to return to the Left C and D, and Right C fingers. At that point, return to linking at both color-boundaries.
Cool colors and warm colors will now be in opposite arrangement, so will line up on opposite sides of the braid. If you don’t want the cool and warm colors to switch sides in the braid, keep doing the no-linking section for 14 cycles instead of 7. That will bring the loops back to their exact original positions, including the shanks of the bicolor loops. The zig-zag interruption sections will be twice as long.
The column pattern has a one-cycle pattern repeat, so it can be braided for any number of cycles. The length of my column sections varied from 6 to 8 cycles long. If I had been more careful about counting the cycles while braiding, the spacing would have looked much better!

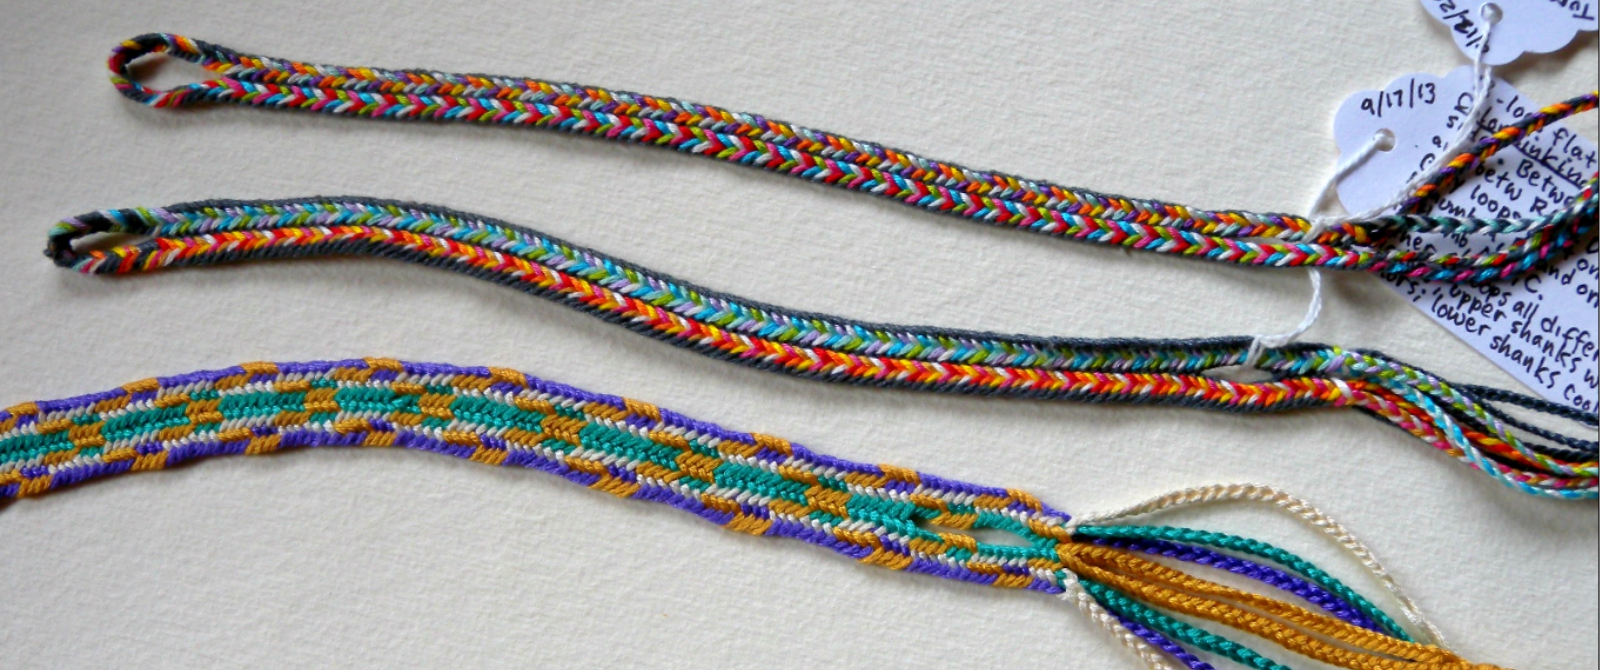
7-loop color linking patterns. (click photo for clearer image)
Starting setups for color-patterns in photo above
No bicolor loops. 2 turquoise, 3 white, 2 golden brown loops.
Left index loop always transferred with a turn, no other transfers turned (both braids).
Lower braid:
Left hand A,B turquoise; C,D white
Right hand A,B brown; C white
This is “Set-up 1”— the starting color set-up for all three flat braid patterns in the lower braid.
1st pattern: Both color-boundaries linked (left and right loops, as taught in first video)
2nd pattern (Brown borders, turquoise and white central chevrons): Left loops NO linking. Right loops linked to bring brown loops back to A and B fingers at the end of each braiding cycle.
To return to 1st pattern:
Braid until all colors return to their starting color set-up on the fingers (listed above). At that point, resume linking the left loops as well as the right.
3rd pattern (just above loop/ buttonhole at bottom of braid):
Check to make sure that all your loops are in the starting setup listed above. Then, keep linking the left loops, but don’t link the right loops.
Borders of braid have diagonal brown and white stripes, center of braid is a lengthwise turquoise stripe.
7-loop color linking patterns. (click photo for clearer image)
Upper braid:
Some of the patterns start with Set-up 1 on fingers as described above.
Others have the opposite starting setup:
Setup 2:
Left hand A,B brown; C,D white
Right hand A,B turquoise; C white
(Note: For both set-ups, the three white loops may actually start on Lc, and Rc,Rd instead of on Lc,Ld and Rc—This just affects which side starts braiding the pattern, not the pattern itself.)
The first section of the upper braid has divided and then square braiding with no linking.
Then, in the next pattern the braid opens into a flat braid with no linking.
For those “no linking” sections, the starting set-up on the fingers can be either Setup 1 or Setup 2 above, with identical results.
(from here on the braid is flat)
Next pattern is started when loops have arrived at Set-up 2 position.
Left loops linked, Right loops NOT linked.
Pattern has central brown column, outer turquoise and white diagonal stripes.
Next pattern has same braiding moves, but starts with Set-up 1.
To get from one set-up to the other:
Continue the pattern you are braiding until your loops have returned to that pattern’s “starting setup” position.
Then, braid without any linking until colors on La,b and Ra,b have switched, and white loops are between them.
Next 2 patterns are the same as the first and second patterns in lower braid.
Last 2 patterns are the exact opposite—turquoise and brown must switch hands (braid without linking until they have switched).
Notes:
Color-linking can also be done with 5-loop and even 3-loop braids, but the resulting color patterns will be very reduced.
Color-linking is my term for a basic color-manipulation technique that is common to many braiding traditions—including ceinture fléchée/ Métis sashes (“finger weaving”), kumihimo, kute-uchi [update: see my more recent Itsukushima braid post for an example], and ancient Andean braids. It was used in some of the medieval and 17th century braids described in the old loop braiding manuscripts, in both forms — turning a bicolor loop twice so the two shanks become linked, as well as “changing” twice—bringing one loop through another and then repeating this so both shanks of two loops link around each other. Typically this is done with the two loops of the loop exchange (the last move of a double braid). But it can also be done as part of a loop transfer, with any two loops that would normally cross each other.
See Anne’s note in the comment field below, with a link to a photo of color-linking in a ply-split braid.
In these videos the first color-linking pattern I demo is done symmetrically, on both sides of the braid, whenever a loop from the A-finger (index) passes through the loop on the C-finger (ring finger). I picked this pattern because I thought color-linking might be easier to learn if both hands performed the same motions.
But color-linking can actually be done anywhere in a braid. You can set up your color groups on any group of adjacent fingers, in any numbers of loops that you choose. Linking can occur between any two fingers, or in the center of the braid, between the two hands, as in the braid below:

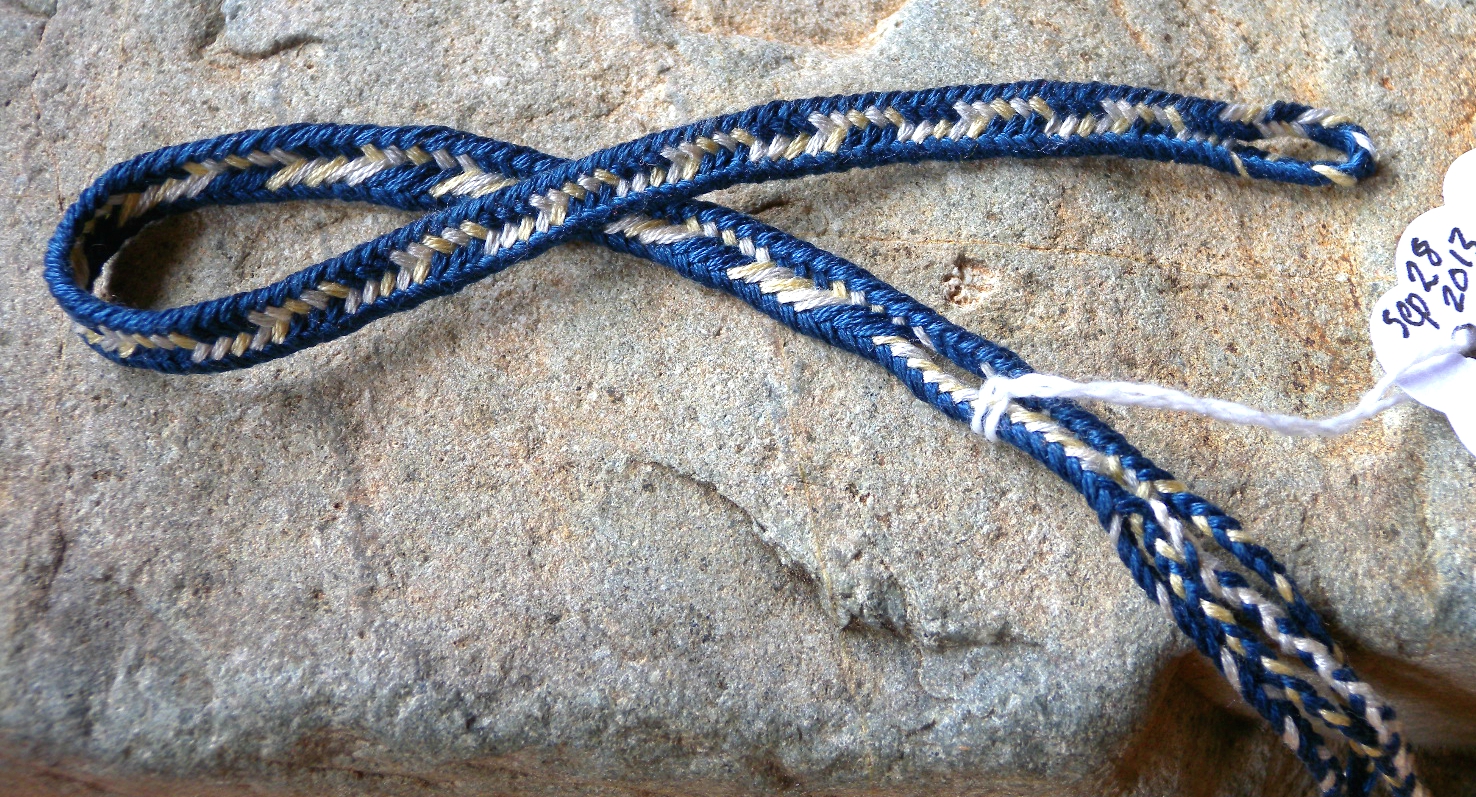
7-loop flat braid, with color linking between left and right loops.
3 all-navy loops
3 bicolor navy + white loops
1 all-white loop
Left: A white; B,C,D bicolor (white up/ navy down)
Right: A,B,C all navy
Flat braid. Left A loop always transferred with a turn.
Left 4 loops and right 3 navy loops are linked throughout braid.
Because of this, at the start of each cycle the white and bicolor loops are all back on the left hand, and the navy loops are all back on the right hand.
The linking move doesn’t happen until after both the left and the right loop transfers are finished.
1st transfer:
Left transfer happens normally (no linking move yet).
La ends up on Rd (with a turn).
Shift L loops and tighten.
2nd transfer:
Ra is transferred, ending up on Ld (with no turn)
BEFORE right loops shift up, Ld ALSO takes Rd (right little finger loop) and holds it toward the tip.
Now the Rd-finger takes the lower of the two left d-loops and lifts it off and over the upper left d-loop (the one near the tip). This links the two loops and they both end up back on the original hand they started out on, though now on a different finger of that hand.
Shift right loops, and tighten.
Repeat.
The particular motions you use to accomplish the color-linking might look a bit different in different parts of the braid, but the principal is the same: loops of two different colors become linked around each other in order to make a U-turn and head back in opposite directions. They don’t pass straight over/ through each other and keep going, the way they normally would in the braid.
There is always an extra step at some point in the cycle. The extra move brings one loop back through the transferred loop that just came through it. Or you might do it this way: by bringing the just-transferred loop back over/around a loop it just came through—produces the same net result.
Here are some photos of flat braids of more than 7 loops, and very similar color patterns to the ones taught above:
9-loop flat braids with color linking, 2 color patterns
Upper braid:
4 green loops, 5 bicolor green + pink loops (I used three different shades of pink, but that isn’t necessary)
Left: Thumb,A,B,C,D all green
Right: Thumb,A,B,C bicolor pink up/ green down
Flat braid. However, for the pattern in the photo, the right A loop must always be transferred with a turn, not the left.
(Or, if you prefer to turn the left loops: Set up these colors on opposite hands. This means you will start each braiding cycle with the left hand as the active hand, and the linking moves will be reversed–as if in mirror-image to the way I described above for the navy-and-white braid.)
[12/30/2013 edited to fix left-right error]
Left and right loops are linked.
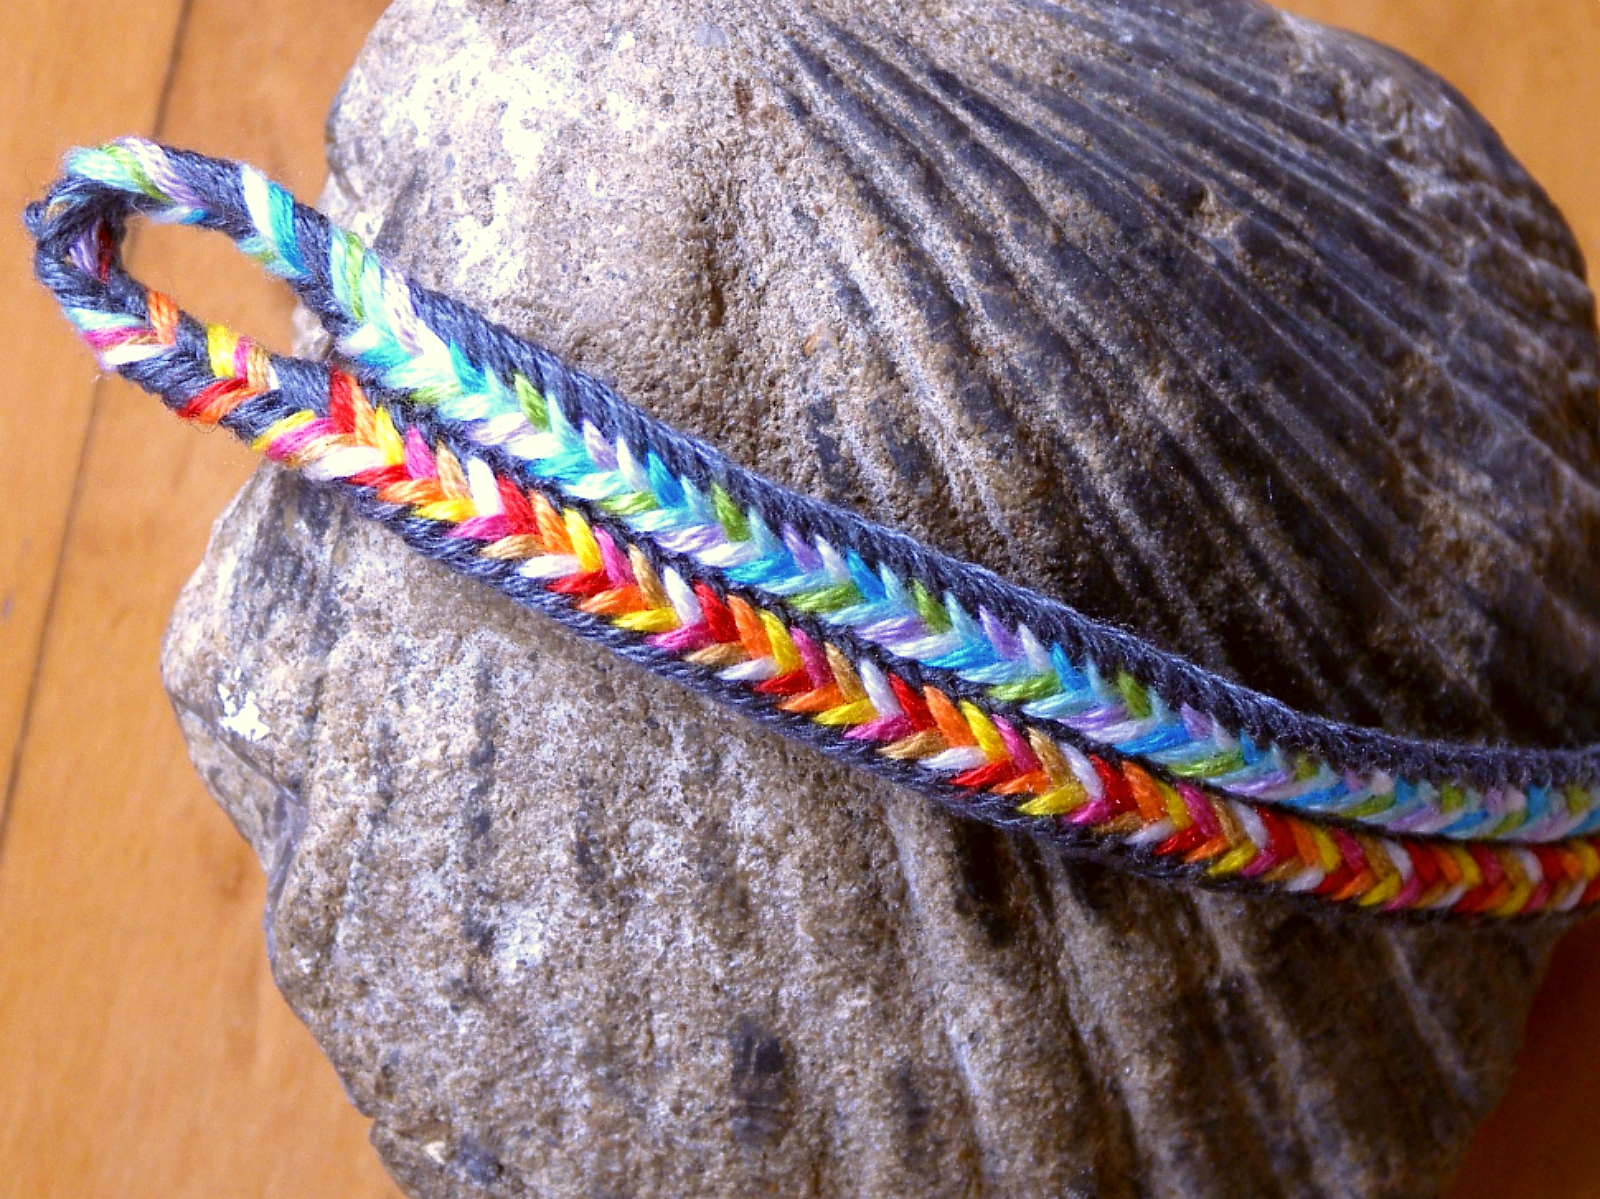
Lower braid:
4 all-gray loops
5 bicolor loops, each one different.
My bicolor loops were (upper shanks listed first):
turquoise/light blue
white/purple
red/orange
lime/yellow
pink/white
The colors of the upper shanks will all line up on one side of the braid, and the colors of the lower shanks will line up on the opposite side of the braid.
Left: Thumb,A gray; B,C,D bicolor (warm shanks up)
Right: Th,A gray; B,C bicolor (warm shanks up)
Braided a bit differently than in the video, as the linking will occur between the A and B fingers. For the first stage of the loop transfer, insert the operator finger through the B-loop, not the C-loop. (Learn 9-loop braiding moves here.)
9 and 13-loop flat “square” type braids, and a 15-loop flat double braid, all with color-linking. In the 15-loop double braid at the bottom, the gold loops are never linked, so they move freely across the braid, while the other color groups always link to rather than cross each other (except for the gold loops). The green, white, and purple areas never cross each other.
13-loop flat braid (flat 2-transfer ‘square braid’ type, not a flat double braid).
[Update Feb 9, 2014: I just posted a video demoing how I make this braid]
13-loop braid:
7 dark loops, 6 bicolor loops (one shank cool color, one shank warm, each loop different colors)
Left:
Thumb, A, B dark; C, D-low, D-mid, D-high bicolor (warm shanks up)
Right:
Th, A, B, C dark; D-low, D-mid bicolor (warm shanks up)
Linking happens on both the left and right loops, but in different places. On left the color-border is between the B and C loops. On the right hand, the color-border is between the C-loop and the D-low loop—requires a temporary hold of the D-mid and D-high loops for the linking move.
Last updated Sep/25/2018
© 2013–2018 Ingrid Crickmore
See full copyright restrictions and permissions at the bottom of the sidebar (if you are on a small screen, the ‘sidebar’ may appear at the bottom of your screen).


Hello, i just wanted to thank you. I am a 43 year old father of 3. My youngest are my girls. Ages 10 and 15. Well at their ages they start breaking away from dad and seeking out the mall and friends. No more daddies little girls. Well I have been big into paracord for a while,but when I came across a video on youtube for fingerloop braiding I was hooked. After watching countless videos yours was the only ones I could understand and follow. I showed this to my girls and they went crazy too. It seems that maybe just for a little while longer I get to be the king in the eyes of my princesses. I am permanently disabled and recently found out I have cancer to boot. I cherish every moment with my loved ones and your videos have given me the daddy daughter time I cherish so much. Thank you so much.
Thanks so much for your note! I am thrilled that you and your daughters have gotten so much from my tutorials!
Being part of helping a child’s creative joy is so special. Your daughters are lucky to have a dad like you! I am a preschool teacher so I know how important making things is to children. (And to a lot of us adults, too, actually!)
Wishing you continued joy in your daughters and in life!
A lot to sink one’s teeth into here! The color link, as you name it, reminds me of a technique in ply split braiding called twined interlinking which is usually used to control color in single course oblique twining (SCOT). If you look at Linda Hendrickson’s facebook page, https://www.facebook.com/LindaHendricksonTabletWeavingPlySplitting , the second from right braid at the top is an example of this, keeping the green in the center and blue on the edges.
Hi Anne! That’s a great example—you can clearly see the two colors linking around each other. I’ve seen color-linking in ceinture fléchée type braids, too, but couldn’t find any photos (didn’t look hard enough, probably). I’ll bet it’s been done in most braiding traditions that involve colorwork…It must be in Peruvian braids, we’ve probably even done it in Rodrick’s workshops but I’m drawing a total blank now on any examples…
[update – Linda Hendrickson’s facebook page shows different images now, here’s another example of what she terms twined interlinking, one example of what I call color-linking – I’m using it in a broader sense, I guess, that includes any type of twined or twill or plain weave braiding. Basically, just strands of two different colors linked together]