Actually, this braid is the flat variation of a square braid. I just wanted to make it clear that it’s not a double braid. (More about square braids here, and about double braids here.)
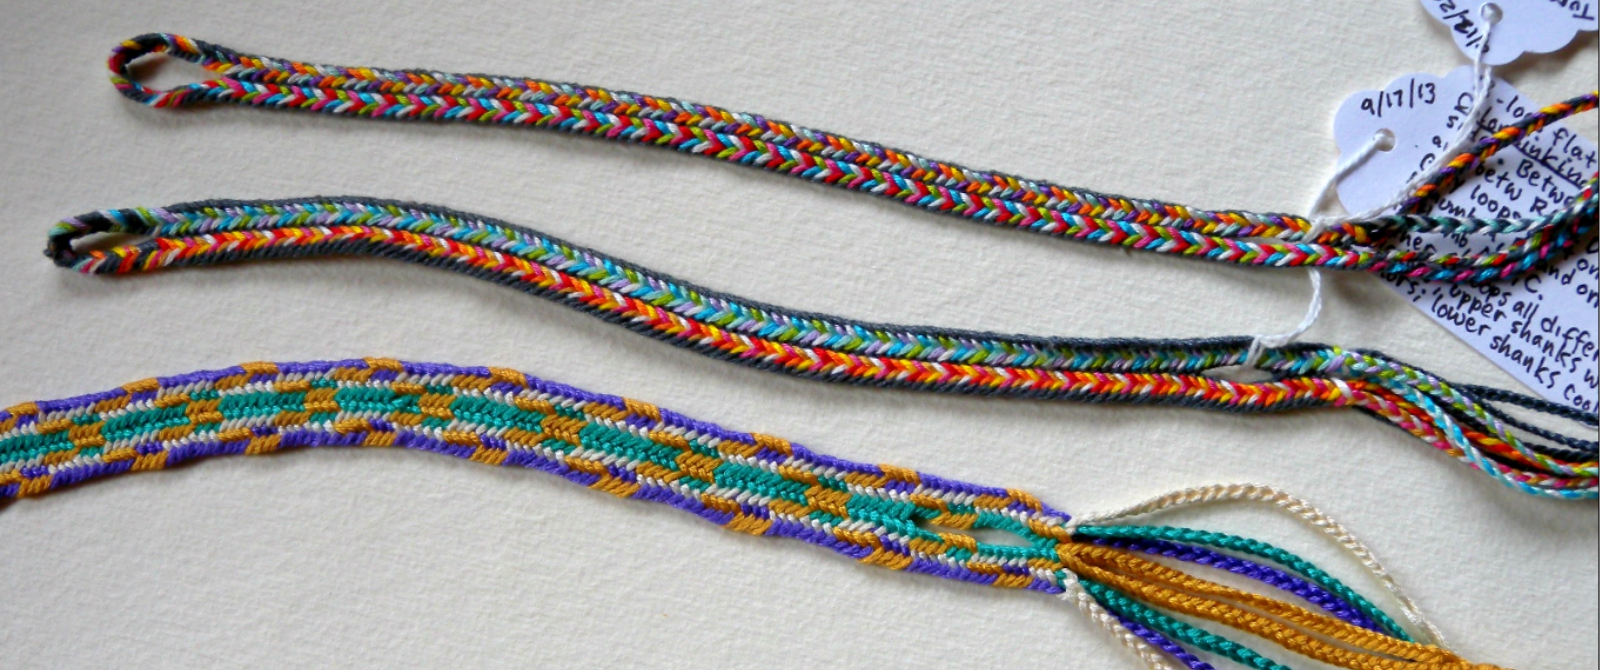
3 different flat braids. The center braid is the one in the video. Upper braid is similar: a 9-loop flat square braid, and lower one is a 15-loop flat double braid. All three have color-linking patterns. Linking the loops while braiding keeps some of the colors in straight lengthwise columns, rather than running diagonally across the whole braid.
The center braid in the photo is the one I’m demoing in this video. The upper braid is a 9-loop braid with a very similar color-pattern. I describe the loop set-up and braiding moves for the 9-loop version at the end of my Color-linking in a 7-loop square braid tutorial. Btw, even though neither of these are beginning-level braids, this site does have tutorials for many easy and beautiful fingerloop braids, see my Tutorials index.
Flat version of a 13-loop square braid, plus extra “color-linking” moves in each loop transfer.
Slide the moving line under the video to any of the time-points listed below to see that part of the video.
0:00 Setup and explanation of braiding/ linking moves.
4:13 Actual braiding starts here, after I fix an initial error.
(To see the braiding moves with less/no explaining, skip to 14:25)
5:58 Explaining left side moves.
6:45 Explaining right side moves (not the same as the left side moves).
11:42 Here’s where I make another mistake – I go through the grey B-loop to start my transfer, instead of the bicolor C-loop.
12:03 At this point I notice the mistake (because a grey loop is where it doesn’t belong), and unbraid it.
13:35 Continuing after undoing the mistake
14:25 Good time-point for watching braiding moves without a lot of pausing and talking on my part.
16:39 Here I show another way of setting down a partly-done braid to finish later: Tying groups of loops together. This is a no-equipment alternative to using a wide-tooth comb and rubber band, as shown in my other videos.
This video is rather out-of-place as I haven’t yet posted a video for regular 13-loop square braids. I do have a text how-to for them, though — it’s within my 11-loop tutorial.
You’ll need to be well-practiced in regular 13-loop square braids before tackling this one — the additional color-linking moves make it more complicated.
The main reason I’m posting this out-of-place video is that I’ll be on a long trip through the rest of Feb and March, and I don’t have anything else ready to post! So this is it for now. I made this video back when I was preparing my tutorial on color-linking in 7-loop flat braids, and photos of this braid are in that tutorial.
This is a wildly complicated braid because of the color-linking for this particular color-pattern. Color-linking adds even more braiding moves to the 13-loop square braid procedure. On top of that, for this pattern the extra moves are not symmetrical across the two hands. The linking moves occur in different places on the two sides of the braid. I think I set the braid up this way because I wanted the middle gray lengthwise column to be a bit wider than it would have been otherwise. This isn’t necessary, in fact. You could choose to set up the loops the same way on the two hands (same arrangement of gray and bicolor loops) so the left and right braiding moves would be the same. The finished braid would look only slightly different from this one.
Moves in this braiding procedure
In case anyone wants a rundown, here’s what you’re seeing in the video: The way I make all 13-loop square braids, the index finger (a-finger) fetches loops instead of the d-finger, because the d-finger that should do it is already holding two loops. They would slide together and get mixed up if that d-finger were used to fetch its next loop. So the index finger does the fetching, and afterwards one of the fingers of the other hand will “ferry” the transferred loop off the index finger, and over to the d-finger where it really belongs.
In order to link the color-groups into separated columns, on each side of the braid it takes two loop-pulling moves to accomplish what is essentially one loop transfer. That’s because the first loop is only pulled partway through the other loops, and set down at that half-way point.
After that, a second loop-pulling move occurs, in which a loop of another color links onto that first loop, and subs for it through the rest of the loops, finishing the loop transfer. See my earlier tutorial on color linking to learn how to do this in a 7-loop braid, with no thumb-loops and only one loop on any finger.
(Since the right hand has a different arrangement of gray and colored loops than the left hand, the linking move occurs in slightly different places on the two hands.)
In my 11 and 13-loop square braid methods, the d-fingers hold more than one loop. The extra loop or loops are temporarily held by the other hand during the loop shifting, so the lowest loop will be able to shift up to its new finger. Then the temporarily-held loop(s) is (are) replaced onto the d-finger. I demo this in my 11-loop tutorial. The 13-loop temporary-hold move is exactly the same, except that you lift two loops off the D-finger (at the same time) instead of just one loop.
The “ferrying” move:
The one extra move for a 13-loop braid (from an 11-loop braid) is at the end of the loop transfer. Even though an A-finger (index) does the actual transferring, the transferred loop still needs to end up on the D-finger (little finger) of that hand, as its third/outermost loop. Any finger of the other hand can “ferry” it over from the A- to the D-finger. I usually use the finger that just lost its loop—the one that had originally been holding the loop before it got transferred. Usually that’s the thumb, but in this braid it’s the B or C finger, because of the two-part linking moves.
Color set-up instructions; and linked sections for this braid’s color pattern:
Th=thumb, A=index, B=middle, C=ring, D=little finger
On D, high=outermost finger-joint, mid=middle joint, low=nearest to palm. (approximately)
13 loops: 7 dark grey, 6 bicolor
One shank of each bicolor loop is a cool color, and the other shank is a warm color.
In this braid, I used 12 different colors for the bicolor loops: six slightly different warm colors for the upper shanks, and six slightly different cool colors for the lower shanks. But even two or three different colors for upper and lower shanks would give a similar multicolor effect, see the lower of the two 7-loop braids in photo below. Or you could use the same two colors for all six loops, as in the upper braid in the photo below.
Left hand: Th, A, B dark grey; C, D-low, D-mid, D-high bicolor
Right hand: Th, A, B, C dark grey; D-low, D-mid bicolor
Warm-color shanks up, cool color shanks down for all the bicolor loops, both hands.
On a thumb, the so-called “upper” shank is the shank closest to the other hand (thumbs pointing up, hitchhiking-style), as long as you are following my directions for transferring loops to the thumb.
Text instructions for ‘regular’ 13-loop square braids are in my 11-loop square braid tutorial.
Set-up instructions for the both braids below are in my 7-loop color-linking tutorial.

Two 7-loop flat braids with variations of the same pattern
Mistakes in the video:
I made two mistakes while filming the video. The first mistake was right at the outset:
Before starting the video, I had braided a certain distance, then paused to set up the camera. I paused at a bad point—after finishing only the left moves, and not the right ones. After the camera was running, I started braiding on the left side again, instead of continuing with the right hand’s loops.
I had already explained the set-up and the first several moves before noticing I was braiding on the wrong side! I didn’t want to explain it all over again, so I just paused the video, fixed the braid and then continued. (sorry to be such a lazy videographer!)
The second mistake occurred later on, and this time I didn’t pause the video while correcting it. This shows a way I often unbraid when I’m holding too many loops to use A-fell moves:
I wrap the last-transferred loop around the tip of my finger, and then send it back through the loops it just came through. I usually use an index finger to do this, but here used a d-finger for one of the passes. Check the timeline below the video if you want to see that part. (I described this particular unbraiding technique in my post on unbraiding, but this may be my only example on video.)
You don’t necessarily have to understand a mistake in order to undo it. In this case, I didn’t realize what I had done wrong until later on when I watched myself in the video, yet it was still quite possible to undo the mistake. I highly recommend trying to unbraid mistakes, not to be a perfectionist, but to understand the structure of the braid (whether or not you understand the mistake)…I’ve spent a lot of time in Rodrick Owen’s workshops doing loop braiding side-by-side with his kumihimo students. Kumihimo braiders are always “backing out” of a braid — ie unbraiding — when things go wrong, and I’ve heard many of them say that it helps them understand the braid better. It’s the same thing with loop braiding, yet this never seems to be mentioned anywhere, so I think people get the impression that it must be impossible.
OK, that’s it for my rant and for this too-many-loops post. On my upcoming trip I will have occasional internet access, so please do leave any comments or questions below and I’ll reply as soon as I can.
©2014-2025 Ingrid Crickmore
last updated August 27, 2025
See full copyright restrictions and permissions at the bottom of the sidebar (if you are on a device with a small screen, the ‘sidebar’ may appear somewhere other than at the side).


Pingback: Demo: Color-linking in a 13-loop square braid | Loop Braiding | Knotworks
Hi, thanks for sharing! I greatly appreciate the opportunity to add a new skill that will complement those I’m in the process of refining. Enjoy a creative day!!!
You’re welcome, Nancy, thanks for the note!