The Video tutorial is just below the photo-tutorial. The two videos are a little long-winded but they do demonstrate the moves. You can skip any part by dragging the little bubble in the video toolbar.
Learn 7-loop, and 9-loop braids first, and practice 9-loop braiding until using thumbs is easy and automatic, before moving on to this 11-loop braiding method. Here you will be using thumbs, and holding two loops on one of the little fingers.
The “temporary hold” during the loop shifting is basic to all my other braids of “too-many-loops”.
Notes on color patterns, unbraiding to fix mistakes, abbreviated instructions, and more follow the tutorial.
Text-only instructions for the 13-loop square braid follow a question in the comment field below this tutorial.
Photo-Tutorial for 11-loop square braid:
My hand positions in photos are sometimes a bit contorted because in each shot I was trying to display all the loops clearly for the camera.
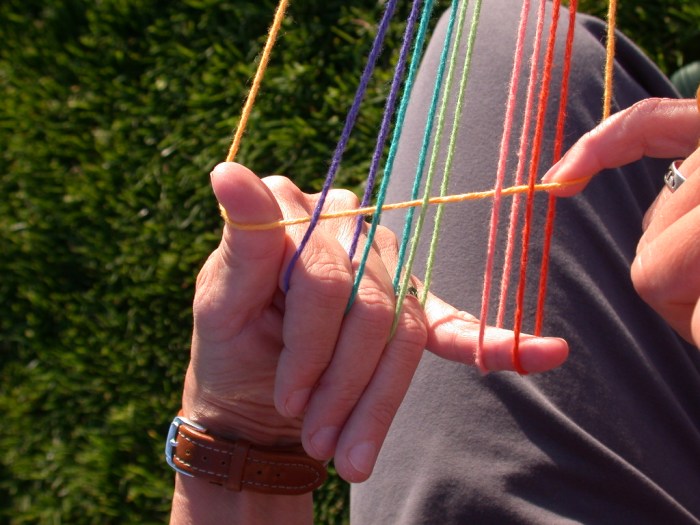
An 11-loop braid starts out with 5 loops on the right hand (one per digit), and 6 loops on the left hand. The left little finger holds 2 loops, one about halfway down the finger, and one in the crease near the tip. The right little finger holds 1 loop, low–at the base of the finger. That finger will be the first operator/ loop-fetcher.

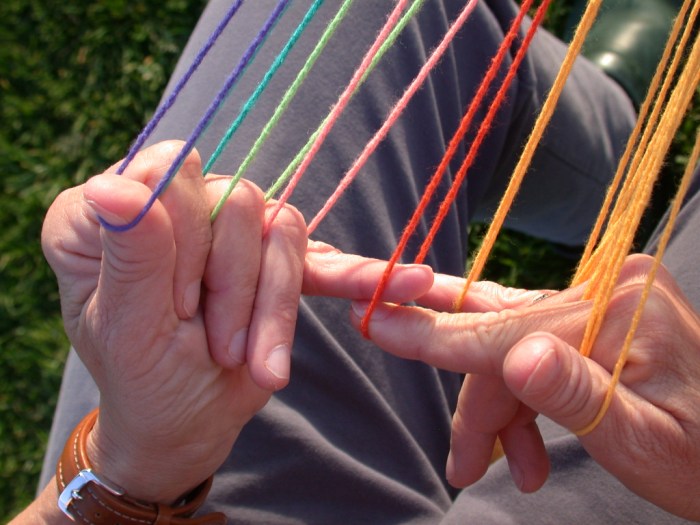
(1) Loop set-up: 2 loops on left little finger (pink and red); 1 low on right little finger (yellow).
Step 1. First loop transfer:
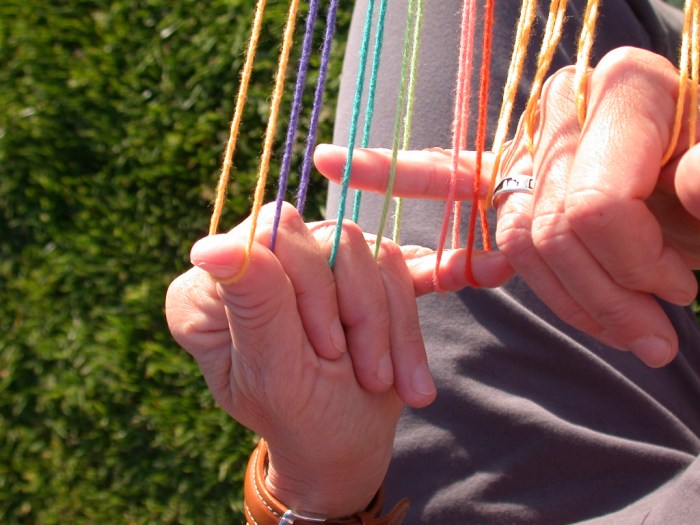
(2) fetcher finger–holding 1 loop low–tunnels through the left fingers’ loops to take the left thumb loop.
Carrying its original loop low, the fetcher – right little finger – goes through the left fingers’ loops: both loops on the little finger, then the rest of the fingers’ loops, all in one carefull pass, to take the thumb-loop (turned from above – see 9-loop photo-tutorial for this), and keep it in high position.
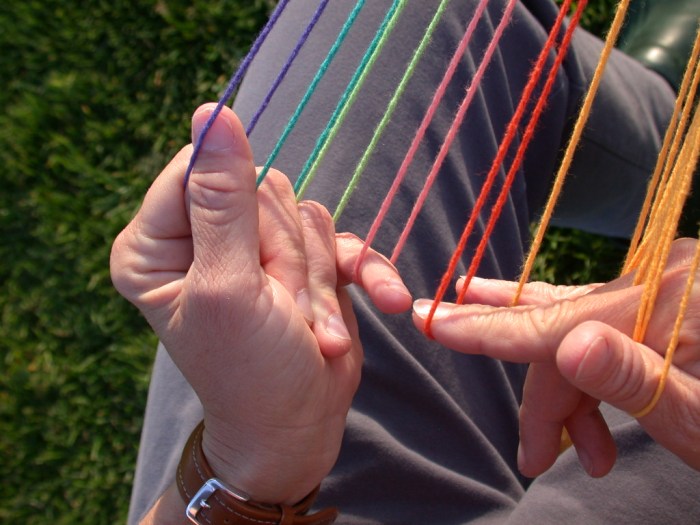
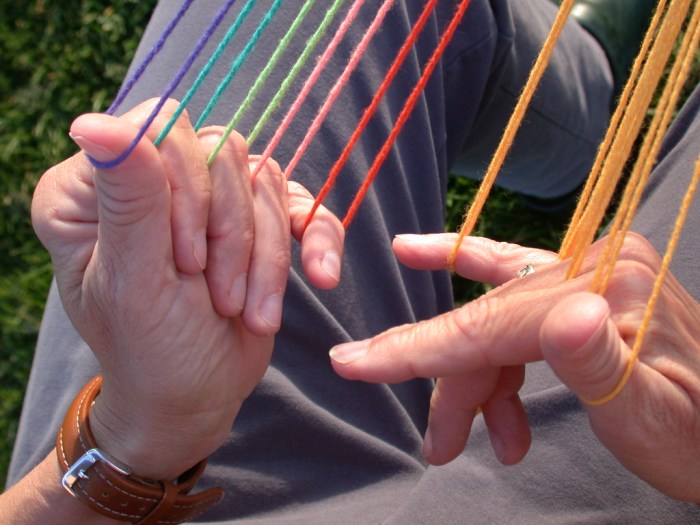
Below, the yellow ex-thumb-loop is now on the RIGHT little finger, in high position. (that finger looks weirdly big here because it’s closer to the camera) The right little finger is actually now holding two yellow loops–unfortunately the lowest one doesn’t show in this photo.
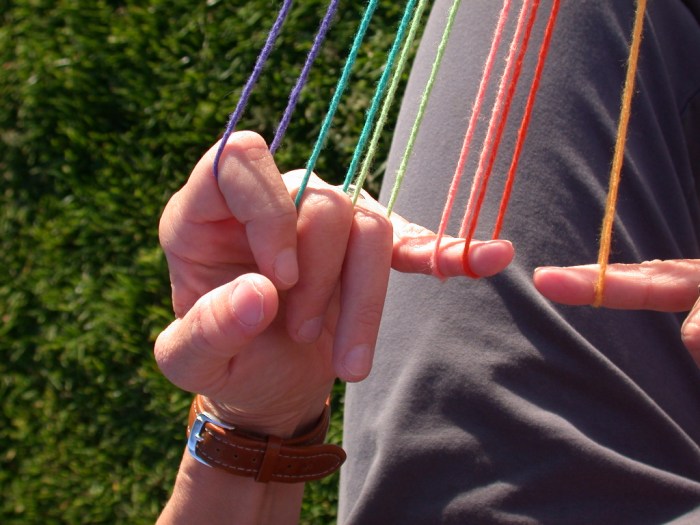
(4) Left thumb now has no loop. Right little finger’s new (high) loop is visible (yellow); the low (original) loop doesn’t show in this photo. In the next move, the red loop at the tip of the left little finger will be temporarily lifted off.
Step 2. Loop-shifting: One extra move happens before the L loops shift up–The uppermost (red) left little finger loop must be moved out of the way temporarily, so the lower (pink) loop can shift up to the ring finger:
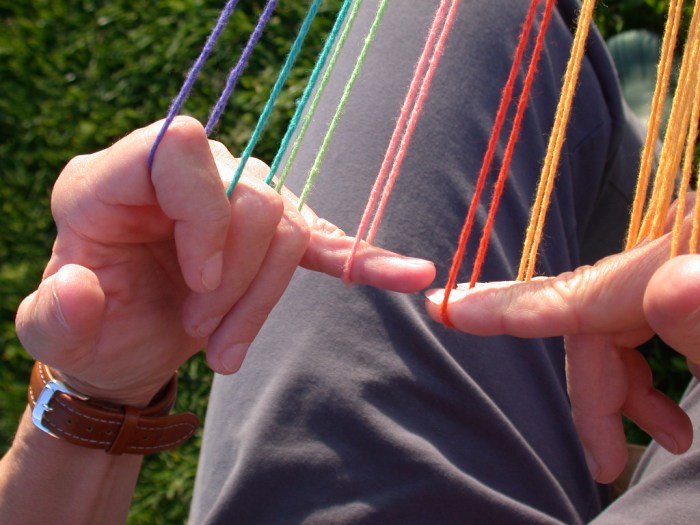
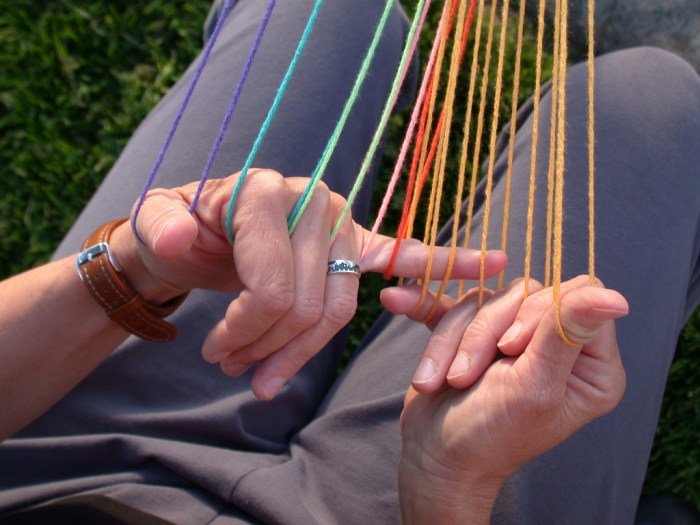
(5) Right index is temporarily holding the red loop from the left little finger, so left loops can all shift up one position, filling the empty position on the left thumb.
So, the right index will help with the shifting: it temporarily lifts the high (red) loop off the left little finger, and holds it while the left loops all shift up one position in normal fashion (see 9-loop tutorial), filling the empty space left on the thumb.
After the loops have all shifted up one position, the now-bare little finger reaches out to take back the red loop temporarily held on the right hand’s index finger.
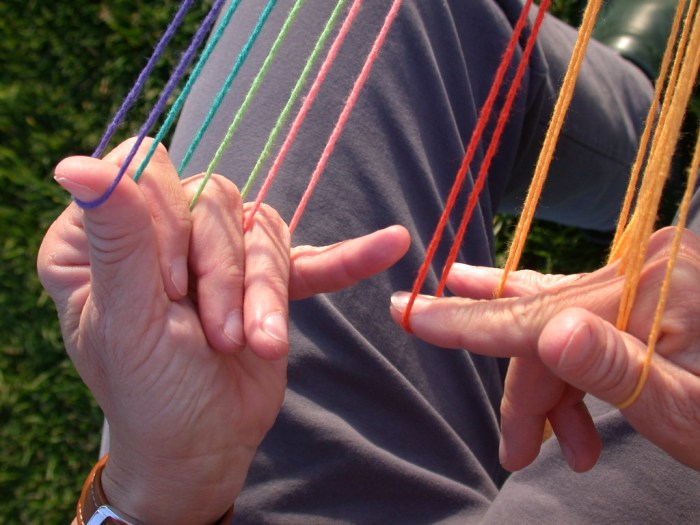
(7) Last loop shift–little finger reaches out to retrieve its old ‘high’ (red) loop from the helper right index finger
Before the next loop transfer, that red loop should drop down to be in low position, since that finger (LEFT little finger) will now be the next fetcher. After the next loop transfer, it will again be holding two loops: the red one low or mid, and a new (yellow) one high.
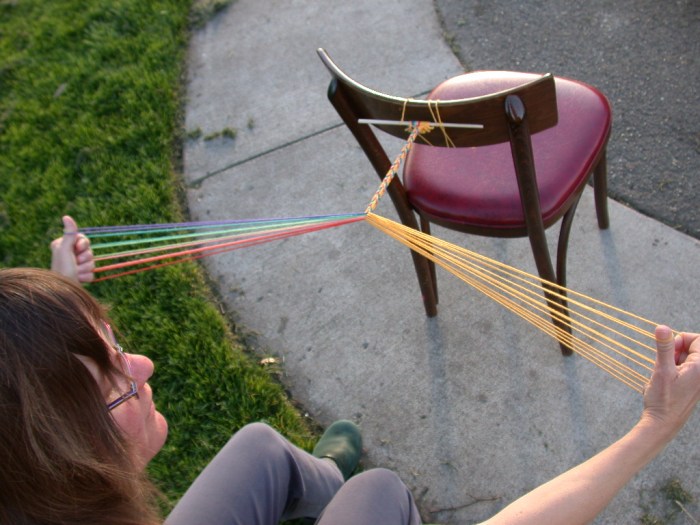
(10) Tighten outward in gentle but firm arc, til left and right loops are almost in a straight line.
Step 3. Tighten fell of braid–stretch Left and Right loops out to the sides til they make almost a straight line from one hand to the other (maybe even a little further than the photo shows). Repeat arc if necessary (do not jerk loops to tighten!)
After or during the tightening move, it might be a good idea to ease the low-position left [oops!] right little finger loop up a bit up to mid-position, but not too close to the new high loop. This isn’t completely necessary, but might help the next fetching/operator finger go through these loops more easily.
Step 4. Repeat above steps in mirror-image fashion:
2nd loop transfer in progress.
The active (here, left) hand’s loops are usually low at the base of the fingers during the loop transfer. Later they will slide forward to the middle or tips of the fingers for the tightening move, and stay there, because the loops must be “forward” – held near the outer finger-joints, not close to the palm – when they are the passive loops that the other hand’s operator finger will tunnel through. (see hand-position tips).
[I tend to slide the ‘fetching’ hand’s loops back down to the base of the fingers before the loop transfer, partly to prevent any of them from falling off, but particularly to get the loop on the d-finger all the way down to low position to make room for its new loop. Tip the whole hand to slide loops forward or back. For any braid, the loops don’t sit in one place on the fingers, you slide them forward and back as needed.]
Proceed with loop-shifts and tightening just as in first loop transfer.
One braiding cycle done. Repeat braiding cycles til braid is done.
11-loop square braids, first video:
Please ignore how often I repeat the tightening move! – it was a nervous habit of mine while I was thinking of what to say next.
Below is part 2—I had to break my initial video into 2 parts because it went over my (then) youtube maximum of 15 minutes. Both have useful tips for learning this braid:
Please leave a note in the comments section at the bottom of this post! I’d love to see any braid photos you care to show me – if so contact me (under the ABOUT tab in the upper menu bar) and I’ll let you know how to send them…
Notes:
For flat and divided 11-loop braids, see the videos in the 9-loop tutorial to learn how to do a loop transfer from the thumb without turning the loop.–Necessary for making a flat braid, or a divided braid (for a loop or buttonhole)
Abbreviated instructions
Finger and loop codes/ abbreviations:
L=Left, R=Right,
th, a, b, c, = thumb, index, middle, ring finger
d-low = base of little finger; d-mid = middle of little finger (middle crease); d-high = tip of little finger (upper crease)
In my instructions below, underlining indicates a loop; no underline indicates a finger. Most sources don’t bother to distinguish this – it really isn’t hard to figure out by the context.
11-loop square braid:
Loop arrangement at start of braiding cycle:
Right hand: 5 loops– Rth, a, b, c, d-low
Left hand: 6 loops– Lth, a, b, c, d-mid, d-high
Braiding procedure:
1. Rd thru Ld-high, d-mid, c, b, a, takes th (turned from above);
Rd holds new loop in high position, old loop in low position.
2. Ra temporarily holds Ld-high.
3. L loops shift up one position (to Lth, a, b, c).
4. Ld takes back the temp-held loop from Ra, keeps in low position.
Tighten
5. (optional but helpful–let Rd-low slide up to Rd-mid position)
Repeat steps 1-4 in mirror image–Ld will be the operator.
One braiding cycle done.
Color patterns
After 11 full braiding cycles (22 loop transfers), loops will be back on the same fingers where they began.
For an 11-loop braid, 11 full cycles = one color-pattern repeat (usually!).
See Planning color patterns for how to plan and set up for different color-patterns in square and flat braids.
See “unorthodox ll-loop braids” further down in these notes for other color-pattern ideas for these almost-square braids.
Unbraiding
Unbraiding is the best way to understand the structure of any braid, and is the only way go back to undo a mistake. By the time you get up to 11-loop braids, unbraiding becomes an essential part of the braiding process. Eleven loops is so many that you won’t want to start a braid all over again when you make a mistake, and there are some mistakes you probably won’t want to “live with”.
(If you’re like me, you’ll have a lot of them in your first few 11-loop braids! Save unbraiding for later, after you are used to the braiding moves.)
With 11 loop braids, there is no equivalent A-fell method to use for unbraiding, the way there is for unbraiding 3 to 7-loop braids. But you can still unbraid by reversing your braiding motions and sending loops back the way they came. See my post on unbraiding.
Using the little fingers (d-fingers) to hold the extra loops (for braiding too-many-loop-braids)
This was my main breakthrough in trying to figure out a workable way to braid with more loops. Holding the extra loop on the d-finger means no extra moves for the loop-transfer, and also makes the loop-shifting much simpler than if extra loops are held on other fingers.
In fact, even holding two extra loops on the d-fingers for a 13-loop braid doesn’t require any extra moves for the loop-shifting than this 11-loop method (it does require one extra step for the loop transfer). During the temporary hold, you lift both extra loops off at the same time, and replace them with one move as well. [new–I’ve added a text tutorial for my 13-loop method below, in the Comment section].
Using thumbs with V-fell (aka method 2) fingerloop braiding:
This is documented from Finland. It was also ‘documented’ to me by first-hand report, from someone who learned how to braid 9-loop V-fell braids in China in the 1940′s. I have more about this, also how I stumbled onto the V-fell braiding technique, in my 9-loop tutorial′s notes.
Square braids of 11 loops can be less neat in appearance than square braids of fewer loops. Especially if you are using very fine, slick thread, a single contrast color loop can disappear occasionally in the pattern–sinking into the mass of threads that make up the extra-long 5/5 twill floats on the four ridges of the braid. [This did not happen in my 11-loop video demo, using thicker, smooth cotton yarn—the single light-color loop stood out cleanly throughout the braid.] With fine, slippery thread, I suggest using at least two adjacent loops of each color if you want that color to show consistently.
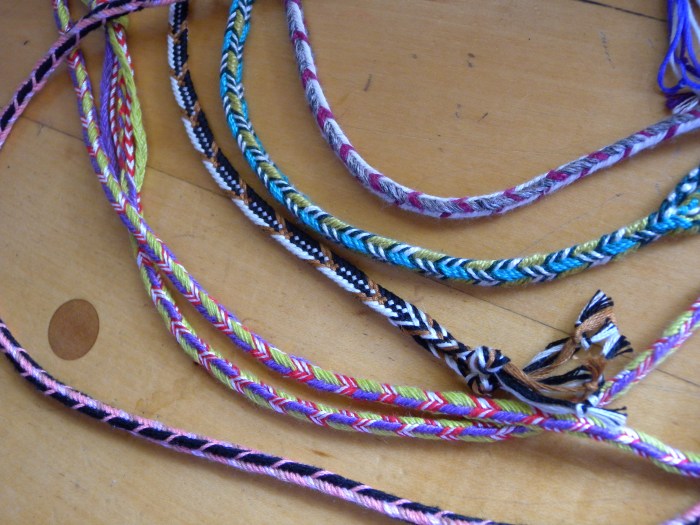
The lime/purple 11-loop braid has alternating single red and white loops of linen and silk that tend to sink into the surface and disappear. I show the color set-ups for most of these braids in a more recent post. (Linen, cotton, silk)
Structure:
In a way, 11-loop square braids aren’t really more complex (structurally) than any other square braid: each pass of a loop covers a wider area, but still dives through one single section of loops (its ‘through’ passage). After that the loop emerges for one single section of the same number of ‘over’ passages (accomplished over the following several moves), before it reaches the opposite edge of the braid. These two sections of ‘overs’ and ‘throughs’ create the 2 ridges of the upper and lower surface of all square braids—four ridges altogether, no matter how many loops are in the braid.
However, 11-loop braids get really fun to make! The braids are bigger, have more color possibilities, and nice, long pattern repeats. And they are very fast and fun to make once you get used to them.
There are other braids that may be more interesting than square and “flat square” braids, but to me 9- and 11-loop square braids might be the most purely enjoyable braids to braid, with beautiful and quick results. (And their unorthodox variations are just as fun, as well as very interesting.)
11-loop square braids are also a key step for learning how to manage “too many” loops, whether for square braids, double braids or letterbraids. If you are interested in learning my methods for other braids with more than 9 or 10 loops, learn the 11-loop square braid first (and then the 13-loop version, and/or a double braid of 12 loops.)
Unorthodox 11-loop braids
Check out my info page on Unorthodox braids to find out more about these really fun braids, and try out the two that I describe in the notes following my 9-loop tutorial. There are many more you can discover on your own, especially with 11 loops. The variety almost seems endless at first, and many are great-looking and very unusual braids.

11-loop, D-shaped unorthodox braids. This shows the upper, rounded side of both braids. The lower, flat side is solid orange (top braid), and solid black (lower braid). Many other types/shapes of unorthodox braids can be made with 11 loops.
Update: since this tutorial I have made tutorials for 2 different types of unorthodox braids: The D-shaped braid, and the Triangular braid.
Plus two color-pattern tutorials for them:
D-shaped color-patterns
Triangular braid color patterns (this one includes several 11-loop patterns)
I adapted this 11-loop tutorial from an earlier version that I made for Masako Kinoshita’s LMBRIC site back in 2008.
Photos are from the original version (or are out-takes from that version), but the text is completely rewritten. Photos by Robert C. Ellis.
Last updated Aug 13, 2019
© 2011–2019 Ingrid Crickmore


so question do you think this would also work with 14 loops?
[edited to be clearer – I hope!]
Yes, although after 11 loops, the next step up for a square braid is a 13-loop braid—one more loop on each hand. Here’s the way I do it:
Start with one more loop on each d-finger, so 3 loops on the left d-finger (one at each joint) and 2 on the right d-finger (lowest 2 joints). The first loop transfer will place a third loop onto the right little finger as well, at the tip (third joint).
But since that little finger starts out already holding two loops, the loop transfer move has to be done differently. If you just reach that little finger through the left loops, the two loops it’s already holding would get pushed together.
The new loop transfer move is a ‘ferrying move‘ to get the transferring loop from the left thumb to the tip of the right little finger, but using other fingers to do it.
The right index finger takes over to do the fetching. It reaches through the left loops in the same direction and way that the little finger would have done it, and fetches the Thumb-loop. That means the transferred loop ends up on the tip of the right index finger, where it doesn’t belong.
So then I use any finger of the opposite hand – the left hand – to “ferry” the loop off the tip of the Right index finger and place it onto the tip of the Right little finger (at the 3rd joint), which is where the transferred loop belongs.
Then basically the same loop shifts happen as in the 11-loop braid.
The only difference is that now the shift-helping finger (right index finger again) temporarily holds and then deposits back two ‘extra’ loops on the left little finger.
The helping index finger lifts both loops together as one move, leaving only the lowest of the 3 loops still on the little finger – that lowest loop will shift up to the ring finger before the two extra loops get replaced onto the little finger as the last loop-shifting move.
After the loop shifts are over, that hand is left with only two loops (at lowest and middle joints) on the little finger, and is ready for a new loop to be transferred – with a ferrying move – to the tip of that finger during the following loop transfer.
The loop shifting is really no slower than for an 11-loop braid! Lifting off two loops for a temporary hold doesn’t take any longer than lifting off one loop. Overall, the braid is slightly slower because of the extra move in the loop transfer, but not significantly.
The next step up is a 15-loop square braid, and for that one I hold a second loop on each c-finger (though the loop shifting would be more straightforward if you could manage 4 loops on the d-finger). The loop transfer is essentially the same as for a 13-loop braid, but the loop-shifting is much more time-consuming, because the other hand has to assist in shifting loops for two fingers, not just one. This 15-loop braid is a lot slower to make than a 13-loop braid, but worth it for certain braids (unorthodox braids, and my new rep-like plain weave braids). Not really worth it just to make a bigger square braid, in my opinion!
A 14-loop square braid would have the loop movements of a 13-loop braid on one hand and of a 15-loop braid on the other.
Whew! longest reply and shortest tutorial I’ve ever written!
Please let me know how it goes if you give it a try…
[edited for clarity]
I’m suddenly wondering if by “14 loops” you may have meant the 14-loop letterbraid? The letterbraids are braided very differently from square braids. A square braid (or the equivalent flat braid) has only one single loop transfer on each hand (in each “row” or “cycle” of the moves), no matter how many loops are in the braid.
A letterbraid has two transfers on each hand if two people make it together (the traditional way). If you make the braid solo, that ends up being four transfers on each hand. Eight transfers altogether, plus a loop exchange move between the two hands after the transfers are done. So it’s a very different braiding method than the two total transfers for square braids…
I recommend learning the 11 and 13-loop braids above, and then 10 and 12-loop Double braids before tackling the solo 14-loop letterbraid method. They are a great intro to using “too-many-loops”.