Update – we played with beads at the most recent braiding get-together and made actual FB’s! (finished bracelets)

Beaded loop braids. Linen thread, Czech and Japanese glass beads
Jump to Notes for my tips-and-tricks advice on loop braiding with beads. (5/2015 – I just added more tips to this section!)
I’ve had this idea on the back burner for ages…ever since Terry Nimmer sent me some photos of his experiments with adding beads to his loop braids.
A few weeks ago I suddenly made a couple of samples even though I was supposed to be getting ready for an upcoming workshop at CNCH, not playing around with stuff I wouldn’t be teaching. (The workshop was really fun, by the way! I didn’t have a camera with me, so check out Laverne Waddington’s post to get a feel for what the conference was like. My “Loop Braiding Potpourri” students were such quick learners that we managed to cover in two half-days almost all the braids I normally teach in two full days…)
When Terry first sent me his reports on combining loop braiding and beads, I had only ever made two beading experiments, both of them charm bracelets. The one below I braided first, and then added all the beads and charms, and figured out the closure last (it’s much smarter to plan the closure first, before making the braid!). It was fun and challenging, and I liked the end result, but it took ages. I didn’t use metal findings to attach the charms, instead I braided all the connectors with a finer version of the same nylon beading cord I had used for the main braid:
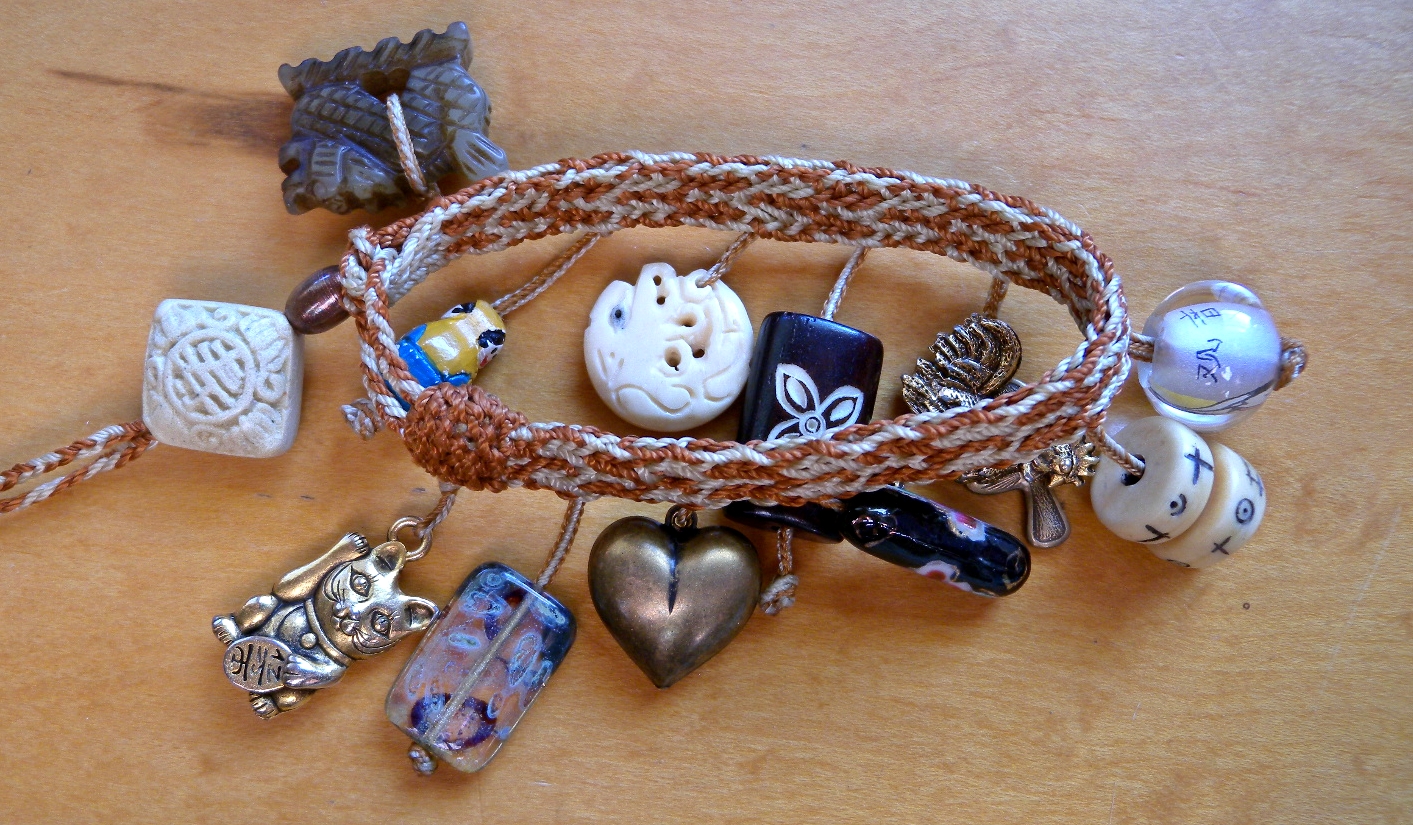
Bonded nylon beading cord (two sizes of C-lon), mixed charms and beads. Main band and all attachment cords loop braided.
I had to enlarge some of the bead holes, and I vaguely remember a big mess of hardware and glue and beads and cord lying around for quite a while… My next and only other beading experiment back then was a sea-theme charm bracelet that I never finished. I pre-attached most of those beads in pairs to each end of a tiny connector-braid, which I then I suspended through the main braid during the process of braiding it.
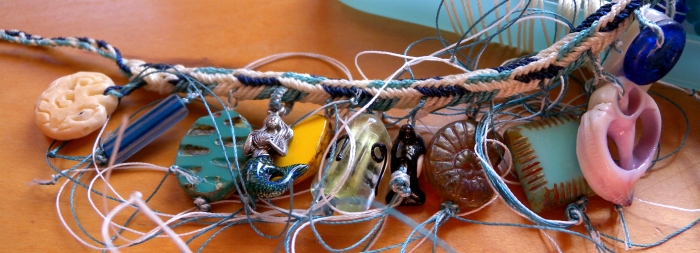
Scary mess of nylon beading cord! Unfinished ocean-theme charm bracelet. Unorthodox braid. C-lon thread, mixed charms and beads.
This bracelet has been parked on a comb for years now…I should really finish it—I love the mermaid charm and the beach-glass look of some of the beads.
One charm had no attachment cord, instead I just threaded it directly onto a loop of the braid. That’s the seahorse charm in the photo below, hanging from both shanks of a loop. [a so-called Unorthodox braid (see footnote*)]

Unfinished charm bracelet. Loop braided. (Unorthodox braid, reverse side). C-lon – Nylon beading cord.
Terry had done exactly that for his first bead experiment – paused his braiding to string a whole loop through a bead wherever he decided to insert the bead into the braid (his was a spiral braid). But he quickly moved on to pre-stringing his beads onto a single strand of each loop before starting the braid. That way he could more easily push a bead into the braid while braiding.
I’ve followed Terry’s advice in pre-stringing beads whenever possible, but I do it for both of the two methods described above:
1. loading beads into a loop by stringing them onto a single strand before tying it into a loop, as Terry did.
Or:
2. loading beads onto a whole loop, by pre-threading both strands of a loop through the beads, and then tying a knot or another bead at the bottom to hold them on.
In either case, I can then slide the beads up into the braid while braiding. As Terry discovered, that is a much more efficient method than trying to thread the beads onto the loops after you start braiding.
For two-layer braids (like square, flat, spanish, double braids), method 1 and method 2 above give very different results (in where the beads end up in the braid). With spiral braids there may not be as much of a difference. [More on the nitty-gritty of beads + loop braiding in Notes below.]

Beaded Spiral braids. Upper 3 braids are rounded on one side and flat on the bottom. Lowest braid is round, with an “empty” unbeaded spiral.
Above are some spiral braids with beads added – a lot of them. These took longer to make than most of the others–except for the charm bracelets–just because of the sheer number of beads on loops. It takes a while to load all those beads onto the threads ahead of time! And then they have to be pushed into place with every braiding move, which wasn’t the case with my other beaded experiments. To me that makes the braiding seem a little tedious compared to stopping only occasionally to push up a bead. Not as fun to braid, but I really like the results!
At first glance these might not look a lot different from the 8-strand beaded kumihimo ropes that I’ve seen youtube videos for. But these 8 and 10-loop braids are structurally equivalent to 16 and 20-strand kumihimo braids, and have a supple yet substantial feel to them when they are draped around your wrist..
What doesn’t show in the photo above is that the upper three 8 and 10-loop spiral-type braids aren’t round, but “half-round” — I left the lower half unbeaded, so there is a flattish and firmly braided lower surface. It’s a great shape for wearing around the wrist, doesn’t roll at all, but hangs and drapes beautifully. That beveled shape would also be great for couching onto fabric as a beaded embellishment.
Half-round beaded bracelet, showing upper and lower surfaces. 8 loops, 3x4mm drop-shaped seed beads
I should probably try making a 4-loop version. That would be equivalent to an 8-strand kumihimo braid, and maybe it would be quicker to make than these ones were, though it would still require loading an awful lot of beads onto those 4 loops.
Half-flat beaded Spiral braids.
I’ve been beading like mad ever since CNCH, but still haven’t experimented enough… One thing about beading is that it adds time to the experimentation process. It can take quite a while to figure out the math, load the beads onto the strands and finally get started braiding. And then, after all that your brilliant idea can turn out to be fatally flawed! I’m only posting photos of the ones that turned out ok—believe me there were a lot of samples that got recycled back into my bead containers:

Bead stash
The photo shows most of the beads (along with a few buttons) that I bought at a local bead extravaganza that was held at the same location as CNCH just the weekend before. I have a lot of other beads stowed away from my earlier charm-bracelet bead experiments, but that sale was my first jump into the world of seed beads. These are small, glass beads, mostly from the Czech Republic or Japan. They come in several shapes besides the classic small, round one. Wow, are they addictive!
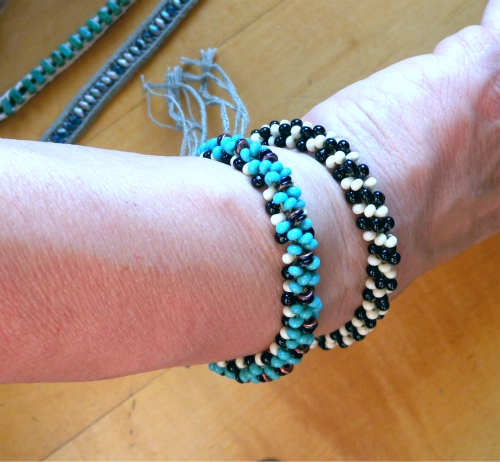
In the photo below, the upper two bracelets are the beaded spiral braids of my previous photos. Their beads are drop-shaped seed beads, which have a slightly tear-drop shape and an off-center hole. (Japanese versions of drop seed beads are sometimes called small Magatamas – under 4mm).
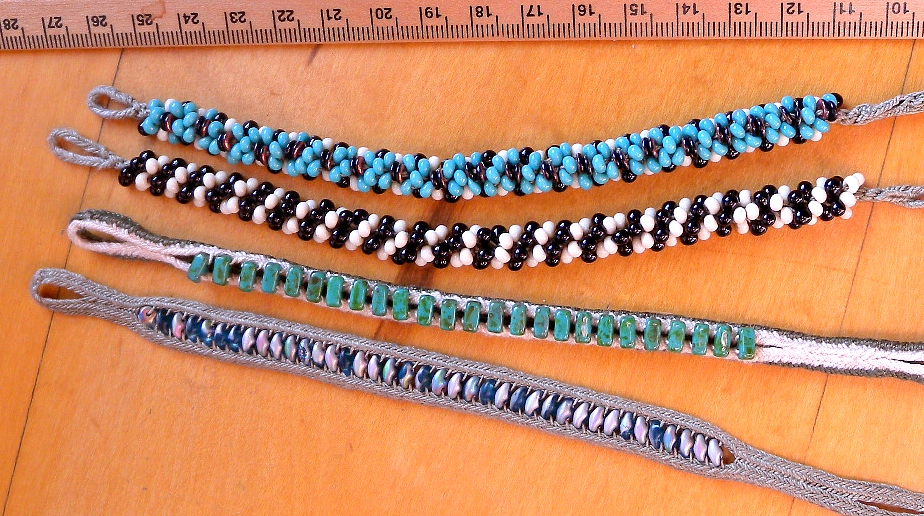
Two beaded spiral braids and two beaded double braids.
The two lowest braids are double and “letterbraid”-type braids (this type of beading can also be done with square-type braids, though). Their beads all have two holes, one at each end. This allows for an interesting way to load beads onto whole loops — one shank can go though one hole and the other shank through the other. This wouldn’t be possible with kumihimo–in fact even loading a whole loop through one hole of a bead can’t be done with kumihimo, as each half of a loop would be on separate bobbins. (In an equivalent kumihimo braid, this would mean trying to string one bead onto the strands of two bobbins on opposite sides of the card or marudai.)
In the lowest bracelet, only the 2-hole beads link the two halves of the divided braid into an overall flat bracelet. The strands themselves don’t cross from one side of the bracelet to the other. (These are “super-duo” seed beads – they are a sort of a lumpy diamond shape with a hole through each end.)
The bracelet above it with two-hole turquoise ‘brick’ beads was made in a similar way, but with flat braiding moves, rather than “divided” moves. In that braid, the beads connect the two outer edges of what would be a flat braid, so the overall shape of the bracelet ends up as a semi-open hollow tube, with beads lying like little bridges across the gap. This was a flat “letterbraid-type” braid of many loop transfers, but the basic idea would work with flat double or ‘square’-type braids as well. (2-hole brick beads are 5 or 6mm long, but still classified as seed beads.)
[update: these two bracelet types can be made with regular one-hole beads as well, as long as they are mounted onto whole loops. At our recent braiding meet-up, 2 braiders used single-hole beads in this way – linking two sections of a divided braid together into a flat bracelet, as in the lowest bracelet in the photo above.]
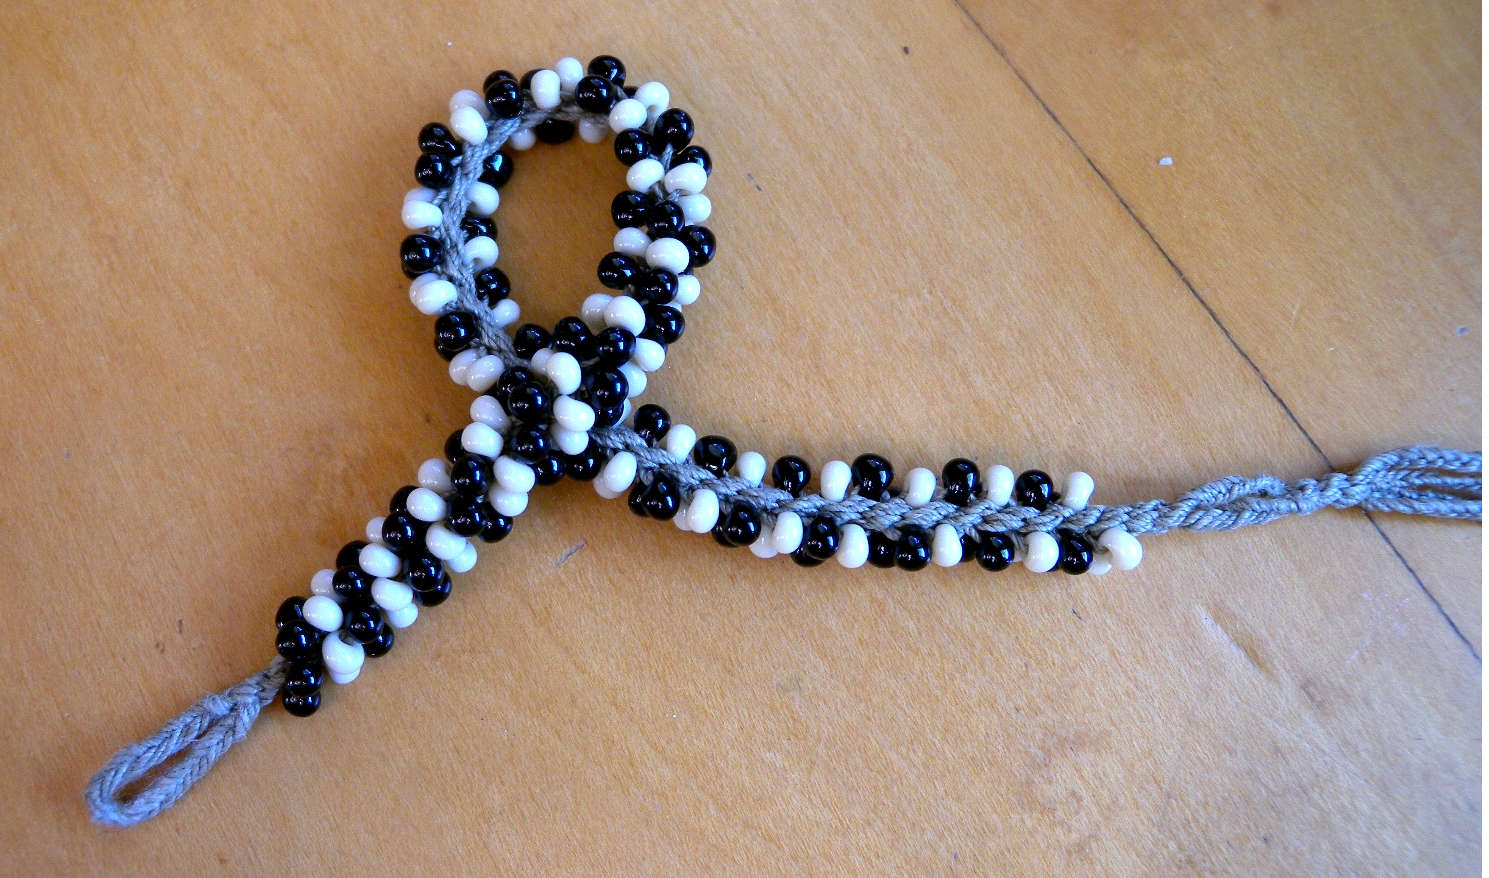
Below is an in-progress braid (mostly flat, though linked by the beads into an overall tubular shape, and with intermittent hollow braided sections). It is beaded with metallic-looking super-duo beads. Seed beads are made out of glass, but they come in a myriad of different finishes that can look like metal or clay or stone or rainbow-crystal-fire-glitter, etc etc…
In-progress braid, linen thread and super-duo beads.
I also bought buttons and charms at that big bead show, and of course way too much cord/ thread. So far, I haven’t been using any of that cord, though…The main thread I’ve been using for my recent beading is hard-twist, firm linen thread, in not very exciting colors, that I’ve had forever. But it feels great and is stronger than embroidery floss, and more manageable than nylon beading cord.
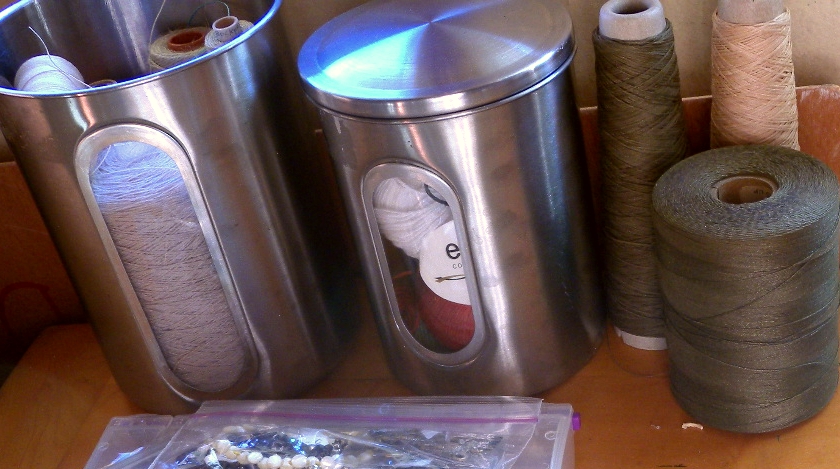
Thread – linen industrial thread, and cotton gima cones on right. Left bin has smaller linen rolls.
The cotton gima on the tall cones is a Japanese tape-type yarn, that I bought at an earlier CNCH, from Habu Textiles. I used the army green cotton gima in one of the samples below, the braid with flashy “diamond”-looking glass beads down the center.

Beaded braid samples
The sample above with fish-shaped shell beads is a 5-loop flat braid with beads loaded onto single strands. Above it, the orangy sample with metallic-looking faceted glass beads is a 7-loop flat braid, with beads loaded onto whole loops (both strands). Those were the first beaded samples I tried using Terry Nimmer’s two techniques. Both were braided with embroidery floss, which worked well, but would probably wear out more quickly than my firm-twist linen thread. Beads are heavy, and the edges of their holes can rub and wear on threads.

Linen thread and seed beads (Czech and Japanese glass beads). Finger loop braiding.
So far, the white flat braid above is the only sample in which I used both bead-loading techniques in one braid. It was a lot trickier to get those small round white beads (mounted on single shanks of a loop) into the correct spot on the edges than it had been for the dangly fish beads. As Terry warned in his notes to me, beads tend to migrate to places where you don’t want them… But only when beads are loaded onto single shanks. When beads are loaded onto whole loops, they become ‘locked’ into position in the braid because the two shanks of the carrying loop criss-cross each other there with the bead locked in place at the center of their ‘x’.
My bead experiments aren’t over with yet… I just bought even more 2-hole and seed beads. (I already buy more thread than I will ever get around to braiding with—I can see that same pattern starting up with beads now, too!)
Notes:
This is a “what I’ve been braiding lately” post, not a tutorial. But if you’ve already learned 5 or 7-loop braids from my other tutorials, it shouldn’t be hard to get some beading ideas from my photos and descriptions.
[update: in a recent braiding get-together all three of the other braiders made and finished a beaded bracelet. Feedback was that it was fun and easy but requires being comfortable with the braiding first — don’t try to do beading on your first fingerloop braids.]
Tips:
Always try a small sample first, as there will likely be a steep learning curve, at least there has been for me. As Terry pointed out in his notes to me, beads are cumbersome to braid with, and they won’t necessarily go where you expect them to go. The general rule seems to be that in your first trial of any beaded braid, the end result will look very different from what you expected. I’ve also found that my initial assumptions in planning/ counting out the beads ahead of time can be way off.
Stringing onto one strand:
This is the only way to place beads on the edge of a flat braid (as they are taught in my 5 and 7-loop tutorials). If you place beads onto a whole loop and try to push a bead up to the edge of a flat braid, it will bring both edges of the braid together, because the two strands of one loop braid on opposite edges of a flat braid
When you are stringing beads onto only one strand of the loop, larger, dangly yet lightweight beads like my flat, fish-shaped shell beads in the pics above are easiest type to place securely into position in the braid. Smaller beads are extremely liable to wander somewhere you don’t want them before the subsequent braiding moves lock them in place. This can take several more braiding moves—many opportunities for small, sneaky beads to wander off!
If you want the beads to dangle from one edge of a flat braid, move each bead up into the braid on only the upper shank of the loop (or only the lower) for the whole length of the braid. The upper shanks form one edge of a flat braid; lower shanks form the other.
Either way, you will only push beads up into the braid from your right index finger loop. That’s because both edges of the flat braid are actually formed by the loop on your RIGHT index finger if you braid as taught in my square braid tutorials. (During the process of braiding, the flat braid is folded, with both true edges on the right side, and the lengthwise fold on the left side.) Pushing beads up from the left index loop would feed beads into the midline of the flat braid–however, if you want to place beads along the midline, it’s much more secure to do this by loading the beads onto both shanks rather than just one (see below.)
Move the bead up into place in the braid on that upper strand of the Right index finger’s loop just before you transfer that loop. Try to keep the bead from sliding back down the loop, or too far up the loop (into the middle of the braid rather than the edge) before the successive moves lock the bead into position.
The whole loop (both shanks) strung through each bead:
I’m very excited about this method because I’m pretty sure that this type of stringing — as well as the resulting look of the beadwork — is only possible with loop braiding. To do this in a kumihimo braid, you would have to load one bead onto the strands of two different bobbins, on opposite sides of the braiding stand or slotted card…totally impossible. With free-end braiding you might be able to do it by stringing a bead onto two particular strands at just the point where they cross each other in the the braid. You couldn’t prestring the beads before beginning braiding, though. Every time you wanted to insert a bead you would have to stop braiding, get the bead, and string the two strands through it.
Beads that are strung through a whole loop don’t tend to wander and get lost somewhere in the braid where you don’t want them. In 2-layer braids (like square, flat, double, spanish), there is really only one place in the braid where you can insert beads mounted on a whole loop if you don’t want to distort the braid: the center of flat and hollow braids, and the sides of square and rectangular braids. Spiral braids and unorthodox braids are a slightly different case. They have sections in which the two shanks of a single loop are actually side-by-side in the braid, rather than merely crossing each other. Those are the places where beads mounted over a whole loop can be pushed up into the braid.
Center-line of a flat braid:
Push the bead (mounted over both shanks of the index loop) up into the braid just before transferring the LEFT index loop (if braiding a flat braid as I teach them, with the left loops turned and the right loops not turned).
If braiding a square or rectangular braid, that would place a bead on the left edge of the square braid. For beads on both sides of the square braid, you would place beads from both the left and the right hands’ index loops.
It’s probably best not to put a bead into the braid with every cycle (“row”) of braiding, they would be so crowded they would likely distort the braid. Every other cycle might be ok for tiny seed beads and is a safe repeat (see below) for any braid with an odd number of loops. Every 3 cycles is “safe” for 7 and 5-loop braids, but not for 9-loop braids. By “safe” I mean you can load beads onto all the loops of the braid and they will all get used up evenly, keeping the loops all roughly the same in length.
You don’t have to do this, and for some effects you may want to load beads only onto certain loops, say a loop of a particular color. But in that case you will have to start with that particular loop much longer than the other loops, and keep shortening it (retying the knot at the bottom) as its beads get used up into the braid. Otherwise, as the beads leave, the loop will get too long to braid with comfortably.
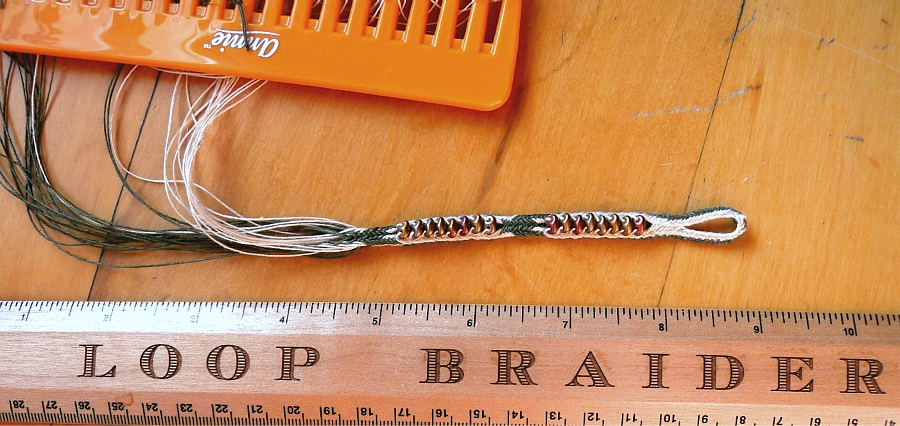
When beads are pre-strung onto whole loops (with a good knot or another bead tied at the bottom of the loop to keep them from falling off), they will dangle below your fingers while you are holding the loops—kind of like the “caterpillars” of knotted-up loops that I sometimes use when braiding extra-long braids.

Photo shows how I braid longer lengths using knotted-up ends. Beads that are pre-strung onto a whole loop also hang down like this below the fingers when you are braiding, though usually not this long. However, when strung onto single strands of a loop, the beads end up suspended up and down the loop like beads on a necklace, so they don’t much reduce its length. (They are difficult to work with in other ways though—they are much more likely to get lost in the braid and end up somewhere you don’t want them.)
Bead “caterpillars” shorten the working length of the loops. So they are easier to manage if all the loops hold about the same number of beads, and give up their beads into the braid at the same rate. Otherwise the loops will start and/or end up very different in length, which is awkward and difficult to braid with.
Unless you push up a bead in every braiding cycle (as in my spiral beaded examples above), using up the beads evenly from all the loops entails using math! For me, it also entails drawing diagrams and counting on my fingers, since mathematics is not one of my strong points.
Basically, if you start with the same number of beads on each loop, and you want to use them all up evenly, you need to push one bead up into the braid from one particular finger either in every cycle of braiding moves, or else in every X cycles of braiding, where X is a number that can’t be evenly divided into the total number of loops in the the braid. If that makes any sense! (see my terminology page if “cycle” is unclear)
So for a 9-loop braid, pushing a bead up into the braid from a particular finger at every 3rd braiding cycle would not be a good interval to pick if you want to use beads from all the loops evenly. You will be beading from the same three loops all the time. However, almost any other possible interval would be ok. Hmmm…would every 6 cycles be a problem, though??? Here’s where I would have to get out my pencil and draw stick-figure loops and count this out! (This is why I don’t want to make beading tutorials!)
[Update: Yup, an interval of 6 would be a problem! It still ends up being the same 3 loops putting beads into the braid, while none of the other 6 loops get a chance. So I guess your interval shouldn’t be a multiple of the problem number, either.]
Note: As I mention in my Longer Loop Braids post in regard to braiding with “caterpillars” of shortened loops — there is a big difference between V-fell (the way I teach square braids) and A-fell (the way fingerloop.org and others teach square braids) in how it feels to braid with “danglies” handing on the bottom of the loops!
With the V-fell (Asian) method I teach, dangly beads or knotted-up shortened loops easily clear through the passive loops with each braiding move. With the A-fell (European/African) method of making square braids, the “dangly” bottoms of the loops do not easily get pulled through. They end up lying inside their neighboring loops, along the braider’s knuckles. This isn’t actually a problem with knotted-up loops (although it can be a little disconcerting at first).
However, I am not so sure it would be workable with beads as they are heavier, and more awkward in general. I haven’t tested this type of beading with A-fell braiding though. Let me know how it goes if you try it!
Terry Nimmer not only sent me photos of his beading experiments, but also some very cogent notes of observations (you can read them in the footnotes to this Readers’ Pics post). In his own words, he didn’t end up being a fan of the beading process, and I’m not sure I’m one either… Stringing the beads onto threads before braiding takes some time, and can be either tedious or suspenseful, depending on how excited you are about the braid. And a subsequent mistake might mean not only unbraiding, but also unstringing and restringing a lot of beads. But once the braiding and beading is working, it is very gratifying to see the beaded pattern emerge!
Re my ocean-theme charm bracelet: the braid is an Unorthodox type braid, but one in which only the loops at the center of the braid are penetrated by the braiding finger—the loops on the edges of the braid are skipped over. This is the opposite of the more common unorthodox braid in which the loop or loops at the center of the braid are skipped over by the braider. For example the “broad lace of 5 bowes” of the medieval loop braiding manuscripts. My braid had more loops than 5, though. I can’t now remember how many but it would have been at least 9.
[update: This blog now has tutorials for both these types of unorthodox braids – the “D-shaped” Unorthodox Braid, and the Triangular Unorthodox Braid.]
re “Gima” yarn: Carried by Habu Textiles, in cotton, silk, and other fibers. Apparently gima means ‘fake linen’. It’s a narrow, flat yarn, with parallel fibers held together in tape form by a sizing of some kind which softens or even disappears (?) with washing. I got infatuated with silk and cotton gima recently and acquired more than I know what to do with. It is a great braiding material, though it braids a lot finer than it looks, especially the silk. The braids are very soft after washing, yet have a slightly basket-woven look.
Last updated Mar/10/2018
© 2014-2018 Ingrid Crickmore
See full copyright restrictions and permissions at the bottom of the sidebar (if you are on a device with a small screen, the ‘sidebar’ may appear somewhere other than at the side).


Do you have a tutorial or post somewhere about how you braid longer lengths using knotted up ends? I’ve never heard of this but it would be a huge help to me to know how to do this! Thanks!
Hi Rebecca, thanks for asking! I just added a link to that post in the caption of that photo of my knotted-up “caterpillars”. But before using ‘caterpillars’ for extra length, be sure to use the “start from the center” – that’s described in the same post. It is a much quicker, easier way to get exactly twice your usual longest braiding length. I only add caterpillars (after the center-start) when I want an even longer braid…
That “Longer Loop Braids” tutorial is also listed in my Tutorials index (see tab in upper menu), in case you are looking for it in the future. It’s probably a bit lower down in the list of tutorials, but if you scroll down you’ll find it.
Let me know if those methods work for you! Caterpillars can be a little fussy to get the loop lengths to be equal, but after a few times doing them it gets easier to set up.
That’s just what I needed, thanks!
You are so amazing! The beaded bracelets are beautiful! It was so fun to see you teach at CNCH. Your enthusiasm is contagious!
Connie
Thanks Connie! CNCH was really exciting, thank you (and Elaine and everyone else involved) for all the work you did for it…
I enjoyed reading your post on beads & braids. It is nice to see what an artist can do. This almost makes me want to pick up the beads again – but I still don’t think they are any fun 😉
Thanks for the nice comments.
Terry
Hi Terry, Can you believe it took me this long to follow up on your great examples? Thanks for the inspiration!