First Tutorial:
The mysterious and elusive BUCK’s HORNS braid!
Sketchily described in some 17th C. loop braiding manuscripts, method forgotten, then reconstructed over 300 years later by Noémi Speiser (Old English Pattern Books for Loop Braiding), method revisited and slightly revised a bit later by Joy Boutrup (European Loop Braiding, Part I). This is a striking ten-loop double braid of bicolor loops, traditionally made by two braiders working together, but with one small difference to the braiding moves from a regular double braid…

Bucks Horns braids. Cotton embroidery floss except for central braid (heavy linen) and second from bottom (green cotton floss, gold rayon)
I’ve put off trying to make this braid as a solo braider ever since I first read about it in Noémi Spieser’s Old English Pattern Books for Loop Braiding. And of course after all that avoidance it turns out that the scary part wasn’t such a big deal after all!
That (not) scary part is the slightly different loop-exchange move at the end of each row of braiding. The loop-exchange move is the move in which the team of two braiders exchange their closest two loops (their neighboring index-finger loops) to join the two halves of the combined braid together. In the Bucks Horns braid (and many others, from the earliest known European loop braids to the most recent!) the two braiders do not use the ‘standard’ loop exchange method I describe and teach in my previous “double braid” tutorials – also taught in SCA multiple-braider workshops and in Noemi Speiser’s first books.
It turns out that many historic European braids were made with a very different type of loop exchange between the two braiders – one that Joy and Noemi term ‘unorthodox’ (explained below). Because of that difference, the braids have a very interesting over-under structure down the midline of the braid and a more complex structure than braids made with the ‘standard’ method (which may NOT have been the standard for most of loop braiding history!). This difference really shows in the color-pattern called Buck’s Horns, because the bicolor loops produce a central dotted stripe along that midline join area – along a central ridge (lengthwise column) that doesn’t even exist in a normal double braid! Compare the two upper braids with the two ‘normal’ lower braids:

Bucks Horns braids, top, compared to the same color pattern made with the “standard” loop exchange taught in my previous double braid tutorials (bottom). Note: You can’t get the color pattern of the lower two braids simply by braiding the Bucks Horns braid and substituting the ‘normal’ loop-exchange method – a different pattern of turning loops is required as well.
This tutorial for my solo-braider workaround way to make this braid will be easier to follow if you’ve already learned my “regular” solo-braider double braids from my earlier tutorials, and have practiced using thumbs as well as fingers to hold and manipulate the loops. I only demo this braid with the full 10 loops in the video below, but it’s actually possible to make a reduced 8-loop version without using thumbs. (The center of the braid should look the same; the pattern on the outer edges will be somewhat reduced.) For an 8-loop version, follow the 8-loop video in my double braid tutorial, but come back here to learn the color-pattern setup and the new loop exchange move for the Bucks Horns braid pattern.
Solo-braider method for the Buck’s Horns braid:
(Braiding instructions in the video start at 4:19, after the intro.)
Correction to both videos: At some points I refer to the loop exchange as a loop TRANSFER – that is a mistake! Loop transfers are the regular braiding moves, the loop EXCHANGE of a double braid is the final move that connects the two halves of the braid together. Sorry for the confusion!
Solo-braider method
Both videos – above and below – teach my non-traditional solo-braider method for making these two braids. (The traditional method of course, was two braiders working in tandem.) The focus is the unorthodox loop exchange. I do show all the braiding moves, both normal speed and slowly, but the regular braiding moves are demo’ed more thoroughly in my earlier Double Braid tutorials. Here I am focusing on the new and different way to make the final loop-exchange move. Essentially, the two loops on the little fingers are exchanged as usual (one through the other), but both loops are given a turn during this process. The direction of the turn matters in this braid – as well as the direction of the turns to the loop transfers. See below for more details, including color pattern setups etc.
2-person method
Sadly, I can’t get together with my team-braiding buddies to make a video demo’ing this, because of the current pandemic. However, for a team of two braiders this unorthodox loop exchange is even easier than the one more widely known today! (Likely that’s why it seems to have been ubiquitous in Europe prior to the the 15th C. , and even remained popular after the ‘orthodox’ method was described in the 15th C. braiding manuscripts – all the way into the early 20th C.) If you already know how to loop braid as a team, you can easily learn the unorthodox loop exchange from my drawing and description further down. Note – see my Braid a 10-loop Braid with a Friend to learn how to loop braid as a team of two braiders, using the “normal” exchange method.
Thumbs or not: My videos here demo the full, 10-loop version of these two braids, for which I use thumbs as well as fingers to hold loops. However, either braid can also be made in a reduced 8-loop version which only requires using fingers to hold loops, no thumbs. See my earlier Double Braid tutorials, which include videos for 8 (and even 6)-loop versions of the classic 10-loop double braids, and then return here to learn this unorthodox loop-exchange (the last move in each row before the final tightening).
Note: Turning vs. not turning a loop when transferring it to (or from) the thumb looks very different from the same move on the fingers, because the thumb “opposes” the fingers – its orientation is already turned toward the fingers. The 10-loop videos in my earlier double braid tutorials (link above) show and compare turned vs. straight loop transfers to the thumb very clearly.
Second tutorial
My second video below teaches another historic double braid with this same unorthodox loop exchange:
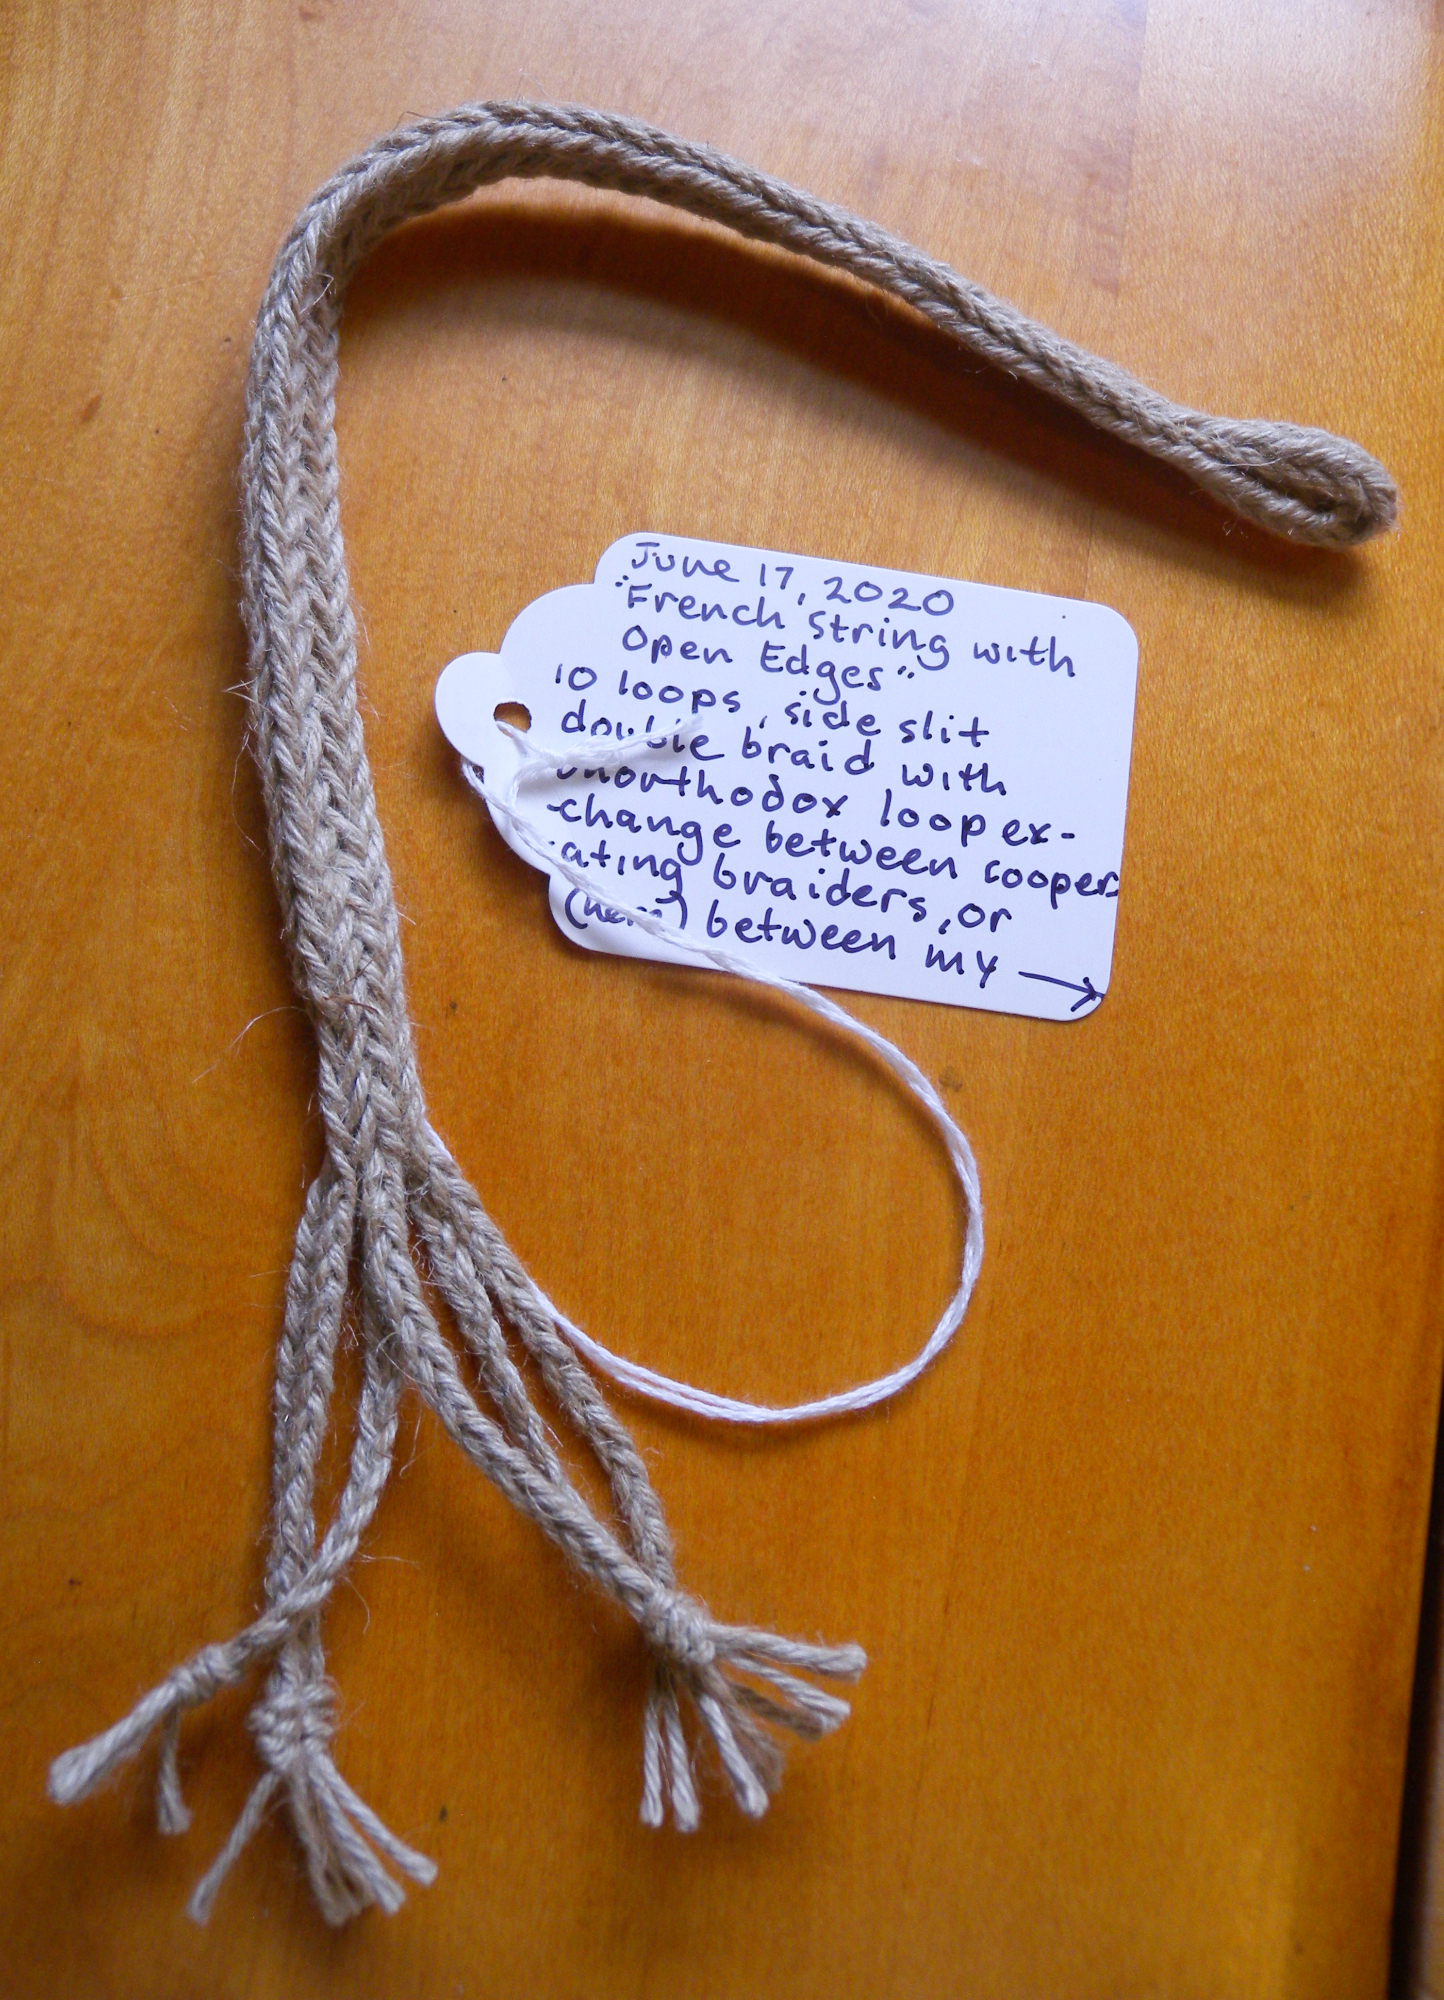
The French String with Open Edges.
Double braids with open edges (which I’ve sometimes called “side-slit” edges) are often found as handle-cords on the many European 17th C. precious purses displayed in museums today, but are also known from as far back as the 13th C, though fewer of these older ones survive. (See History below.) This braid can also be made with the ‘normal’ loop exchange I teach in my double braid tutorials, in which case it comes out a bit narrower, and with a less intricate ‘weave’ or interlacing in the midsection of the braid.

French String with Open Edges (Side-slit double braid, with unorthodox loop exchange). Different colors but same color-pattern as Rijksmuseum’s pursestring described below. White silk and yellow rayon thread, by loopbraider
Solo-braider method for the French String with Open Edges:
(Braiding instructions start at 5:36 in the video, after the intro.)
This “French String” is the braid that finally got me to attempt the unorthodox loop exchange as a solo braider. A few months ago Marjolein Houwer, a blog reader in Holland, sent me a link to a 17th C. purse-string braid of this type in the Rijksmuseum in Amsterdam that she was interested in re-creating. (More about it below.) Over the years I’ve often bumped into photos of side-slit double braids as purse-strings on museum specimens, but had never paid much attention to which of the two types of loop exchange might have been used.
But if I was going to tell Marjolein anything about this braid, I wanted to get it right! So I checked with the expert, Joy Boutrup, who confirmed that’s what was going on in the center area of the braid. Which brought me to the gradual conclusion that this blog really ought to have a solo-braider tutorial for the unorthodox loop exchange as well as the orthodox one. Plus, if I learned it, I would finally be able to braid Buck’s Horns! (Plus those REALLY old double braids of multiple Broad Lace sections connected by this unorthodox exchange!)
The French String in plain heavyweight linen. Not a good photo because it doesn’t even show the intricate bit at the center of the braid – I’ll try to take a better photo at some point!
UPDATE: Jana Skalská Obročníková, a craftsperson and 14th C. reenactor, has incorporated this French String with Open Edges in making a gorgeous replica of 14th century German leather pouch with woven edges! Her work is exquisite, including the braiding. See photos in link below to a page of her website (currently only in Czech, but an English translation is in progress). This pouch is stunning, and includes an outer pocket with its own separate drawstring braid. I love the decorative ‘bobbles’ at the end of the braids, wish I knew how to make those! Here is the page on her website – shows many details of the making of this goatskin pouch: https://www.dobraczech.cz/l/kozeny-stredoveky-mesec-podle-nalezu-z-kolina-nad-rynem/
History of the Unorthodox loop exchange:
In my all-history post (Which Braids on this Site are Historically Accurate?) I called this unorthodox loop-exchange method the “archaic exchange,” because when Joy Boutrup and Noémi Speiser analyzed actual braid artifacts for their 4-part collaboration European Loop Braiding, they found only this type of loop exchange in any team braids made prior to the 15th C. They call it an ‘unorthodox’ loop exchange (explained below). They found it in multiple-worker European braids from the 12th C. all the way up to the early 20th C, so even after the orthodox method appeared sometime in the 15th C. the earlier method remained popular. Yet it isn’t well known today, even among most recreators of earlier textile techniques.
A lot of great braids (see Other Historic Braids below) will be lost and gone forever if everybody puts off learning it the way I did! I haven’t seen any references to this easy method with its odd resulting structure in any other loop braiding tradition, so it may have been unique to Europe. Plus it looks cool! And it creates a stronger, slightly wider, and more interconnected braid – what’s not to like? (Don’t abandon the orthodox method of course – it’s only method that works for a wide range of other possible braid shapes like flat, hollow, double-tubular, not to mention letterbraids, etc etc)
In Joy’s class at Braids 2012 in Manchester, England, she discussed several examples of interesting historic braids made with this unorthodox loop exchange method – braids that are virtually unknown to modern re-creators and loop braiders. (See Other Historic Braids below)
A 17th C. pursestring in the Rijksmuseum in Amsterdam:
Back in May, Marjolein Houwer, a blog-reader in Holland, contacted me to ask about this braid. It’s the pursestring on a 17th C. purse in the Rijksmuseum in Amsterdam. (link to museum photo)
This is what finally got me to stop avoiding the Buck’s Horns loop exchange!
The photo clearly showed that the drawstring braid was what I have called a Side-slit double braid on this blog (side-slit = open edges). I already knew this was a common shape for European purse strings, from reading Speiser and Boutrup’s books and articles, and from seeing various museum photos myself. Enlarging the museum photo revealed a color pattern (in metallic thread) indicating that the braid was probably made with 10 loops. But enlarging the photo also revealed an oddness to the center area that I suspected might be due to the unorthodox loop exchange I had been avoiding all these years! I contacted Joy Boutrup to ask, and found out she had already analyzed this particular photo when she was researching for European Loop Braiding. She confirmed that it showed the unorthodox exchange. She calls this braid shape a ‘double square braid with open edges,’ and she mentioned that it is often referred to as “the French string with open edges.”
So because of Marjolein’s interest in a beautiful purse-string braid, and Joy’s input, along with my old curiosity about the Buck’s Horns braid, I suddenly had a strong incentive to try to figure out how to do the unorthodox loop exchange as a solo braider. I knew (in theory if not in practice) how it was done by a team of braiders, but at first neither that, nor Joy and Noémi’s charts and illustrations in European Loop Braiding Part 1 enabled me to understand what was really happening to the loops so I could translate it to my solo-braider technique…
Until I read this line on page 13: “And as a result, both the exchanged loops have received a mirror image half-twist away from the receiver and towards the taker.”
Bingo! No problem!
So after all my avoidance, and a bit of initial frustration, it turned out to be easy to translate after all.
Details about the braiding method(s), color patterns, etc.
Solo-braider method: As in my regular solo-braider method, the two loops on the little fingers are first exchanged as usual, one loop through the other, but then both are given a turn (which should be in the opposite rotational direction from the way they were turned during their just-previous loop transfers). I demo a more efficient way to do this in the video, by turning both loops as part of the loop exchange move, rather than turning them separately afterward. (Note – be sure to turn the ‘around’ loop after the other loop has gone through it!)
This brings up a small can of worms:
A solo braider can braid this braid in two different ways to achieve the same results: with the loop transfers (the regular braiding moves) turned ‘from below’ but the final loop-exchange loops turned ‘from above’ – which is the only way that two team-braiders would do it; OR vice-versa – the loop transfers turned ‘from above’ and the loop exchange turned ‘from below’. The only difference to the resulting braid is that the top surface of one would be the bottom surface of the other – no way to tell which was which after you finish braiding.
My solo-braider method can be done in either of these two versions, but the second way feels a little more convenient to me – turning specifically the loops of the inner loop transfers ‘from above’; and then turning those same loops ‘from below’ when they are later exchanged during the loop exchange move. That’s the way I demo it in the videos. However a team of braiders would always do the opposite, because there is only one (easy) way to exchange the loops when performing the unorthodox loop exchange as a team. It inevitably results in a “turn toward the taker” – equivalent to a turn ‘from above.’
Two-braider method: If done by a team of braiders, the loop-exchange movements don’t seem like the description above for a solo braider at all!
When two cooperating braiders perform this unorthodox loop exchange, it’s not at all obvious that the two loops are turned. That’s because a pair of braiders each holds his or her own set of loops in a completely different orientation (relative to each other) from the way these same loops would all be held across the two hands of a solo braider. The loops of two braider’s neighboring / adjoining hands are held in a sort of back-to-back position that results in the exchanged loop being turned without the two braiders even being aware of it.
As always, using the traditional two-person method for double braids, two cooperating braiders would stand side-by-side and braid from the same loop bundle – each braider holding 5 of the 10 loops, and each performing the braiding moves of a normal 5-loop braid (though for open edges, each braider turns one loop transfer and not the other – the turned transfer being the one closest to the neighboring braider – nearest the center of the braid.)
After each row of braiding, the two braiders exchange their neighboring index-finger loops (one through the other). This 2-braider ‘unorthodox’ way of exchanging loops is even easier than the more well-known ‘standard/ orthodox’ method I teach in my Braid a 10-loop braid with a friend tutorial! See the text and illustration below:

Note: Loops are not drawn accurately! They should extend directly away from the viewer, not to the side. I drew them this way to display them more clearly.
French String compared to Buck’s Horns method:
The only difference between the braiding methods for these two braids is in the outer loop transfers of the braid (in the videos, these are the 2nd loop transfers of each hand).
For ‘open edges’ (what I’ve also called ‘side-slit edges’) as in the French String, don’t turn either of the outer-edge loop transfers (the loops transferring from middle fingers to thumbs). For ‘closed edges’ as in Buck’s Horns, do turn the outer loop transfers. Inner loop transfers are turned for both braids. Watch the outer loop transfers in the videos carefully, because the ‘turned from above’ transfer compared to the ‘no turn’ transfer is a very subtle difference. That’s because the thumb holds its loop in sort of a ‘turned’ position already, even when it hasn’t been turned.
Buck’s Horns: All loops are turned as they are transferred onto their new finger.
French String with Open Edges: Only the inner two loop transfers are turned. (In the videos, these are the first loop transfer of each hand – the closest transfers to the center of the braid.)
For both braids, the loops of the final loop-exchange are also turned – in the opposite rotational direction from how those particular loops were turned in their earlier loop transfers – the inner loop transfers.
Color Patterns:
Buck’s Horns refers to a particular color pattern of a particular braid-shape. 10 bicolor loops of the same two colors. Braiding starts with all the dark colors in upper position and all the light colors in lower position on all fingers, or the opposite arrangement (study the photo in my 9-loop square braid tutorial to see which is the so-called “upper” of the two shanks of the thumb loop – this is not obvious!).
The French String with Open Edges doesn’t refer to a particular color pattern – just to a particular shape/type of braid, regardless of its color pattern. (The name might even apply to side-slit double braids made with the orthodox loop exchange as well – I need to research this some more.)
Rijksmuseum pursestring braid color-pattern for the French String: (Enlarge the museum photo to see this color pattern, using their icon for enlarging.) Use 6 thinner metallic gold loops, and 4 thicker tan or ecru loops. Before braiding, place the tan loops on thumb and index finger, and the metallic loops on the middle, ring and little fingers (both hands).
French String with Open Edges and a Bicolor Stripe – I show an example of this braid pattern near the end of my video tutorial for the French String with Open Edges. Start with the same arrangement of loop colors as the Bucks Horns color pattern: All identical bicolor loops: Begin braiding with all dark (or all light) shanks uppermost. One side of the resulting braid will be dark, with a narrow, light dotted stripe down the middle, and the other side will be the opposite – light, with a thin dotted dark stripe. The dotted stripe shows off that extra ridge down the center of the braid created by the unorthodox loop exchange.
I don’t believe this particular color-pattern is described in any of the 17th C. or earlier loop braiding manuscripts, but it starts with the very common bicolor (“departed bows”) set-up of all-dark-shanks-up, so it’s highly likely that this color pattern was used in the past. By logical inference it is period-appropriate for any era in which bicolor loops, the unorthodox loop exchange, and orthodox (square and divided) loop braids have been documented – and especially if the French String with Open Edges has been documented. This includes the 15th C. and earlier, (see Speiser and Boutrup’s European Loop Braiding, volumes 1-4, especially volume 1).
You can switch between “dark-braid-with-light-stripe” and “light-braid-with-dark-stripe” within the same braid by turning (or refraining from turning) loops during the loop transfers (don’t vary the loop exchange move) just until the opposite color is uppermost on all loops, then return to the correct braiding moves.
This pattern is also fun to alternate with Bucks Horns braiding – two braid types in the same braid! (When braiding Bucks Horns, be sure to wait until all the loops have returned to “all dark up” or “all light up,” and only then switch to French String with Open Edges braiding moves for the Bicolor Stripe pattern. When braiding the Bicolor Stripe pattern, the loops are always in the same color configuration, so you can switch to Bucks Horns at any point.)
The mystery of the unorthodox loop exchange
This unorthodox loop-exchange method is a main topic of the first monograph in Noémi Speiser and Joy Boutrup’s collaborative 4-monograph series European Loop Braiding. In analyzing actual braid artifacts from previous centuries, they discovered that the Buck’s Horns loop exchange wasn’t a 17th C. invention as Noémi had assumed when she first described the braid in Old English Pattern Books for Loop Braiding. Instead, it seems to be the original method used in Europe by team braiders to connect their loops, many centuries before. Noémi Speiser and others (Frieda Sorber for one) had long puzzled over the method behind the mysterious, hard-to-analyze, oldest team loop braids that they had found in their research into old European loop braid artifacts. These braids were quite different structurally on the front and back surface, and their method remained a mystery until Joy Boutrup joined the research effort several years later.
First Joy Boutrup managed to figure out the true loop exchange method used in the 17th C. Buck’s Horns braid, which turned out to be a simpler and more straightforward method than Noémi Spieser’s original hypothesis in Old English Pattern Books. Joy did this by reinterpreting the opaque 17th C. instructions, and also by comparing them to an amazingly fortuitous series of photographs from the 1930’s of a trio of Scandinavian braiders performing that exact braiding move! (What are the chances??!)
This then turned out to be the key to figuring out how those much older team loop braids had been made. Unlike the Buck’s Horn braid, those much older braids had been made using a combination of unorthodox braiding moves (for the separate braid that each braider was making) and the unorthodox loop exchange for connecting the separate braids together. All that ‘unorthodoxy’ results in a very complex braid – hard to analyze, despite being easy to make!
Joy Boutrup and Noémi Speiser’s extensive research of actual braid artifacts seems to show that that in Europe the orthodox loop-exchange method only appeared around the 15th C., and never totally superseded the older, unorthodox loop-exchange method. Yet it’s only the newer loop exchange method that is widely known today – described in the 15th C. manuscripts, Noémi Speiser’s Old English Pattern Books, taught worldwide in SCA workshops, and demo’ed in my other Double Braid video tutorials on this blog.
The older and very long-lasting ‘unorthodox’ exchange method has been largely forgotten, despite Noémi and Joy’s hard work and research, and despite the fact that it is even easier to do as a team than the orthodox method! (It’s not necessarily easier for a solo braider, but it isn’t much more difficult.)
Orthodox vs. Unorthodox:
Noémi Speiser came up with the term ‘unorthodox’ to describe certain fingerloop braids. It doesn’t mean a braid or technique that is uncommon, or difficult to do, or risqué in some way! An unorthodox braiding move may be very easy – sometimes even a ‘no-brainer’ – to do, but the braided structure it produces is very convoluted, and difficult to analyze and chart out – unlike the familiar two-layer twills and plain-weaves of square and double-square braids (‘orthodox’ braids).
The small difference to the Buck’s Horns loop exchange essentially locks the upper and lower layers of the braid together at the midline of the braid, in an asymmetrical way if you compare the top to the bottom layer of the braid – like a wrench in the works. Like a mistake, really! But since the mistake is repeated the same way in every row, it produces its own beautiful regularity to the overall braid. It’s really the turn given to the ‘around’ loop of the loop exchange move that stirs everything up. It violates two of the unspoken rules of braiding orthodox 2-layer loop braids:
When transferring a loop, you must never turn the ‘around’ loop, only the ‘through’ loop.
When cooperating braiders exchange their loops, neither loop should be turned..
In a normal ‘orthodox’ double braid, the loop exchange seamlessly joins the left and right halves of the braid, without adding much else to the braid. It’s a very neutral move. It does not create a whole section of the braid, like the 4 loop exchanges do – each loop exchange building one ridge on the upper layer and a parallel ridge on the lower layer of the braid. (“Ridges” are the lengthwise columns of slanted thread passages that you can see running up and down a braid.) The loop exchange does contribute one span of thread to the center two ridges of the braid, but this is almost invisible overall.
But the ‘unorthodox’ loop exchange significantly adds to the structure of the combined two halves of the braid. That out-of-place twist to the ‘around’ loop creates a whole extra ridge down the midline of the braid – on both sides but not quite identical on the two sides. There’s a narrow and somewhat sunken central ridge on one side, and what looks like one or even two narrow ridges on the other side depending on how tightly you braid. You’ll either see a narrow central column of short slants of threads – all slanted in the same direction; or a narrow column of ^-shapes of thread – which actually represent two oppositely-slanted ridges.
Those extra ridges along the centerline of the braid are the visible part of a ‘messy bit’ tying the two layers of the braid together.
A normal double braid made with the orthodox loop exchange consists of only four ridges along the braid – on each of the two layers, so eight altogether. Those two layers of the braid can (optionally) be braided as completely separate layers, analogous to a divided doubleweave. But turning the “around” loop during the unorthodox loop exchange messes up and enmeshes the two layers of the braid at the center point between the two braiders, so it’s not possible for the resulting braid’s upper and lower layers to be completely separate from each other. This makes hollow, divided, and single-layer braids impossible when using the unorthodox loop exchange.
Meanwhile, the simultaneous and mirror-image turn given to the ‘through’ loop during the unorthodox loop exchange is actually not a structural ‘mistake’ or unorthodox move. It doesn’t ‘mess up’ anything. Rather, it simply undoes the earlier turn that was given to that loop in its previous loop transfer – or, conversely, it would double that turn if you turned the loop in the same rotational direction for both the transfer and the following exchange. Neither of these creates an unorthodox structure. (Turning a loop twice – ie one full 360-degree rotation – links the two strands of the loop instead of simply crossing them, but this is a common color-manipulation strategy in loop braiding as well as many other braiding traditions, and Noémi Speiser doesn’t categorize linking as ‘unorthodox’.)
You can see this “undone turn” quite clearly when unbraiding (undoing) your Bucks Horns braid. When you unbraid the loop exchange, magically the inner loop of the two has no twist to undo, even though you were sure you had given it one! And in unbraiding its next loop transfer there is also no twist to undo, even though you gave that loop a turn when you transferred it. That’s because you undid the turn when you performed the following loop exchange.
Note: If you want to be overly clever, you could choose to NOT turn the first loop transfer of the right hand (the way I teach the braid, this is the 3rd loop transfer of the braiding cycle), and then during the cycle-final loop exchange between the two hands, NOT turn that same loop (at this point it should be the inner loop of the two loops being exchanged) – so, only the ‘around’ loop would be turned during the loop exchange. That would accomplish the same thing, and might theoretically be a little more efficient. However, I find it easier to perform the same motions on both sides of the braid, and let one loop get turned and then ‘unturned’ along the way.
Whatever you choose to do, for the Buck’s Horns color-pattern, that loop must finish the braiding cycle either having had no (net) turn to the loop during its last transfer and subsequent loop exchange, or else having had TWO turns in the same direction, so that its two bicolors end up in the correct upper and lower position. If the loop’s net result for those two moves is one turn, then it would finish with the wrong color in upper position, which would spoil the color-pattern. This is not an issue for braids without any bicolor loops, like the color pattern I demo in the French String video. A difference in the number of turns only affects bicolor-loop color patterns. It of course also affects the structure of a braid, whether bicolor or not. The Bucks Horn braid theoretically comes out with a ‘hollow’ right half and a ‘solid’ left half because of having no (net) turn to the right inner loop transfer, but this is not apparent when looking at the braid. And because of the messy tied-together bit at the center, it would be hard to deduce even by prying into the braid.
Anyway, that’s the reason Joy and Noémi call this an unorthodox loop exchange. It may have been the easiest and most common loop-exchange method throughout much of European loop braiding history, but the structure it creates is a joyously complicated one for a fiber structure geek to unravel.
Historic braids with the Unorthodox loop exchange:
Buck’s Horns and French String braids have regular “orthodox” braiding moves, like a square braid, and are only “unorthodox” in their loop exchange method – the move that connects the left and right halves of the braid.
However, the very oldest known European team braids described in European Loop Braiding had no orthodox braiding moves like a square braid. The braiding moves in those oldest team braids were like those of the unorthodox 5-loop braid called a broad lace in the 15th C. loop braiding manuscripts, then connected by the unorthodox loop exchange I teach in the tutorial above.
According to Joy and Noémi, the unorthodox loop exchange is ideal for connecting sections of the ‘Broad lace.’ Apparently a two- or three-person version of the Broad Lace has very long floats of thread if the braiders connect their sections using the orthodox loop exchange, whereas the unorthodox loop exchange ties down those floats, stabilizing and strengthening the braid.
(I’m hoping to make a tutorial soon for one of these! I have made a few samples, and I love this braid – it’s a wide, flat-but-dense braid with a really unusual and beautiful structure/ texture that is different on the two main surfaces!)
Another interesting category of European team braids that Joy Boutrup and Noemi Speiser found in their research have sections of both unorthodox and orthodox braiding. Joy taught one of these in her Braids 2012 class – a double braid, in which each braider made ‘Broad lace’ moves with the loops of one hand, but ‘Square braid’ moves with the loops of their own other hand! (In mirror-image left-right order for the two braiders’ hands). I think that braid artifact had been made with the orthodox loop exchange between the two braiders (? I need to find my class notes to confirm that!)
In that class Joy Boutrup also showed a braid sample she had made that was a reproduction of a 17th C. royal horse rein. This was braided with yet another type of combo – in this 3-braider braid, both outside braiders make orthodox divided (or open-edges) square braid moves, but the center braider makes 5-loop ‘pigtail braid’ moves – none of that central braider’s loops go through any other loops, only over-under whole loops. I believe all three braiders use the unorthodox loop exchange. (photo in my blog post about her class.)
These braids, as well as others that Joy Boutrup and Noemi Speiser have analyzed, are not described in any of the known loop braiding manuscripts, which shows that those manuscripts only reveal a portion of what was a very extensive tradition in Europe. (Another European braid not mentioned in the known manuscripts is the 14th C. Sudarium braid, a 10-loop double braid with no loop-exchange move!)
Posted August 19, 2020
last updated July 31, 2025
© 2020-2025 Ingrid Crickmore
See full copyright restrictions and permissions at the bottom of the sidebar (if you are on a small screen device, the ‘sidebar’ may appear somewhere other than at the side of the screen).
Note: The publication date of May 2020 at top of this blog-post is an error. That was the date I first started writing this post, not the date I published it. I forgot to change the date when I finally made the post public on Aug 19, 2020, and only just noticed that mistake. At this point, I can’t change the publication date without changing the url of this post, so decided to let it stand.


Loved reaading this thank you
Thank you Ingrid, I just recently took up loop braiding to learn something new in these cooped up times. First the 5 loop braid you taught me in Shoshone years ago, and yesterday I finally tried flat braids, 5 and 7 loops.
Hermi Hiatt
Hermi it’s so great to hear from you!!! I hope you and John are staying well. We are feeling very cooped-up too, get out for a good walk once a day but that is about it. Thanks for coming by here and saying hi! Have fun with your braids! They can be really nice additions to knitted and woven pieces – drawstrings and fringes…