7-loop, D-shaped braids 1, 2, 3, and 4. Braiding method taught here (along with two other color-patterns).
These four color-patterns each have three colors, and have almost the same starting setup of the three colors. If you want, you can switch between any of these four patterns within the same braid. (see footnote*).
All have 2 loops of the main color, 4 bicolor loops of the main color plus contrast color 1, and 1 bicolor loop of the main color plus contrast color 2. It’s probably best if the two contrast colors are both much darker (or much lighter) than the main color.
All the patterns start with the same arrangement of loop colors on the fingers, except that the bicolor loops for some of the patterns may start with the upper and lower colors in the reverse order.
Always double-check your bicolor loops before you start braiding to make sure the correct colors are in upper and lower position on the finger! Upper color is underlined in set-up instructions.
A= index, B= middle, C= ring, D= little finger
| 7D-1. Asymmetrical color-patterns on both sides. | ||
 |
7 loops: (main color is white) 2 white loops; 4 white/variegated bicolor loops; 1 white/black bicolor loop. (Or substitute a bright solid color for the variegated) | |
| Left hand: A white/varieg (varieg up) B white/varieg C white/varieg D white/varieg |
Right hand: A white B white/black (black up) C white |
|
| Braiding method: D-shaped 7-loop, turn loops when transferring. Note: in the sample braid, the variegated-color strands were cut such that their colors all matched/ were aligned identically along each strand. |
||
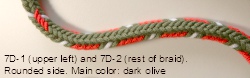
| 7D-2. Central stripe in main color (photos: front and back of black/red braid, front of olive green/red braid). |
||
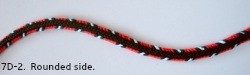 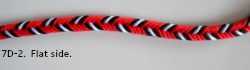  |
7 loops (main color is black): 2 black loops; 4 black/red bicolor loops; 1 black/white bicolor loop | |
| Left hand: A black/red (black up) B black/red C black/red D black/red |
Right hand: A black B black/white (black up) C black |
|
| Braiding method: D-shaped 7-loop, no turns when transferring loops. (I used a thinner yarn for the upper shanks of the black/red/white braid–see footnotes*) | ||
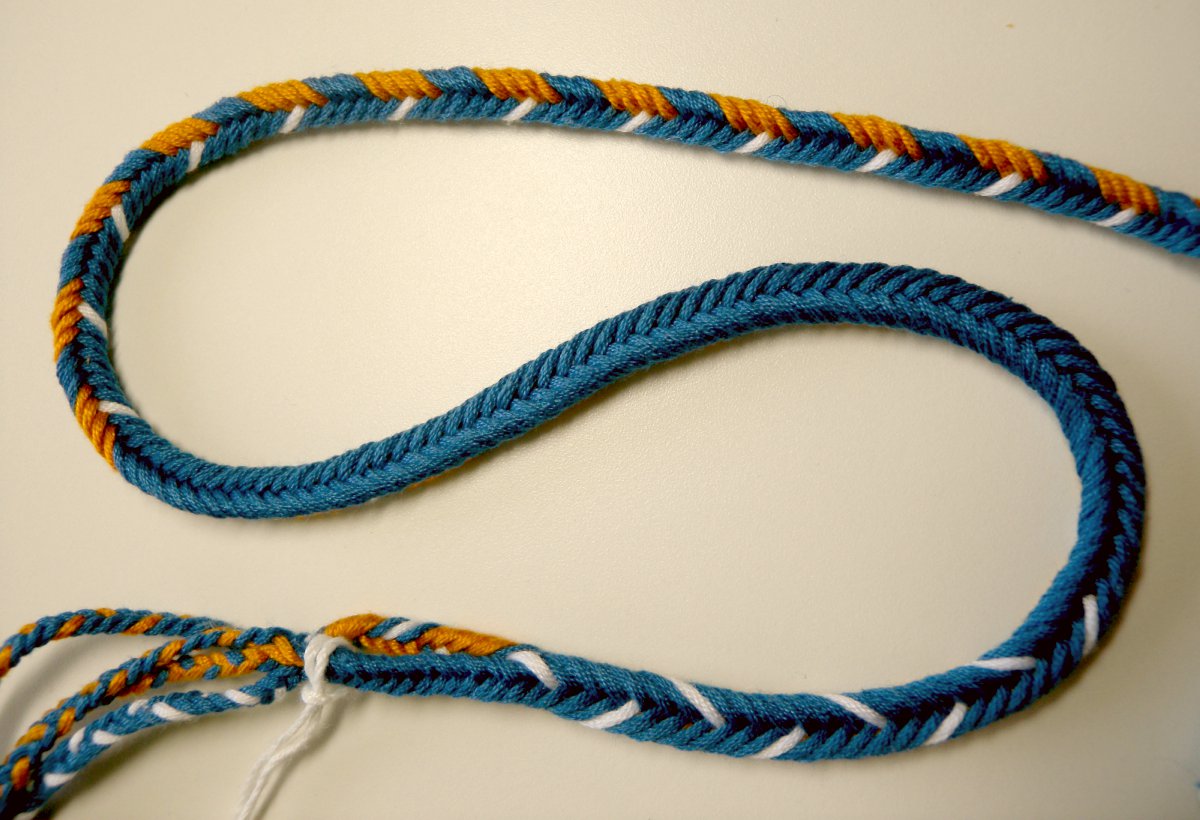
| 7D-3. Center with alternating colors. (Black might be a better choice than dark blue–I think this pattern needs a little more contrast.) | ||
  |
7 loops: (main color is blue) 2 blue loops; 4 blue/gold bicolor loops; 1 blue/white bicolor loop. | |
| Left hand: A blue/gold (gold up) B blue/gold C blue/gold D blue/gold |
Right hand: A blue B blue/white (white up) C blue |
|
| Braiding method: D-shaped 7-loop, no turns when transferring loops. | ||
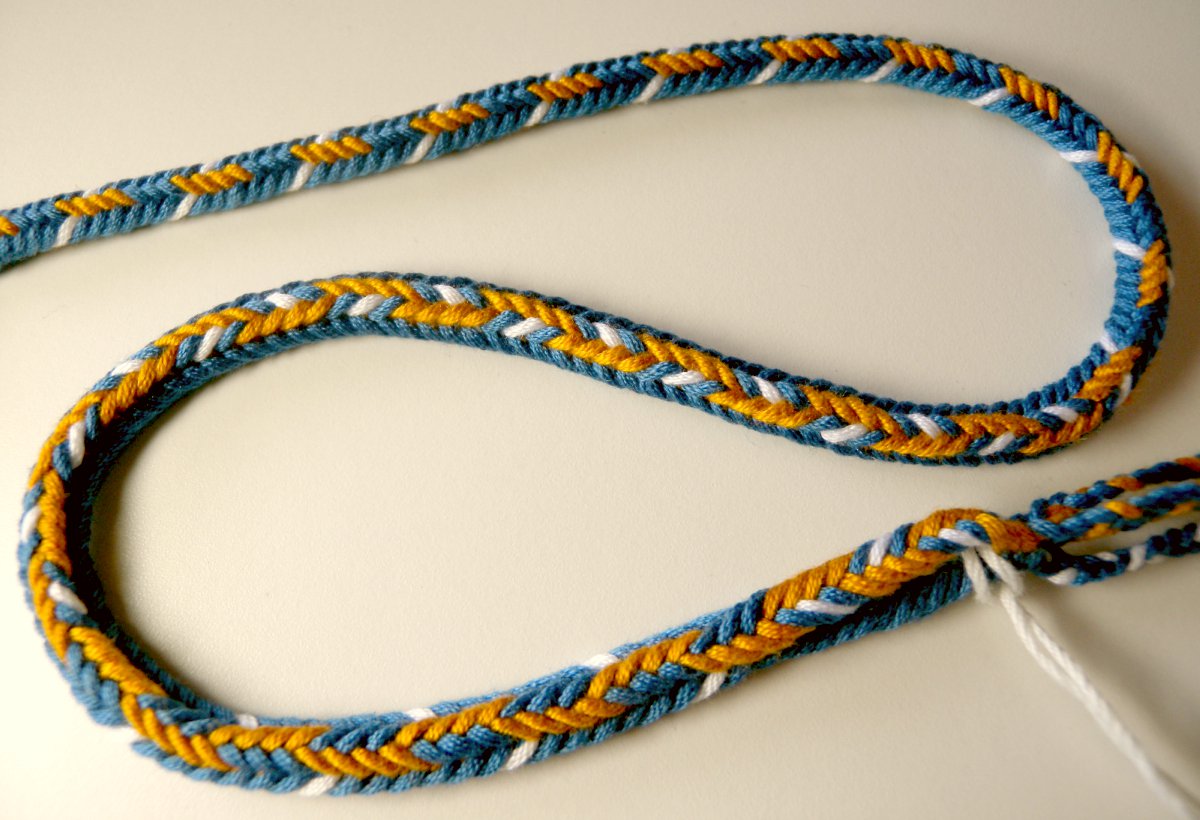
| 7D-4. S–type design snaking down center, with contrast color ‘zigs’ on sides and flat lower surface. | ||
 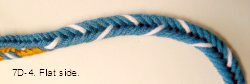 |
7 loops: (main color is blue) 2 blue loops; 4 blue/gold bicolor loops; 1 blue/white bicolor loop. | |
| Left hand: A blue/gold (gold up) B blue/gold C blue/gold D blue/gold |
Right hand: A blue B blue/white (blue up) C blue |
|
| Braiding method: D-shaped 7-loop, no turns when transferring loops. Note: the only difference between this pattern and the previous one is that here the single bicolor loop on the right hand has the opposite color in upper position. | ||
Notes
Yarn:
You can use any smooth yarn or thread that is suitable for braiding. The yarn that I used for these sample braids was (mostly) sport-weight mercerized cotton knitting yarn, about twice as thick as embroidery floss. I have three or four brands that are very similar, but are now all discontinued, unfortunately. This type of cotton yarn is still made, but I don’t know the names of current brands. (the type is very smooth, highly mercerized, and composed of several finer strands — sort of similar to embroidery floss in that you can separate/ divide the yarn into thinner pieces very easily.)
Sport-weight is a U.S. term for yarn about twice the thickness of embroidery floss (in between “fingering” weight and “dk” or “worsted” weight).
Using doubled embroidery floss would give similar results to these samples. But you can also use embroidery floss without doubling it, for smaller-diameter braids. I used this sport-weight yarn so the details would show more clearly in photos, for my own samples I usually use embroidery floss.
Switching between patterns within one braid:
The four color-patterns above all share a very similar initial color set-up:
Each braid has three colors – four bicolor loops of color1 plus color2, two single-color loops of color1, and one bicolor loop of color1 plus a high-contrast color3.
The first three patterns – 7D-1, 7D-2, 7D-3 – have almost the same initial arrangement of colors on the fingers. The only differences between them is that 7D-1 is made with turns; 7D-2 is made with no turns, and starts with all the main-color shanks facing up; and 7D-3 is made with no turns, and starts with all the main-color shanks facing down. (The first one – with turns – could actually start with the main-color shanks all facing up or all facing down without making a difference to the color pattern).
The fourth pattern (7D-4) is a slight variation of 7D-3. It has the same braiding moves and the same loop set-up except for the Rb loop (right middle finger). That one bicolor loop of color1 plus color3 is in the opposite up/down orientation from 7D-3.
In the braid below, I started with pattern 7D-1, switched to 7D-3, then to 7D-4. I could have switched to pattern 7D-2 as well, but I hadn’t found that pattern yet when I made this braid.
Switching between patterns can sometimes make the braid too busy-looking and hard to “read.” In this pattern sampler braid, I think I like how the flat side turned out better than the rounded side – that long stretch of plain navy sets off the two patterns on each end, whereas on the rounded side it’s harder to see where one pattern leaves off and the next starts.
Rounded side
Flat side
How to switch seamlessly between patterns:
If two color-patterns have the exact same initial loop set-up, like the first and third patterns in my chart (7D-1 and 7D-3), and only differ in their braiding moves:
Braid until the loops have returned to their initial loop set-up positions on the fingers (this will take a multiple of seven cycles for a seven-loop braid). Then and only then, change your braiding moves to the moves for the next pattern.
If the two color-patterns have the same braiding moves, but a difference in the initial upper/lower color positions of all or some of the bicolor loops (like 7D-3 and 7D-4 above):
Braid until all the loops have returned to their initial loop set-up on the fingers. All the loops are now on the correct fingers for the second pattern, but one or more of the bicolor loops are in the “wrong” orientation. Don’t turn them over!!!
(Actually you could turn them over to switch to the new pattern, but it would probably also result in a slight glitch in the braid at that point – a bump, or color-irregularity, or uneven-looking ‘stitch’).
Instead of turning it or them over, do this:
For the next 7 cycles of braiding, keep track of exactly which bicolor loops are in the wrong orientation for the new pattern. The first time you transfer each of these “wrong” loops, transfer it “wrongly” — that means with a turn, if the braiding moves are supposed to be without turns; or without turning it, if the braiding moves are supposed to be turned. This “wrong” move will put the loop into the correct position for the new pattern. (Transfer any “correctly” positioned loops correctly.) After 7 cycles of this, the bicolor loops should all be in the correct set-up positions for the new pattern, and you can start braiding with the “correct” braiding moves for all the loops.
(Other patterns than these four are also possible.)
*Enhancement for Black/Red/White 7D-2 braid:
I cheated a little with this braid! In order to make the central black line down the braid a tad narrower, I used a thinner black yarn (embroidery floss) for all the upper shanks, and a twice-as-thick yarn for all the lower shanks. So even the two all-black loops were each made from two different yarns – black embroidery floss for the upper shank and thicker black cotton yarn for the lower shank.
You can get the same effect by using embroidery floss for all the upper shanks, and doubled strands of embroidery floss for all the lower shanks.
You don’t have to do this, though. The braid pattern is still very effective even with yarn of all the same thickness. In the Olive green/Red/White braid, I used thicker yarn throughout. (third photo, below the black & red braids). The main difference in using thicker thread for all the strands is that the braid came out thicker. Using embroidery floss for half the strands had resulted in a narrower braid. The pattern itself isn’t very different, although if I used black instead of olive green it would “pop” more – the olive doesn’t contrast as much with the other colors as black does.
Tip for measuring out/ cutting strands:
If a braid has any bicolor loops at all, I usually find it quicker and easier to measure out (by winding around my c-clamp and a chair) and cut all the loops as two strands per loop, even the single-color loops. That is, I make any single-color loops with two lengths of yarn, exactly the same way that I make the bicolor loops – except that I take two lengths of the same color and tie them together at both ends. It may sound like extra work to do it that way, but it actually saves a lot of time in getting the loops to all be the same length. The way I do it, the bicolor loops and the single color loops all end up the same length automatically.
Otherwise it’s tricky to measure accurately for the two types of loops. The two lengths for a bicolor loop need to be cut a bit longer than simply half the length of a single-strand loop. That’s because the knot connecting the two parts of a bicolor loop takes up a certain amount of length itself. It takes less time fussing to get the loops the same length if I just measure and cut them all the same way to begin with.
Set-up chart:
The chart of the set-up instructions above was my first attempt to create a table in html, so I could put the instructions in columns next to the photos. I’m a dunce at coding! I relied heavily (and slowly) on Panos’s invaluable WordPress Tips site to come up with a chart template [thank you, Panos!]. I think it’s working, if I can judge from how it looks on my rather small monitor.
The chart also seems to come out ok on a little tablet and on my husband’s phone. But I am not sure how it looks on normal-size or larger computer monitors – do the photos look too small and the chart contents too spread out??? If so, please let me know, so I can try to fix it…
Last updated Nov 5, 2020
© 2015-2020 Ingrid Crickmore
See full copyright restrictions and permissions at the bottom of the sidebar (if you are on a small screen device, the ‘sidebar’ may appear somewhere other than at the side of the screen).


Reblogged this on The Middlegate Cryer.