[update 8-30-2017: I just posted a chart of set-up instructions for all (I think!) of the sample braids I show in these photos and in the videos.]
This is an easy, two-pass braid similar to a square braid, but with three sides rather than four. In cross-section it’s kind of a wedge-shape or blunt triangle. Not an equilateral triangle – it’s wider than it is high – and it’s blunt-topped, not sharp-edged. I call it a ‘triangle braid’ mostly in order to differentiate it from a square braid and from the D-shaped braid (another easy-to-learn braid with very similar moves to square and triangle braids).
The European A-fell version of this braid was called the “Broad lace of 5 bows” in the 15th C. English loop braiding manuscripts – it has the same exact over-under thread structure, yet a completely different appearance than this “triangle braid!” [more in Notes]
Click links to jump to the videos: 5-loop Triangle braid – 7-loop Triangle braid – 9-loop Triangle braid
[If you haven’t loop braided before, I recommend starting with learning the square braid – to me, it is the most basic and versatile braid – the ‘base braid’ of a huge family of braids that include flat braids, lacy braids and much larger, multiple-person braids. The D-shaped and Triangle braids are fun off-shoots of the square braid.]
The Triangle braid has some great color-patterns, most of which are distinctively different from the equivalent square or D-shaped braid, and its wedge shape is really nice, too! Unfortunately the 3-dimensional shape doesn’t come across clearly at all in the photos. I think it shows more clearly in the videos, like where I’m showing closeups of some of the braids in my sample book.
These are the 3 braids I demo in the videos: 5-loop, 7-loop, and 9-loop Triangle braids
The Triangle braid is another so-called Unorthodox braid, like the D-shaped braid I’ve already taught here. The braiding moves are very similar. On its way to the loop it will take, the operator finger will go through only one or some of the loops, skipping over one or more of the other loops.
Like the D-shaped braid, the Triangle braid has a beveled upper surface, and a wide, flat lower surface. The upper surface is beveled in a different way than the D-shaped braid, though, and many of its color patterns look very different. The lower surface looks similar to the D-shaped braid.
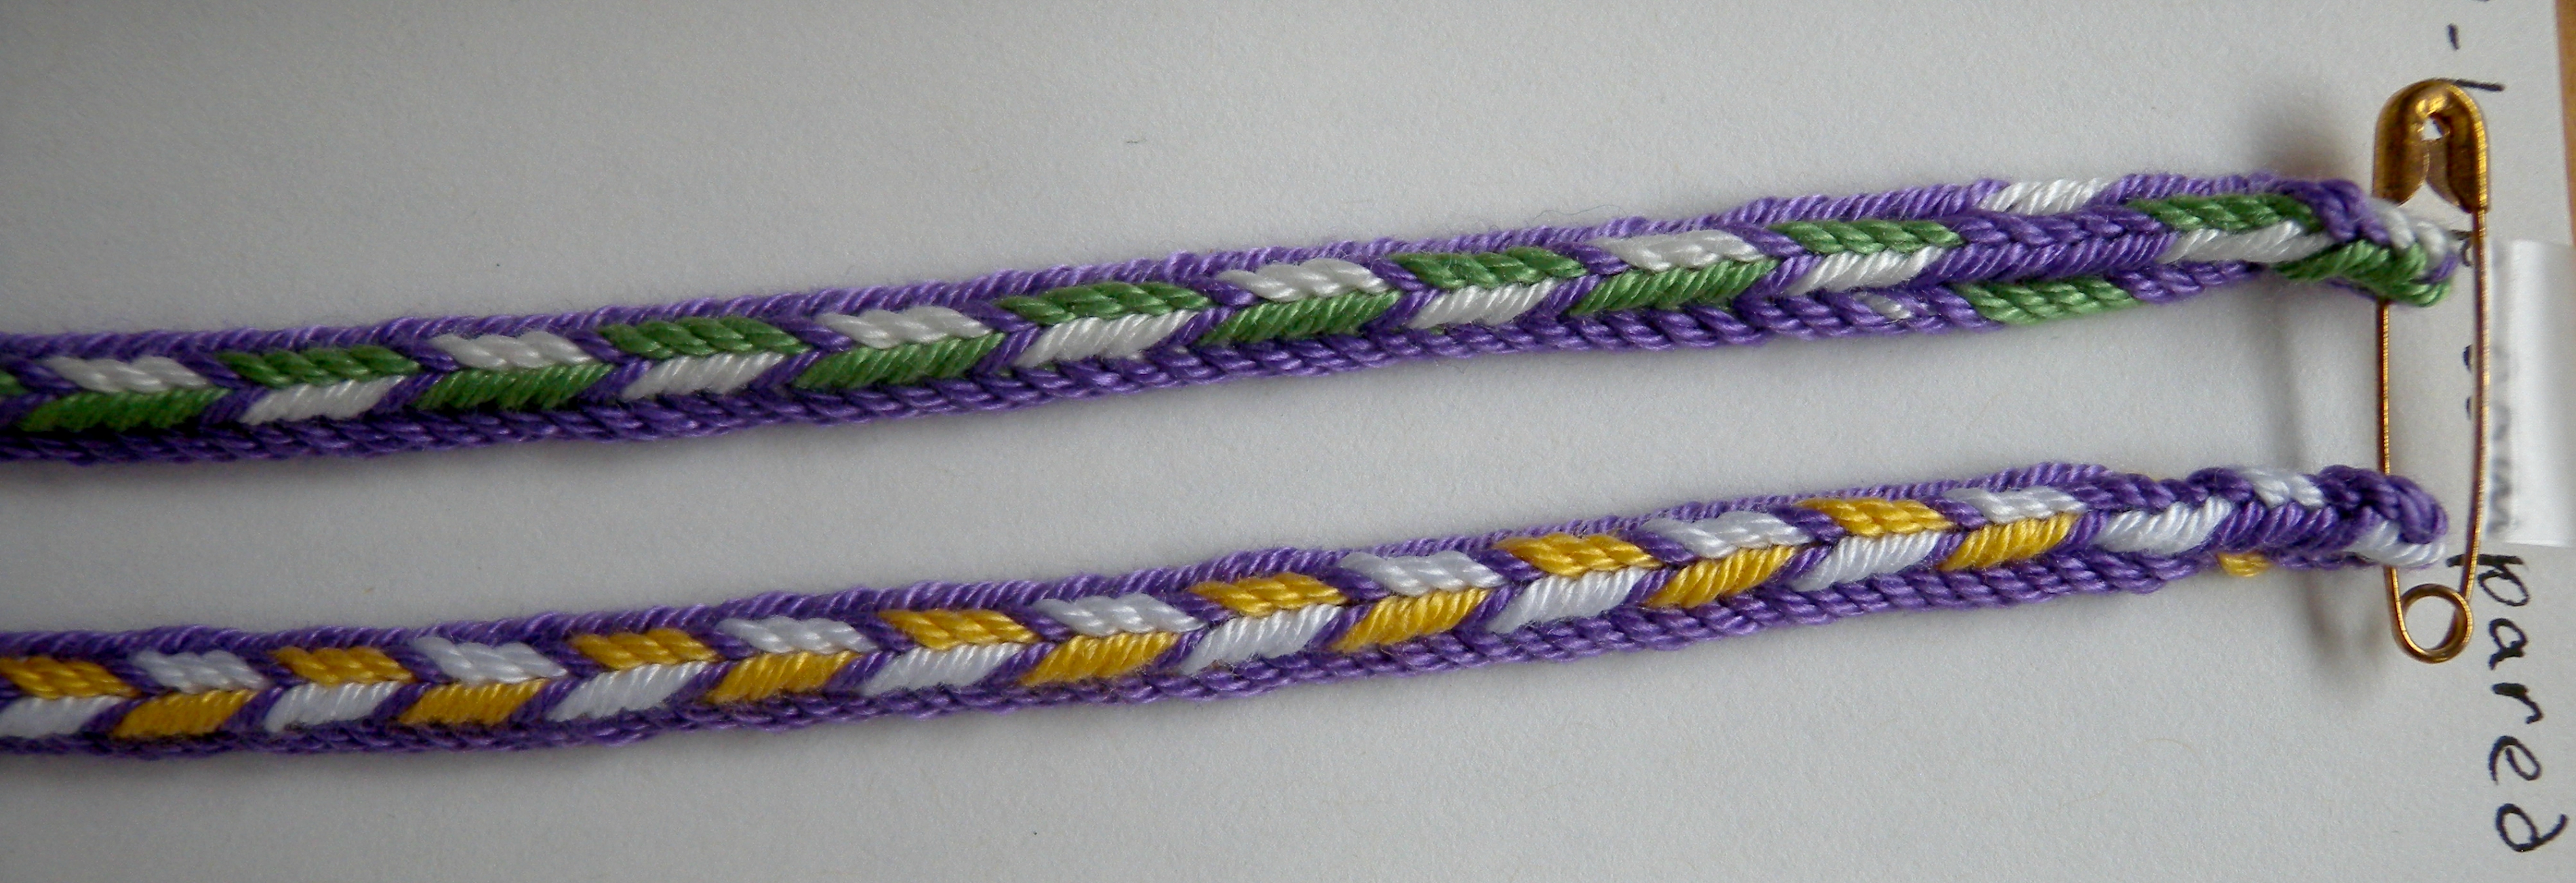
The two leaning upper surfaces have pretty much the exact color pattern as the left and right sides of an equivalent square braid! This brings those great chevron designs of a square braid’s side surfaces up to front and center:
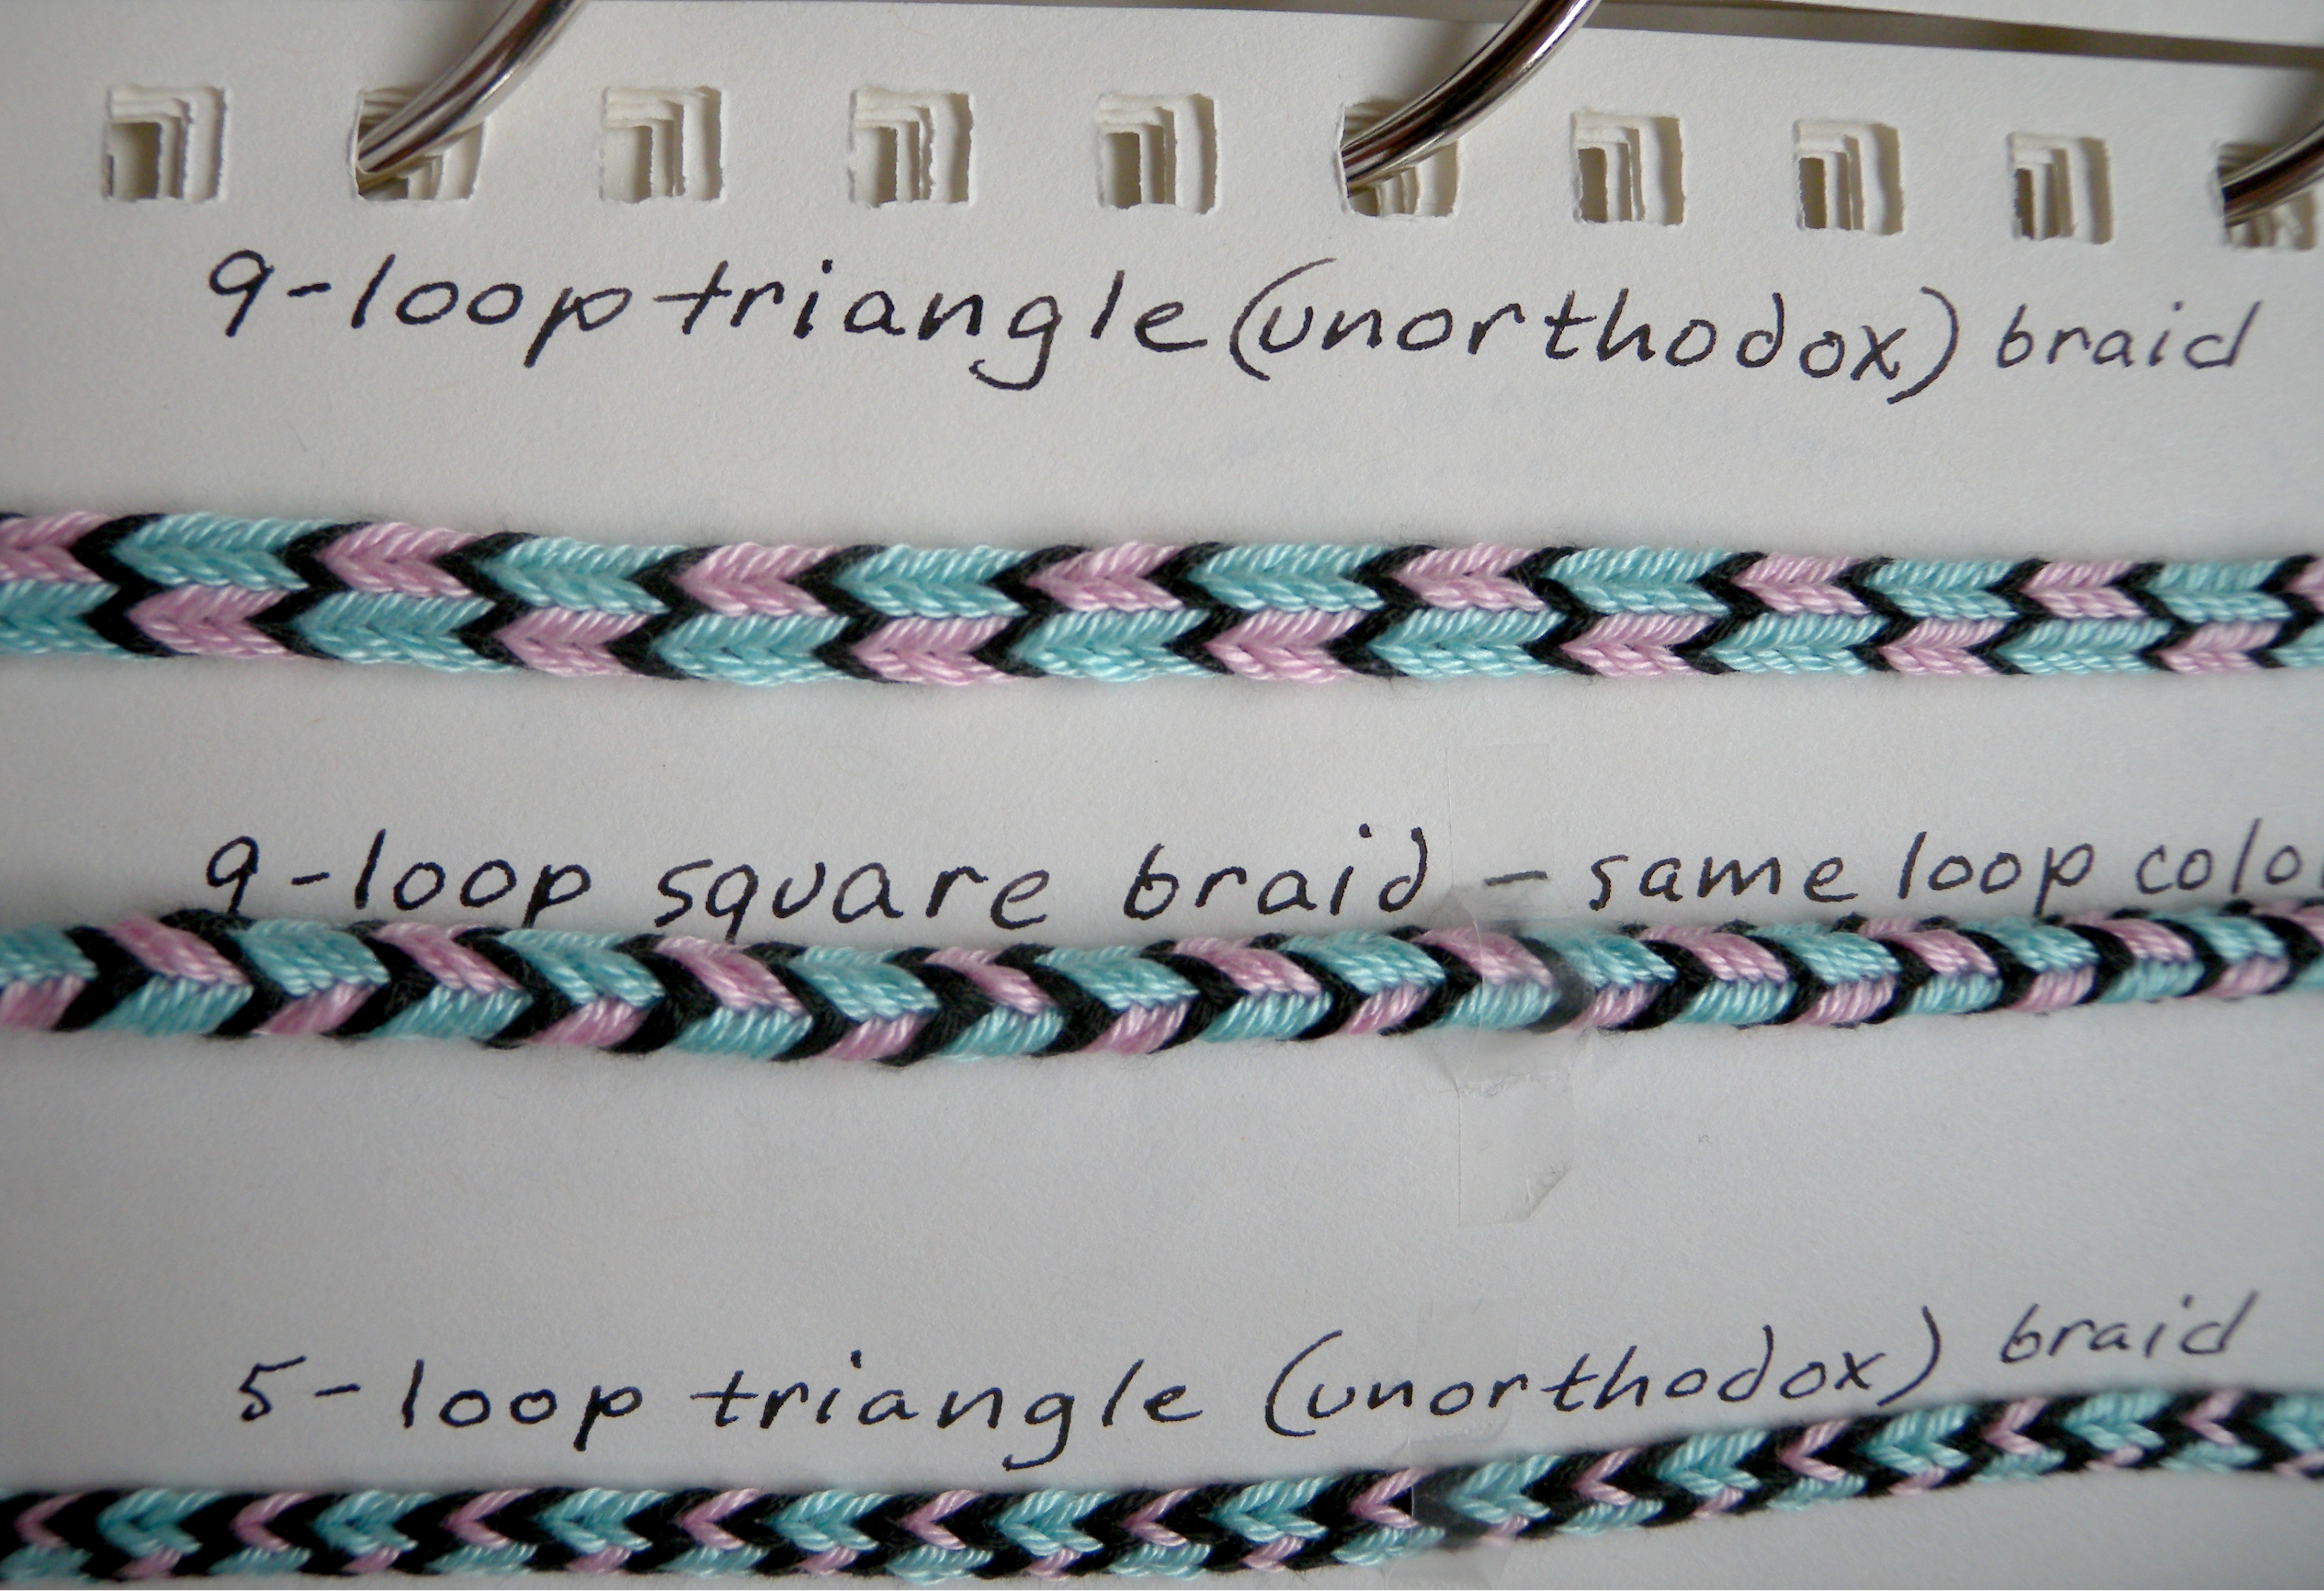
Top braid is a 9-loop Triangle braid. Below it is a square braid that had the same loop-color set-up.
In the 9-loop Triangle braid above, the “stained glass” black lines separating the chevrons makes the pink and blue areas look like nested chevron tiles rather than pink chevrons on a blue background. This braid can have other color patterns than chevrons, though. Here are a couple patterns with lengthwise stripes:

Two Triangle braids with “Edge” pattern variations
These ones remind me of a parquet or tiled floor:
symmetrical Triangle braid patterns
Each of the three videos teaches a different Triangle braid color-pattern. All of them can be extrapolated to triangle braids of different numbers of loops, see immediately below the timeline of the last video for more information.
[update 8-30-2017: I just posted a chart of set-up instructions for all (I think!) of the sample braids I show in these photos and in the videos.]
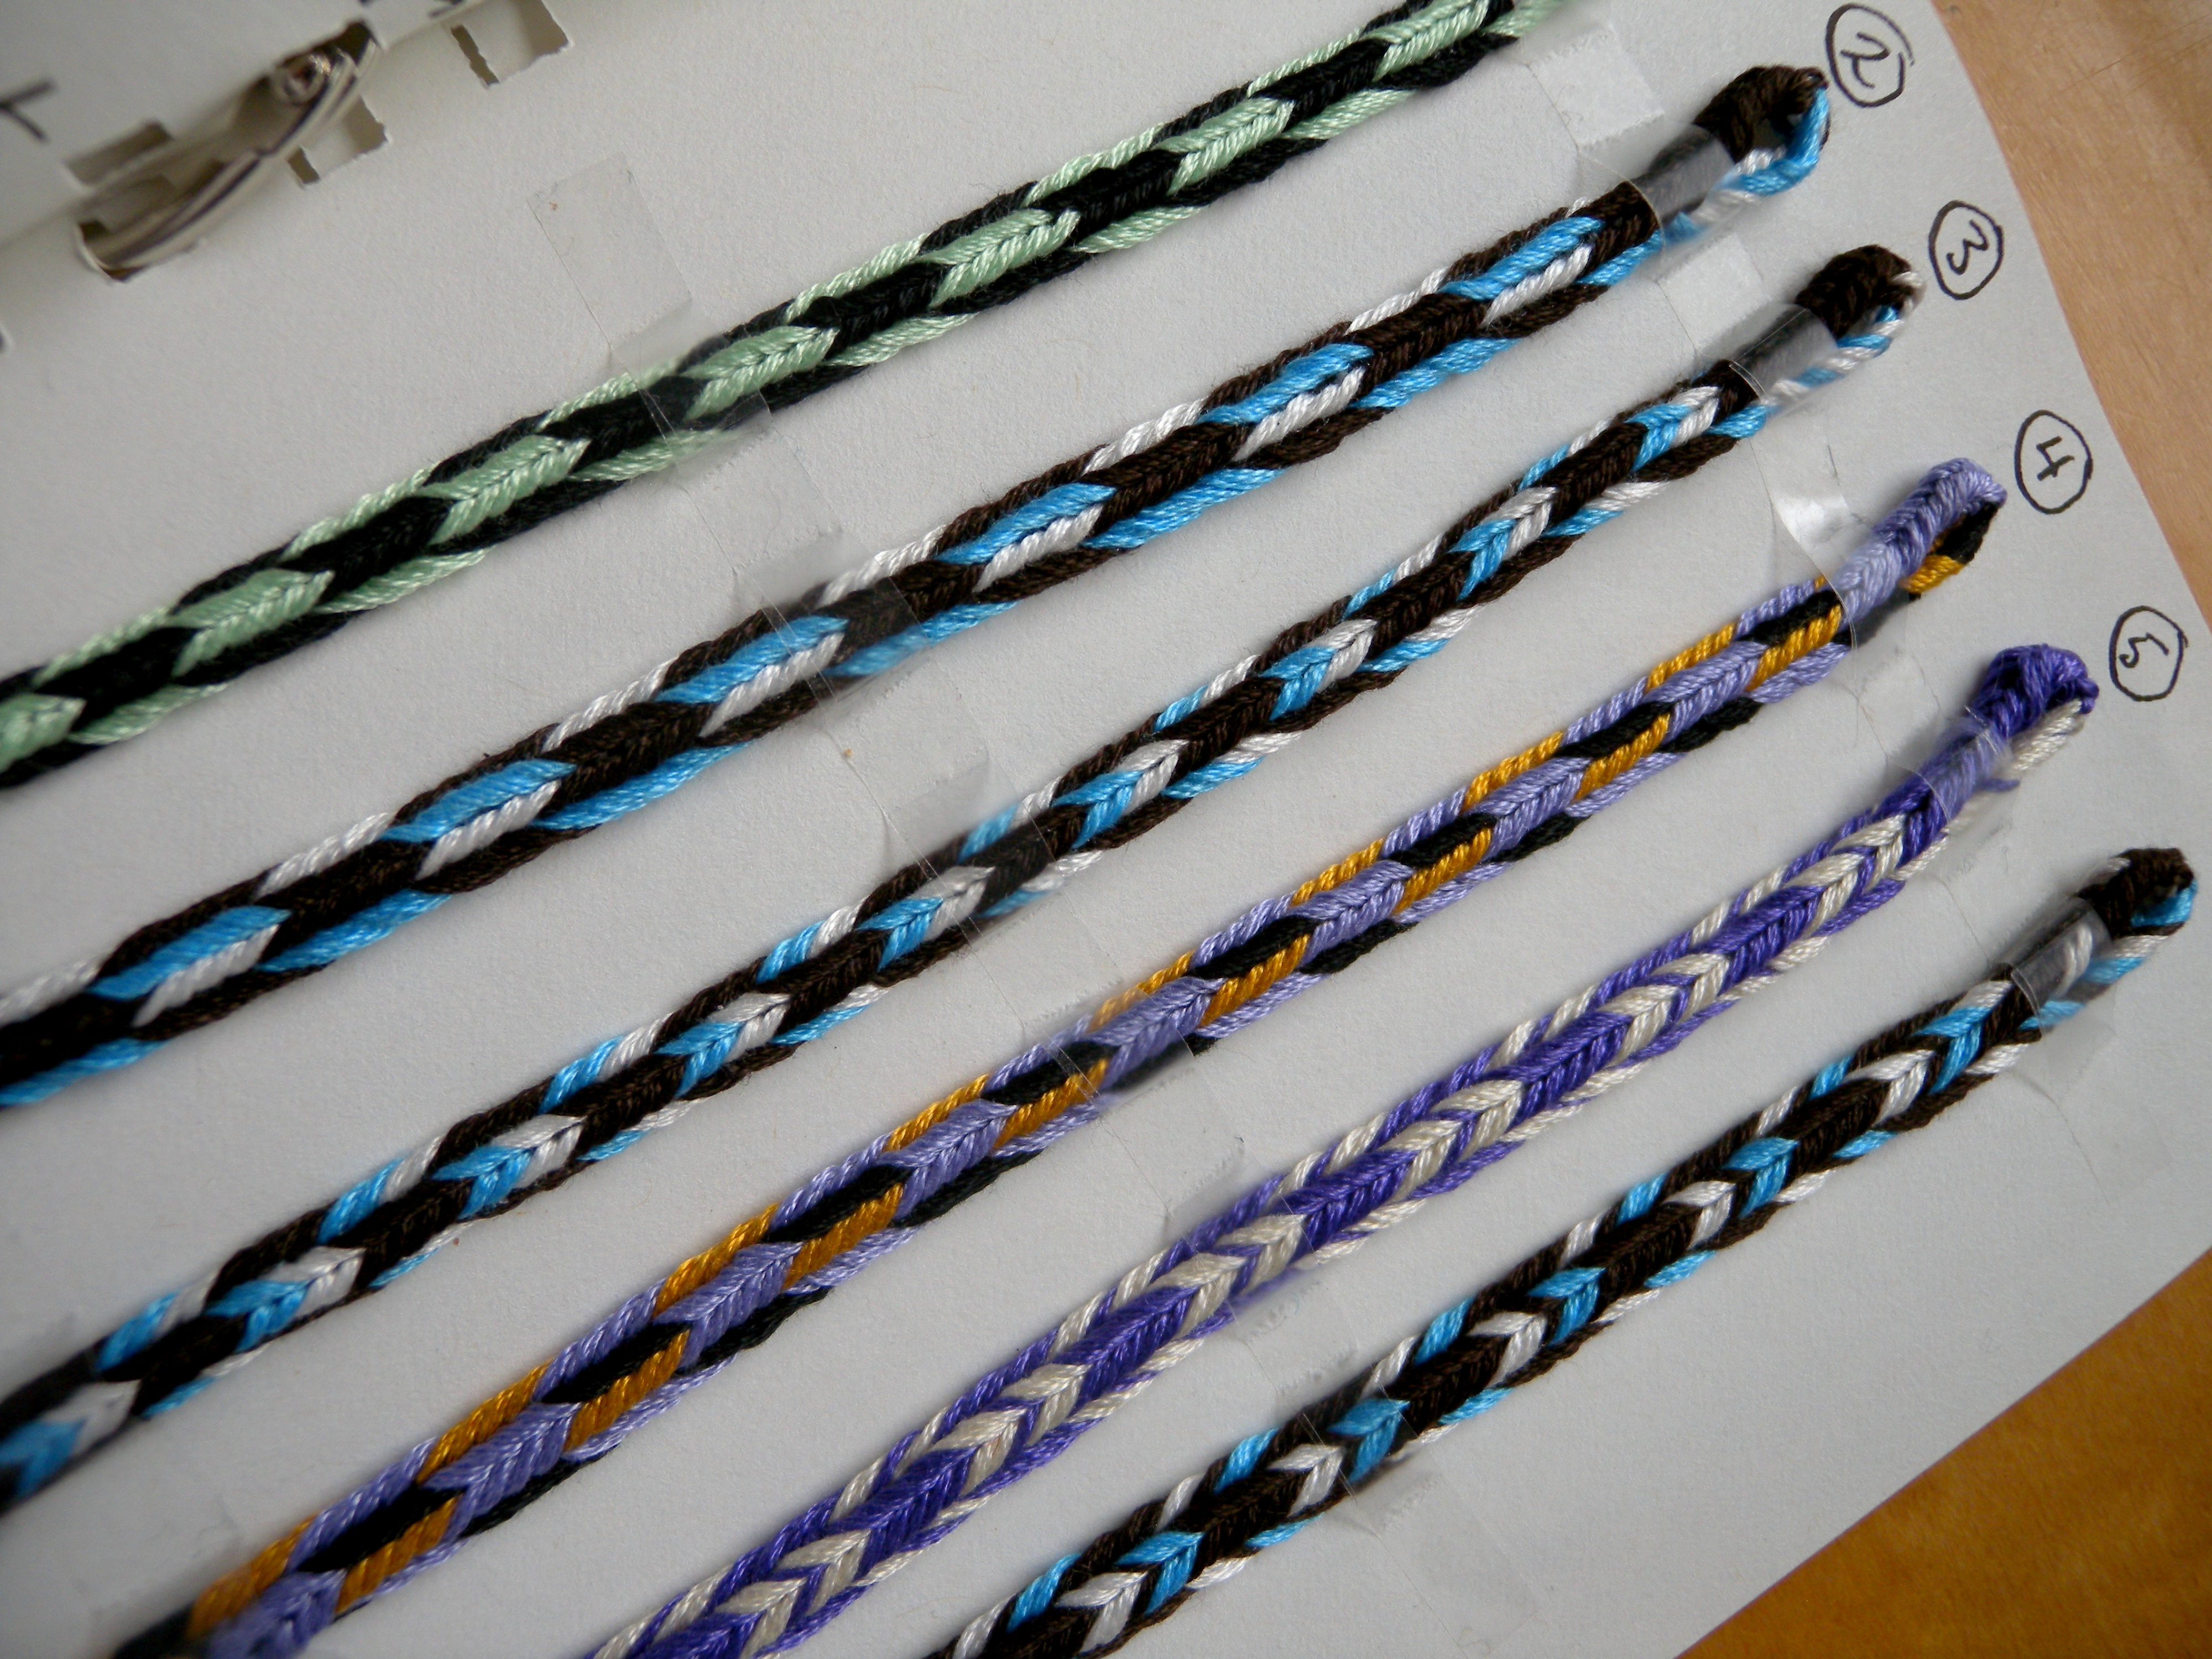
Both the D-shaped braid and the triangle braid can be made with as few as 5 loops, though you do get more color-pattern possibilities with 7 or more loops. Aside from the lowest braid, all the samples in the photo below have essentially the same 5-loop color-sequence: [black-bicolor-black-bicolor-black] incorporated into 5-loop, 6-loop, 7-loop, 9-loop, and 11-loop triangle braids (6-loop braid has one extra bicolor loop; others’ extra loops are green.):
The triangle braid can be made with an even number of loops as well, though I don’t demo that in the videos. (see footnote for a tip on making them.*) Some color-patterns are only possible with an even number of loops.
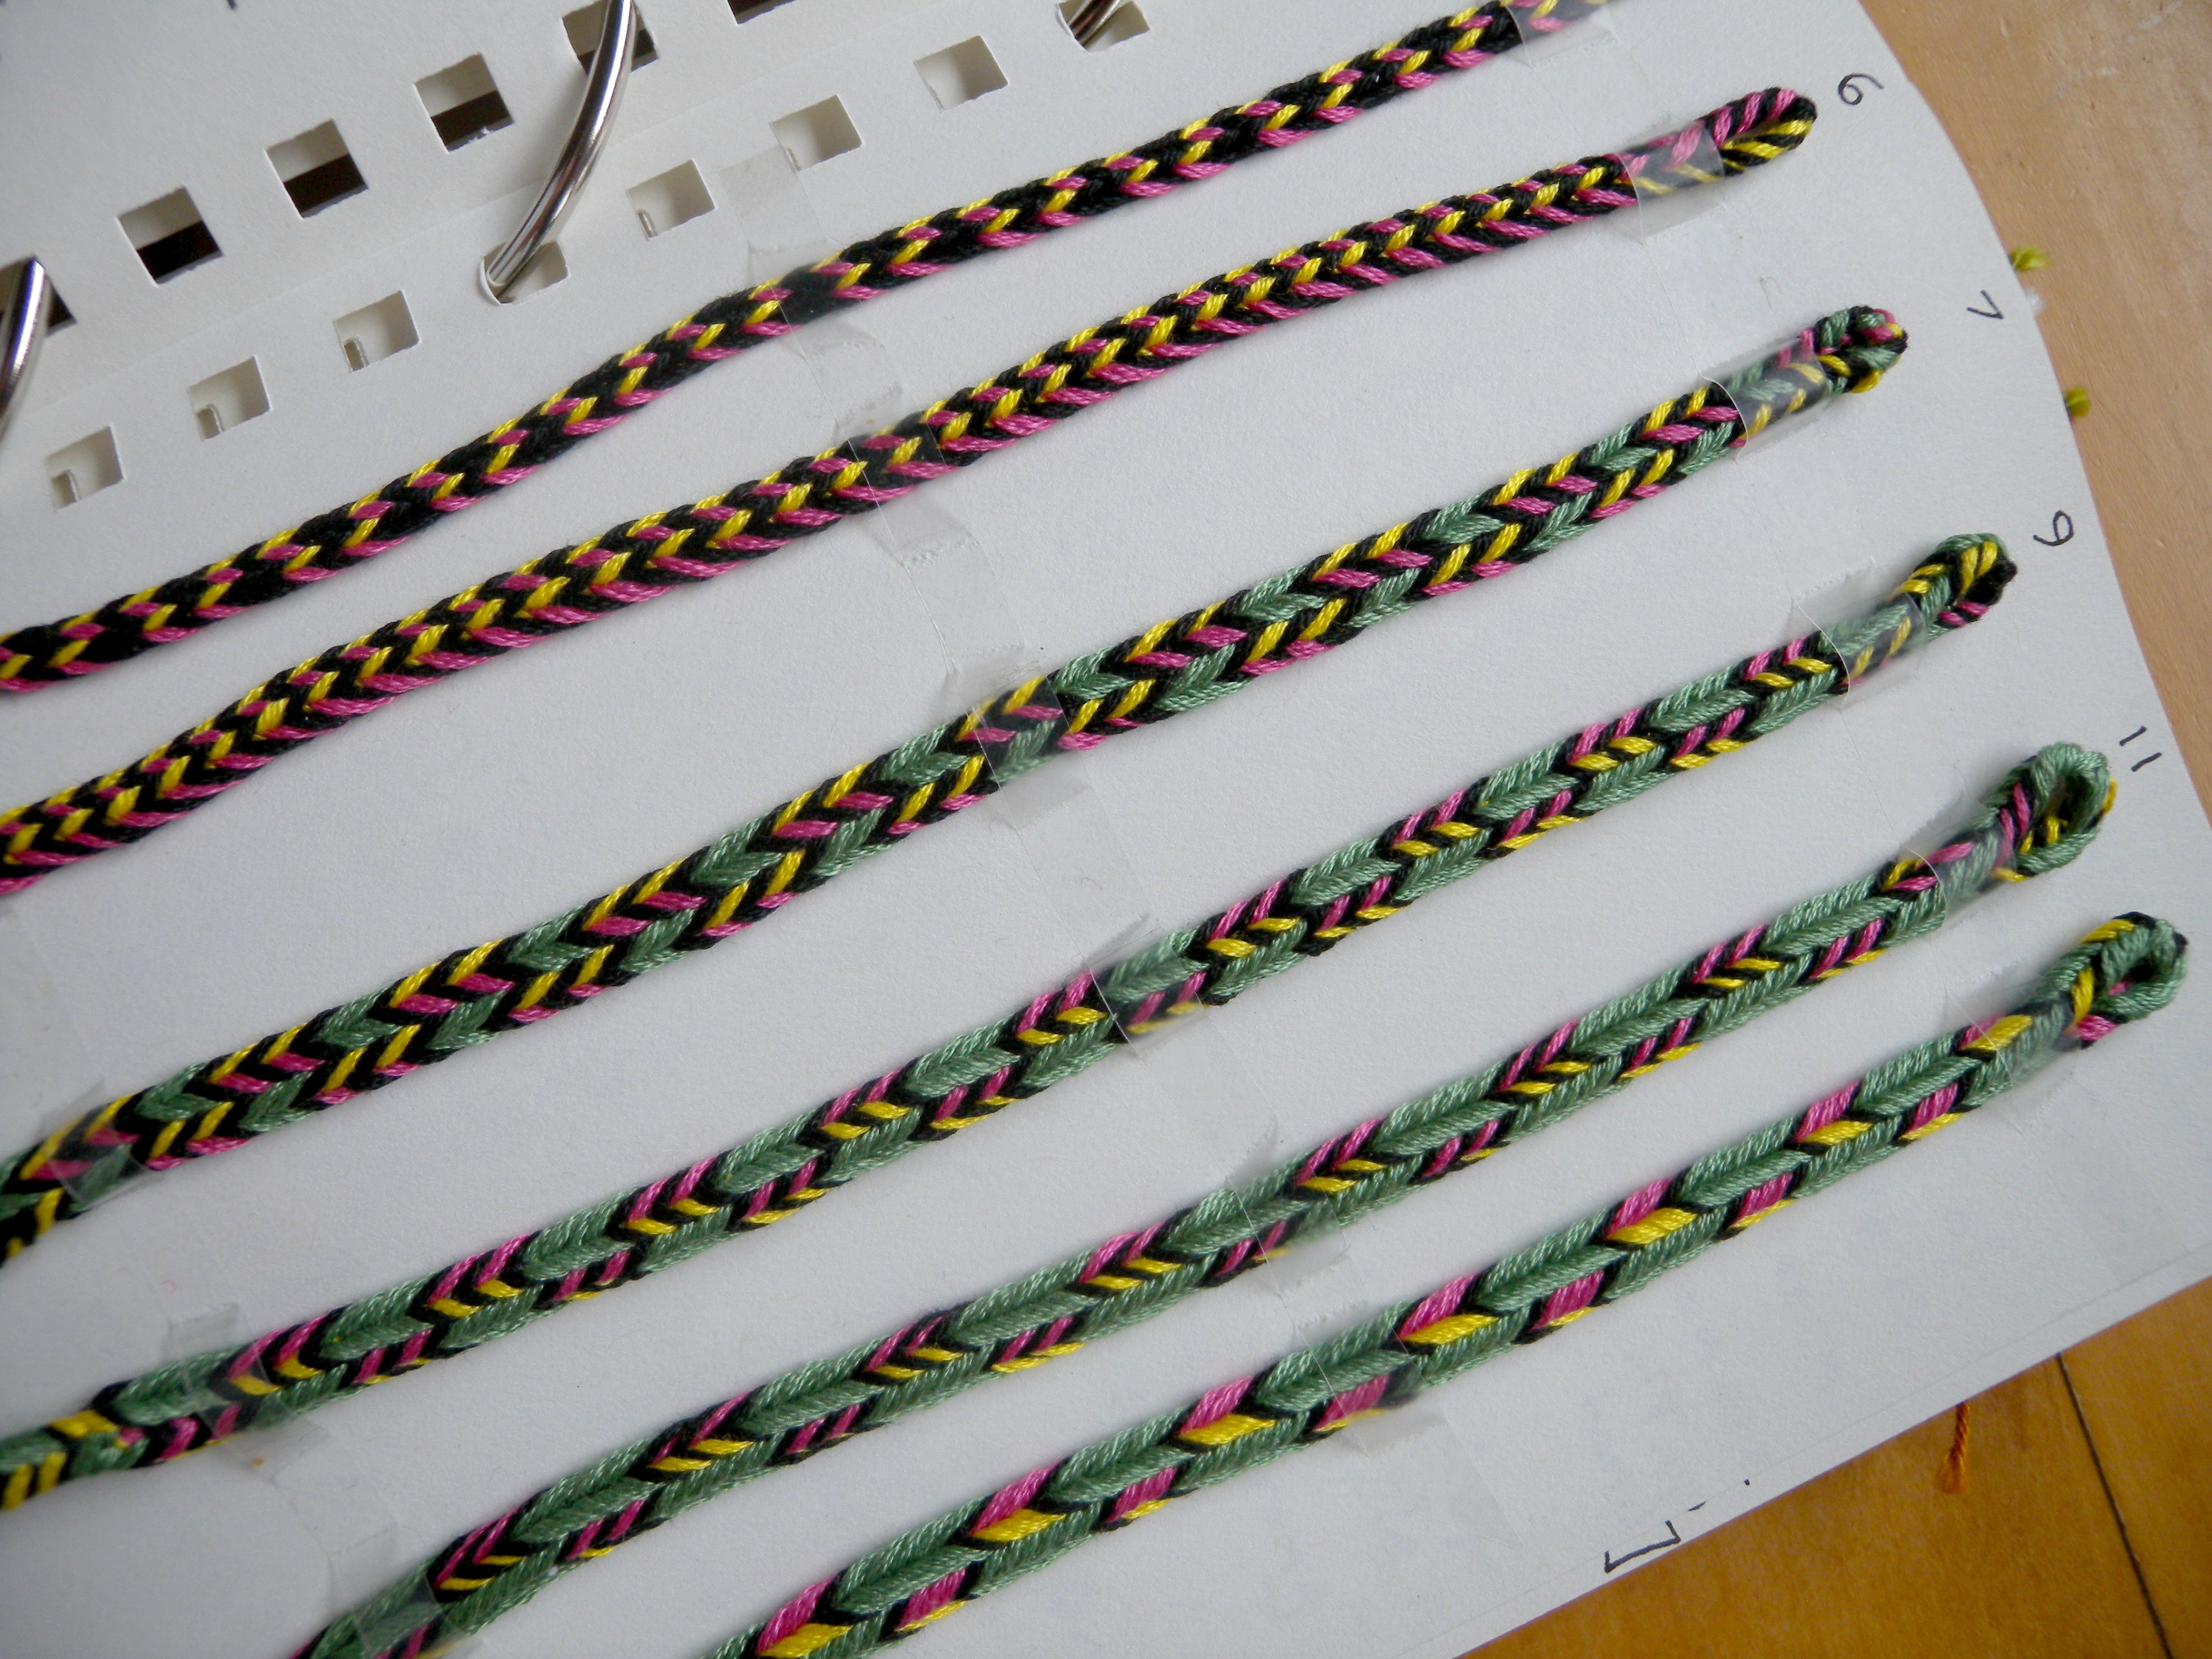
In the videos, I didn’t give examples of making this braid with NO turns to the loops the way I did in my D-shaped braid videos, but this is also a way to braid some nice patterns in the Triangle braid format:
9 and 8-loop Triangle braids. White, green, and yellow strands are bicolor loops, and all the bicolor loops have purple as their other color. Loops were transferred without being turned (straight/ unreversed/ open transfers).
My first video demos a 5-loop triangular braid.
The second video demos a 7-loop triangular braid.
The third video demos a 9-loop triangle braid, and at the end of the video I show some of the braid samples in my Triangle braid sample book, and compare the triangle braid to its equivalent square braid, and to an equivalent D-shaped braid.
If you haven’t loop-braided before, I recommend starting with my 5-loop square braid tutorial. It covers some basics that I don’t teach here, like how to set up your loops, how to get proper tension, how to form a loop at the end of the braid, and more. The square braid can be modified into a wide, flat braid, or a divided two-layer braid (for forming a loop at either end of the braid) – good for making a loop at the top of this Triangle braid as well!
(See below the videos for some triangle-braid tips.)
Fingers/loops:
a=index, b=middle, c=ring, d=little
Th=thumb
In all the Triangle braids:
The little (or ring) finger is the ‘fetcher’/ operator.
In making its way toward the transferring loop (on the opposite hand’s index finger or thumb), the operator finger will SKIP OVER the entire 1st loop or loops
[c-loop for a 5-loop braid, d-loop for 7-loop braid, d AND c loops for a 9-loop braid]
and only go through the loop or loops NEXT to the transferring loop
[b-loop for a 5-loop braid; c AND b loops for 7-loop braid; b and a-loops for a 9-loop braid]
Take transferring loop [a– or th– loop] by hooking onto it from above the loop = an ‘inward turn’ of that loop as it moves onto the operator finger.
5-loop Triangle braid:
Skip to the part you want to see!
After clicking to start the video, drag the bubble under the screen to the point you want to see in timeline below:
Timeline:
0:00 Intro to 5-loop Triangle Braid
1:11 Loop set-up for this color-pattern (bicolor chevrons on a white background)
2:12 Explaining braiding moves
3:10 Continuous braiding moves
3:20 Possible problem when making a 5-loop triangle braid: “losing” the triangle shape. How to prevent that from happening.
6:14 How to braid a “loop”/ buttonhole area into the braid
7:17 Closing the loop area with 5 turned loop transfers.
7:47 Braiding 3 mini-braids as a way to finish off the bottom of the braid with a braided tassel.
8:34 Tying off the first pair of mini-braids.
9:25 Braiding a 2-loop braid mini-braid as the last braid in the ending tassel.
10:22 Showing the finished braid. Back is similar to the D-shaped braid.
11:35 Examples of other color patterns in my Triangle braid sample book.
OOPS! On the 7-loop video below, the black and rainbow-pastel braid is actually a 5-loop braid! – it belongs with the 5-loop video above, not this one. You can make the same pattern with 7 loops, but it would be a more substantial braid.
7-loop triangle braid:
Video timeline: (after starting video, drag bubble under screen to point you want to see)
00:00 Intro, showing the 2 color patterns I will be teaching for this braid
2:00 Demoing how to find the correct loop order if you’ve dropped the loops.
3:34 Loop set-up for the first color-pattern (“Edge” – lengthwise striping)
4:13 Explaining the braiding moves for Triangle braid, compared to square and D-shaped braids.
4:55 Beginning of braiding moves
6:04: Explaining Edge pattern, and how to trouble-shoot – recognize if you’ve made a mistake while braiding that pattern.
7:40 Second color-pattern (“One-Loop-Wrong,” a contrast zigzag design over lengthwise stripes) – Loop set-up, and how to change into that pattern seamlessly FROM doing the Edge pattern.
6:30 Unbraiding this braid (to undo back to a mistake, for example)
9:30 Explaining the wedge-shaped structure of the braid, and how to tighten it to maintain that wedge-shape.
11:25 How to return to the Edge pattern (seamlessly) from braiding One-Loop-Wrong – basic ‘pick-up’ technique
12:27 How to braid a “loop”/ buttonhole area into the braid
14:06 How to close/ tie off the loop area in a 7-loop braid.
14:50 Braiding 4 mini-braids as a way to finish off the bottom of the braid with a braided tassel – 2 braiding procedures makes 4 little braids. (I should have ended this braid sooner, so there would be more loop-length available for these mini-braids!)
16:45 Tying off and cutting apart the tassel of mini-braids at the bottom of the braid. Knot: “UP, around and down”. Before tightening the 2nd knot, slide it OVER and to just below the first knot before tightening.
19:45 How to deal with a couple of loose ends at the top of a “no-ends” beginning to a braid.
20:14 Showing the finished braid – the two color-patterns, loop at the end, and braided tassel.
20:25 Showing the BACK of the braid – looks totally different from the front.
9-loop Triangle braid:
Video timeline (after starting video, drag bubble under screen to point you want to see)
0:00 Intro, 9-loop braids in my triangle braid sample book
1:05 Loop set-up for this color-pattern (black and yellow chevrons over lengthwise purple and white stripes) – Pay attn to the bicolor loop on the right hand! On the right hand, the PURPLE shank must be higher, NOT the white shank like the loops on the left hand.
1:39 Using the thumb in making this 9-loop braid (see also my 9-loop square braid tutorial)
2:39 Loop order in the braid (this is the order the loops will follow each other in the braid itself)
3:05 Triangle braiding moves. Beginning of braiding moves – how to use the thumb in loop braiding.
4:21 Continuous braiding moves
6:06 Undoing/ Unbraiding this braid (to undo back to a mistake, for example) – NOTE: my first undoing moves had a built-in mistake, since in demoing a more difficult way to undo by using the thumb, on both hands my first loop became twisted! I noticed this and fixed it in undoing, but didn’t realize how it had happened. Skip to point below to see uninterrupted unbraiding moves.
9:00 Better demo of undoing moves.
10:30 How to get all the white shanks in upper position before making a loop in the braid (optional! I sometimes do this before making a loop, when I have any bicolor loops in the braid)
11:54 How to braid a “loop”/ buttonhole area into the braid (also optional).
13:31 Closing off the loop with 9 square-braid loop transfers.
14:56 Braiding 6 mini-braids as an optional way to finish off the bottom of the braid with a braided tassel…Strategizing how to arrange the loop colors.
16:03 Starting braiding the 3 divided braids for a 6-mini-braid tassel.
16:52 Tips for braiding 3-loop braids – they are easy to braid, but difficult to braid neatly.
17:47 cutting and tying off the first pair of minibraids.
18:30 Starting on the second pair of minibraids
19:56 Cutting and tying off the second pair of minibraids
20:48 Starting last pair of minibraids
20:57 Yarn I used in this braid.
22:46 tying off the last pair of minibraids.
23:28 Showing the finished braid – minibraids at end, BACK of braid – looks completely different than the front – crevice/ ‘ditch’ along front peaked center of braid.
25:31 Examples of other color patterns in my Triangle braid sample book, including a comparison with a D-shaped braid, and a comparison with a square braid.
Making the color patterns in the videos with different numbers of loops:
1st video: For the bicolor chevron pattern shown in the first video, and any (odd) number of loops: Start with the single-color background loops all on the left hand – which starts out holding one more loop than the right hand. On the right hand, place the bicolor loops, each with the same color shank in upper position. There should be one more single-color loop (background color) than there are bicolor loops (chevron colors).
2nd video: For the Edge pattern and 1-loop-wrong pattern, and any number of loops from 5 and up: Start with all bicolor loops, dark up on one hand, light up on the other (for the Edge pattern). For 1-loop-wrong start with the same setup except for one loop – any loop – which should be in the opposite dark/light configuration from the other loops on that hand.
3rd video: This 9-loop color-pattern can also be made with 7 loops – though the chevrons come out a bit more crowded together. Start with only 4 bicolor loops on the left hand, and only the 3 black, yellow, black loops on the right hand, in that order.
In a 5-loop braid, the 3 black, yellow, black loops would be placed on the LEFT hand, and only 2 bicolor loops on the right hand. However the resulting braid pattern won’t look as much like separate chevrons. The 3 black and yellow loops will connect to some degree around the braid, since they only have 2 bicolor loops to separate them. For a pattern of separated chevrons in a 5-loop braid, only one or two chevron-color loops can be used (with 4 or 3 background-color loops).
Tip #1: Making the braid divide into two (to form a loop/ buttonhole, or to make the braid fork into two braids)
In unorthodox braids, the upper and lower layers of the braid are tied together wherever your braiding finger “skipped” over one or more of the loops and didn’t go through them.
So, as with the D-shaped unorthodox braid, if you want your braid to divide into two braids, switch to using divided square braid moves for that portion: Put your braiding finger through all the loops, and don’t turn any loop when taking it.
Tip #2: Tightening
If your braid is turning out fine, don’t bother reading this! But if your braid isn’t turning out the way you think it should, read this, and/or try a 7-loop version if you’ve been making the 5-loop version (see my note below on 5-loop triangle braids ‘morphing’ into another shape).
First: Are your loops too short? Braiding a 5-loop triangle braid using loops on the short side can cause shape problems (more under Notes below). Use “regular-length” loops – say at least 8-10″ long – for learning and practicing this braid, esp if you are only using 5 loops.
Second: In tightening all triangle braids, it helps to tighten a bit more on the lower loops than the upper ones, at least at the very end of the tightening. Upper loops are the left and right index loops of a 5 or 7-loop braid. For 9 or more loops it’s the left and right thumb loops.
Pulling more on the upper loops opens up the crevice/ ditch at the center line — try it and you’ll see what I mean. Whereas pulling on the lowest loops (little fingers, or ring fingers for a 5-loop braid) closes up that crevice, which is important for a good triangle shape to the braid.
Notes
Shape of braid: Although this braid looks like a blunt, wide triangle in cross-section, it actually has an invisible “ditch” or crevice along the top, all the way down its peaked center-line. You can pry the two sides apart a bit and look down into that crevice, but otherwise it doesn’t show at all. All the ‘unorthodox’ thread passages are sort of sucked down into that ditch and don’t show on the surface of the braid. I think that’s the reason why many of this braid’s color-patterns have a crisper-edged quality about them compared to the equivalent pattern set-up in a D-shaped braid or square braid.
5-loop triangle braids morphing shape:
Sometimes a triangle braid (esp. a 5-loop one) will turn out oddly square-ish instead of wedge-shaped. This is the result of the central ‘ditch’ or crevice along the upper surface of the braid opening out, exposing the unorthodox thread passages that normally would be hidden down in that crevice. The resulting braid is square-ish in shape, but not identical to a normal square braid.
I can’t reliably produce this result on purpose, but it used to happen more often when I was braiding with only 5 loops, and especially if they were short loops, like when I was nearing the end of my braid, or if I happened to be braiding a very short sample braid.
I think this is because of two reasons: a five-loop unorthodox braid is inherently a rather unstable braid structure. The taken loop only travels through one loop, and then wholly over one other loop. It’s like a see-saw balancing! A very narrow pivot-point, in a way. On top of that, in the case of very short loops, the loops spread outward at a much wider angle (from the point of braiding to the fingers) than long loops do. This must exert a different force on the rather minuscule braid structure – a force that can sometimes cause the central ‘ditch’ to be pulled upward, changing the shape of the braid.
This doesn’t tend to happen when I am braiding with longer loops (narrower angle of ‘spread’ for all the loops) or with more loops than 5 (a more stable structure).
Even number of loops: If you braid a triangle braid with an even number of loops, you will end up having one more loop on one of the hands than on the other when it comes time to do the loop transfer. (With a 6-loop braid, one hand will always be holding 4 loops when it is about to lose a loop, while the other hand will always be holding 3 loops when it is about to lose a loop.) I recommend going through the same number of loops on each hand. Let it be the loops that are skipped over that are a different number on the two hands.
So, for a 6-loop braid, put the operator finger through only one loop on each hand, as for a 5-loop triangle braid. You will be skipping over one loop on the left hand and two loops on the right hand.
Broad lace of V bows: The European A-fell version of this braid was called the “Broad lace of 5 bows” in the 15th C. English loop braiding manuscripts. It has the exact same over-under structure/ ‘architecture,’ yet it turns out completely different from this triangle braid!
The Triangle braid can only be made with (Asian-style) loop braiding moves in which the ring or little finger is the active braiding finger, not (European-style) braiding moves in which the index finger does the loop-fetching. I think the basic 5-loop Slentre braid – done with the palms completely facing the floor and index fingers operating – may be the same as the 5-loop version of this triangle braid. It ought to be, as it is also made by bringing outer strands to the center of the braid.
Superficially, skipping the first loop (in the 5-loop version of the Triangle Braid) might seem to be a different structure than the Broad Lace, in which the (index) finger goes through the first loop it encounters, and skips the next one. The thing is, “first” does not mean the same thing in those two examples! That’s because the little finger and the index finger come at the loops from opposite directions.
In both braiding methods, it is the loop nearest the center of the braid that is skipped over. The taken loop only passes through the loop nearer the outer edge of the braid. The two braids really do have the same abstract/ charted structure.
Yet the Triangle braid is a dense, firm, wedge-shaped braid, while the Broad Lace of V bows has a flattish, slightly convex shape. The appearance of the ‘weave’ is very different as well, and I would assume that the same color pattern set-ups would turn out quite differently in the two braids.
[for too-much-musing on this difference, see my info page on The Mystery of V-fell vs A-fell Unorthodox 5-loop braids.]
Last updated Nov. 29, 2019
© 2017-2019 Ingrid Crickmore


Hi thankss for posting this
you saying that the triangular braid can’t be braided with the index finger made me try it and guess what: i made it 😀
I went with my free A finger through the B loop on the opposite hand and then took the C loop by tuggin the lower shank from below (so the mirrored movement to taking the upper shank with the ring/little finger)
it turned out looking exactly the same as the triangle braid i made before just that i braided it upside down
Very cool 5feetunder!!! Congrats!!! I will have to try that too. I am struggling to imagine what happens to the threads when the index finger goes through the opposite hand’s B loop to take that opposite hand’s C loop! That is not a ‘normal’ A-fell braiding sequence at all. (very clear description of moves, btw!)
You know, someone in a workshop I taught last year also showed me a triangular shaped (5-loop) braid she had made using – I think – sorta- A-fell moves but taking each loop without turning it. You are turning the loops if I understand your description. But going in that direction through the opposite hand’s loops is really different, so I’ll have to try both now!
I’d love to see a photo of your braid – no pressure, though! but if you ever want to send me a photo of any braids you’re working on just email me through my contact form – that form doesn’t allow sending photos, unfortunately, it’s a WordPress.com safety feature, but then I can reply and let you know how to send ’em.
These are so awesome! Will have to give them a try! Thanks so much, Ingrid, for sharing! I loved the d- shaped braids…
Hi Connie! Nice to hear from you! I bet you’ll love this one too!