厳島組
I’ve been trying to reproduce a Japanese national treasure braid known as the Itsukushima braid. It’s described in Masako Kinoshita’s big book on Kute-Uchi: 日本組紐古技法の研究 (Study of Archaic Braiding Techniques in Japan*¹).

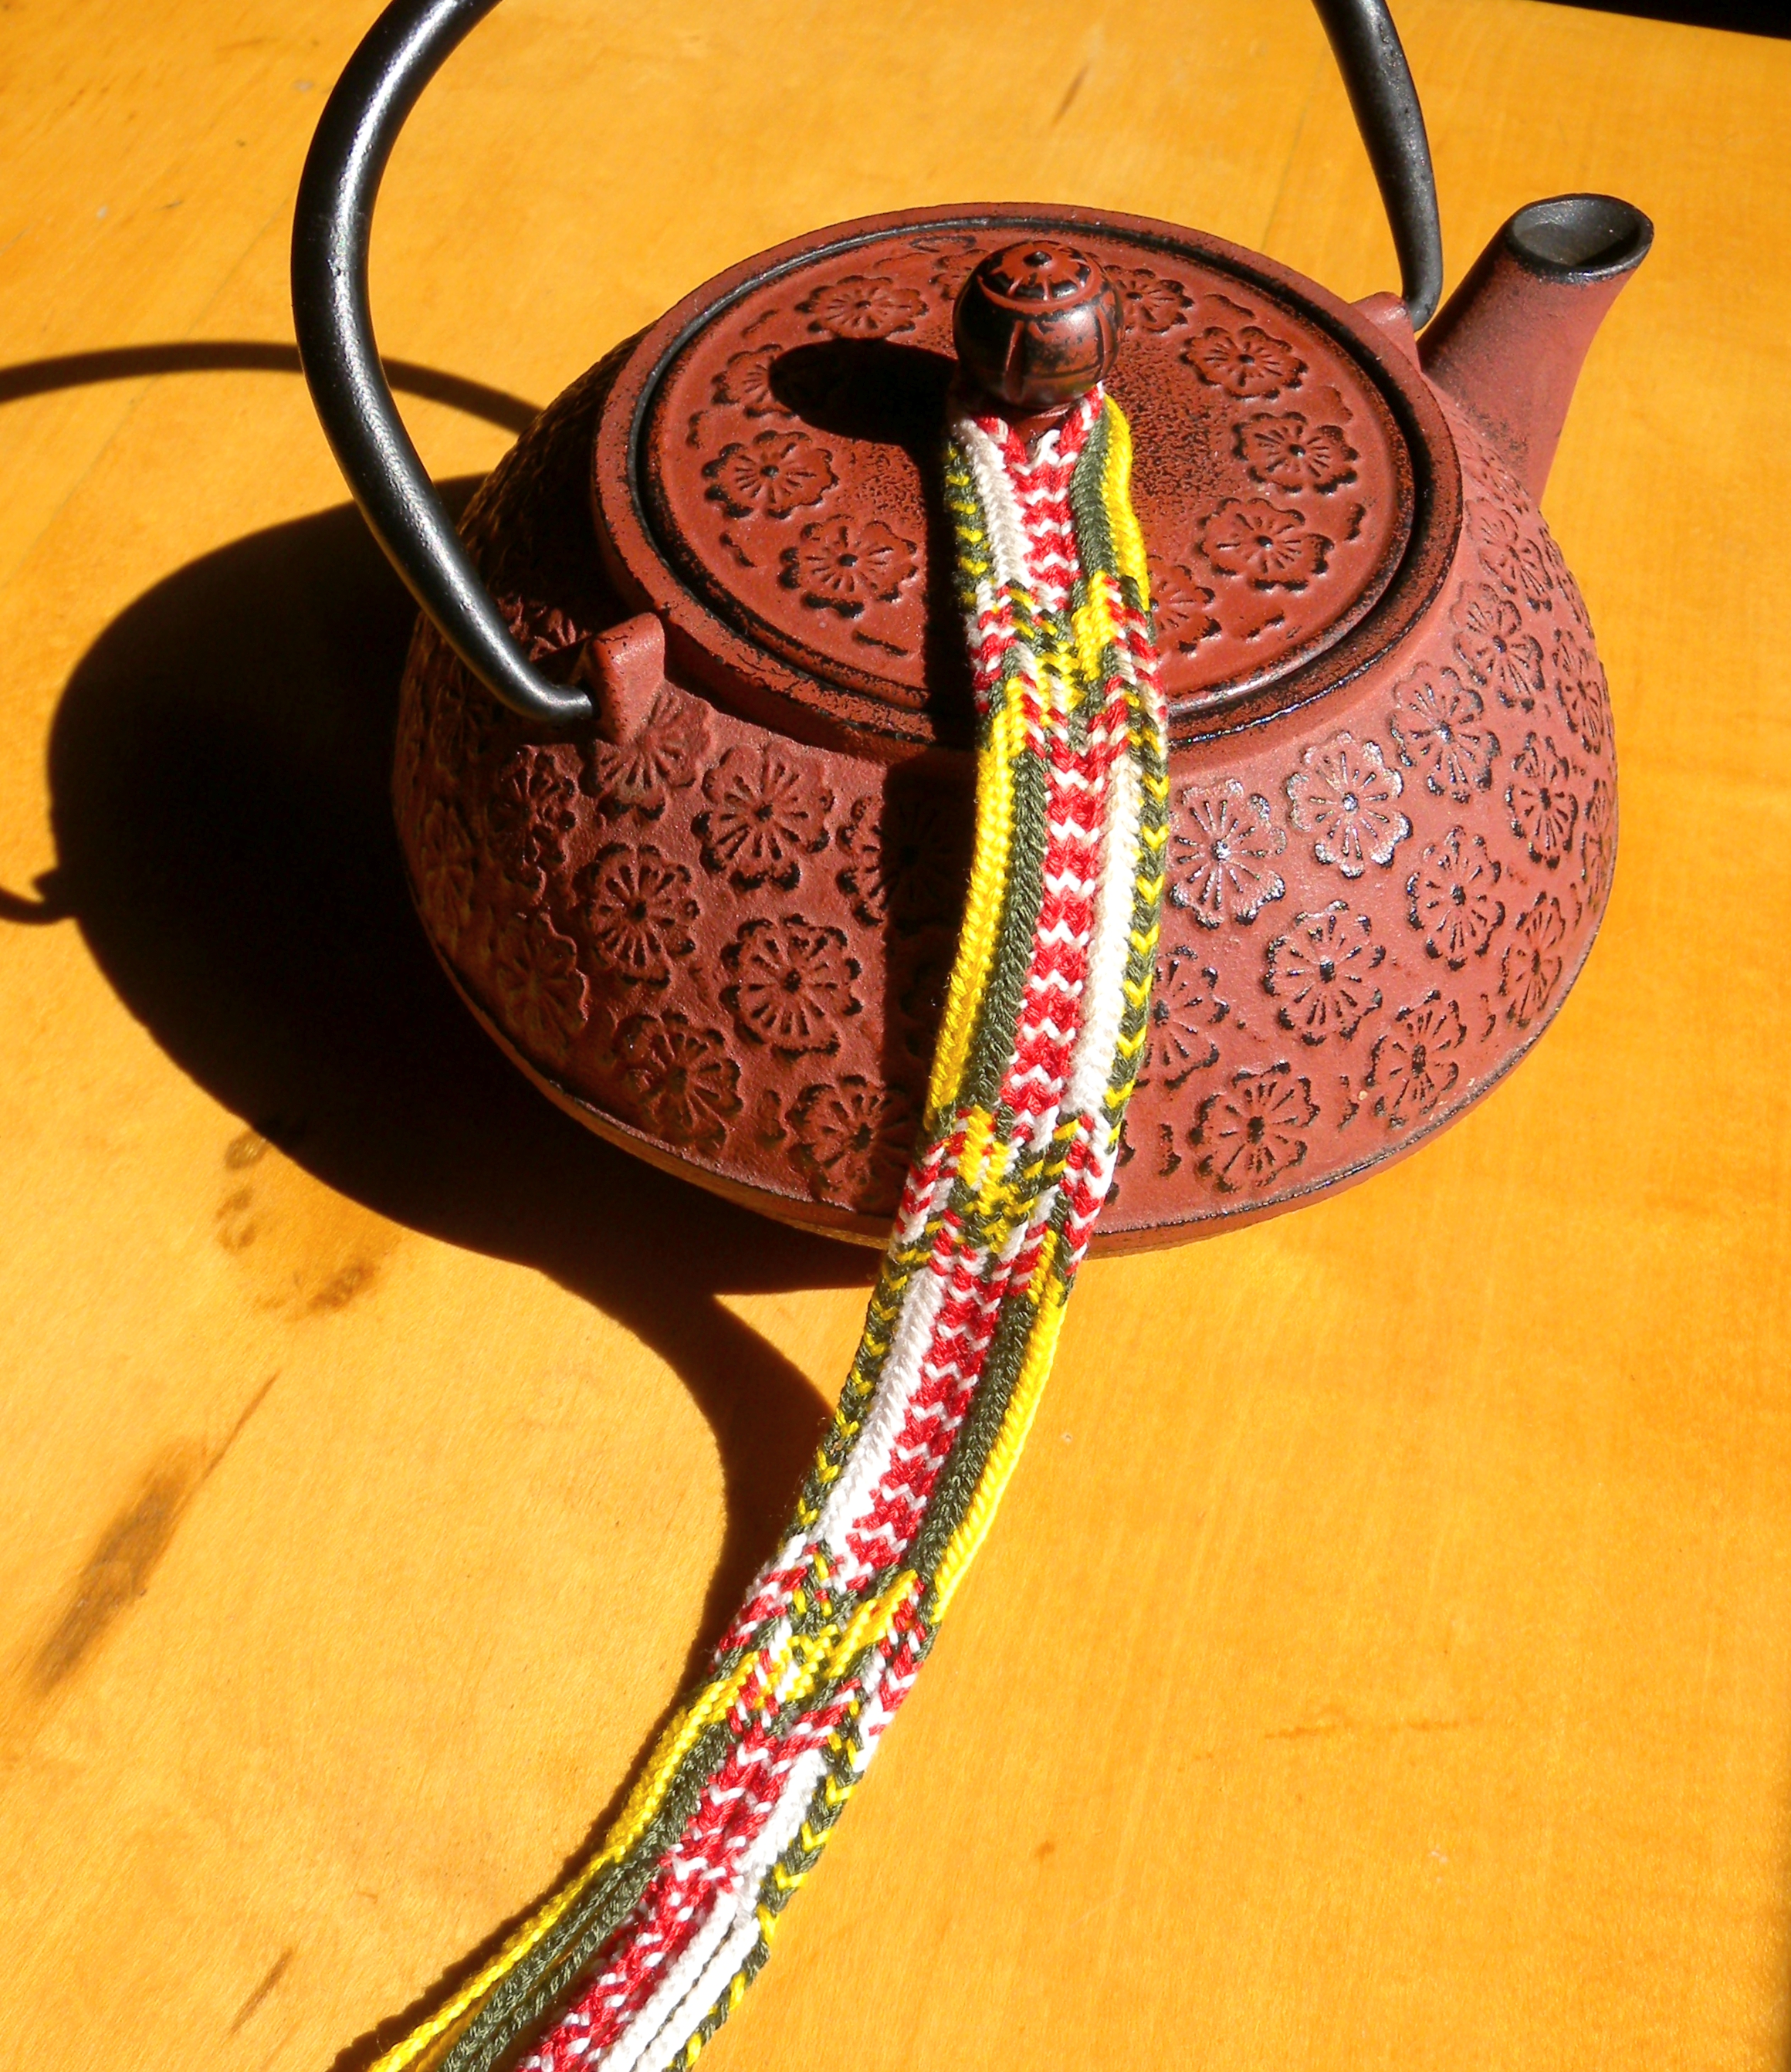
厳島組, fourth attempt at Itsukushima braid. Cotton embroidery floss – colors quite different than original braid. (ループ指操作組紐技法)
The original 12th C. braid was (and maybe still is?) wrapped around an ancient scroll in the famous Itsukushima shrine in Japan. There’s a photo of this braid in Masako Kinoshita’s book, but I can’t find any photos of it to share or link to that are not protected by copyright. The original braid was green, white, yellow and red, more like my other examples than the one above. However the color pattern above may be the most like the original, even though the colors are different. By the time I made this one I was getting tired of green, white, yellow and red, just wanted to try something different!
Kumihimo braiders nowadays make close replicas of the original Itsukushima braid by braiding on a large braiding stand called a takadai, and and using separate braiding strands, rather than strands connected into loops. Here’s a link to Richard Sutherland’s gallery page on BraidersHand – center of the page shows a beautiful kumihimo version of the Itsukushima braid. (braided by Richard, following Rodrick Owen’s takadai instructions*²)
According to Kinoshita, the original 12th C. braid was probably made by two cooperating braiders, one holding nine loops and one holding thirteen. These would have been held around the whole hand, not on separate fingers. (see my post on Kute-Uchi )
I’m braiding as a solo braider rather than as a team of two braiders, and I’m using fingerloops rather than hand-held loops. But I’m aiming for a fairly accurate recreation of the original structure of the braid, if not the original method. I understand from Rodrick that the kumihimo versions are are not quite the same structure as the original. Though mine aren’t yet, either! I’m pretty sure there are at least a couple of things I need to change…
I don’t speak (or read) Japanese, so it took me a long time to locate the Itsukushima section in the book – it’s nowhere near the color photos of the braid. When I first started my attempts, all I had to work with were two photos and one brief line in English.
The braid has two repeated sections – one in which the colors drift diagonally across the braid and back, and one in which the colors keep to five distinct lengthwise columns. That’s what creates the visual ‘kick’ in this braid. In most braids, the threads naturally drift diagonally across the braid and back as part of the braiding process, so it’s surprising to see colors temporarily staying in columns at the center or edge of the braid without crossing it… Especially if they do cross in other sections of the braid.
There’s one basic trick for getting colors to stay in columns, rather than cross the braid. Here on this blog I’ve been calling that trick ‘color-linking’. I used it in the orange/yellow/gray braid photo partway down my sidebar (it’s a 10-loop flat double braid). I’ve already taught color-linking in a few different tutorials on this blog, especially in this one: Color-linking in a 7-loop flat braid. It’s really the exact same process in the Itsukushima braid, though certain details about when and where to start linking in this Itsukushima braid weren’t immediately clear to me.
Recreation attempts (an ongoing saga!)

Series of trials in left – right order. First two made with 18 loops, rest made with 22 loops. Fingerloop braiding, cotton embroidery floss. (厳島組, ループ指操作組紐技法)
Looking at the photos in the book, I could count the loops in the narrow contrast columns, but I couldn’t tell how many loops made up the wider green and white areas. Luckily or not, I was under the mistaken impression that Rodrick Owen’s kumihimo interpretation called for 36 strands total, so I decided to use that number. Later on, I found out that his instructions actually require 38 strands, but at the time, 36 strands was a much more encouraging number! I can handle 18 loops fairly comfortably with fingerloop braiding, but more than that gets fidgety. (I find it easier to use finger-held loops than hand-held loops when making two-person loop braids as a solo braider.)
My very first attempt had a stupid mistake in the loop set-up…While burrowing through my embroidery floss, I somehow forgot that I only needed three loops for the central column of red-and-white, and instead I set it up with six loops, like the edge columns. This only left 6 loops for the green/white bicolor loops that create the green and white areas.
1st Itukushima attempt – too many loops in central column; too few loops in green and white columns.
So the center became a much-too-wide, red-and-white panel rather than a slender column. The braid’s color pattern is definitely on the garish side, but I like how it brightens up my teapot!
On my second attempt, I corrected my warping mistake, but the resulting braid still wasn’t quite right. The central red and white column looked better, but even with three more loops, the green and white areas still weren’t wide enough.

2nd Itsukushima braid attempt – 36 strands (18 loops), mistake in non-linked areas
Plus, the edge columns didn’t look right on the reverse side, and something also seemed wrong about the way the colors all crossed each other in the “non-linked” sections. (I should have focused more on that last problem – I ought to have been able to figure that out sooner than I did!)

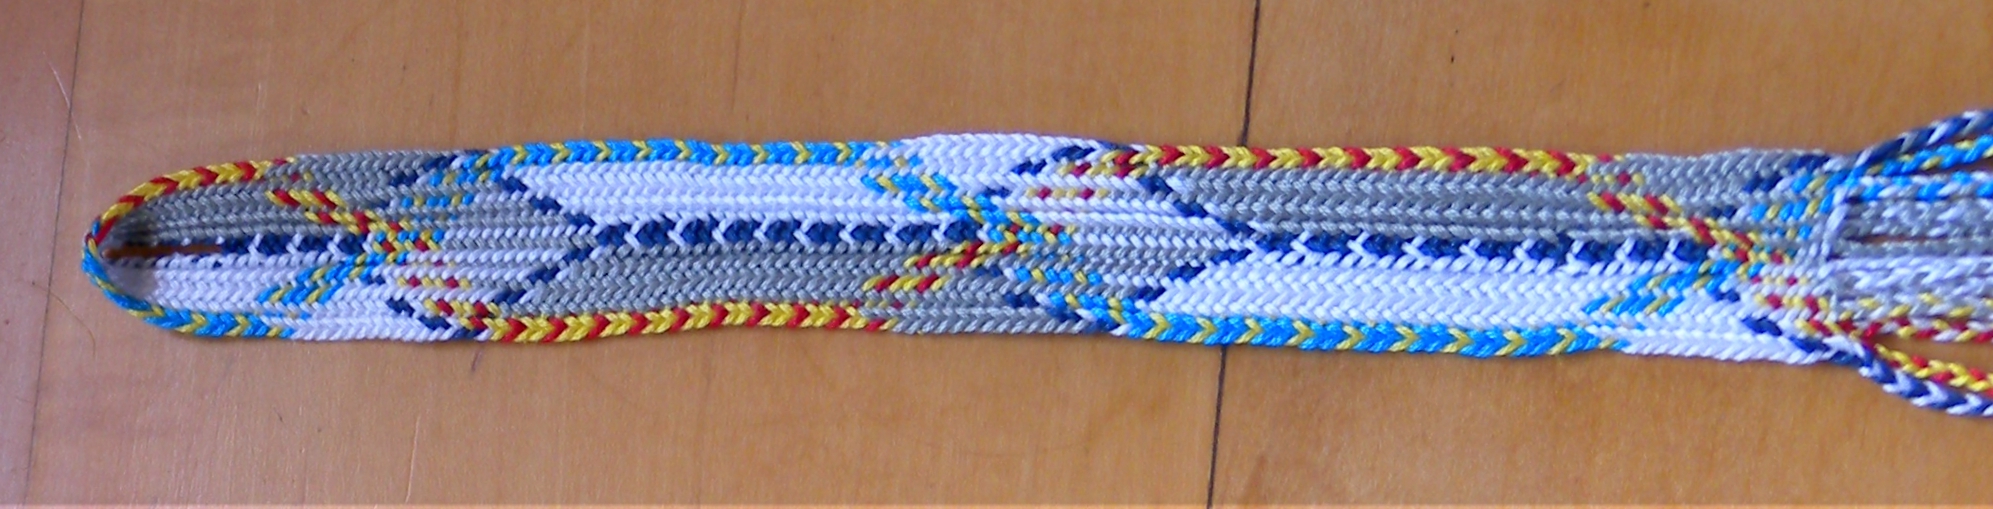
Practice braid with 22 loops
It was about then that I finally found the pertinent section in the book. I couldn’t read the text, but the three diagrams (pp. 152-153) showed that the original braid had 22 loops, rather than 18 (darn it!). The four extra loops were in the green and white areas, of course.
Eighteen loops is a lot more convenient for me than twenty-two, but I buckled down and plotted out a method with 11 loops on each hand. Slow but doable.*³ First I practiced it with a simple zig-zag pattern to get used to the braiding moves – that’s the braid sample on the left…
Then came a color-pattern adjustment. The diagrams in the book showed that the columns on both edges of the braid should have contrasting chevrons. That wasn’t how the braid looked in the color plates! In both the photo of the original braid, and the photo of Masako Kinoshita’s own reproduction of the braid, one edge column is plain yellow, while the other edge column is patterned (green with yellow chevrons). But the diagrams indicated that both edge columns should be patterned. The yellow column should actually have red chevrons on a yellow background. Just like Rodrick Owen’s takadai version (as braided by Richard Sutherland here).
Apparently the reds in the original braid all faded to yellow over the last 900 years. That created a solid yellow edging from what was originally a yellow-and-red chevron pattern. I actually kinda liked that solid yellow edge! – it’s an interesting contrast to the opposite, patterned edge.
In both my first two attempts above, you can see that single plain-color (yellow) edge-column snaking from side to side of the braid as the colors shift across in the non-linking sections.
Oh well, I also love Richard’s beautiful braid with chevrons in both edge columns! So I decided to go with that more-accurate version of the Itsukushima braid’s color-pattern.
So, having practiced with 22 loops, and finally figuring out what I thought was the true color-pattern, I measured out a somewhat longer warp (since now everything would be perfect, right?), and started my third Itsukushima attempt. This was exciting, because right away I could see that the color distribution looked much better!
BUT after sailing happily along for several inches, I suddenly noticed that my color-columns weren’t crossing each other correctly! This had been the case in both my previous attempts, too, but I had been so distracted by other problems that I hadn’t focused on it. Once I stared at the problem, the solution was very obvious. I should have been allowing the edge columns to cross the braid well before I stopped linking for the central column, instead of simultaneously. [hmmm…or alternatively, well after – I’d better go back and look at that possibility!]
Doh! I put down this sample without finishing it, which is kind of a shame, after measuring out the longer warp…Maybe I will find some time to finish it later. There’s nothing wrong with the pattern, it just isn’t the pattern of the Itsukushima braid:

3rd attempt. 22 loops (44 strands), but wrong color-pattern. Edge columns should not cross through center of red diamond!
I was so tired of green, white, red and yellow by then that I had to use different colors. Now (except for the colors) the braid finally looked sort of like the original!
4th attempt, blue and grey version
There was at least one more structural detail that I wanted to solve, though. It had to do with a mysterious reference to “pigtail braids” in the single line of English about this braid, and the diagrams that showed that, in the sections of the braid with linking (those sections where the colors keep to lengthwise columns), the narrow contrast columns were not braided with the same 2/2 twill as the rest of the braid – they had a different braiding structure.[*4]
I had noticed throughout my attempts that the backs of my samples didn’t look right on the edges – the chevrons weren’t true chevrons on the back, only on the front. After finally figuring out what Kinoshita must mean by ‘pigtail braid’ I did my last sample (with several mistakes) using that different structure for the narrow columns in the linked sections of the braid…I still need to practice it more, and to figure out how to make the switch between the two types of braiding without changing the color-order of the threads. (hard to explain!) That 5th perhaps more accurate(?) but more mistake-ridden sample is the furthest-right in my group shot above. The chevrons do end up showing as chevrons on both the front and back of the braid, but the braid has other problems. Some are the unavoidable results of switching from one braiding structure to another “midstream”. Others are regular old mistakes and inconsistencies that I need to work on.
So I’m posting what I’ve done so far as an unfinished work-in-progress.
Other things on the Itsukushima to-do list:
I’d like to make an Itsukushima braid that’s actually long enough to wrap around a scroll. And also try some more color combinations. This is such a beautiful pattern! The traditional colors are gorgeous but it would be really fun to play with other color combinations as well.
I also want to try again to use hand-held loops for solo-braiding two-person kute-uchi braids like this one. This stymied me several years ago, when I was first learning kute-uchi braids. I found two-person braids very difficult to tighten when I used hand-held loops as a solo braider. (That’s why I was so stubbornly intent on using finger-held loops for this Itsukushima braid!) I’ve made Genji-uchi braids of up to 36 loops, but Genji-uchi is a traditional solo-braider kute-uchi braid, so the tightening is very straightforward.
Some of Masako Kinoshita’s other diagrams in her book have sparked a few ideas. I also have a vague memory of something Makiko Tada taught me in a Kute-uchi workshop years ago that might relate to this – it was an interesting method for braiding 2/2 twill of several ridges as a solo braider. Gotta dig up my old workshop notes…
But realistically, more Itsukushima braids have to wait for a while, so I can work on braids for my upcoming class at Braids 2016, so this project will have to be continued at a later date…
© 2016-2018 Ingrid Crickmore
NOTES:
*¹ Masako Kinoshita, 日本組紐古技法の研究 Study of Archaic Braiding Techniques in Japan, 1995 (thank you to Fumiyo for giving me the correct Japanese title!)
This is a large, out-of-print book in Japanese, in a boxed and very expensive hardback format. Some libraries may have a copy. Braid diagrams in the book are mostly in Noemi Speiser’s “track-plan” charting system, taught in her books. It is a powerful system for describing loop braids, but it’s not easy to learn. Color photos are all together in a separate color-plate section, not near the text that might apply to the photo. There’s a fascinating summary chapter in English, however this doesn’t include instructions for or analyses of individual braids. Some of the captions to the diagrams and illustrations do include a line in English. There’s also a included short pamphlet in English that translates more captions. (Be sure to find out if this is included in any used copy.) It was while poring through this pamphlet that I stumbled upon a reference to a diagram labeled “Itsukushima,” supposedly located in chapter 7, section 3 (no page number given). However, the book itself only uses Japanese characters for the chapter headings, no roman numerals: 第 七 章 is how “Chapter 7” appears in the book. So even using the pamphlet requires a detective work if you can’t read numbers in Japanese. 七 means 7 (the other two symbols are an ordinal prefix, and the word “chapter”). It isn’t hard to find a list of numbers in Japanese characters online, so that should help with locating specific chapters.
*² Rodrick Owen, Making Kumihimo, 2004.
This is the main English-language reference on braiding on a Takadai – a large Japanese braiding stand used primarily for making flat braids. Rodrick’s instructions for a takadai interpretation of the Itsukushima braid are on p. 110 (design 38 in the book). His instructions call for 38 tama (bobbins/ strands), not 36 as I had first assumed.
*³ I didn’t want to try braiding this by holding 9 loops on one hand and 13 loops on the other! That’s how Masako Kinoshita’s diagrams show the loop distribution between the two braiders – one braider holds 9 loops (shared across both hands) and the other holds 13 loops (also across both hands).
With 18 loops, I held 3 loops on each thumb and little finger, and 1 loop on each of the other fingers. This is exactly how I braid my 18-loop letterbraid variation, which is (mostly) 2/2 twill. For the 22-loop braids, I held 3 loops on each thumb, ring and little finger, and 1 loop on each first and middle finger.
My method creates an extra float in two of the twill passages because of the reciprocal exchange move. So two of the lengthwise twill ridges are 3/3 twill rather than the 2/2 twill of the rest of the braid. I’m not sure that’s the case in the original braid, so that’s one thing I still want to work on.
*4. The brief line in English that goes with the caption to the Itsukushima color plate states that the Itsukushima braid was formed from interlinking three “pigtail braids” with two braids of 2/2 twill. This does not mean it was braided in five lengthwise parts that were later joined together. The five sections are all braided together. But the lengthwise columns of colors can be considered as five linked-together braids, connected by what I call ‘color-linking’. In those areas of the braid, if you were to carefully cut and pull away the rest of the braid, any one of the five distinct columns of colors – including the wider green and white ones – would stand on its own as a cohesive braid without falling apart. That isn’t the case where all the colors shift diagonally across the braid, though. In those areas there is no linking-together of “free-standing” braids.
What confused me was the term “pigtail braid” – to me that sounds like a 3-strand ‘regular’ pigtail (hair-style) braid, which doesn’t describe any of columns in this braid. The three narrow contrast columns all have 6 strands. The central column’s six strands are from three single-color loops, and the six strands of each of the edge columns come from the upper (or lower) shanks of six bicolor loops.
Eventually, as I browsed through more of the book, I finally realized that Masako Kinoshita’s term “pigtail braid” must mean any flat braid of only two ridges/ braiding moves. By that definition, braiding the divided version of a square braid (of any number of loops) would result in two “pigtail braids”, one above the other.
Her definition includes, but isn’t limited to, a three-element flat plain-weave braid – the braid I think of as a pigtail braid. The edge-columns of the Itsukushima braid form as a divided 6-loop braid. Braided as two-layer 2/2 twill (the way I braided most of these samples), these divided flat sections each have more than two ridges, though only two of them show clearly on the front of the braid. But if braided like a divided 6-loop square braid, the divided edge-columns are two 6-strand, 2-ridge flat braids, each of them a “pigtail braid” by Kinoshita’s definition. The center-column braid is a slightly different case as it unfolds from a 3-loop two-layer braid to be a single, flat, 6-strand braid. Also a pigtail braid as defined here.
*The number of loops for this braid is on the upper edge of what I can handle with fingerloop braiding. So, why not use hand-held loops? This would seem like an obvious approach, right? I’ve done a fair amount of braiding with hand-held loops…including Japanese and Andean-type braids with even more loops than this Itsukushima braid.
The trouble is that I haven’t had good results with braiding two-person Japanese braids as a solo braider. That might be a next-step for me to try again at some point, but for this two-person braid I wanted to stick with the finger-held loop braiding that I’m more familiar with.
Another approach some modern braiders have used for making traditional two-person braids as a solo braider is to use some kind of a “helping hands” device. This is something that can temporarily hold one set of loops (under tension) while the solo braider works with the other set. So the solo braider only holds the loops of one of the two hypothetical braiders at a time, and picks up and puts down two sets of loops in turn for each cycle of braiding. I’m not planning to try this, myself. I like ‘no-equipment’ braiding (or maybe I’m just not patient enough to keep putting down and picking up loops from holders!).
Masako Kinoshita has used a helping-hands device in making two-person braids as a solo braider, also Makiko Tada, and Chizuru Nishioka of Nishioka Armor Studio, Japan. See Chizuru Nishioka’s short article “Braid Making for the Replica of ‘Kozakura-kawaodoshi Yoroi'”, in L-MBRIC, Issue 9, 2006. (it’s the fifth article in the following link, scroll down to find it.) http://www.lmbric.net/n9/n9.html
Update Sep 22, 2018: Fumiyo Kitahara describes her own simpler but very effective helping-hands braiding device in her blog Kumihimo with Loops (in both Japanese and English). Her device does not seem to hold loops under any tension, yet her braids are tensioned very evenly!
I did a google image search for Itsukushima Braid in Japanese, and a few variations of this particular color pattern seem to be included under that term. Often, the original braid’s outer edge columns of contrasting colors are omitted, yet the braid is still labeled 厳島組, meaning Itsukushima braid. (Of course, other braid and non-braid images come up that are clearly not Itsukushima-type braids at all – probably because the words ‘Itsukushima’ and ‘braid’ were somewhere on the same site.)
last updated Sep 22, 2018
© 2016-2018 Ingrid Crickmore
See full copyright restrictions and permissions at the bottom of the sidebar (if you are on a small screen device, the ‘sidebar’ may appear somewhere other than at the side of the screen).


Another wonderfully thorough post!! Welcome back! Your site is always my goto on my (infrequent!) braiding projects. Thanks for this great informative journey.
Hi Textiles-on-the-move, thanks so much! – for reading and the welcome back both! What kind of textiles do you make?
My pleasure! I can’t seem to shake my knitting habit at the moment, but have just bought some delicious leather so shall be posting about that project shortly.
I think I found your blog! the link from your name goes somewhere else, but I googled textiles on the move (hope that’s ok!) and found Craft-a-licious, is that you? I love your knitted deer trophy! and the felted bird’s nest, will have to go back in the morning and explore some more. I so want to get back to knitting myself, but there always seems to be another braid to try…
Thx for letting me know about the bad link! Yes, I’m also often ‘torn’ between knitting and doing other crafty stuff – so I know where you’re coming from!
Glad to hear you are back posting. Although I braid A-fell and haven’t done enough playing with string to figure out V-fell instructions, I always appreciate your thorough, informative posts. 🙂
Hi Miriam, thanks so much for the welcome-back note! I’ve been away from the blog so long I wasn’t sure anyone would be around when I got back…Happy braiding!
Hi Ingrid, I didn’t tread the whole post but Andrea at the Freight speaks Japanese if you need translation. CR
Hi CR, that is really good to know! She may be a little dismayed to see me lugging this tome into the Freight for her to translate! But seriously, if it’s just a question of a word or two in a diagram, it might be a big help, THNX!