This post demos two alternative fingerloop braiding methods that a team of two Iron Age loop braiders may have used in making the 2,500-year-old, 15-loop fingerloop braid known to archeologists as “HallTex 301.” This braid, and a smaller one of ten loops (HallTex 306), are part of the large body of textile finds from the famous Hallstatt Salt Mines in the Austrian Alps. Joy Boutrup (co-author of European Loop Braiding) is one of the authors of a study of these two braids. The lead author is Karina Grömer, a textile archeologist who has specialized in the Hallstatt Salt Mine textiles. The study found that they were most probably made by a loop braiding technique. The braids were of finely-spun, dyed wool thread, the smaller one in two colors and the larger one in at least three colors. This post is only on the larger of the two – the 15-loop HallTex 301. (More about the study in my endnotes.)

The paper provides one possible fingerloop braiding method for making “HallTex 301”. The method given is based on the method for a similar type of braid of only 7 loops described in a 15th C. A.D. loop braiding manuscript (Tollemach, “a lace broad parti” – link goes to another site’s description of the braid). Other fingerloop braiding methods would also be possible. The same braid can in fact also be braided with free ends, and the paper gives instructions and a schematic diagram for braiding it that way, however some of the micro details* Joy Boutrup analyzed would likely turn out a little differently if it were braided with free ends.
While I was procrastinating on trying out this braid, two braiding buddies of mine here in the San Francisco Bay Area jumped on it: Kim Davis of the Lace Museum in Sunnyvale, and Carol Wang of Chinese Knotting.
Together they came up with a slightly different method than the one suggested in the paper – still fingerloop braiding, but done with palms facing down. I have never heard of anyone making a team braid with palms-down braiding before! Neither Carol nor Kim had done any Slentre (palms-down) fingerloop braiding before this, and I hadn’t suggested anything to them about trying it that way, they just found it more intuitive/ easier to accomplish the necessary moves this way. Luckily, Carol’s son was available to make a video – and voila, I got an email the same day containing a video and pics of the resulting reproduction.
Then a couple of days ago the three of us got together and tried the method suggested in the published study. With Carol videoing on her cell, we got a second video – the vertical video below. So, with permission from Carol, Kim, and Brendan James (the other videographer), I can now present two possible methods for a team of two braiders to make HallTex 301, the 2,500-year-old Iron Age fingerloop braid!
The vertical video shows the method suggested in the published study, with my voice-over describing the moves.
Palms-up/ facing method (as described in the study):
Text description for the above moves – also a more authentic color pattern set-up, and notes about the color pattern of the original braid artifact – here (further down this page)
Palms-down method (like Slentre braiding)
The horizontal video below shows Carol and Kim’s palms-down method. This video has no voice-over, but the moves are very clear. (Youtube videos can be slowed down, btw – click on the ‘gear’ icon in the video toolbar, and then under “playback speed” choose what speed to play the video.)
There is a slight structural difference between the original artifact and this version – I think Kim and Carol are doing the plain weave (“over/under one loop”) on the two edges of the braid, and the 2/2 twill (over/under two loops) in the center of the braid, whereas it’s the reverse in Hallstatt 301. This would be easy enough to change around – each braider could either switch their left and right-hand moves; or the left and the right braider could keep doing the same moves, but switch places with each other.
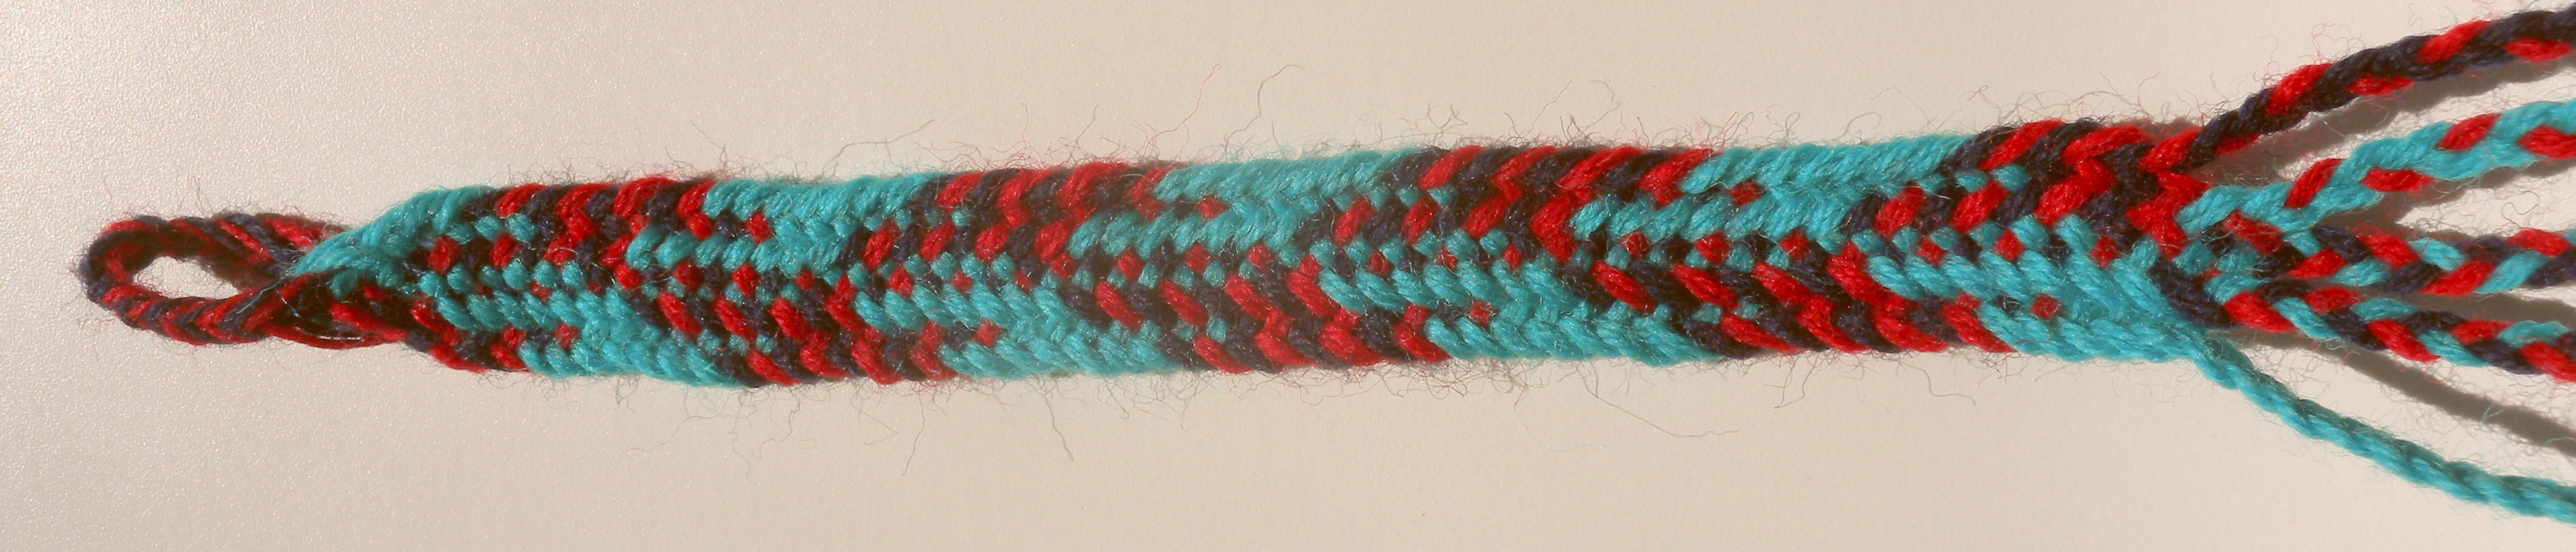
Whichever method is used, this is a different type of loop braid from any of the braids I have taught here so far, in that each loop functions as a single element throughout the braid. Both shanks of each loop stay next to each other – as if glued together – all the way through the braid, with the result that all the strands in the braid are doubled – each loop is a pair of strands moving together as one element.

Twill-and-plain-weave interlacing of doubled strands. This is the sample Kim and I made in the vertical video.
To accomplish this, the braiders never put their ‘fetching finger’ through a loop, only over or under both strands of one or more whole loop(s). The fetching finger weaves up and down between loops, never through the two shanks of one loop.
To see the braid’s structure in photo above, follow the path of the lowest red loop from the right edge of the braid inward to the middle of the braid. Each ‘strand’ or ‘1’ is a loop, so a doubled yarn. Starting at the edge, the red loop goes under 2 (a blue and a green); over 2 (2 greens); under 2 (2 greens); over 1 (a green); and under 1 (another green). The next loop down is a blue one, performing the same order of interlacing, though offset by 1 strand from the over/unders of the red loop above. The interlacing is primarily 2/2 twill, with a section of plain or tabby weave (over 1/ under 1) at the center of the braid. If you are recreating HallTex 301 you can compare the thread passages to these. You may see the opposite over-under sequence (first two OVERS, then two unders, etc). That’s still the correct sequence, because ‘over’ and ‘under’ are two sides of the same coin. If you turn this braid over, or if instead of tracking that red loop you follow an opposing loop that the red one passes over, the ‘overs’ would all be ‘unders’ and vice versa. (It’s not known which side of HallTex 301 was “up” while it was being made.)
I tend to agree with Carol and Kim that the palms-down method seems more intuitive somehow – for the basic moves as well as for the ease of NOT turning a loop when taking it (which is different for this over-under loop braid than for ‘normal’ through-loop braids, btw). According to the study, the two strands of each loop stayed in strict left-right order throughout the braid, never twisted around or crossed each other.
Not turning loops is a no-brainer when making this braid palms-down, it’s the most obvious way to take a loop. With loops held palms-down, it would be difficult to turn a loop while moving it. That’s not the case when holding the loops palms-up or palms facing.
In a nutshell, the palms-down method almost necessitates the correct “no-turn” loop transfer for this Iron Age braid, whereas the palms-up method allows the correct “no-turn” loop transfer, but doesn’t exactly encourage it. *More in endnotes*
(My own half-baked speculations about the palms-down braiding tradition here, in Endnotes).
Set-up, and Braiding Method:
Text instructions below are for the braiding method described in the published paper, but in my own words, and using slightly different abbreviations. (See notes on instructions in the study in Endnotes.)
I give two color pattern set-ups below. That’s because the study’s two schematic diagrams for this braid actually show a slightly different color-pattern than the one described in the text – it’s just a difference in the color of one strand (on Right Braider’s left hand in the set-up), but it does make the pattern come out differently. (more about that further down, in Endnotes). Unfortunately, the color pattern we are braiding in the vertical video is different from both of these! – I had been hoping for the pattern described in the text, but messed up in trying to set it up “on the fly” for the video.
Note: my interpretation of these patterns may be in the opposite direction of the actual artifact, or of the authors’ recreations of the artifact. However, this might not matter very much – probably the researchers themselves wouldn’t be able to determine the original braiding direction (which end of the surviving fragment was nearer the beginning, and which nearer the end, as it was being braided). I don’t think the direction of braiding is mentioned in the study.
The researchers identified at least three colors in this braid, with the possibility that there may have originally been two shades of blue-green, for a total of four colors.
Abbreviations:
a, b, c, d = index, middle, ring, and little fingers
La, Lb = Left index, Left middle; Ra, Rb = Right index, right middle, etc
LB = left braider
RB = right braider
HallTex 301 color pattern described in text of study. (Wool weaving yarn)
Color set-up described in text of study:
7 bluish-green loops (green in video); 4 red loops; 4 dark loops (black or dark blue)
LB (left braider): Left hand holds 4 loops (a, b, c, d); Right hand holds 3 loops (b, c, d – Ra holds no loop). All 7 loops green in video; bluish-green in HallTex 301 braid
RB (right braider): Left and right hands each hold 4 loops, alternating dark blue and red (the dark blue may have been black originally in the HallTex 301 braid).
On both the left and right hands, RB should hold
a – red
b – dk.blue
c – red
d – dk.blue
Color set-up for the pattern shown in the diagrams:
7 bluish-green loops (green in video); 3 red loops; 5 dark loops (black or dark blue)
LB (left braider) – both hands as above
RB (right braider) – right hand as above.
only RB’s left hand has different color arrangement:
a – red
b – dk.blue
c – dk.blue
d – dk.blue
Note: Given the wide variety of dyes and color-patterns found in the woven textiles from the Hallstatt Salt Mines, it’s likely that many other braided color patterns were made as well. This single surviving 15-loop example in at least 3 colors, as well as its 2-color little sister of 10 loops suggests to me that other color-patterns were likely braided as well as the ones in these two known braids.

HallTex 301 color pattern shown in schematic diagrams of study. (Wool weaving yarn)
Braiding method:
The method in the vertical video is easiest if palms face somewhat upward, rather than facing each other. I believe it is necessary to always take a loop by reaching into it from below the loop, so as not to turn it over when pulling it off. (Note: this is the opposite of how you would take a loop without turning it when making a “through-loop” fingerloop braid like a ‘regular’ square or flat braid!).
(In the instructions below I made the left braider a “She” and the right braider a “He,” so the pronouns might help differentiate them.)
Braiding moves:
1. LB (left braider) uses her bare Right index to go through RB’s (right braider’s) left-hand loops in this manner:
Over one loop (La), under two loops (Lb and Lc), over 1 (Ld) to take RB’s (right braider’s) RIGHT little finger loop (Rd). She takes his loop from below, so as not to twist it.
SHIFT: RB (right braider) now shifts his remaining 3 right loops down one position, to free his right index finger for the following move:
2. RB (right braider) uses his bare Right index to go over and under the adjacent loops of his same hand (his right hand) in this manner:
Over 2 (Rb, Rc), under 1 (Rd) to take his LEFT little finger loop (Ld).
SHIFT: RB (right braider) shifts his remaining 3 left loops down one position, to free his left index finger for the following move:
3. RB (right braider) uses his bare Left index to go over and under LB’s (left braider’s) RIGHT hand loops in this manner:
Over 1 (Ra), under 2 (Rb, Rc), and over 1 (Rd) to take LB’s LEFT little finger loop (Ld).
SHIFT: LB (left braider) shifts her remaining 3 left loops down one position, to free her left index finger (La) for the following move:
4. LB (left braider) uses her bare Left index to go over and under the adjacent loops of her same hand (her left hand) in this manner:
Over 2 (Lb, Lc), under 1 (Ld) to take her right little finger loop (Rd).
SHIFT: LB shifts her remaining 3 right loops down one position, to free her right index finger (Ra) for the next move.
Repeat from Step 1.
Tightening: It’s not necessary to pull hard unless you want a very stiff, tight braid. Likewise, with short loops try not to pull too widely, that may also over-tighten the braid.
In the vertical video, Kim and I tightened mainly after Step 4 – tightening against each other’s loops – but if we had braided longer, I think we would have come up with a different tightening strategy. In team braiding, it’s usually more natural for each braider to tighten their own loops – opening their own two hands apart to tighten, the way Kim and Carol are tightening in the horizontal video, and not to tighten much against the other braider’s loops.
In the two samples in wool (dk.blue, red, and turquoise) that I made as a solo braider, I tightened whenever a loop passed between my two hands. My first sample is in the color pattern described in the text of the study – upper braid in the photo below – and it came out a lot tighter than my second sample. The lower braid shows the color pattern of the study’s diagrams. I was more relaxed when I made it, and so was the braid. Both braids compressed inward during braiding. With both of them, after I finished braiding I pulled the two edges of the braid out width-wise (not lengthwise) up and down the braid to pull it into a flatter shape, with a clearer-looking pattern.
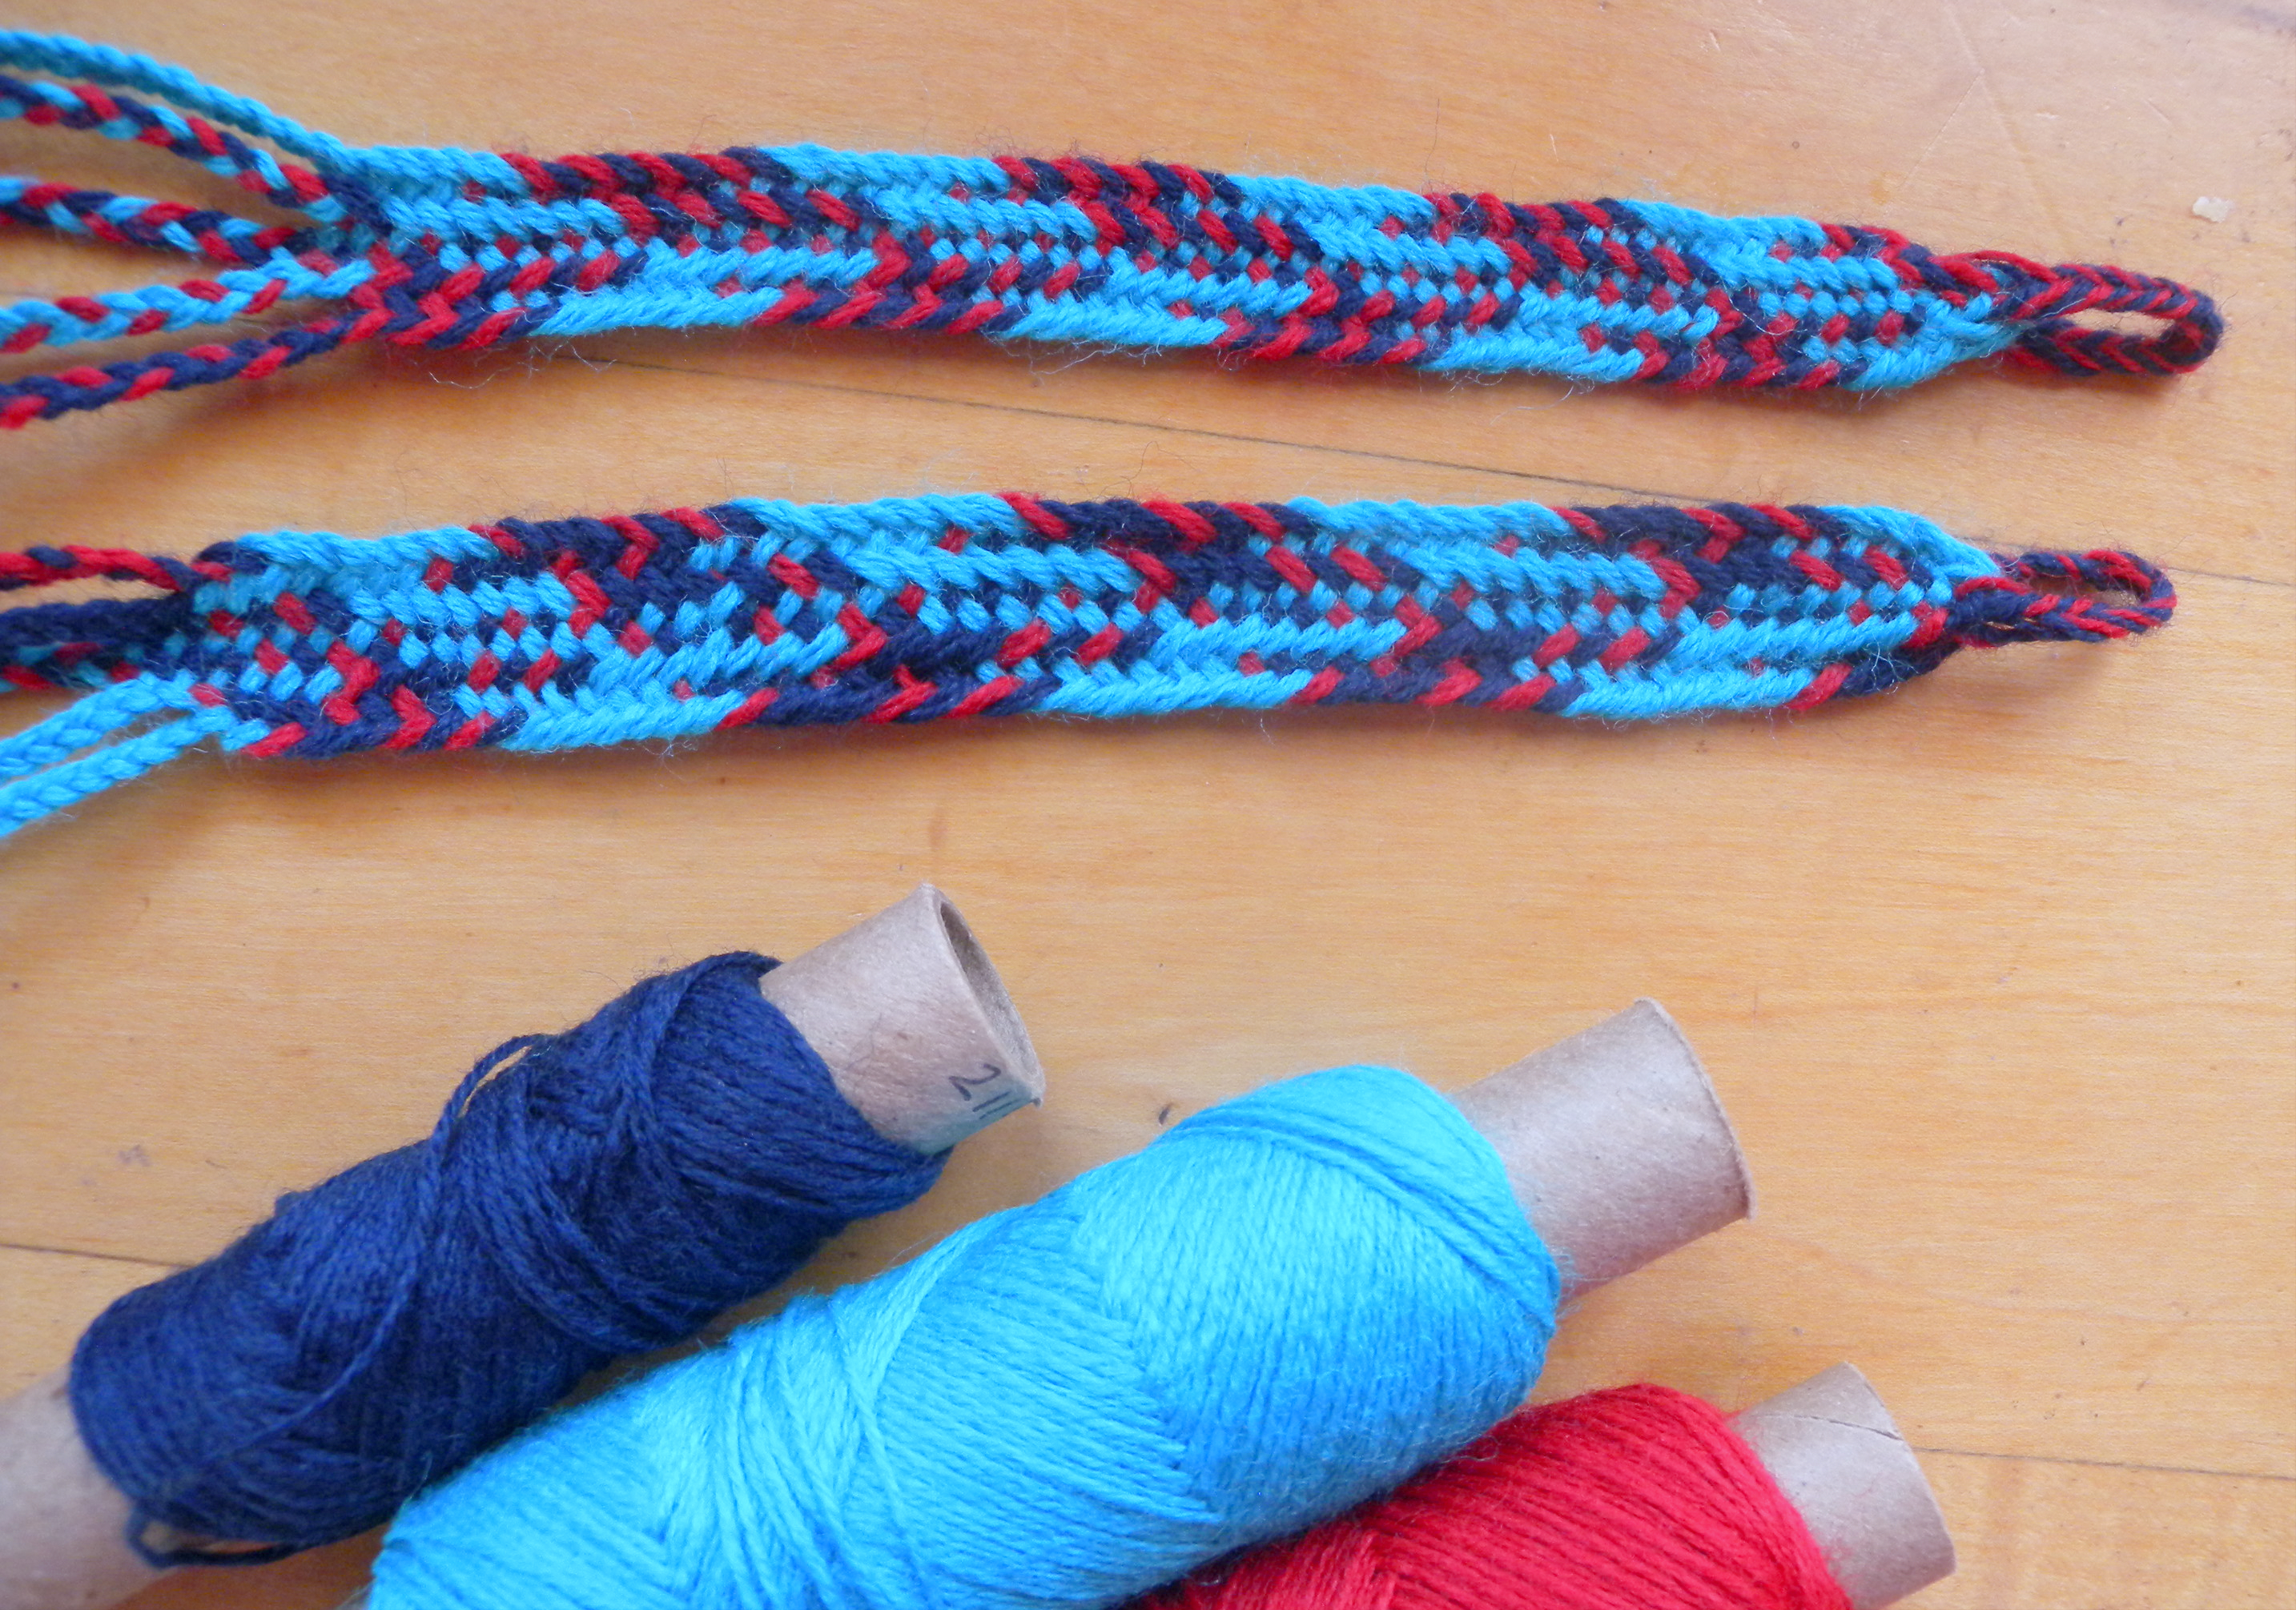
Solo-braider samples: I made the 2 solo samples with palms-up loop braiding. (Palms-down does not seem workable when you are carrying more than one loop on some fingers.) Working solo is slower than working with a partner, but develops a nice, predictable rhythm of moves. I hold the left braider’s loops on my left hand, and the right braider’s loops on my right hand. Both hands hold 1 loop per digit thumb-to-ring finger, and 3 to 4 loops on the little finger. (This is not the only possible way to hold the loops. I often end up changing a “too-many-loops” method after making a few more of the braids. So far, I have only made these two small samples.)
At the start of braiding, Left braider’s Left a, b, c, d are on my Lth, a, b, c. Left braider’s three right loops are on my Left d finger, Rb nearest the tip, Rc mid, Rd at the base (the left braider starts with no Ra-loop). Same general arrangement for the right braider/ my right hand loops, except that the right braider starts with 4 loops on his right hand, not 3, so likewise I start with 4 loops on my Rd finger. But this one-to-one correspondence doesn’t stay exactly the same throughout the braiding process, because I shift the loops as I braid to keep 1 loop per digit on thumb-to-c, with the remaining loops on d.
Update: A solo-braider tutorial for this braid’s “little sister” is in the works! Halltex 306 is a 10-loop Iron Age braid, found with or near Halltex 301, the 15-loop braid in the tutorial above. The smaller braid is very similar, but has an interesting asymmetry to its braiding moves.
Endnotes
1. Hallstat Salt Mine textiles, and this study:
Click link to read and/or download the paper on two Iron Age fingerloop braids.
Ancient salt mines might not seem like a likely source of textiles, but apparently the mine shafts were also used as garbage dumps, and the unusual environment of the mines preserved discarded textiles, as well as all sorts of other material. This famous salt mine complex in the Austrian Alps has been the source of a treasure trove of textile techniques from the Bronze age onward, showing dyed yarns and fabrics, woven color-patterns (tartans, etc) and very fine spinning as well as the two braid fragments in the study.
These two braids were excavated from the Hallstatt Salt mines many years ago, but for a long time were thought likely to be contamination or litter from more modern times, since they look so similar to shoelaces that are still used in the area. They were finally carbon-dated a few years ago and their true age was discovered – it turns out they are from sometime between 756 and 415 BC! Both braids are of fine wool yarn, one (HallTex 301) made with 15 paired strands, and the other (HallTex 306) made with 10 paired strands. Joy Boutrup – as one of the authors of the study – was able to deduce that they were almost certainly braided by loop braiding, based on the way each pair of strands stays in the same left-right configuration for the whole length of the braid, as well the way the pairs “turned the corner” on the edges of the braids.
I should have remembered about this study without being reminded, as Joy Boutrup had sent me information about it when she was working on it, so I am a little embarrassed but grateful to Réka Tóthné, a reader in Hungary, for bringing it up in the comments to my recent history post. Thank you, Joy and Réka!
Here’s a link to an interesting and well-illustrated article in an archeology periodical about even earlier textiles uncovered in these mines, from the Bronze Age. It has diagrams of the mines and gives a sense of how ancient they were and how long they were continuously in use. (one of the authors is Karina Grömer, who was the lead author of the Iron Age Fingerloop braids study): https://core.ac.uk/download/pdf/42372140.pdf
2. Two slightly different color patterns are described in the study:
The study’s 2 schematic color-illustrations of this braid show a slightly different color pattern from the one described in the text. The text says:
The colour sequence is one dark (blue or black) followed by one red, repeated four times, then seven green-bluish ends.
But neither of the two diagrammatic illustrations (one of the braid itself, the other showing how to do the moves with free ends) show alternating blue and red loops (four of each) as described in the text above. Instead, both of them show five blue and three red loops – the red loops all separated by blue loops, followed by the seven green-blue loops. The difference is of only one loop – one red loop in the text description has become a blue loop in the illustrations. In the actual photos of the braid, the colors are so mud-stained they can barely be seen – the braid’s original color-pattern is completely obscured. I’m guessing that the color pattern described in the text was an earlier assumption by the researchers about the color pattern that was later revised (as shown in the 2 detailed schematic diagrams), but mistakenly left in the text of the article.
3. Following the instructions in the published paper:
In the instructions given in the published paper, the two braiders are described as Person 1 and Person 2. It isn’t mentioned how they are positioned relative to each other, but they must be (generally) side-by-side, and it can be deduced from the description of the moves that Person 1 must be on the left side and Person 2 must be on the right.
In the abbreviations given, the first symbol is an L or an R, which stands for the left or right HAND of a braider, the next symbol is a 1 or a 2 for Person 1 or 2, and lastly (if used) comes a lower-case letter to represent a finger or its loop. (a, b, c, d = index, middle, ring, little fingers)
L1 = Left hand of Person 1 (deduced left braider)
R1 = Right hand of Person 1 (deduced left braider)
L2 = Left hand of Person 2 (deduced right braider)
R2 = Right hand of Person 2 (deduced right braider)
Loops, index to little finger:
Person 1 (left braider)
left hand: L1a, L1b, L1c, L1d
right hand: R1a, R1b, R1c, R1d
Person 2 (right braider)
left hand: L2a, L2b, L2c, L2d
right hand: R2a, R2b, R2c, R2d
Note:
There is a minor error in the instructions given in the published study.
In the first move, the loop that should be taken/ moved by Person 1 is Person 2’s right little finger loop, not his left little finger loop as stated.
She (Person 1) should take his (Person 2’s) Rd loop, not his Ld loop. This is the only interpretation that makes sense for making this braid, and it is corroborated immediately afterward in the instructions, as Person 2 then shifts his right loops down to fill the empty spot (and free his index finger), not his left loops.
4. Palms-down, Palms-up, and Palms-facing loop braiding methods:
To make this “over-under-whole-loops” type of braid, while keeping the doubled strands in the same left-right orientation for the length of the braid, requires a horizontal loop orientation for the purpose of the loop transfers. Even if two palms-up braiders choose to hold their hands in more of a “palms-facing” position than “palms-up”, they need to transfer loops as if those loops are on a horizontal plane, keeping the left strand of the loop on the left, and the right strand on the right, even when the loop crosses to another hand. To accomplish that with palms facing upward (or facing each other), the ‘fetching’ finger must be inserted into the transferring loop from below the loop. This is basically an inverted or flipped-upward version of the “palms-down” method, in which the fetching finger must be inserted down into the transferring loop from above the loop.
Unlike the case with palms-down braiding, this is not the only obvious way to insert the fetching finger into a loop. Holding loops with “palms-up” to “palms-facing” hand positions allows a braider to transfer a loop by taking it in three distinctly different ways just as easily:
1. Hooking onto the “lower” shank from below the loop (necessary for an exact reproduction of the HallTex braid)
2. Hooking onto the “upper” shank from above the loop
3. Hooking onto either shank from within the loop.
Each of these produces a different result. For the HallTex braid, only the first option results in no turn to the loop.
The palms-down hand position is somewhat more limited in this regard – this is true whether making the single-layer Iron Age HallTex 301 braid, or a 2-layer Slentre square braid. When holding loops palms-down, the only easy way to transfer a loop is to insert the ‘fetching’ finger down into the center of the loop from above. This transfers the loop without turning it in the case of an “over-under-whole-loops” braid like the Halltex braid. Conversely, it results in the loop receiving a turn when part of a “through-loops” braid like a Slentre square braid.
In a nutshell, the palms-down position almost necessitates the correct “no-turn” loop transfer for this Iron Age braid, whereas the palms-up or palms-facing positions allow the correct “no-turn” loop transfer, but don’t necessarily encourage it. If palms face each other or upward, the “from below” loop transfer is easy enough to do, but it might be slightly less obvious than simply reaching down into the loop “straight-on”, which would effectively turn the loop for this Iron Age braid.
I should add that the difference in the actual braid would be fairly minor, even if the braiders did turn the loops every time! The turns on the left would be cancelled out by the opposite turns (of the same loop) on the right. The two strands of each loop would cross each other and change places repeatedly in each cycle of braiding, but they wouldn’t end up twisting around each other. The basic structure would be the same, the only difference would be that the doubled strands probably wouldn’t lie as neatly side-by-side.
(It’s even possible that with use, a braid made with turns – resulting in regular criss-crosses in the two shanks of each loop – might actually straighten itself out over time(?) – since each cross of the shanks on the left side of the braid would have a ‘negating’ cross of those same shanks on the right side of the braid. I am not about to do any experiments with this, but others may wish to.)
Side note: I just realized that the 15th C. instructions for a much simpler 7-loop analog to the HallTex 301 braid specify for each loop transfer: “Reverse upward”! (“reverse” in those manuscripts meant “take the loop by turning it”). This is unusually specific for the 15th C. loop braiding manuscripts.
(This 15th C. braid is a very simple braid, almost as simple as a pigtail hair braid, so it is not analogous to HallTex 301 in complexity, only in that the braider never takes a loop through any other loops, only over whole loops.)
“Upward” means “by inserting the fetching finger from below into the transferring loop” (as opposed to “by taking the upper strand of the loop from above the loop” i.e. “downward” turn.)
This is the only 15th C. braid instruction I’m aware of that specifies the direction to turn the loop! I’m pretty sure that all the other instructions regarding turning loops just say “reverse” without specifying whether the loop should be turned from below (“upward”), or from above (“downward”).
This unusually specific line in the instructions means essentially “Take the loop from below AS IF TO TURN IT UPWARD.” However, in this “over-under-whole-loops” braid (the only such braid in the manuscripts), taking the loop from below will in fact result in the loop not turning, whereas taking the loop from above (“reverse downward”) would in fact turn it. As I would bet the original writer knew well. However the average loop braider of that era would only think of the “from below” loop transfer as a turning transfer, so the direction is to “reverse” – the writer does not go into complicated explanations the way I do, apart from specifying “upward” solely for this braid.
If these directions are followed, all the paired strands should stay in a fairly consistent left-right order with each loop transfer. However, I just did some trials with this braid and sadly, the results were a bit messy and inconsistent. I used bicolor black/white loops for the 4 loops that start on one hand, as opposed to the 3 single-color gold loops for the other hand. (The original directions don’t call for any bicolor loops.) Each bicolor loop moves as one throughout the braid, so the two colors of the bicolor loops should reveal whether the two shanks stay in the same left-right order. In actual braiding they weren’t very consistent – maybe partly because of the thick cotton yarn I used, but I think mostly because of that single long twill passage of “over (or under) 3 loops” on both sides of the braid. To get the neatly-alternating black-white strands of each loop in the photo below, I had to fussy-tighten and sometimes correct their order.

15th C. fingerloop braid Lace Broad Parti. All loops are transferred over other loops, never through any loops. Color pattern variation with 4 bicolor black/white loops and 3 gold loops. Tightened very carefully to emphasize color pattern. Mercerized cotton yarn – 3 slightly different weights, gold thickest and black thinnest.
However, when I divided the loops at the bottom to form a loop, and braided two side-by-side smaller braids with shorter (mostly plain-weave) passages, the results were much neater, and didn’t require ‘cheating.’ (in the photo above, this is the short section near the left end where the braid divides into a gold braid on top, over a black-and-white braid below.) The doubled left-right shanks of the loops made a very smooth, neat 3-loop flat gold braid on the left; while the 4-loop black/white braid on the right came out with a neat color pattern because of the regularity of the left-right black and white shanks of the loops. If you braid these simple braids holding the palms upward as described in the old manuscripts for Lace Broad Parti, it becomes very obvious that you are really not reversing / turning a loop when taking it from below, at least if you use short loops (with long loops it gets harder to see what is happening to the left and right shanks up at the point of braiding).
The two-person Hallstatt braid has several over-unders of shorter passages (2/2 twill and 1/1 plain weave) across the braid, which helps to ‘lock’ or fix the left-right orientation of the two strands of that loop. In contrast, each loop in the Broad Lace Parti has one long “over-3-loops” passage on each half of the braid, and that same loop then turns back around the edge of the braid to follow the single long “under-3-loops” passage on the other side, which makes the Broad Lace Parti more like a fat ‘pigtail’ braid – a much more rounded and “bunchier” braid than the flat, wide HallTex 301 braid. I think that’s why the Broad Lace Parti tends to come out with a messier alignment of the left and right strands of the loops.
5. Historical speculation about palms-down braiding:
The idea that the two braids in the study could have originally been made with a palms-down braiding method is very intriguing to me, because the palms-down loop braiding method has so far only been known historically from one very tiny part of the world – the Faroe Islands. I’ve always wondered about this. Why there and (apparently) nowhere else in the world? Elsewhere in Europe the only reports are of palms-facing methods (which can also be done somewhat “palms-up”). But these 2 braid artifacts in the study are from the Iron Age, and are a good 2000 years older than first known European loop braiding report – that being the 15th C. English loop braiding manuscripts. That’s a lot of time for traditions and techniques to evolve or change.
The Hallstatt Salt mine area was peopled by Celts during the Bronze and early Iron Ages. Peoples and languages and presumably textile traditions have done a lot of wandering over the millennia in Europe. (I learned about this in Historical Linguistics when I was a Linguistics major in college, and read more about it much more recently in an amazing book called The Horse, the Wheel and Language. Archeologists are finally paying attention to what researchers in historical linguistics had already proven a hundred years earlier!). The Celts ended up in the British Isles and nearby, after occupying much of the rest of Europe for thousands of years. Celts were already weaving tartan fabrics when they were mining copper and salt in the Swiss and Austrian Alps, long before they arrived in Scotland!
The Faroe Islands is an isolated group of islands located between Iceland, the British Isles, and Norway, although politically it’s actually part of Denmark. Its population is Nordic – their language, Faroese, is not Celtic, it came from Old Norse like most Scandinavian languages. So not a very obvious connection to the Celts. But after watching the video of Carol and Kim so conveniently braiding this Hallstatt braid palms-down, I can’t help wondering if palms-down loop braiding might be a relict tradition that was once widespread all across Europe, and only later replaced by the palms-facing method – that is, replaced everywhere but in the isolated and remote Faroe Isles.
In my info page on A-fell, V-fell, Slentre, and other types of loop braiding methods, I wrote that I doubted that palms-down braiding could be used (easily) to make team braids. Kim and Carol easily proved me wrong on that! The move I had imagined would be difficult to do palms-down is the “loop-exchange” move, in which 2 adjacent braiders swap their two closest adjacent loops to connect their loops into one braid. With palms-down braiding, it would have to occur between two neighboring braiders’ adjacent little fingers. But that move never happens in this braid – instead the two braiders use another way to “exchange” loops, in which each braider takes the other braider’s loop as part of one of their own loop transfers, rather than in a separate loop exchange move. This obviously works fine with palms facing down!
Posted Sep. 18, 2019
last updated May 23, 2022
© 2019-2022 Ingrid Crickmore


This is amazing and I can’t wait to try it with a friend! Thank you so much for your thorough and beginner friendly tutorials.
You’re welcome!
Pingback: 2redolent
Thank you:)
You’re welcome, and thank you! Now your Iron Age braid has got me thinking about some braids of Dietlind Wagner that Gary Mitchell drew to my attention a while back. The black-and-white section of the loop on the braid photo I just added to this post (way at the bottom of the post) came out just like some of Dietland Wagner’s braids that we thought could only be made with “palms-down” braiding – yet I made that braid palms-up. I just had never thought much about horizontally-manipulated loops before looking into this Iron Age braid.
Look what happens when I am not there… awesomeness!
Yeah, I know – I wasn’t there either! At least, not when Kim and Carol came up with their awesome alternative!