I’m in the middle of making an extra-long braid, and thought I would make a quick post of a photo of my loop-shortening strategy: “caterpillars.”
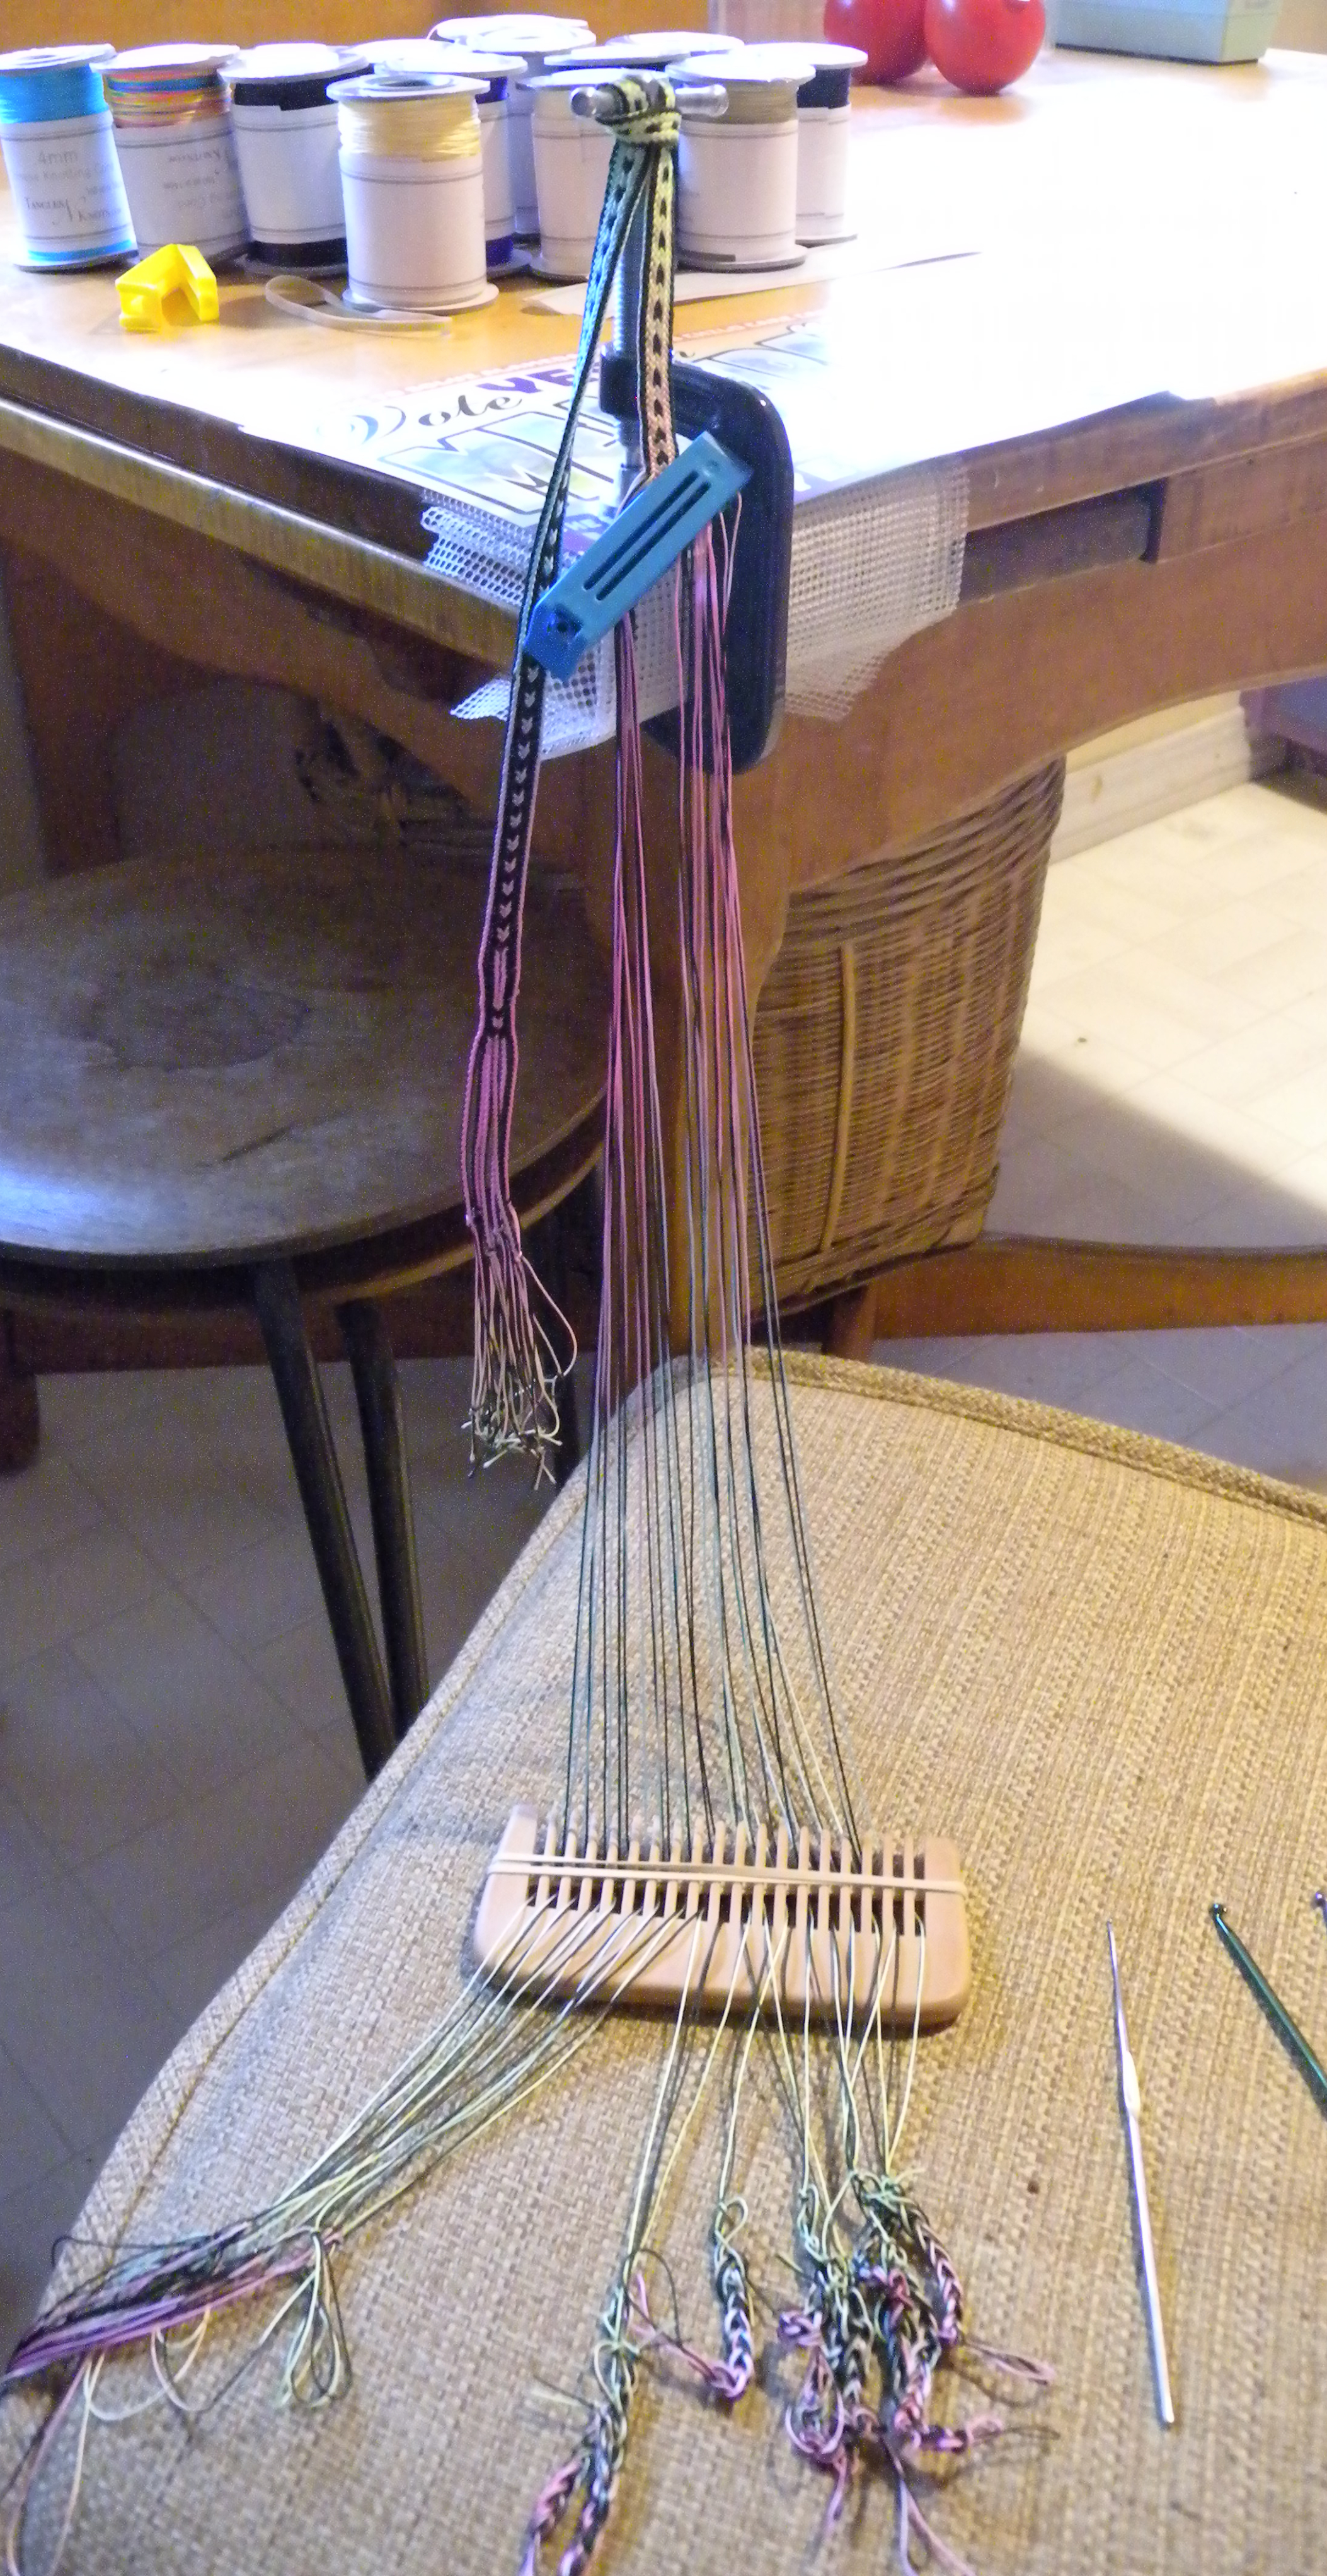
In this photo, I’ve already used my center-start method to braid the left ‘half’ (really about a third) of the braid – I started braiding from the point where the blue clip is now attached, and braided outward to the ends of the loops on one end of the braid. Then I looped that finished section snugly around the C-clamp, in preparation for braiding to the opposite end of the loop-bundle.
So one whole section of this too-long braid got braided without having to do any loop-shortening! Starting from the center of a loop bundle allows you to make a braid exactly twice as long as your normal length limit, with almost no extra set-up time. [Details in my Longer Loop Braids post.] However, since this braid is planned be more than twice my normal length limit, I will be using caterpillar tie-ups to temporarily shorten the loops of the opposite end.
One half of the start-from-the-center is finished; the longer ‘half’ is now being temporarily shortened into “caterpillars” (because “butterfly” bobbins don’t work for loop braiding!)
After finishing that first part of the braid, I hung the finished section securely onto my C-clamp, with the as-yet-unbraided (and much longer) ‘half’ hanging down in front. The loops at this end had been temporarily organized onto a comb at the start of braiding to keep them in order while I braided the first half, and to hold them in order now while I shorten them. (If you haven’t used a comb this way before: Each loop is mounted onto/ over a prong of the comb, not in between two prongs. Once a rubber band is placed around the comb, the loops can then slide freely back and forth, but can’t fall off the comb.)
Then I shortened the working length of each of these overly-long loops by tying a single slip-knot partway down its length to make each loop a good length for braiding. I hadn’t clipped that blue clip on at that point – it would have distorted the loop-lengths as I was tying the slip knots. The loops should all be shortened to the same length. In the photo above, the loops really are all the same length – some are sagging back on the other side of the comb, so they look shorter.
After I tie the first knot into each of the loops, the center start area has usually loosened up a lot, so I then manually pull it all tight and firm at the center point. I’m using a slippery nylon thread for this braid, so I then clipped the blue clip there at the center-start point to hold the strands in place while I chain up the ‘caterpillars.’ In this photo, I’m halfway through chaining up the loops. I begin chaining at the slip-knot I’ve already tied, and chain downward to the end of the loop. (Time-lapse instructions here on a knotting site) This compresses the extra loop length into a short, stubby chain of knots that dangles harmlessly at the bottom of the loop as I braid – the ‘caterpillar.’
When I’m ready to braid I will remove the blue clip (and move the loops from the comb onto my fingers). I never tie or cinch anything around the starting area before I start braiding this half of the braid! – no clip, no string, no knot – if I did, the strands there wouldn’t tighten well and my braid would have a loose, gappy section at the center-start area. Instead, I usually tie the braid onto the C-clamp using the finished part of the braid itself to tie with, as shown in the photo, except with an actual knot rather than the simple wrap I have here. However this braid is holding quite firmly, so I don’t think I’ll need to tie it any more than this.
In this photo, I am halfway done making the caterpillars. Completed caterpillars are to the right. Loops waiting for their caterpillars are on the left — their full length doesn’t show in the photo because they’re hanging over the edge of the chair.
A caterpillar is simply a chain of slip knots formed onto the first slip knot. That’s the same thing as a crochet chain, and I usually use a crochet hook to do it, but it’s just as easy to use your fingers. At the end, pull the last loop all the way through so the chain of slip knots won’t unravel. Later on, when you want to unravel that chained-up length to braid the final section of the braid, you’ll just undo the last knot on the chain and pull the end to make all the slip knots pop out.
There are more details in my old Longer Loop Braids & Starts with No Ends post. I just added this photo to that post as well – I keep throwing tips and tricks into that post, and occasionally re-organizing it. It now has nested and linked sub-pages for each topic, so you don’t have to wade through the whole post to get to the part you want…
The comb: I don’t braid with my loops on a comb! Wouldn’t work at all. But a big-tooth comb with a rubber band around it can hold the loops in the correct order while you are fussing with them. I’ve demoed my comb strategy elsewhere on this blog, as a way to put loops down and take breaks while braiding. It’s easy, quick, and useful – in daylong workshops, even first-time braiders learn and use this trick right away. It’s also a great way to keep your loops in order if you want to do something to them – like say you discover you need to re-tie all the knots at the ends of your loops. The loops are free to move around on the comb, you can slide one or more forward, measure them, work on one at a time to untie/ retie, whatever. Meanwhile the other loops can’t fall off the comb and get out of order because the rubber band is a complete barrier. When you are ready to braid, you remove the rubber band, and load the loops one by one onto your fingers. (Make sure your fingers take the loops off the comb in the same orientation as when they set them down on the comb, or the loops will get twisted and possibly reversed in order.)
Update June 20, 2018: Fumiyo Kitahara of the blog Kumihimo with Loops just made a post about using Caterpillar tie-ups for a kute-uchi braid! Check out her photos of the beautiful end result, a 120cm / 47″ long Karakumi-style belt with beaded fringe-braids:
With kute, you have to tie a separate caterpillar for each strand, so two caterpillars per loop, because the two strands of a loop are connected separately to each end of a kute (kute are the ‘handle’ strands that are often attached to the ends of the loops in hand-held braiding). At the end of the post, she says that she had some trouble dealing with the strands. I think she means in setting them up, not in braiding with them, because earlier she said that whereas she had expected the caterpillars would be difficult to braid with, in fact they were not.
The first few times I did it, I had trouble too setting up caterpillars in a braid of many loops. But after a few times you work out the kinks and everything gets simpler.
P.S. Yes, I am still working on the Pick-up Patterning series! It’s been slowed down by some other obsessions and obligations, but is still in the works, and should start chugging faster once my botany class has finished, a couple of weeks from now…
Posted June/08/2018
updated Jan/18/2020
© 2018-2020 Ingrid Crickmore
See full copyright restrictions and permissions at the bottom of the sidebar (if you are on a small screen device, the ‘sidebar’ may appear somewhere other than at the side of the screen).


