This 3rd Pick-up installment is on flat braid pattern-switching with bicolor loops. However it also includes instructions for some great “regular” flat braid bicolor patterns that don’t require pickup moves – jump to them further down page. Plus, I finally have some concrete, sure-fire (I hope!) tips on how to get flat braids to come out “fully flat” instead of the “3/4-flat” result that is so common – especially with 5-loop braids.
Previous info not covered here can be learned in these tutorials: Start Here (5 loops), and Continue Here (7 loops) teach how to make square and flat loop braids, and Bicolor Loop Magic shows how to set up and braid with bicolor loops. See Pick-up 101 and Rock Your Square Braid for pick-up patterning terms and techniques.
‘Real’ Pick-up Patterns
Even though you can only use pickup on one side of the braid when making a flat braid (more on this below), the pattern displays across a wider area than a square braid, so it can be very striking.
Here’s where my artificial distinction between “real” pick-up patterns and switching between automatic patterns breaks down! Combo patterns are actually ‘real’ pick-up. The overall, larger pattern does not have an automatic loop-turning sequence to every row:
 The overall pattern in this braid has a 16-row repeat made with different loop-turning moves in different rows. In braiding it, you break it into 2 easily digestible chunks: 9 rows of All-Dark-Up (remember, this is pick-up, so those 9 “all-dark-up” rows probably won’t all have the same sequence of turns) then one repeat (7 rows) of All-But-1-Dark-Up .
(All pattern set-ups and pick-up charts follow the flat pick-up instructions below).
With square and flat braid pickup, after you get used to the idea of choosing whether or not to turn loops, the braiding process is mostly about counting your rows as you braid. In the video, I show how to find your place by examining your loops if you happen to forget what row you are on.
The braid below has a very similar overall pattern to the one in the first photo, though with two contrast loops instead of one: 7 rows (one repeat) of All-But-2-Dark-Up, then 11 rows of All-Dark-Up. Click once to enlarge, twice for extreme close-up; use back-button to return here:

The two braids above have regular, repeating pick-up patterns, with a regular number of rows to each repeat. That’s because I chose to have the pattern repeat regularly. With pick-up, the pattern doesn’t have to repeat regularly – in fact, pattern variation is a hallmark of pick-up patterning. You could think of the braid below as a patchwork of a few automatic bicolor patterns randomly pieced together, or as planned-out pick-up motifs, but either way, it’s still pick-up patterning. In Pick-up 2 (Rock Your Square Braid), I sort of falsely implied that switching between automatic patterns is different from “real pick-up”, when really it isn’t!

Below is another long combo-pattern, here one pattern-repeat (14 rows) of Dark-Light-Alternations separated alternately by about 30 rows of All-Dark-Up or All-Light-Up:

The combo-pattern braids above have extra-long pattern repeats, but a regularly repeating pick-up pattern may also have a very short repeat.
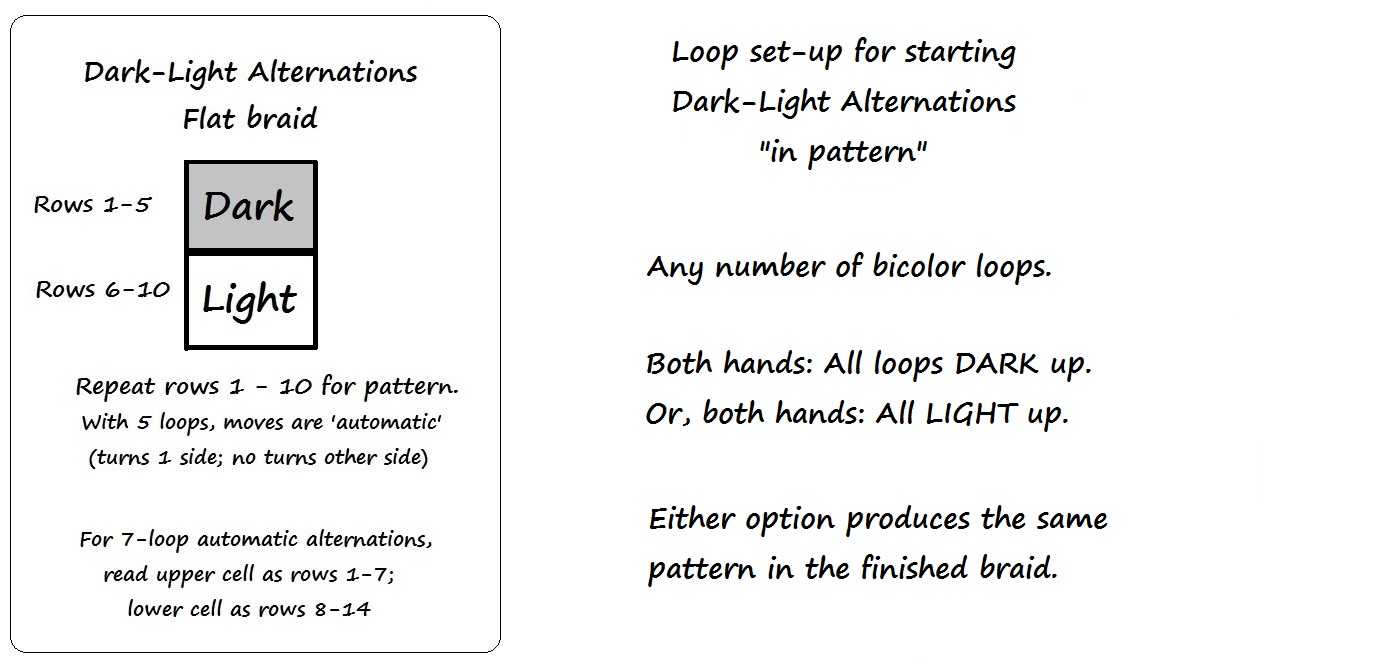
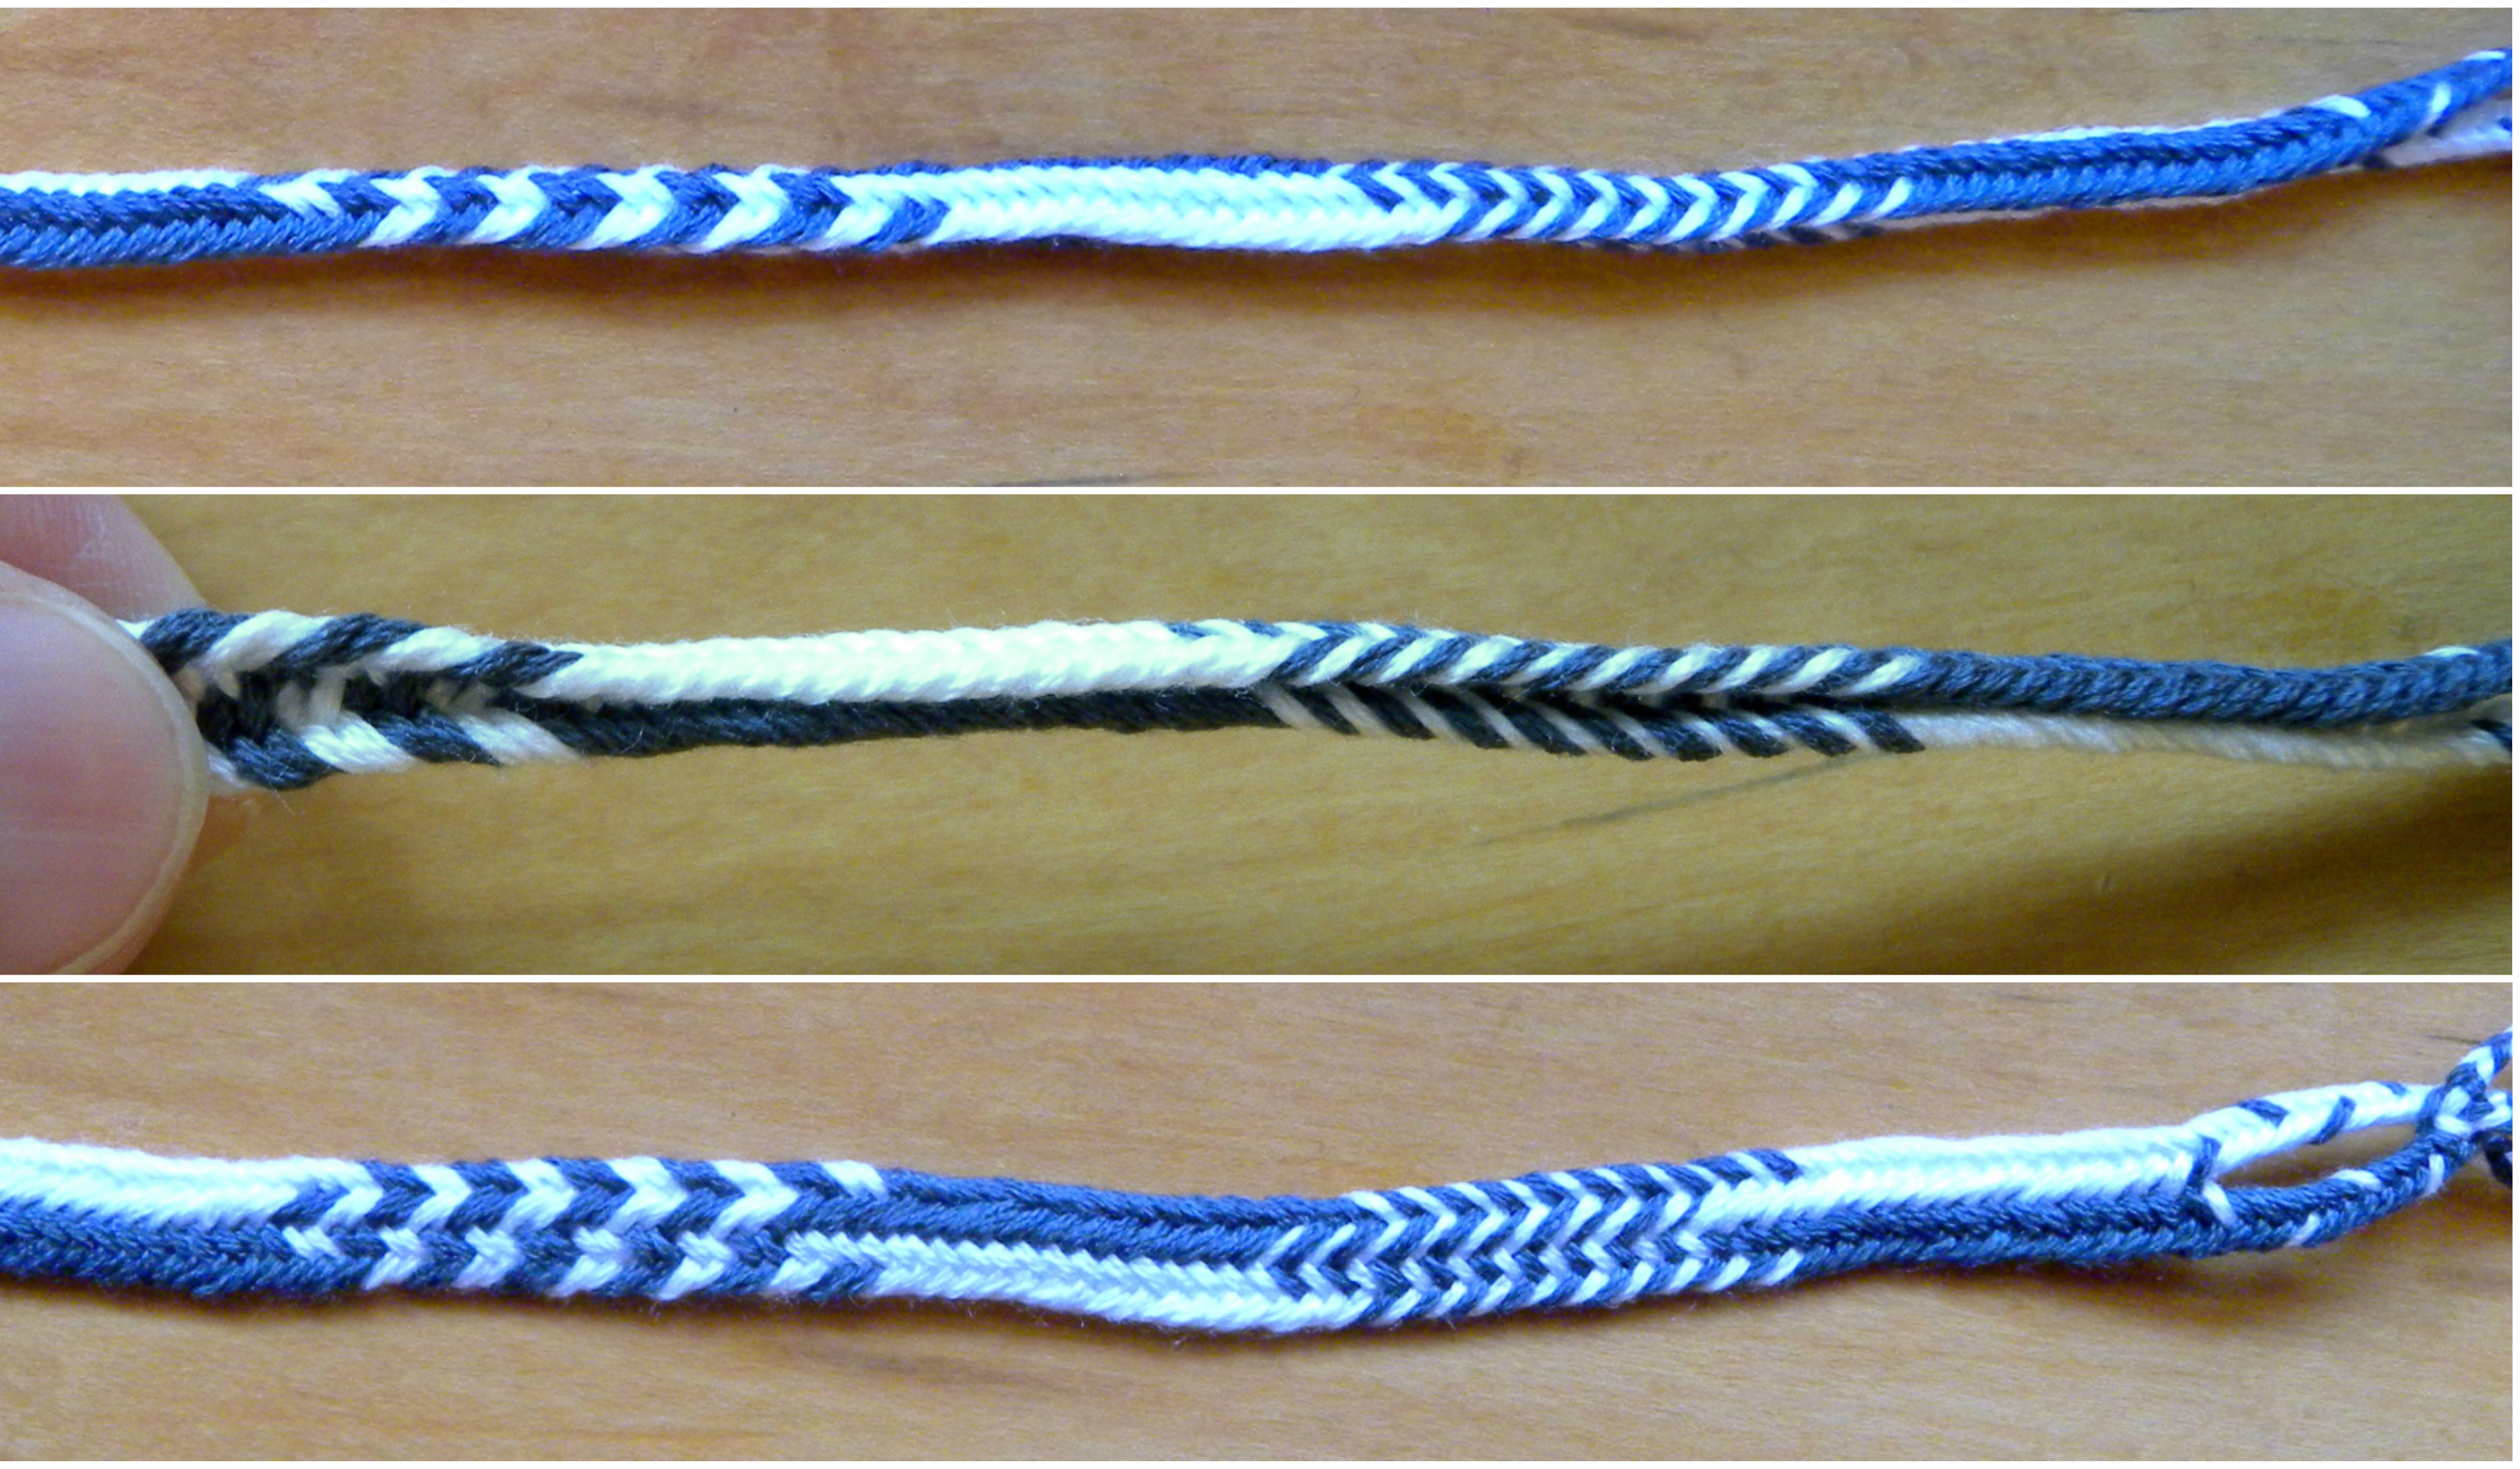
Below are two 7-loop braids, both with variations of the pattern that I’m calling here Dark-Light Alternations. Charts for both are further down. The pattern in the white/blue braid (bottom of photo) is an ‘automatic’ bicolor pattern for a 7-loop braid: you start with all your dark shanks ‘up’ and light shanks ‘down’ and braid a flat braid with the same moves throughout. It has a 7-row Dark-Light alternation. (I usually call this automatic pattern a “50-50 Zig-zag” when I’m teaching it as a standard bicolor pattern, with no connection to pickup patterning.)

However, the 7-loop black/blue braid (top of photo) has Dark-Light Alternations of only 5 rows (the full pattern repeat is actually 10 rows: 5 dark rows followed by 5 light rows). That would be a normal for a 5-loop braid, but in a 7-loop braid this requires using selective pick-up – a different turning sequence in some of the rows. The pickup sequence is very simple and easy to memorize. A chart would only be necessary for the first run-through.
A 5-row color-pattern repeat looks a bit different in a 7-loop braid than it would in a 5-loop braid. In the black/blue braid above, the pattern is condensed lengthwise in a way that starts to highlight a different symmetry than the broader zig-zag of the white/blue braid below it, which has 7-row, ‘automatic’ Dark-Light Alternations. To make the upper pattern, use 7 loops, but follow the 5-row Dark-Light Alternations chart below (follow the whole 10-row chart – 5 rows of Dark alternating with 5 rows of Light).
If you braid Dark-Light Alternations with fewer and fewer rows of each alternation, the pattern changes even more:
 Left-to-right (not including the braided loop at the farthest left), the above Dark-Light Alternations patterns go from 4-row alternations (I really like this one!), 3-row, 2-row. In a 7-loop braid, all three of these patterns require some very easy, repetitive pickup. A 1-row Dark-Light alternation becomes the pattern I call Alternating Stripes:
 The braids above are of 5 loops. Alternating Stripes is an automatic, no-pick-up pattern in any odd-number-of-loops flat braid.
The middle braid in the photo above was braided with no pick-up, from start (far right end of all three braids) to finish. The upper braid has pickup between the All-Light-Up braided loop and the Alternating Stripes flat braid, and the lowest braid also had pick-up in the center of the braid, where it switched for a short section of All-Dark-Up, and then All-Light-Up, before switching back to Alternating Stripes.
Fully flat, or 3/4 flat?
Here’s a common problem with flat braids, especially 5-loop ones.
They can easily come out in a ‘squeezed together’ form that is not fully flat, which won’t work for making the patterns shown in this tutorial. That “3/4-flat” form has a firm, lozenge-shaped cross-section, and is not as wide or flat as a “fully-flat” flat braid. Here’s a photo comparing the two forms:

These are both 5-loop flat braids braided with the Dark-Light Alternations pattern (start with bicolor loops all with the dark shank uppermost, and braid a flat braid). If your version comes out like the top braid, you’ll need to learn how to achieve the second braid in order to braid the examples in this tutorial. See pointers in the footnotes and video. I’ve finally figured out (I think!) how to achieve the 3/4-flat form on purpose, which means I also have better tips on how to avoid it.

Pile o’ samples: 5 and 7-loop flat braids with bicolor patterns – some pick-up, some ‘automatic.’
How to switch between automatic bicolor patterns in a flat braid:
You don’t have to learn pickup to braid most of these patterns! Just use the starting set-up information right next to the chart for each pattern. Arrange the loops on your fingers in the dark-light color-order I give, and then braid with regular braiding moves (as taught in my intro tutorials for 5-loop and 7-loop square and flat braids). Below I’ve listed each pattern’s starting loop color set-up alongside its chart.
A chart for an automatic bicolor pattern is only necessary if you are switching to that pattern after starting braiding with your loops in a different set-up arrangement. For example, I like to start braiding with my bicolor loops in “All-dark-up” position, braid a simple all-dark-up loop at the top of my braid, and only then segue into my desired color pattern. Or maybe I’m switching color-patterns mid-braid, as in some of my sampler braids. In either of those cases, you can follow the pick-up chart of the new pattern for a few rows to change the dark-light orientation of some of the loops. After a few rows, the loops will all be in the correct position for the new pattern, and you can just braid automatically again. Following a pick-up chart helps you choose whether or not to turn a loop while braiding, rather than doing it automatically as part of the regular braiding moves.
Each row of a square braid pick-up chart shows the two braiding moves as either ‘light’ or ‘dark’ which lets you know whether or not to turn the light-dark bicolor loop in that move. For flat braids, you ONLY turn loops on one side of the braid, so the charts are even simpler than square braid charts. For a 5-loop flat braid, it takes no more than 5 rows to transition the loops into the new pattern, at which point you can braid automatically again.
Part 2 of this series (Rock Your Square Braid) showed how to transition between square braid patterns using a pickup chart, as well as how to turn a loop twice rather than not turn it. These both apply to flat braids as well, though a flat braid chart is simpler.
“Turning twice” is KEY to bicolor pattern-changing in a flat braid.
The big difference between square and flat braids when doing ‘pick-up’:
When braiding a flat braid, you must do all the color changing moves on just one side of the braid (the side with turned transfers), because the other side of the braid must not have any turned transfers if the braid is to remain flat.
Every transferring loop on that one side must be turned. Otherwise, you would get a hole in the center of your flat braid any time you didn’t turn a loop.
Despite that, you can still selectively change the colors on that side. You can either choose to turn the loop once (to change the color), or twice (instead of not at all) to keep the same color.
Do not turn any loops on the other side of the braid! If you were to turn any of the loops on the “non-turned”, open side of the braid, it would tie the braid together there and prevent it from opening out to be flat later.
A pattern chart for a flat braid is very simple, almost more of a list than a chart. It consists of just one column, representing the side of the braid with the turned-loop moves – the ‘folded’ side of the braid. So each ‘row’ just shows one cell, representing only one of the two loop transfers in that row of braiding. Remember to turn a loop on that side twice rather than not turn it, if it already has the correct color uppermost. If you forget this and don’t turn the loop, you will get a little hole in the middle of the braid in that spot. If the loop does need a color change, give it a normal turn. All the loops on the other side of the braid will be transferred ‘straight’ / without a turn, so those moves are not represented in the chart.
Bear in mind that all the loops travel back and forth to both sides of the braid, so the Darks and Lights on the “ignored” side of the braid will be corrected to the new pattern’s configuration once they get over to the other hand! It’ll only take a few extra rows of braiding before all the the loops have been switched to the correct configuration for the new pattern.
Pattern instructions:
(photos can expand twice for closer view)
Follow the loop set-up instructions to begin a braid in that pattern, with no need to do any pickup moves. These are all great flat braid bicolor patterns that don’t require any pickup moves if you are making the same pattern for the whole length of the braid.
Follow the pick-up instructions shown in the chart to switch to that pattern from another one. (demoed in video)
Loop abbreviations in starting set-ups:
A = index B = middle finger C = ring finger D = little finger Th = thumb
None of my braid samples below started or ended in the main pattern (except for some of the so-called “linked” flat braids, like All-Dark-Up). I started them with a loop/ divided area using one of the divided-braid patterns, and later segued to the main pattern by means of pick-up.
Alternating Stripes flat braid:


(See footnote on Left and Right issues if you prefer to turn loops on the right side in making flat braids.)
Dark-Light Alternations: In a flat braid, this pattern comes out like a broad zig-zag down the braid.

5-loop version above; 7-loop version below:

The full pattern repeat for a 5-loop version of flat Dark-Light Alternations is 10 rows long – even though it’s a very simple pattern! (You wouldn’t have to actually follow its chart for all 10 rows, since it’s an automatic pattern – following the first or last 5 rows would put the loops into position for automatic flat braid moves.)
In the chart below I merged identical rows together to make the chart more concise:
Contrast Stripe This pattern is like Dark-Light Alternations but with one loop in opposite dark-light orientation from the others (shown in the 6th and 13th rows in the chart.)


All-Dark-Up: Divided braid (the buttonholes), and Linked-flat braid versions (the unified flat braid portions with two different-colored halves.)

A ‘linked’ flat braid is a flat braid made with ‘automatic’ moves of all the turns done as double-turns (turned twice). Turning a loop twice links its 2 shanks around each other. This is a strategy for connecting the two parts of a divided braid into a unified flat braid, without changing the divided braid’s pattern.
The starting loop set-up for both the divided and flat versions of All-Dark-Up is identical to the loop set-up for Dark-Light Alternations above: All DARK shanks uppermost, both hands. (It’s the braiding moves that create the differences between the 3 patterns.)
The charts below are so simple that they may be hard to comprehend at first! They consist of only one row each, which is then repeated for the full length of the pattern.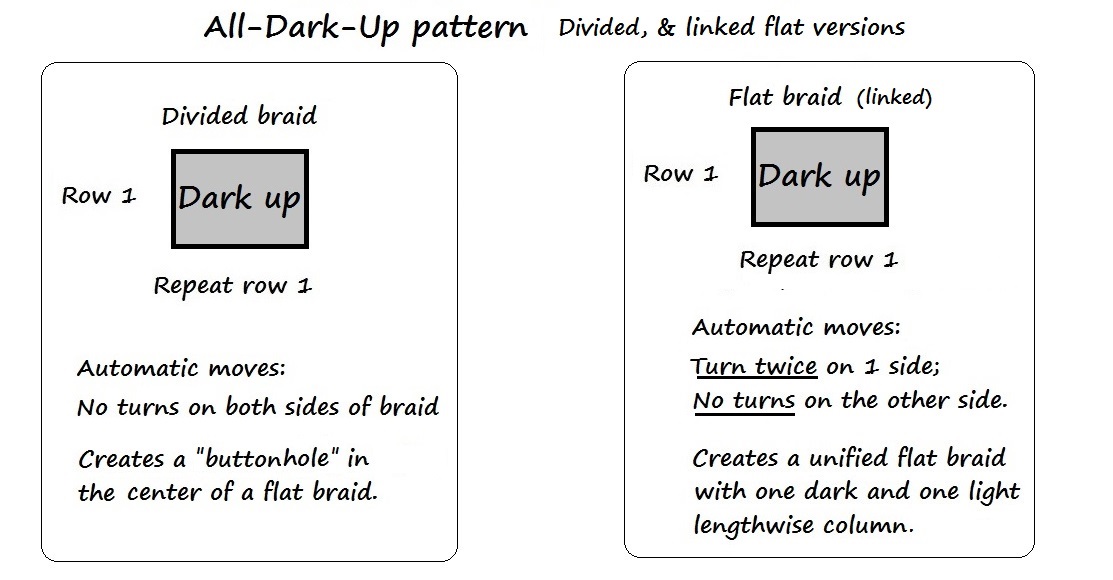
(Note that in a flat braid, a divided area / braided opening in the braid turns out looking like a buttonhole at the center of the flat braid – a very different look from a divided area in a square braid.)
All-But-1-Dark-Up, divided braid and linked-flat braid version.

This is basically the same pattern as All-Dark-Up, but with one loop in the opposite dark-light orientation.


The 7-loop linked flat braid above has a combo-pattern: 9 rows of All-Dark-Up followed by 7 rows – one pattern repeat – of All-but-1-dark-up.
All-But-2-Dark-Up: A thicker version of All-but-1:
(Braid in photo below is just a closer view of a shorter braid than the other samples. All samples are made with embroidery floss.)


Contrast V’s, divided braid and linked-flat braid version.
 This is another divided-braid pattern that can be made into a flat braid if you use double-turns / turn twice.

A slightly more symmetrical version of this pattern can be braided if you only follow the first 4 rows of the chart. With 7 loops, this sequence would not resolve into automatic braiding moves. Some rows would require regular turns and some would require turning twice. But it’s not difficult to braid as a pickup pattern: it just requires counting to three as you braid. With each left loop transfer you would think or say in turn: “Light, Dark 1, Dark 2, Dark 3; Light, Dark 1, Dark 2, Dark 3…” etc etc. See chart below. I demo both these braid patterns in the video.
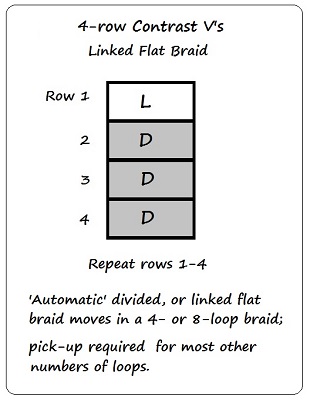
If you use this 4-row chart with 5 loops, the resulting pattern does not have the same appearance. It’s a nice pattern, but it doesn’t look like alternating V’s. You can get an Alternating V-like pattern with 5 loops if you omit row 4 from the chart above.
The resulting 3-row chart’s sequence is Light, Dark, Dark (repeat).
More examples of Linked Flat braids from previous tutorials: I have taught this “linked flat-braid” technique at least twice before in this blog. The braids in the photo below are from a past tutorial I posted in 2013, which teaches two types of color-linking: The type I teach above for flat braid pick-up: ‘turning twice’ to link the two shanks of bicolor loops, as well as another kind of linking that is a fun “non-pickup” type of color-manipulation:’transferring twice’ to link BOTH shanks of two loops. Here are a couple of examples of the second type of linking:

Two 7-loop braids with linked flat-braid patterns
The braids in the photo above both have 4 single-color dark loops, while their other loops are all bicolor with one “cool” and one “warm” color tied together – pink/ green for the upper braid, and a range of different warm and cool colors for the bicolor shanks of the lower braid. However, whole-loop linking doesn’t require using any bicolor loops, so it’s really a different color-manipulation method than pickup. The various patterns in the braid in my sidebar were made with this type of whole-loop linking, and with no bicolor loops. (The sidebar braid is a 10-loop double braid, flat variation.)
Video:
Demos braiding both versions of Contrast V’s from the charts above in a 7-loop flat braid.
See ‘table of contents’ with video timepoints below the video. The video is long (28 min), so the timepoints can help you skip to the part(s) you want to see. Start video, then drag bubble under video along the timeline.
Skip to the part(s) you want to see. Start video, then drag bubble under video along the timeline to any timepoint listed below.
Video timepoints:
0:01 Showing braided samples of these two patterns in my braid notebook.
1:09 Problem of ‘flat’ braids sometimes turning out compressed into a narrower, thicker shape I call “3/4-flat”.
1:42 Showing the braid patterns I will be demoing: 2 versions of “Contrast V’s”.
2:04 Loop set-up and suspending the loop bundle onto a rigid bar.
3:25 Making sure all the loops will be the same length even after the big knot is tied.
4:05 Tying a temporary knot near the top of braid, leaving a long section for a braided fringe of mini-braids (will braid those later, after rest of braid is done)
4:40 Putting a header cord below the temporary knot, – that header cord is temporary, too – ONLY for braiding the divided section. If you braid the FLAT braid from a header cord, it might not turn out fully flat!
5:07 Placing the header cord onto the bar of the C-clamp
5:35 Placing loops onto fingers with DARK shanks all up for “All-Dark-Up” divided braid pattern
6:33 Starting divided braiding to make a braided loop at the top of the braid – later will hang the the loop bundle from that loop while braiding the flat part of the braid.
7:40 Showing a shower-curtain ring – handy for suspending the top of the braid.
7:55 Taking divided braid’s header cord off the clamp, to hang the braided loop itself over the C-clamp bar, or onto the shower-curtain ring. Keeps braid stable, helps flat braids form ‘fully flat’ rather than ‘3/4-flat’.
9:38 Showing the charts and braid samples for the two patterns: 7-row Contrast V’s (will be automatic braiding moves in a 7-loop braid), and 4-row Contrast V’s – similar but more symmetrical pattern.
12:03 Starting flat braiding using the 7-row chart to segue from All-Dark-Up (the pattern of the divided loop) into 7-row Contrast V’s.
14:32 Tightening technique for helping flat braids form fully-flat. (This does not show clearly in the video. From above you would see that after the 2nd transfer when the right hand has only 3 loops, I pull those right loops in an arc out to the side and then almost all the way away from me, while holding the left loops firmly toward me – I don’t stretch the left loops to the side.)
15:28 Two ways to “turn twice” – very important for this braid, as the automatic moves will be to ‘turn twice’ on the left in every row, once the loops are in pattern.
16:20 How to figure out what row you are on if you lose your place. Shown again @ 25:39, going back even further in the loops.
18:55 After 7 rows of pick-up, all my loops are now in position for the new pattern, and I can start doing linked flat braid moves – all left loops turned twice – for the rest of the pattern. “Automatic” moves = using the same braiding moves in every row.
22:00 Now doing pickup again (sometimes turning once, sometimes turning twice) to bring loops back to All-Dark-Up as a separation between the 2 Contrast Stripe variations.
24:29 Starting braiding 4-row Contrast V’s (a pick-up pattern in a 7-loop braid)
25:39 Again how to check what row you’re on by looking at the loops, here looking all the way onto the loops of the other hand.
27:28 Showing the regular alternation of the 2 types of turns in this pickup pattern – 2 rows of single turns, followed by 2 rows of double turns.
I ran out of time on this video before I could show how the braid unfolds/ opens out from a folded ‘square braid’-like shape to a fully-flat shape. See photos of this with a different braid in the last footnote, near bottom of page.
Notes
Pick-up Charts: A pick-up chart is a visual aid that helps you decide which loops to turn. For a ‘real’ pickup pattern (see Pick-Up 101) you might need to follow a chart for the whole pattern.
But if you are just switching between ‘automatic’ patterns, you would only use a pick-up chart for the first 5 rows of braiding the new pattern (for a 5-loop flat braid). Flat braid pattern charts are simple – only one column – but tend to be long. A full pattern repeat for a 5-loop flat braid can be as long as 10 rows of braiding. But after following the chart for 5 rows, the loops will be “in pattern,” and you can braid automatically again.
After you get the hang of most of these ‘automatic’ patterns, you won’t need their charts anymore when switching back and forth. They are all very straightforward. The trickiest thing when changing patterns in a flat braid is simply remembering to only turn loops on the one side of the braid! That seems simple, but it is a big mental switch after changing patterns with square braids. It is very handy to be used to ‘unbraiding‘ in case you slip up and let a couple rows go by with turns on the wrong side of the braid…
Left vs Right in flat braids:
If you prefer to turn loops on the right side rather than the left when making a flat braid, you may need to use a different initial loop set-up than I give above. This is definitely the case for the set-ups I give for Alternating Stripes and for Contrast Stripe. The simplest alternative set-up for me to describe is to mount the loops in mirror image: Switch the left and right hands in the given set-up directions. The right hand will be holding one more loop than the left. Because of that, you will begin your braiding moves with the left hand as the ‘fetcher.’
Turning once, turning twice…
Turning a bicolor loop once (while transferring it) rotates the loop 180°, changes the upper color of the loop, and connects the upper and lower layers of the braid at that point.
Not turning a loop when transferring it keeps the same color uppermost, and leaves the two layers of the braid unconnected at that point. This is necessary on both sides of the braid for a divided braid, and it is necessary on one side of the braid for a flat braid.
Turning a loop twice – a 360° rotation of the loop – will result in the same color remaining uppermost… almost as if you hadn’t turned the loop! Yet the braid’s two layers will be connected at that point. They will not divide, open up, or form a ‘hole’ there. Turning twice can be done as a single move or as two separate moves (shown in this video at 15min:28sec, also in 3rd video in Rock Your Square Braid)
For a flat braid, the two layers of the braid must always be connected on the ‘folded’ side of the braid. So, on that folded side of the braid, turning the loop twice is the alternative to not turning the loop when you want to keep the same color “up” in the braid.
Loop start patterns:
I almost always start braids with a braided loop, using divided braiding (no turned loops). All-dark-up is my go-to pattern, but sometimes I use All-but-one-dark-up, or One hand dark–other hand light, or Contrast V’s for the divided braid section of no turns, before switching patterns for the start of the main part of the braid. If you use pick-up you can start the braid with any pattern you want before switching to your main pattern.
Tip: You can start with a loop at the top of your braid, yet avoid doing any pickup moves when starting the main pattern.
You just have to make sure that when you about to start your flat braiding moves, all the loops are back in the correct loop set-up for the pattern, without your having to turn any of them over. (Turning any but the ‘folded’ edge loop over will make the braid bunch together at the top/ not be flat there.)
Begin with all your loops arranged in the correct loop set-up for your pattern, and start braiding with divided braid moves (no turns) for the braided loop. When your loop area is (close to) long enough, keep braiding ‘divided’ until all the loop colors have returned to their initial loop set-up arrangement on your fingers. Only at that point, begin your flat braiding moves (turning left loops, not turning right loops).
With bicolor loops, this will usually result in a somewhat to very different-looking pattern in the braided loop section than in the flat braid.
The divided braid pattern All-dark-up segues naturally (with no pick-up moves) into the flat braid version of Dark-Light Alternations, which starts with all dark (or all light) shanks up, among other possible starting set-ups.
The divided braid pattern One hand dark–other hand light can also segue into flat braid Dark-Light Alternations, or into square braid Edge pattern (if you braid divided until all the darks and lights are back on separate hands before you start braiding the next pattern).
The flat braid Alternating Stripes loop set-up creates a slightly different stripe pattern as a divided braid than it does as a flat braid. See center braid below:

In the photo above of three 5-loop flat braids of Alternating Stripes, the middle braid was started “in pattern” for flat Alternating Stripes, but braided as a divided braid for the braided loop section (I braided the fringe of mini-braids last). The resulting pattern in the loop isn’t quite the same as the Alternating Stripes of the main part of the braid, but it’s a fairly subtle difference.
Another way to make a flat braid of ‘alternating stripes’ without using bicolor loops:
Use an even number of loops, half of one color and half of the other color – so 3 red loops and 3 white loops for example. See the “zebra-stripe” pattern in my Power of Six pattern-post. I used to think this was the only way to braid alternating stripes in a flat braid. This method creates a slightly more symmetrical zig-zag pattern, but it doesn’t allow you to switch easily between patterns – that’s only possible with bicolor loops. The two patterns are not completely identical, just very similar…
Avoiding or achieving the 3/4-flat form of a flat braid:
Update: It works! We group-tested this in my recent workshop at the Lace Museum, and everyone who tried it was able to make fully-flat 5-loop braids, even the first-time loop braiders – which to my best recollection has never happened in any of my previous beginning workshops!
Above: Two 5-loop flat braids braided with the Dark-Light Alternations pattern (start with all bicolor loops, dark shanks uppermost, and braid a flat braid). Top braid is the “3/4-Flat” form and bottom braid is the “Fully Flat” form of a flat braid.
Both forms have the same over-under thread structure. In fact, unless the braid is so tight that it’s rock-hard, you can usually manually pull a 3/4-flat braid into the fully flat shape. First loosen the strands by ‘plumping’ together every inch of the braid (as if to shorten it), and then strongly pull/ stretch/ wiggle the two edges apart up and down the whole length of the braid.
Achieving a 3/4-flat braid: I recently discovered that it is VERY easy to get a 3/4-flat braid of five loops if you suspend your loop bundle from a cinched-together top (as when the top is a knot hung from a header string) and tighten widely out to both sides – the way I teach how to braid in my introductory tutorials. (Sorry!) It’s good for square braids, but not for fully-flat 5-loop braids, even if you don’t over-tighten while braiding. I always start braids in a different way myself, and have found it hard to achieve a 3/4 flat braid when I want one. Now I finally know how to get it. It’s a really nice braid in its own right, with very snazzy color-patterns that look quite different from their fully-flat equivalents. If I want that shape, I now start with my loop bundle cinched tight up at the top – either by a knot or just by the header cord itself – and suspended by the header cord exactly as I demo in photos my 5-loop tutorial. I tighten fairly firmly, while spreading both hands all the way out to the sides.
Achieving a fully-flat braid: There are 2 things you can do while braiding to encourage your 5-loop flat braid to turn out fully flat. Either of these might do the trick, and together I find them foolproof, but please let me know what your results are. (If you get 3/4-flat braids even with 7 loops, you are probably braiding much too tightly. Try either or both of these tips below, as well as relaxing your tension. Tightening should be a sweet spot between gentle and firm, not a hard pull.)
1. Tighten differently on the two sides.
Assuming that your turned-loops, “folded side” of the braid is on the left: Only tighten out widely to the RIGHT, and only after the right loop transfer (left hand doing the ‘fetching’)!
After each turned/reversed LEFT transfer (right hand doing the ‘fetching’):
Tighten minimally, by opening both hands apart evenly and not very far – NOT all the way out to the side the way I recommend in my intro tutorials (sorry)!
After each straight / unreversed RIGHT transfer (left hand doing the ‘fetching’):
Tighten by holding the left loops straight toward yourself, while pulling the (fewer) right loops in an arc ending VERY FAR away from you, almost straight forward – much further than straight out to the side! This is the main tightening move. It doesn’t have to be a hard pull, just an evenly-tensioned arc (in other words, don’t let the loops hang loosely while stretching them away from you, and then tighten them straight). I demo this in the video, but it’s hard to see what I’m doing as the camera’s viewpoint is so low – a view from above would show it better, but it’s not possible with my camera set-up.
Do that single wide-reaching tightening either before or after the loop shifts – and reach to almost a 180° straight line away from the left loops which you are holding firmly towards you. I would say well beyond a 45° angle, but not all the way to a straight 180°. Gently pull the right loops against the left loops. Repeat or “rock” the end of that arc once or twice if you “turned twice” in the previous loop transfer – turning twice makes the following loop transfer a bit harder to pull through.
2. Suspend the braid from an upper loop in the braid while braiding. This has been my habit for years now, and it seems to prevent the 3/4-flat shape even when I want that shape. It completely prevents a ‘cinched-together’ start to the flat part of the braid.
Do not constrict the beginning of a flat braid with a header string, the way I demo in my intro tutorials.
One option: Follow one of my “no-ends loop-start” instructions for starting a braid with no loose ends at the top, and a handy loop/ eyelet at the top of the braid, from which the braid is suspended during the course of braiding. Nothing is cinched tight around or through that top loop.
Another option: (demo’d in video) Start with a knot at the top of the braid suspended by a header cord, but before starting the main flat braid section, braid a divided-braid section to form a loop at the top of the braid. Before beginning any flat braiding moves, mount that divided, as-yet unclosed braided loop section onto the horizontal bar of an upside-down C-clamp (eliminating the need for the header cord). Be sure to mount it correctly – with the upper layer above and the lower layer below. Only then, with the braid suspended over a rigid support, should you begin braiding the flat, unified, main section of the braid.
Either of these options prevents the top of the flat braid from being constricting into a tight circular bunch of threads, as well as prevents the braid from randomly twisting. The bar supports the braid in proper orientation, keeping the upper layer on top and the lower layer below. This all seems to help flat braids turn out fully flat.
As you are braiding, you should see your flat braid forming FOLDED and looking like a square braid – or possibly curled into a C-shape. (See the photo-montage below of a 7-loop braid still folded, then being opened out flat after the braid is done.) That folded or C-shape while braiding is necessary for a fully flat braid. When you open it and spread it out later it will be in its full, wide, flat form.
If instead, your ‘flat’ braid looks flat as you are braiding it, then it is actually not fully flat – it has taken that squeezed-in lozenge shape. There will be nothing to unfold when you are done braiding. Once the braid has started forming in that 3/4-flat shape, it seems to be almost impossible to switch out of it no matter how you hold or tighten the loops – as you braid, the threads will tend to fall in place in line with the threads that preceded them, replicating the established shape. This is especially true for 5-loop flat braids, I think because they are so minimal that it’s a bit hard for them to braid folded in half lengthwise – it doesn’t take much encouragement for them to pop out of it and into the 3/4-flat shape.
Is it pick-up, or not?
Flat braid bicolor pattern switching – is it really pick-up? To me it is, but I think I’d have trouble convincing a weaver!
Pick-up patterning is supposed to be restricted to a two-layer fabric, whereas a flat braid is a single layer, right?
Flat braid color-selecting moves create color-changes on the left and right sides of a flat, single-layer braid, rather than between the upper and lower layer of a two-layer braid.
But actually, the left and right halves of a flat braid are braided as an upper and lower layer, connected along one edge, that later opens out into a single flat layer.
7-loop flat braid. Top: View from above immediately after braiding – looks like a square braid. Middle: Side view – opening/ spreading apart the two layers. Bottom: One single flat layer, twice as wide as a square braid. This view shows the side that was originally the outer side of the folded braid – the inner side of the braid is now flat against the top of the table.
If your flat braiding moves tend to result in the more compacted “3/4-flat” result instead of the fully-flat result, you might have trouble seeing an upper and lower layer as you braid, but at least theoretically it is still there – the upper layer formed by the interlacing of the upper shanks of the loops; the lower layer formed by the interlacing of the lower shanks of the loops.
Pick-up is very limited in a square braid, and extremely limited in a flat braid. In a square braid, pick-up only happens at the two edges of the braid. In a flat braid, pick-up only happens at one of the two edges.
With flat braid ‘pick-up’, every upper and lower pair of dark/light strands is turned over when it reaches that one folded edge, switching layers and connecting the two layers there while also exchanging colors between the two layers. Whenever a color-change is not required for the pattern, the pair of strands is turned twice – a 360° turn. This links the two strands around each other, and brings them back where they started, still connecting the two layers but nullifying the color-change of the turning move. This is selective color switching between two layers, also serving to connect the two layers at that point, so to me that makes it complementary pick-up patterning.
Especially if you are braiding with more than 5 loops, you can see this in the braid itself before you spread it open. While it is still folded in half lengthwise, it looks pretty much identical to a square bicolor loop braid with pick-up patterning (see top section of photo montage above).
(Thanks for visiting, and for reading this far down!!!)
Posted 10/22/2017, last revised 12/19/2019
© 2017-2019 Ingrid Crickmore


