
Fingerloop braiding can make so many different braids – in different shapes as well as different color patterns. The braids above were each made with 5 loops and the same type of yarn (embroidery floss). It’s a little hard to tell three dimensions in a flat photo, but some of them are flat and wide, some are roundish-square, and two are half-way between, a shape I call “semi-flat” or “3/4-flat”. The color patterns change depending on the shape. And if you vary the starting arrangement of colors, you can find even more color-patterns.
There’s another useful shape variation that isn’t shown above – a totally divided braid, basically “two-braids-in-one”, which is a great way to form a loop in your braid if you braid that way for a short distance.
All these braid shapes can be made with essentially the same set of braiding moves, which my videos below demo. After you learn how to make them with 5 loops, you might want to check out my tutorials for the 7 and 9-loop versions! These make the same braid shapes, but they are even bigger, with an even wider range of possible patterns (check out my homepage or Tutorials page for links to other tutorials)
NEW: For an even easier intro to loop braiding, see my more recent tutorial on 3-loop braids, —Strong, pretty cords and flat braids, that are super-fast to make…Eight- and nine-year-olds can learn these with adult help. A reader told me that after following the 3-loop video tutorial and learning the different variations there, she learned this 5-loop version just by looking at the diagram below! She didn’t even need the videos! The basic process is really the same.
The diagram below outlines the basic 5-loop method, click on it once, and then once again to enlarge it to full size. [copyright applies, download for your own use, pin on pinterest, or use in person if teaching others for free, please do not repost.]:

Setting up loops for braiding: see photos just below the videos – this isn’t covered in the videos themselves.
Finishing off the end of the braid: Click here to jump down to tips on ways to end the braid (tassel, mini-braids, links to more).
The video below shows the loop set-up, demos the braiding moves for a square braid very slowly, gives tips for trouble-shooting and for efficient ways to hold the loops.
If these 5-loop videos are slower than you’d like, move the little bubble below the video forward to skip ahead. Or try following my 7-loop video, but use only 5 loops as shown here. The braiding method is very similar. The 7-loop video moves along faster.
Note: Don’t braid over the top of a table the way I braid in the videos! off the edge of a table is much better. (See other ideas below the videos.) I do this in the videos only because the table makes a good background.
Part 2 (below) has more slow braiding practice and general braiding tips. The other videos (further down) show how to make a flat, wide, ribbon-like variation of this square braid.
Setting up your loops—photo tutorial:
Cut 5 double-length strands (all the same length), fold each strand in half, and then tie all the ends together in one large overhand knot. Experiment with colors. The braids can look very different depending on the color set-up of the loops. Smooth cotton yarn or string is probably the easiest material to braid with. My 3-loop tutorial has yarn suggestions for brands and types of yarn. I tend to use embroidery floss for most my samples, but for a 5-loop braid you probably want something a bit thicker than floss. I use thicker yarn in the videos so you can see it better.
See photos below for an easy way to tie this loop-bundle onto a fixed point before you start braiding:
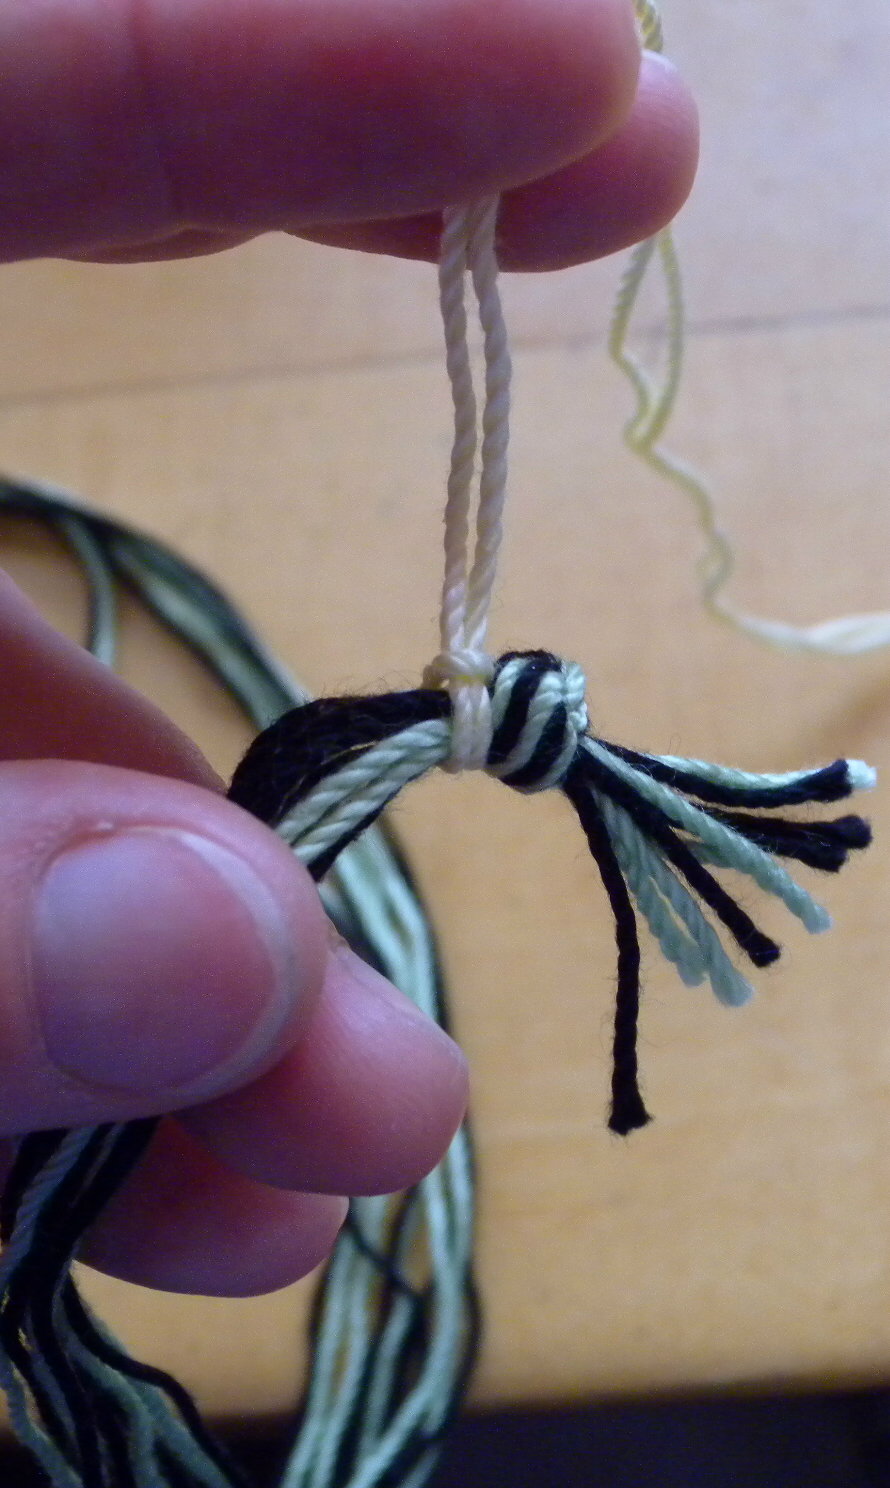
In these photos, please ignore the knots at the bottom of the loops! Your five loops should each be a single, folded strand with no knots at the bottom of the loops. Those knots might get in the way when you are first braiding. (They are used with bicolor loops, I was lazy and recycled these photos from a different tutorial!)
You can tie onto anything available. Best if it’s between waist and shoulder height, and gives you enough room to extend your arms all the way out to the sides.
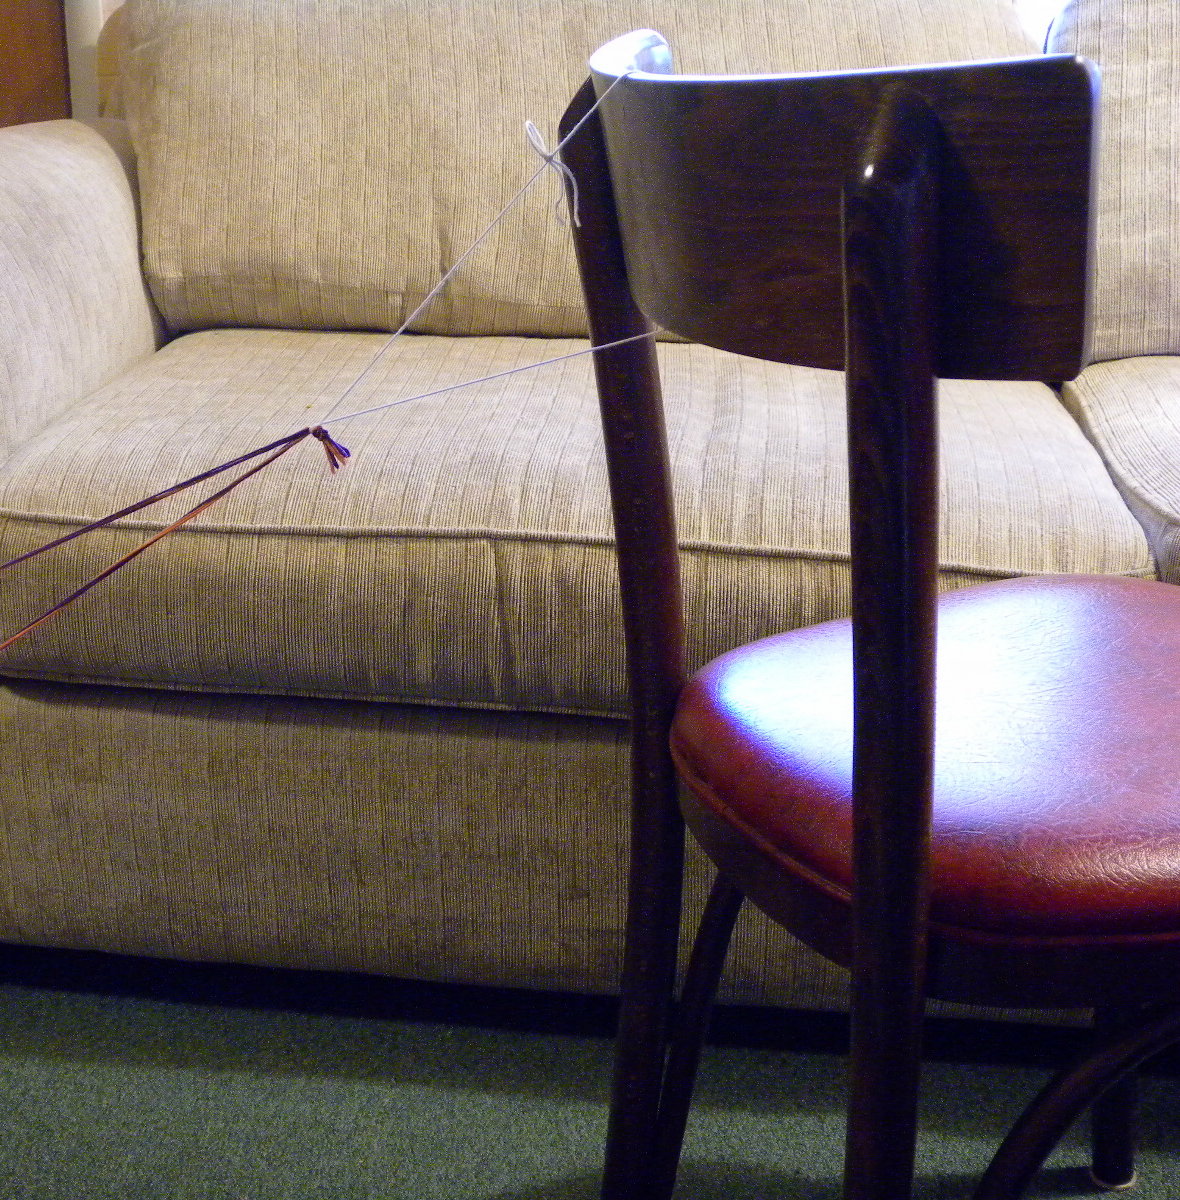
I usually use a short header cord tied into a loop, and hang it over the handle of an upside-down C-clamp (G-clamp) clamped onto the edge of a table. I never braid over the top of a table except in the videos—it makes a good backdrop to show the loops, but it’s a terrible position for braiding.
Putting down the loops to take a break:
Contrary to popular belief, you really can put your loops down and take breaks while braiding, without causing problems in the braid! There are several ways to do it, but I like the wide-tooth-comb method the best.
Flat, wide braid and a divided/split braid—2 variations of this square braid:
My first videos above showed how to make a square braid. You can also make two other types of braids with these same braiding moves: A flat braid and a divided braid.
A ‘divided’ braid is like braiding two little braids at the same time. It’s how you form a loop or buttonhole in your braid. It’s also a first step to learn before making a flat braid.
A flat braid will be twice as wide as the square braid, and thinner. It might not look flat while you are braiding it. But, after it’s done, the braid can be opened (book-style) and spread out to be flat. That’s because the upper and lower layers of the braid were only connected along one edge, whereas the square braid’s upper and lower layers are connected along both edges.
Or, if you are over-tightening your flat braid, it may braid in a more squished-together shape, rather than folded in half. In this case, the braid will have more of an oval cross-section when it is done. I call this outcome a “3/4-flat” braid or “semi-flat”. It’s actually a nice shape, with its own distinctive color patterns (see 3rd pink, and 3rd orange braid in photo below). With five loops, the semi-flat braid is a very common outcome when you are trying to make a flat braid! For tips on how to avoid the 3/4-flat variation and achieve a truly flat, wide braid, see some recent tips I posted in flat braid pickup patterns.
Try not to pull too hard on your braid, even when you are spreading your loops apart to ‘tighten’ ! It’s so common for beginning braiders to tighten too hard. Tightening hard is bad for your fingers AND for the braid. It’s probably my fault – I notice in these videos that I repeat the tightening move too frequently (a nervous habit while I’m thinking about what to say next!) and it might look as if I’m trying to pull the loops really tight. I’m not – I spread widely, but with a soft pull.

A divided braid is like braiding two braids at the same time—useful for braiding a loop or buttonhole into one or both ends of your braid. Usually you will just braid ‘divided’ for a short distance, not for the whole length of the braid. To close the loop back up, you return to the braiding moves for a square (or flat) braid.
Flat and divided braids both require a new move – you will still braid by taking a loop off the other hand’s index finger, but now in a slightly different way. For a divided braid you do this on both the left and right sides. For a flat braid you do it only on the right side, while on the left side you do the regular move that you learned first. (I describe the new move below the following videos that demo it.)
In the videos below, I’m braiding a flat braid with a buttonhole-type loop at the top and the bottom of the braid. You can also do this with a square braid.
In these videos I used a thicker yarn, and then even doubled it so it would show more clearly in the video. That’s why the resulting braid looks different from the finer embroidery floss examples in the photo above. The same braiding can produce a very different look depending on the material and colors you choose to braid with.
Flat variation of the 5-loop square braid:
Flat variation, Part 2 (below)—shows finishing the braid with a loop/ buttonhole at the bottom, and explains how to avoid the 3/4-flat version and get “fully flat” braids.
New move:
Instead of hooking onto the index loop from above the loop, the operator finger (the fetcher) will go THROUGH the index loop before taking it, and take it by hooking down onto the lower shank to pull the loop off the index finger. This ensures that the loop does not turn over as it passes onto its new finger. For this new move, the fetching finger must go straight through the loop before hooking onto it and taking it off the index finger.
For a divided braid, do this on both the left and right sides of the braid. After a few cycles, you’ll see a divided braid forming. Keep braiding this way til the slit is as long as you want it.
To close up your loop or buttonhole and start making a square braid, return to passing your ‘fetching finger’ over the index loop it will fetch, and then hooking onto the higher shank of that index loop to take it, the same move you first learned for making a square braid. Taking the upper shank from above gives the loop a half-turn as it moves onto its new finger.
For a flat braid, do the new move on one side of the braid, and the move you learned first (for making a square braid) on the other side of the braid. Use a mantra while you braid to remind yourself which side is which. Something like “Left over, Right through” or whatever makes more sense to you.
To braid a buttonhole/ loop into your flat braid, do the new move on both sides – with both hands – for a few moves (at least 5) until the opening is long enough, and then return to doing it only on one side.
Flat braids vs. 3/4-flat braids:
During braiding, the flat braid should actually look almost exactly like a square braid, or perhaps look sort of strangely rounded and cupped into a C-shape. This is normal—you will open the braid out width-wise and spread it flat after braiding.
However, especially if you are pulling the loops too hard, you may get a less-flat, less-wide braid. I call that braid a “3/4 flat” braid—it’s the third shape of two of the braids in my first photo. It does not look folded or C-shaped during braiding. It turns out halfway between a square braid and a flat braid in width, and a little thicker in the center where 2 lengthwise columns have telescoped on top of each other from being braided too tightly. This is a very common outcome when you are first learning. (Though even experienced braiders will usually get a “3/4-flat” braid instead of a flat braid if they tend to braid very tightly.) *1
Ending the braid
Easiest finish:
Tie an overhand knot at the base of the braided area, and trim off the ends to match the top of your braid.
Optional loop at the end of the braid:
Just before the end, I usually braid a loop into the bottom of the braid using “divided” braiding as taught in my second two videos above. After braiding a loop/ open area, I close the loop up by braiding a few cycles of “regular” square or flat braiding. I then use one of the finishing methods listed here to finish off the whole braid.
Tassel end: Use a thread (or the same type of string or yarn used in the braid) to wrap a few times tightly around the base of the braid and then tie in a knot, leaving the two ends hanging as part of the tassel below (a neater method is to use what’s called a “whipping” to wrap, which can hide one or both ends of the wrapped thread – see link to more info below). You might want to add a discrete little drop of glue, and then use a pin to poke through the glue and into the braid a bit, to cement the tie onto the braid.
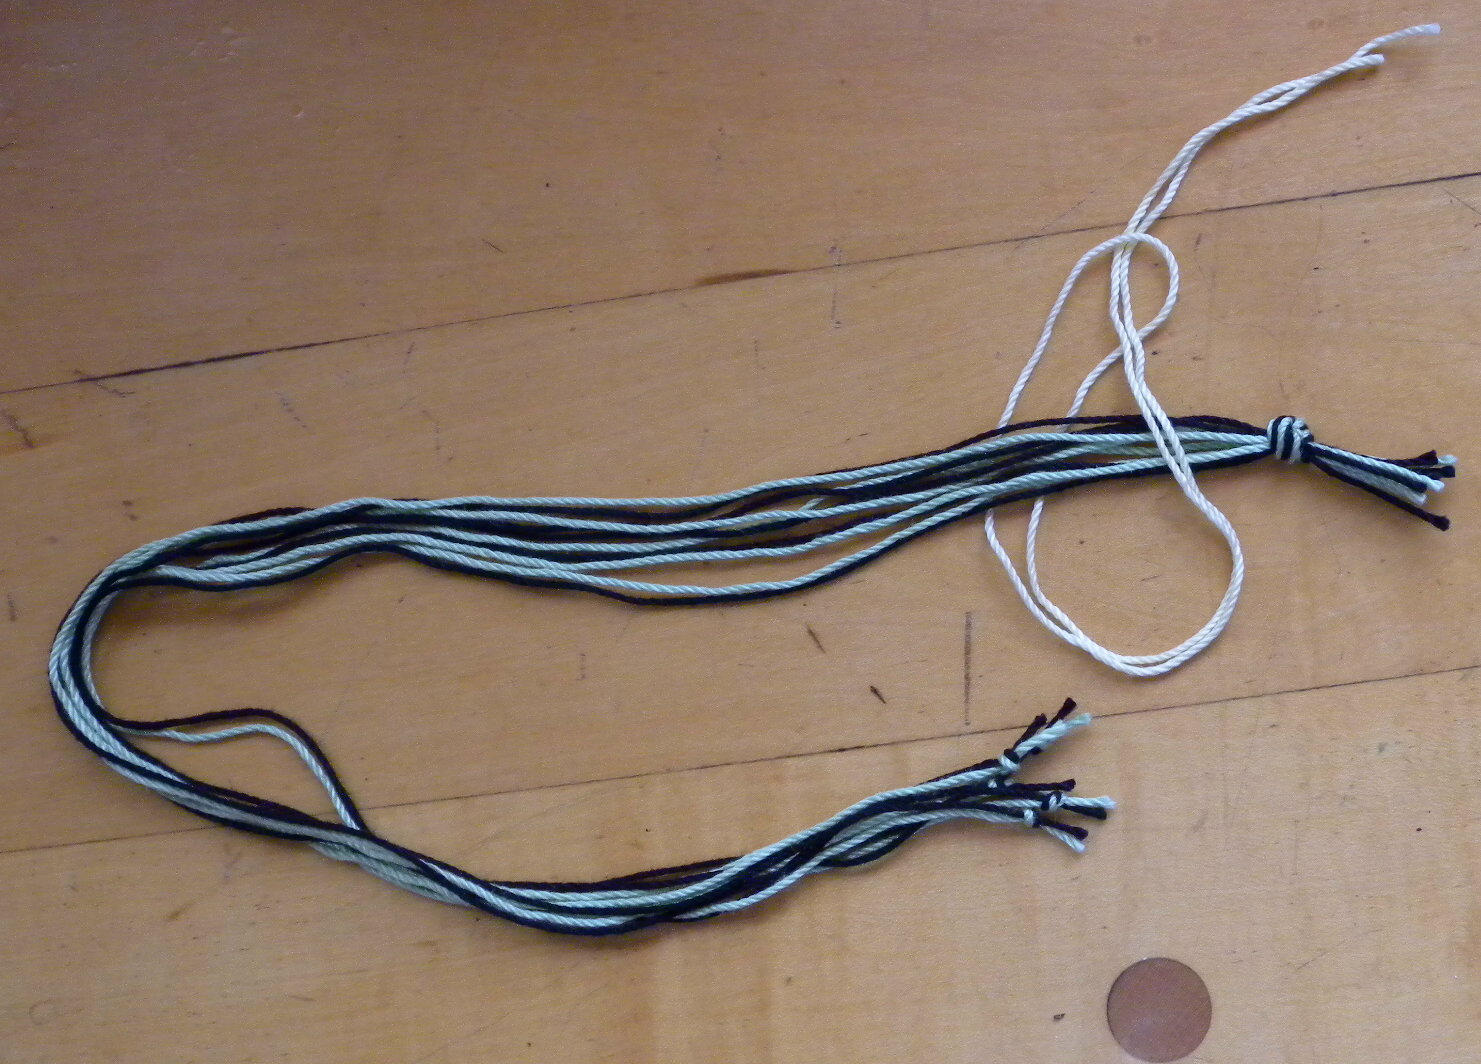
Tassel of mini-braids at the end: The way I end most of my braids is to divide the braid into several thinner loop braids before I reach the ends of my loops. (See the third video in my Bracelet with Chevrons tutorial.) Then I tie a knot at the bottom of each mini-braid, sometimes using the whole end of the little braid, and sometimes just using one of its strands as a tie.
With a five-loop braid, you can make a fringe of either two or three mini-braids at the end. Use divided braiding with all 5 loops to make two mini-braids (cut them apart at the bottom); or use divided braiding with only 3 loops to make two mini-braids, and then braid a 2-loop braid with the remaining two loops – this will give you 3 mini-braids at the bottom of your braid.
More info here, including other ways to finish ends of braids.
Color patterns:
For a 5-loop braid, all the loops will come back to the same fingers after every 5 braiding cycles (=10 loop transfers). That will make one full pattern-repeat on your braid—after that the same sequence of colors will repeat itself.
You’ll see this very clearly if you make a 2-color braid of 4 dark or dull loops with one bright contrast color loop. Watching that one contrast-color loop make its way around all your fingers can give you a good sense of what’s going on when you braid. It also makes a nice braid pattern. You might try it with a shiny contrast yarn of a completely different type of yarn. Or a contrast-color yarn that’s thicker than the other yarns. A 6-loop square braid of mixed thick and thin yarn is recorded in one of the 17th C. braiding manuscripts—the braid was called “the Rose Breed” (it’s in the Nun’s Book.)**2
If you are interested in making more varieties of color patterns, I highly recommend learning 7-loop square and flat braids. Two more loops = four more braiding elements, which allows a lot more color-pattern possibilities than in a 5-loop braid. Also check out my Bicolor loop tutorial. A bicolor loop is half one color and half another color. Using bicolor loops instead of—or along with—loops of a single color increases the color-pattern possibilities exponentially, which is why bicolor loops have been used all over the world for loop braiding. My tutorial will show you some tricks for using them effectively.
If you want to learn what order to place colors on your fingers to get a specific color order in your braid, check out my color-pattern planning post. This information is not strictly necessary in order to make nice color patterns! You can also just pick out some nice colors and go ahead and braid—you will get great unplanned color patterns that way.
[For 5-loop braids, I would say that of these two, the bicolor loop tutorial might be more rewarding than the color-planning one. Five loops is few enough that just by picking out some nice colors and randomly experimenting with them you can quickly get all the possible (single-color-loop) color-patterns. But with bicolor loops, there are some striking-looking color patterns that you might not happen to stumble on.]
Try my 7-loop square and flat braid tutorial as soon as you’ve made a few 5-loop braids and are used to their moves. 7-loop braids are more impressively square or flat, and have even more color pattern possibilities.
Likewise, try 9-loop braids after getting used to the moves of 7-loop braids. My 9-loop tutorial includes a full photo-tutorial, as well as video. 9-loop braids are still my favorite to braid, you get to use all your fingers including thumbs, and the braiding is just as fast and efficient and fun as a 5-loop braid. Once they learn this, your hands will love it (and the braids look great too)!
See my Tutorials page for links to all my loop braiding tutorials. Don’t miss the Spiral braid video tutorial links—they are a bit hidden, down at the bottom of the page. Spiral braids are great braids, really beautiful and fun and easy to learn. I just have videos posted for them, nothing written up here on the blog, except for a paragraph or so on that tutorials page about making other color patterns than the spiral one.
Please leave a note to say hi! And definitely leave one if you find mistakes or if anything is unclear. I would love to hear about what you are making/ what your craft interests are. I would also love to see pics of any braids you make from this tutorial! Leave notes under ‘comments’ below, or send me an email on my contact page.
*1. It’s probably my own fault that new braiders tend to braid too tightly, because I talk about how important the tightening move is. People probably get the mistaken impression that they should pull really hard when they tighten, when what I’m trying to get them to do is to spread the loops apart widely—almost into a straight line from one hand to the other, but not with a lot of force. That will make the braid patterns neat and crisp, without strangling the braid. Pull gently, not hard, and if necessary, repeat/ “rock” the arc a couple of times – without jerking on the loops.
To me the tightening move really is the most important braiding move, as it’s the move that has the most effect on how the finished braid will turn out… It should be done evenly and with a gently firm touch. At a recent workshop, one of the participants suggested that I not even use the word “tighten” for this move, or the equally forceful-sounding “beat the fell” (the equivalent weaving term). She thought “snugging up the loops” would be a better way to describe the move so that she and others wouldn’t interpret it as “pull the loops as hard as you can!”
**2. The Nun’s Book is a more recently discovered 17th C loop braiding manuscript. The only in-depth article on it is in Strands, issue 16, 2009—Strands being the yearly print journal of the Braid Society. The article is by Noémi Speiser, entitled: The Nun’s Book, 2008.67.1, Pitt Rivers Museum, University of Oxford, UK. It is not available online. As of this writing, neither is The Nun’s Book. (some textile-oriented libraries may have a set of Strands, as well as some weaving guild libraries – if you belong to a guild, check with them.) The article includes beautiful color photos from many of the original manuscript pages, and describes all the braids except the Nun’s book letterbraid (because that would be described in Speiser and Boutrup’s then-in-progress monograph on the 17th C. Letterbraids). The article also has directions for a few of the braids, including the “Rose Breed”.
The “Rose Breed” was a square braid of 6 loops: 3 thick loops (white, red, green) and 3 much thinner yellow loops. (Breed or bread or breadth in the 17th C manuscripts apparently meant braid.)
The 17th C. directions for making this braid are very unclear (like most of the 17th C. braiding manuscripts), but do stipulate starting with 3 loops of yellow on one hand—proved by the enclosed swatch to be of much thinner thread; and on the other hand, one white, one red (pink in the attached swatch), and one green loop.
Noémi Speiser analyzed the attached braid sample as being a square braid (both transfers turned). She writes that the thicker loops are almost 3 times as thick as the yellow loops, and swell out like rosebuds along a yellow stem.—I think I would switch the yellow and the green, myself! seems a little odd to have yellow stems.
Published June 5, 2011. Last updated 2/14/2024
© 2011–2024 Ingrid Crickmore
See full copyright restrictions and permissions at the bottom of the sidebar (if you are on a small screen device, the ‘sidebar’ may appear somewhere other than at the side of the screen). Content of this website may not be posted or “reposted” online, sold, or used in fee-based workshops without my permission. It may be shared non-commercially off-line with certain specific restrictions – see full copyright.


Pingback: Braids 2025 Workshop! | Loop Braiding
Pingback: Googly eyes in the Abbey – The Dumping Grounds
Pingback: Absolute Beginner’s Fingerloop – Turned Skyward
Pingback: High Medieval Coin Purse – Getulio's Workshop
Hi,
Your blog is really well written and explained, I think this is the best resource I’ve found 🙂
I’m a 15th century re-enactor, from bits and pieces you’ve said in your posts, I presume all of the braids are War of the Roses suitable?
They look really cool and I’ll try lots anyway, but I could do with knowing which are suitable for making and using at events so I know which to use the nice materials on 😛
Thanks
Thanks Rachel!!! – Ok, re your question, no, not all the braids I teach are specifically known from the 15th C. A few are modern and a few are only documented from the 17th C. though they may well have existed before that. Sometimes the answer to this is complicated!
[5/24/2022 I just edited this over-long reply because I now have a post that specifically addresses this question of which centuries each of the braids I teach are known from!]
See: Which braids on this blog are historically accurate?
I hope this helps!
Hi! I am very glad, that i found this awesome blog! Great job!
I would like to do sageo (it is a long braid whitch is used to tie sword) as a gift to my boyfriend. Could you recomend me a braid that would fit 10mm width and 3 mm thick? I think that the 2nd pink from the first photo look similar.
Could You help me?
Best regards, Irene
Sure! All sageo before approx 1700 (and plenty after that) were made with loop braiding, braiding stands didn’t start coming in til about then. And any two-pass braids (like a square braid) with up to 7 or 9 loops would likely have been made with fingerloop braiding like this, and not hand-held loops.
That second pink braid is the flat variation of the 5-loop braid taught in this tutorial. It could work if your braiding material is thick enough. The width and thickness is also dependent on the way you braid as well as the number of loops and type of braid. Length is another issue – the first few braids you learn on can’t be long enough to be a sageo, but I teach workarounds for extra length. In Japanese braiding guilds they had beater-stands that a solo loop braider could use to make longer braids, otherwise the standard way was for a helper to tighten the strands near the base of the braid, while the braider manipulated the far ends of the extra-long loops.
Ok, width: Depending on your tension and the way you spread your arms to tighten, a flat 5-loop braid may come out like the 3rd pink braid, just to the right. I have some tips on how to consistently get the “fully-flat” result instead of the compressed-together “3/4-flat” version in a more recent post https://loopbraider.com/2017/10/22/pickup-3/#34flat
But it would best to just learn the moves with some practice samples first and not worry about finessing the width.
I actually suggest learning the square version first in order to get the moves down. The flat variation will be a lot easier to learn 2nd, because you have to do something a little different on the right and left sides.
If your chosen braiding material doesn’t get you a full 10mm width, the next step up is the 7-loop version of this flat braid – it’s taught in my “Continue Here” tutorial (see my home page).
After that a really great next step for size is either the 7-loop Spanish braid or a Double braid. (click on my Tutorials tab up top). These are 4-pass braids, so they add two more passes/moves per ‘row’ of braiding, which makes the braid more interwoven and therefore wider (because the strands don’t compress together as much). They can be made somewhat wide and thick (like two of the widest pink braids here stacked on top of each other – I call that shape ‘rectangular’) or twice that width and thin (very flat). In past eras in Japan 4-pass braids like this would have been made with hand-held loops, but they can be made with finger-loops.
Good luck and please let me know how it goes!
Pingback: Finger loop braiding – Crafty Lady
Pingback: Music Midtown: Day 1
Just a few days ago, I found your site by chance while browsing tablet weaving and inkle looms (with the hope of using up my vast stash of hand-spun yarns I made on my daily commute before I retired) and became entranced by the idea of fingerloop braiding.
Your instructions are the clearest I’ve read, your videos are very easy to follow – and the results totally inspiring.
I cut some pieces of string, tied them to the back of a chair, and off I went! Not tried using my thumbs yet, so a 7-loop square braid is the ‘biggest’ I’ve done yet.
I’ve followed your tips for extra-long braids and both the ‘caterpillars’ and ‘start at the middle’ worked out beautifully, if a little fiddly initially. Now I need to start plying some of the fine linen I was planning to use for tablet weaving or on an inkle loom – but wait, I’ve just seen your beaded braiding posts …
What is this rabbit hole down which I’ve fallen? It’s a magical one, that’s for sure, with *no equipment at all* other than one’s own bare hands.
Thank you!
You’re welcome, and thanks for the positive feedback on the longer loop braid tips! I haven’t heard from many readers actually trying them, so I’m really happy to hear they worked for you.
(I love linen as a braiding fiber! Did you spin your own linen that you’ll be plying?)
Yes, it’s spindle-spun linen. A bit slubby, I confess (I blame that on the bus driver and the road surface, not my lack of skill …lol), and I’ll need to bleach and/or dye it, of course. I really want to get some shiny viscose or silk to add a bit of ‘oomph’ to my matt and/or fuzzy handspuns.
The ‘longer loop’ thing: I did a mish-mash of your original ‘caterpillars’, and the suggestion by another commenter of reversing the chain and blocking the slip of the knot until unchaining is required. I need to work on that a bit to get it both secure yet easy to unchain with just a couple of fingers. I found that ‘starting in the middle’ resulted in a messy, slightly-lumpy section with a mismatched pattern, but only for a very short distance; more practice is clearly needed!
However, given that I’ve only been doing it for a few days, and I have arthritic fingers – I’m over 70 – I’m very pleased with what I’ve done so far, and am promising the dog a new lead already. I’ve also been enthusing about it so much that I’ve been asked to demonstrate at my weekly craft guild meeting – I need to get a few jewellery findings to turn my humble beginner samples into keyfobs, bracelets etc.
Wow, that’s great you’ll be sharing this at your guild!
For the “messy bit” at the start-from-the-center, try making a note of the color-arrangement of the loops on your fingers that you started with, and mount them that way when you start again from the center for the second half – but OPPOSITELY/ mirror-image, so right index finger loop matching previous LEFT index loop, etc.
To avoid looseness at the ‘join’ area: before the second start, completely undo whatever knot or ‘cinch’ you had at the center. Re-fasten the loop bundle NEAR but not AT the center-start – tie the connector string onto a firmly braided section of the previous start, do not suspend the warp from any part of the unbraided section. Tighten the first two or three loop transfers extra-tight to get out any looseness at the join.
Good luck, sounds like you are having too much fun with all this! If you take pics of your braids, I’d love to see them! (my email is under Contact, under the “About” tab, right end of my header menu)
This looks so fun! We did little ones in art class today and now I want to make them for myself! How long should I make each loop if I want it to become a bracelet?
Make the loops several inches longer than you want the bracelet. Maybe even twice as long. You’ll need some extra length for the tassels and knot at the top and bottom, and some extra length of braid at both ends to tie it on. Plus, the last few inches of the loops can’t be braided (where your fingers are holding the loops), like maybe about 3 or 4 inches.
Then, on top of that, you lose some length as you braid, because all the strands are weaving back and forth – they dont go straight down the bracelet. That loss of length is called “take-up” and it varies depending on how thick the yarn is and how tightly you braid. I’d suggest that you measure a string around your wrist – loosely, and then maybe double that length to find the best loop length (and maybe add a couple inches just in case!)
Have fun!
I’ve been teaching fingerloop braiding a lot – at SF cons, among other places. I do bracelet kits, and I’ve found that pinching the end of the thread in your thumb and forefinger, and then stretching it to your elbow, makes a good length for a bracelet (with room for knots etc). That’s the length of a bowe (loop), so double that length to measure your bowes (because it’s easier to measure 5/7/9 lengths than 10/14/18).
Thanks, that’s a great tip! (I’m in the East Bay, myself! Do you ever get over on this side of the Bay?)
I’ve been looking for more information on braids; thanks for this page. Just bookmarked it. I’m fascinated by braids, backstrap weaving, bobbin lace. (Took a great class with Laverne Waddington, and hope to take another someday.)
You’re very welcome, thanks for visiting and for saying hi! I’ve taken some great classes from Laverne, too – maybe we’ll see each other in one of her classes someday!
Hi, I have just started out with loop braiding today after discovering this website, although I’m using hemp cord which I beeswaxed, I learned that I was tightening too hard and got the 3/4 flat braid that you mentioned, I have been inspired by your website and videos to learn more intricate braids, thank you
You’re welcome, thanks for the note, it made my day! I hope you keep having fun with braiding. If you ever want to send pics of your braids I’d love to see them (and would be great to show here!) No pressure though!!! 🙂
I did have fun today, making two of the 5 loop flat braid.. watching your videos, adding loops either end.. how do I send pics?
Email me through the contact form (hover on ABOUT in my upper menu, then you’ll see CONTACT in the drop down). Unfortunately you cant send attachments on that form, but just send me a note that you have some photos and I’ll let you know how to send them. (a WordPress safety precaution).
Happy braiding!
Pingback: Let Us Be Joyful! | The Æthelmearc Gazette
I love this site! I just had a friend point me in your direction. For those who like the history side of it, check out http://www.fingerloop.org –its hosted by a pair of amateur historians/re-enactors. Happy Braiding!
Amba
Hi Amba, thanks for the note, I’m glad you’re enjoying this site! I also recommend fingerloop.org, I’ve learned a lot of braids there. Another great site for 15th and 17th C. loop braids is Cindy Meyers’ Silkewerk site, specifically her section on fingerloop braids: http://www.silkewerk.com/braids/index.html
–Ingrid
Pingback: Braid a Bracelet » unikatissima's
Pingback: Flechte ein Armband » unikatissimas
Hi there–
I found this website back in March when I wanted to remember how to do the 5-finger cord-like braid. Thanks for posting all this stuff. Now I know there’s SO much more that can be done!
I finally posted about it today on my blog. Here’s the link if you’d like to read it: http://madebyk.blogspot.com/2012/05/finger-braided-bracelets.html
Again, many thanks for all the work you’ve put into making all of this information available!
Hi Karin, You’re welcome! Your braids look great, and I really like your idea of braiding with T-shirt fabric strips, have never thought of trying anything like that before! That’s a very fun diy blog you have, I’ll be coming back, especially for the crochet ideas…
I love fingerloop braiding but have a hard time maintaining tension on long braids. Are there any tips you can give me? Or would it be better to stick to smaller lengths and then try to join them together through sewing?
Hi Buxey, see my post called Longer Loop Braids
I always set up with lengths short enough that I can stretch the loops all the way apart—til the loops actually make a straight line fr one hand to the other.
The simplest way to get extra length in the braid is to start braiding from the center of a doubly-long loop bundle (tie a big slip-knot in the middle to braid from). Finish one half, then pull out the slip-knot, turn the bundle around and braid the other half. My post will give you more ideas. It’s definitely possible to braid longer lengths, just requires some set-up. The longest braid I’ve made was over 21 feet long…[it’s the hank of 7-loop braid at the right end of my header picture]
Good luck! Thanks for reading and commenting!
Thank you so much for the advice and the link! I’ll definitely check it out. 🙂
Ricky, thanks so much for the link! your braids turned out great!!! I love your bicolor idea of using several different colors for the one half of the loop–beautiful, I hope other people notice that and try that too. I just tried to email you but the webmail said it was down for maintanance–very annoying. If it doesn’t come back up in the next hour or so I’ll contact you mid-july when I’m back at my computer, don’t know if I’ll have another chance to get back online before then. Would love to include your link or the actual picture in my next post (probably wont be before the end of next month).
Happy braiding!
Heyyyy hehehe, I saw you post about you vacation, hope you’re having a great time.. !! 😉
I will leave this picture here, just in case you have the time to take a quick peek at it hehehe
Here’s the picture.. hope you like it..
http://goo.gl/HLFva
(yeah I don’t know how to send you a mail)
WOOOOOW JUST FOUND YOUR BLOG AND IT’S AWESOME !! Really thank you for the new method and the patterns.. I just try this one, but did’t notice the new move, so I came up with something different (but cool) hehe.. Will try again tomorrow..
Thank you !
Hi Again, just droping by to THANK TOU !! I did it !! Thank you !! hehe… 🙂
Hi ricky, congratulations and thanks for trying it out!! I’d love see your braid! Sorry I didn’t reply sooner–I’m on a trip right now, mostly camping and can’t check in on a computer very often. Have you tried making a 7-loop braid? It’s really fun once your ring finger gets used to the loop-shifting. Let me know if you have any questions, I’ll try to check back in soon…
Hurray. I am so glad to see this all coming together. This is just my first stop for today and I will now go and check out all the other pages!
Thanks, Laverne!