This is a video-based tutorial on my workaround method for braiding the ten-loop Nun’s Book letterbraid as a solo braider. I learned about the traditional method from Noémi Speiser and Joy Boutrup’s Instructions for Letter Braids in 17th Century Manuscripts*, which gives very brief instructions for one of the two braiders of a team (see my footnote*). My solo-braider method is very different from the two-braider method, but the actual loop movements are the same.
Update August 2025: In response to a reader request, I just posted Joy Boutrup’s 2-braider instructions for this braid, with her permission, along with some tips of my own!
This technique of making two-color motifs and patterns by swapping light-color strands with dark-color strands between two braided (or more often woven) layers is often called “complementary pick-up patterning,” though I don’t think Noemi Speiser or Joy Boutrup have used that term in reference to the letterbraids.
Page numbers apply to Speiser and Boutrup’s Letterbraid publication. You don’t need their publication to follow my tutorial, but you’ll need it afterwards if you want to braid other letters than U, J, and Q.
Update: I recently found out that Gary Mitchell has posted all the Nun’s Book charts for the original alphabet letters on his FingerTips site! (with Joy Boutrup’s permission) They are available here (link will open in separate tab) without having to purchase the Speiser/Boutrup publication (though the publication has more complete information, plus an errata list). Not only that, but you can also plan your own patterns for the Nun’s Braid Letterbraid on his site – click on his second planner (skip the ‘Lady Bindloss’ planner – that’s for yet another letterbraid that I haven’t taught here).
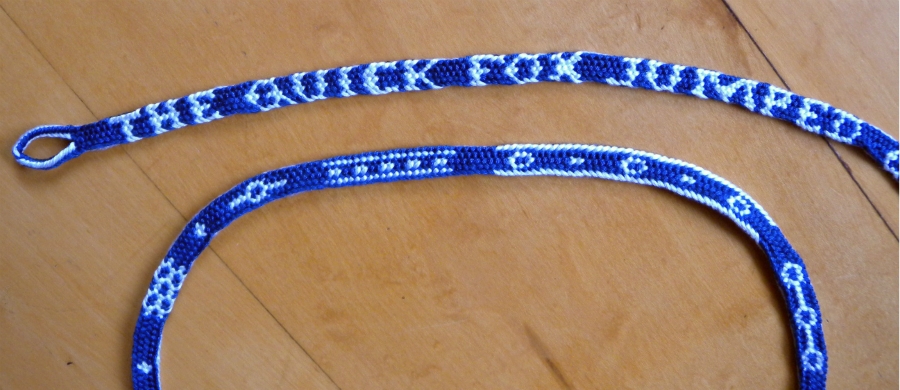
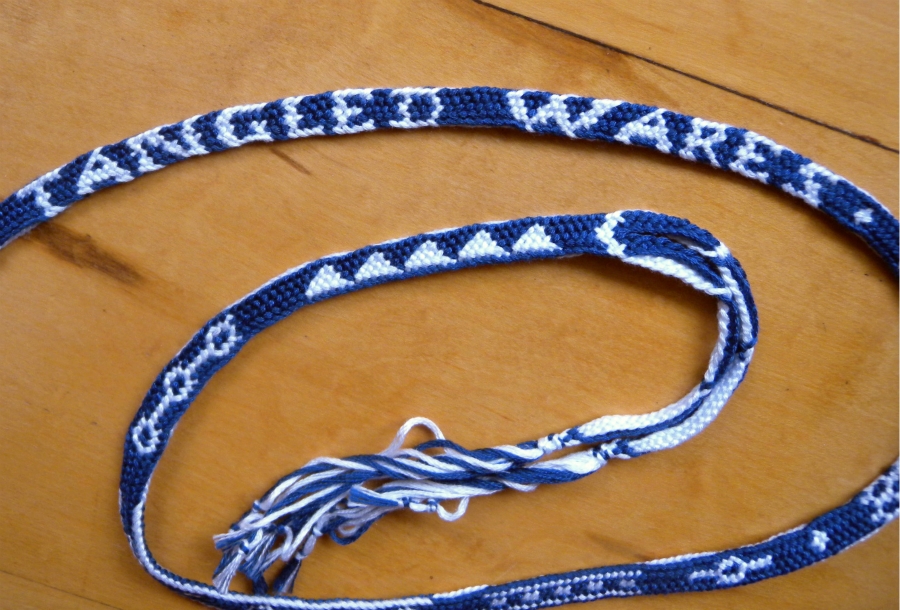
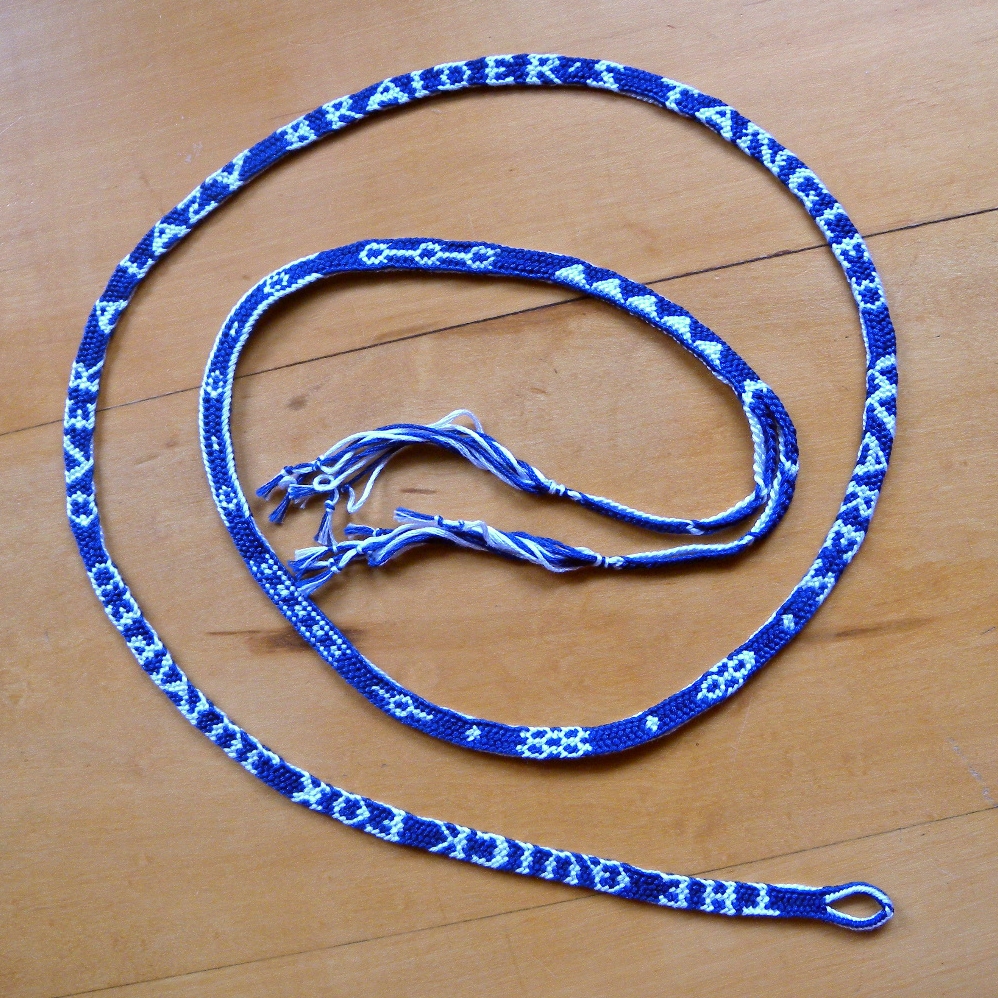
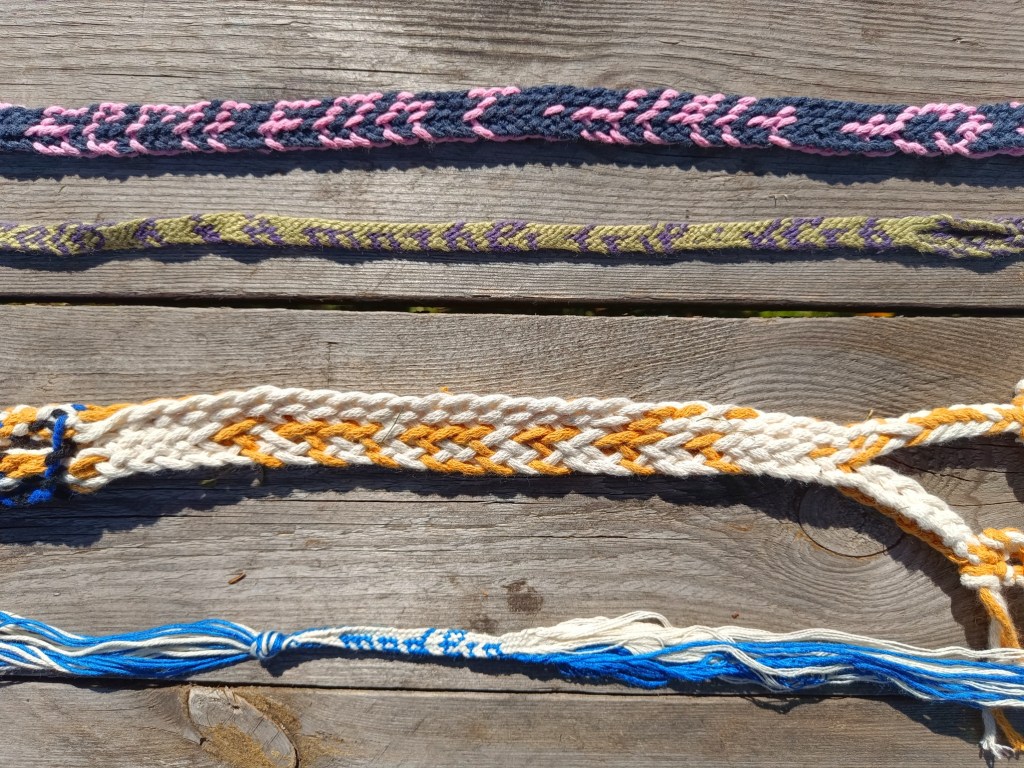
Here’s the rest of my last post’s unfinished quick fox story (a photo of the whole braid is near the bottom of this page):

(In case you are younger than me, and/or didn’t go to school in the U.S., that’s my version of a pangram that was often used in typewriting classes back in the dark ages!)
The braided letters J, U, and Q above are not from the Nun’s Book charts. In the 17th C. the letter “I” was used for both “I” and “J”, and the letter “V” was used for both “V” and “U”. The letter “Q” did exist in the 17th C, but the Nun’s Book chart for it is in the shape of a lower-case “q”, which to me doesn’t read clearly as a “Q”.* So I’ve made up charts for a more standard-looking Q, and for the letters J and U.

Nun’s Book complete alphabet
Click letters to see–and print for your own use–my charts for the letters U, J, and Q. Charts will open in a new tab in your browser. Oops! just noticed I forgot to fill in the B’s for “black” in the J chart’s background squares. It might seem unnecessary, but I find it easier to read a line of the chart to myself if the B’s are there. If you print it out, just fill in the missing B’s in the empty squares.
My second video explains how to follow these charts. The first video shows how to do the braiding moves, which creates a divided (two-layer) braid with no letters. Note: The letters are sideways in charts, which is the way they show up in the braid – bottom of each letter along the left edge of the chart and braid. The charts are not representations of the letters. They just show which loops to turn in each row in order to make the letter. The B-finger positions (middle fingers) have no columns in the charts, because loops on the B-fingers are never turned. I labeled the columns in my charts with the finger-positions that apply to a solo braider. Joy Boutrup’s charts have exactly the same columns, however they are labeled with the fingers that two cooperating braiders would use to hold these loops (no thumbs or little fingers).
Update: At the bottom of this post – below my copyright – I just attached three photos of letterbraids sent in by readers. (I wanted to insert them here, but due to the now unsupported formatting, I can only insert text, have to attach any new photos below the original post.)
Re the “jumbled” look of the charted letter-shapes: See Jen’s question in the comment field below this post (it was the 1st comment, so it may be way at the bottom of the list), and my suggestion on how to work around this if you are trying to create your own motifs…
For this “Nun’s Book” letterbraid, Joy Boutrup deduced two methods that both work for following the Nun’s Letterbraid charts, each with a different order to the braiding moves. My interpretation here for a solo braider is based on her first method, which she outlines on page 56, not on her second method (described on p. 60).
Later on, if you want to go from my tutorial to braiding actual inscriptions, you would use the moves I teach below, along with Joy Boutrup’s ORANGE Nun’s Book charts on pp. 57–59 of the Speiser and Boutrup Letterbraid book (NOT the yellow Nun’s Book charts pp. 61-63).
Material: I recommend cotton embroidery floss for learning this braid. I used bulky yarn in the videos so it would be more visible, but floss is easier to tighten evenly, and I think its untwisted strands help the letters stand out more clearly. From what I remember in Joy Boutrup’s letterbraid book, the few extant letterbraid samples from the 17th C. were all made with of filament silk, in fine flosslike bundles barely or not at all twisted/’thrown’. Filament silk yarn or thread is made from very long lengths of silk filament; as opposed to (modern) spun silk which is made from chopped up, carded, short lengths of silk (less glossy, weaker, and more prone to pilling than actual filament silk.) Silk yarn and embroidery thread nowadays is often made from spun silk. Silk beading thread should be filament silk, but it’s highly twisted, which would give a different effect than the flosslike strands used in samples in the old English braiding books.
My solo-braider method:
In these videos I use the same order of braiding moves that Joy Boutrup describes on p.56 (before her orange charts). Joy’s left braider’s five loops are all on my left hand, and her right braider’s five loops are all on my right hand. Each finger holds a loop, including the thumbs, as in my 10-loop double braid method. But 10-loop double braids only require 2 loop transfers per hand instead of the 4 per hand of this Letterbraid. Learn solo-braider 10-loop double braids first.
The traditional 2-person method for braiding this letterbraid is quicker and easier than my solo-braider workaround! Each braider of a team holds 3 loops on one hand and 2 on the other. Each braider does the moves of a 5-loop Spanish braid. After finishing one set of left and right moves, the two braiders trade their closest index loops, and then proceed to the next row. There are several ways to make the same 5-loop Spanish braid, but only one order of moves is compatible with these letter-charts. Leave a note below in the comment form for more details, I’d be happy to spell the moves out if anyone is interested.
1st solo-braider video – Braiding moves only (no letters):
This video teaches the braiding moves only, not the color-switching moves for forming the letters. Each ‘row’ or cycle of braiding moves has 4 main braiding moves per hand, followed by a loop-exchange move between the two hands at the end of the cycle.
A letterbraid is braided as a completely divided braid (two separate layers, one above the other). This is done by not turning any of the loops while doing the braiding moves. Keep checking to make sure that the two layers of the braid are not connected at any point. That’s the best way to be sure that you’re not turning any loops, and–a little tricky with this braid–that you aren’t inserting your finger in the wrong direction through any of the loops.
Timeline:
Drag bubble under video to time-point you want to see.
00:00 Intro
0:45 example of a finished Nun’s Book letterbraid, showing letters of the alphabet
1:03 example of a “non-lettered”, flat version of this braid
1:14 example of a “non-lettered”, rectangular version (similar to my “Rainbow Girl” braid–4th from left in header photo)
2:35 Loop set-up on the fingers.
3:37 First run-through of the braiding moves, very slowly.
Left hand loop moves:
4:00 First and second transfers
4:50 First tightening move
5:20 Third and fourth transfers
6:50 Second tightening move
Right hand loop moves:
8:07 Fifth and sixth transfers
8:50 Third tightening move
9:36 Seventh and eight transfers
10:44 Fourth tightening move
11:02 Final move: Loop exchange between left and right D-fingers.
11:27 Last tightening move in this row (cycle) of braiding.
2nd row of braiding, slightly faster moves with less explaining
11:52 Left hand moves
12:48 Right hand moves
13:40 3rd row of braiding
15:07 Checking to make sure that the braid is forming as two completely divided layers – describing possible problem of taking a loop through another loop “backwards”.
16:11 4th row – showing a slight shortcut I sometimes do when transferring a loop downward (toward the middle of the braid)
18: 36 5th row – a little faster, and without the ‘shortcut’
19:58 6th row – faster, with the shortcut move
20:57 pausing and placing right loops on left fingers to free up right hand
21:07 showing abstract designs on start of braid, followed by the completely divided area I have just been braiding.
22:14 About the yarn I’ve been using –thicker than I like for letterbraids. Other samples I show are made with embroidery floss.
2nd solo-braider video – following a letter-chart: Demos how to follow a chart in the format of Joy Boutrup’s ORANGE charts for the Nun’s Book letterbraid, pp. 57-59. (Braiding moves are not demoed slowly–see my previous video to learn the braiding moves.) I am following a chart I made up for the letter U, which didn’t exist in the 17th C. as a separate letter from V. I’m turning all loops on the left hand counterclockwise, and any loops on the right hand clockwise. It might be worth trying the opposite as well.*
Timeline:
0:00 Intro
1:25 How to read/ interpret a chart in the format of Joy Boutrup’s ORANGE charts for the Nun’s letterbraid (pp. 57-59), not her yellow charts.
3:35 Color set-up.
4:14 How loops are turned while reading the the chart, starting with Row 1.
5:48 How to tell which part of the thumb-loop is the “UPPER” shank.
7:33 Tightening tip. In the video I am braiding around the camera and can’t see the fell of the braid well enough to follow my own advice! But for making well-shaped letters, it really helps to watch when tightening and adjust accordingly.
7:52 Do the loop exchange BEFORE turning colors for the next row!
8:13 Reading and braiding Row 2.
10:21 How to tell where the loops will be after one row of braiding. (demoed @22:07)
12:21 Reading and braiding row 3
14:01 Pausing to check the braid. Info about delay in seeing the pattern on the braid.
16:02 Reading and braiding row 4.
17:28 Reading and braiding row 5.
18:34 Pausing to check a possible mistake.
19:21 Reading and braiding row 6.
19:56 How to fussy-tighten one particular strand that is loose in the braid, and not responding to “regular” adjustments. This should only be necessary once in a while, if one thread is grossly loose in a previously tightened area of the braid. In general, I adjust the tension by pulling more in one direction than another, or maybe repeating an earlier tightening move, not by pulling on individual threads.
21:09 Recovering from “losing my place” in the braiding procedure.
22:07 “Hmmm… What row did I just finish??!” Examining the loops to figure this out. (explained @10:21)
22:37 Reading and braiding the last row – row 7.
23:55 Letter finished, now doing one or two rows of “space” before starting next letter. Tips about spacing the letters.
27:41 U and following space is done, now checking the letter to see how it turned out (a bit slanted).

10-loop Spanish braids: a letterbraid, and a wider flat braid. The wider braid was made with the same braiding moves, except in having one turned transfer, connecting the two layers along one edge so they can later be opened and spread flat. Both braids are mostly plain weave, braided as 2 layers (“double weave”), using bicolor loops (reds + ecru; and purple + gold). Wider braid is now a single layer after being opened out; narrower braid has complementary pick-up patterning between the two layers of plain weave, which holds the two layers together. Finger loop braiding with DMC brand cotton embroidery floss, and (in the purple and gold braid) a gold rayon embroidery thread (unknown brand).
Notes:
It takes practice to get used to these braiding moves, as with any new braid. But it happens faster than you might think when you are first trying them. Once your fingers “get” that the first two moves are a pair, and the second two moves are a similar pair, they will start to relax and know where to go next in the braiding moves.
Everything will feel smoother and more enjoyable at this point. At this point you have learned the braid! And it’s a great braid—even without any charted designs. It can be made with twice as many variations as the braids that I call double braids. Even if you don’t get into making charted designs, just the “regular” braid designs that you can make are almost endlessly variable and interesting!
If you decide to go on to forming lettershapes, it’ll also take a little practice to get used to following the charts consistently. Be patient and have fun! (Isn’t it amazing that fingerloop braiders in past centuries managed to invent this???!)
Please contact me if you have any questions or would like to show me a braid. You can reach me through the comment form below, or through my contact form (hover on the “ABOUT” tab in my upper menu bar and look in the drop-down list). If you’d like to send me a photo, email me and I’ll let you know how to do it. I’d love to see it!
I’ll be teaching a simplified version of this braid at the next international Braids conference—Braids 2016. The simplified version has only 8 loops, so no thumbs. It’s a great braid for learning how to braid and plan simpler charted motifs than letters—hearts, circles, triangles, etc!
My new series of tutorials on pick-up patterning explain and teach this starting with square and flat braids, up to (coming soon!) Spanish-type and double braids.
* Noémi Speiser and Joy Boutrup, European Loop Braiding, Investigations and Results, Part II: Instructions for Letter Braids in 17th Century Manuscripts (info on BraidersHand purchasing site).
NB: Despite the title, this is not an instruction book. It’s a monograph about some very unintelligible 17th C. instructions, and the author’s process of analyzing them. For more about this monograph, see my info page on it: Letterbraids of the 17th Century.
*The “O-with-a-tail” type of Q did exist in the 17th Century, even though the Nun’s letterbraid didn’t use it. (The fourteen-loop letterbraid does have that “O-with-a-tail” type of Q.)
*There are three (known) 17th C. letterbraids, one of 14 loops and two of 10 loops.
Noémi Speiser and Joy Boutrup call one of the two ten-loop letter braids the “Nun’s Book letterbraid,” after the only manuscript in which it’s been found. They refer to the other ten-loop letterbraid as “the Verbal Letterbraid” because it had text directions for making the color-changes instead of charts.
The only differences between the “Verbal” and the “Nun’s Book” 10-loop letterbraids are in the slightly different shapes of their charted letters (this is due to the designers – theoretically the same exact letter-shapes could be made with either braid), and in the order that the four main braiding moves (of each braider) are done. Structurally, they are the same braid. There is only one minor structural difference that I’m aware of. For certain letters in the ‘verbal’ letterbraid the braiders are occasionally called upon to turn the loops for the following row before doing the final loop exchange for the previous row, which is never the case for the Nun’s letterbraid. This does cause a little structural difference in the braid at that point. This technique for ‘smoothing out’ some of the lettershapes could in theory be done in the Nun’s letterbraid as well, but apparently wasn’t used.
But just considering the underlying braid (and ignoring the slightly different designs of their letters), the Verbal and the Nun’s Book letterbraids are really the same doubled 5-loop ‘Spanish’ braid.
‘Spanish’ braids: Five loops is the minimum number needed for braiding a so-called Spanish braid. A spanish braid is essentially the same as what I call a “Double Braid”. It’s a braid in which each braider makes 2 loop transfers with their left loops and 2 loop transfers with the right. Each braider makes 4 loop transfers in each ‘row’ of braiding – twice as many as a square braid.
With only 5 loops – the minimum for a 4-transfer braid – and no turning of any of the loops, the resulting structure is two-layer (divided) plain interlacing/ plain-weave. “Under one, over one” across both braid layers. Each loop passes through only one other loop, before another loop is transferred through it. The four transfers create 4 ‘ridges’ – lengthwise columns of slanted ‘overs’/ stitches – along both layers of the braid.
Extra ‘overs/unders’ / why braid structures aren’t ‘perfect’: When a plain-weave 5-loop braid is doubled into a 10-loop letterbraid of 8 columns across, one column on one side of the center of the braid (where the two braiders exchange their loops) ends up being over-two (2/2 twill) rather than plain weave. And if any loops are turned, this also adds extra ‘overs’ here and there. I still refer to any braid in which I only ever move a loop through one other loop as a “plain weave braid” though. It’s close enough! Braids just aren’t ‘perfect’ structures, like weavings can be!
Fell-shapes: The 8 interlacing moves in a letterbraid are done in 1 of several possible sequences. Maybe the inner transfers first, outer transfers second, etc etc. There are several possible orders, all of which result in the same braid — the same threads passing over and under each other in plain-weave (with the minor exceptions I noted above).
These different sequences create what Joy Boutrup refers to as different “fells” or “fell shapes”. Depending on the order in which you do the 8 given interlacing moves, the working edge or fell of the braided area will have a differently-shaped contour at the end of each cycle of braiding (one full ‘row’ of all the moves).
This makes no difference to the final structure – it only applies to the continually changing lower edge of the developing braid. That contour changes a bit each time you transfer a loop. After the thumb-to-index loop transfer, the fell shape at that point is different than after the b-loop-to-c-finger transfer. But the braid itself that is being built by these eight given interlacing moves will end up with the exact same structure regardless of which of the several possible order of moves (and their their ever-shifting fell-shapes) the braider uses.
However, color-charts for pick-up patterns – just like the initial color set-ups on the fingers for an ‘automatic’ color-pattern – strongly depend on a particular order of braiding moves. (one or more particular orders – some differences in the sequence of moves are minor enough not to make a difference.) Doing the moves in a different order would usually require changing the color chart for a particular pattern. [Update: my current series of posts on Pick-up Patterning explains this a little better, I think!]
Even for a normal color pattern (no charts) – changing the order of the moves will (likely) require a different starting set-up arrangement of the colors of the loops in order to achieve the same color pattern.
Even though the Nun’s book color-charts don’t work for the Verbal letterbraid and vice-versa, both 10-loop braids are structurally the same braid. If you aren’t using the charts, you could pick whichever order of operations feels the most comfortable to you and make the same 10-loop braid with either method…or even a few other orders of making those same ‘through’ and ‘around’ loop moves.
*Joy Boutrup’s first deduced method for turning loops:
The way I demo this braid follows the first of two possible braiding methods that Joy Boutrup deduced from the Nun’s Book instructions. She first assumed that the two braiders would turn loops on their fingers (following a chart) before doing a row of braiding moves. The braiding moves for that method are given on page 56 of Boutrup and Speiser’s Letterbraid book.
This way of following the charts — turning loops before doing the braiding moves — is how both the other two 17th C. letterbraids are known to have been done, and I think it’s easier to learn than the second method that Joy deduced.
Joy Boutrup’s second deduced method
The second possible method that Joy Boutrup deduced requires that the two braiders turn loops while doing the braiding moves. This requires following a different order of the same braiding moves. That order of braiding moves is described on page 60, and the accompanying charts are in yellow.
The second method includes the same four loop transfers, but they must be done in a different order. Turning the loops while doing the braiding moves is not how the other two known letterbraids were done, so it might seem less likely that it was the method used by the writer of the Nun’s Book.
But certain oddities about the order in which the color changes were listed in the Nun’s Book instructions made Boutrup suspect that perhaps the loops really were meant to be turned while braiding, rather than beforehand. [One of my replies in the comment section below has more details.]
Either of the two ways of following the charts produces the same letter shapes. The first method (which I follow in this tutorial) is a little slower, but feels more relaxed. First you read a line of the chart to find out which loops to turn, then you turn them on the fingers, and then you braid a row, using the exact same braiding moves every time. The second method requires more concentration while braiding, and the braiding moves are a little different every time, depending on which loops need to be turned. It does feel like a faster way to braid the letters, and it’s the way I prefer to braid them now that I’m more used to these braids.
[Update: in my current series of tutorials on Pick-up Patterning with simpler braids than letterbraids, I teach the second method of following charts – the ‘turning while braiding’ method. This probably seems very inconsistent! But for simpler braids than letterbraids, turning the loops separately from the braiding moves is much too cumbersome and unnatural.]
The other two 17th C. letterbraids in Joy Boutrup’s book were both described as using the first method, the one I demo in the second video above – all loops turned or not turned (according to the chart) before the braiding moves are performed.
* The rotational directions of the loops’ turns can have a slight-to-fairly-big effect on how the finished braid turns out, but the original manuscripts don’t specify which direction to turn loops.
Last updated August 29, 2025
© 2014–2025 Ingrid Crickmore
See full copyright restrictions and permissions at the bottom of the sidebar (if you are on a small screen device, the ‘sidebar’ may appear somewhere other than at the side of the screen).
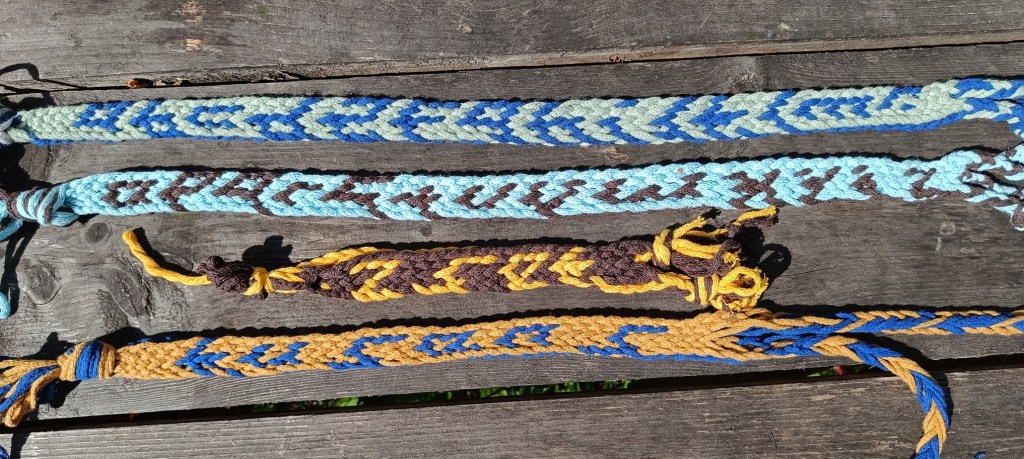
New: Here are photos sent to me by two readers, of samples they made after following this tutorial.
Dominic is a knotter who does amazing nautical-type ‘fancywork’ which I guess is somewhat related to braiding, but I can say from experience is a very different skill from loop braiding, I was lousy at it! He’s contributed photos before of his braids. He confirmed in his email that you don’t need curved thumbs to follow my ‘thumb’ tutorials, his are totally straight. He says he practiced the braiding moves until they were completely automatic before he started following the charts. He sent me this photo not long after I first posted this tutorial in 2014, and later used Gary Mitchell’s online planner (link near top) to design an original motif of a pair of dancers. (When I find that photo, I’ll add it here.)
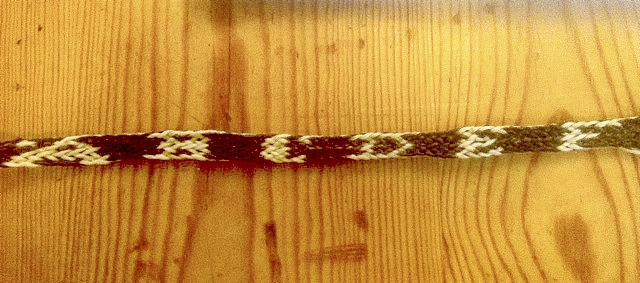
Reto Pulfer just sent me the photos below (2025). He’s a Swiss artist who uses some traditional textile techniques in his very modern art pieces. He prefers to work spontaneously, without following charts. Below are some samples of his freehand lettershapes (mostly lower case it seems to me). This is harder to do than following a chart! It shows deep understanding of the braid structure. Reto tells me that he learned much of that from practicing what I call ‘unbraiding’ – using the reverse loop movements to undo what you have just braided. That enabled him to figure out which loop transfers produce which ‘pixels’ or stitches on the braid. In this (and many) braids, the stitch produced by a particular braiding move doesn’t necessarily end up on the braid in the spot where one intuitively expects! On top of that, it also doesn’t become visible until the braiding has progressed a few rows past the point when you braided it.


For us poor souls who did not get the chance to attend the Braids 2016 conference, is there any possibility that you might post a tutorial of the modification you taught there?
Hi Amie – Sorry to take so long to reply, I totally missed seeing your question til now…
I’m afraid the topic isn’t something I can teach in a video or blog-post. The braid itself I could teach, it’s similar to the one in this post, except omitting the thumb loop, and one of the loop transfers on each hand… So only three loop transfers per hand instead of four. But the concept of pickup patterning – planning and following charts for purposeful color-changes to effect patterns – is not something I can teach here. In the workshop it required a lot of demoing and individual attention with each student…
No worries! Thanks for your response.
If you don’t mind my asking, why is the pickup patterning not teachable here? How is it different from the ten-loop braid?
No I don’t mind! It’s true that I did teach pick-up patterning here in this Nun’s letterbraid tutorial. My main goal was to teach how to follow Joy Boutrup’s pre-existing charts and instructions for making these particular lettershapes. I really wanted to get it out there since I doubt many people are learning it from her scholarly monograph, which was such an important groundbreaking work. This tutorial kind of exhausted me – after finishing it, I was not very keen on doing more pick-up patterning tutorials. I’ve only heard from one person who’s used this one. [update 2025, i just heard from another person who’s used it! see photos just above the comment field]
But in the last year I changed my mind about not teaching any more about pickup patterning on this blog. See my recent series of posts starting with Pick-up 101.
I guess I’m just inconsistent on my goals for the blog. I go through phases of pouring a lot of time into it and other times I get discouraged because I don’t see a lot of people actually use any of the tutorials beyond the very beginning ones. I’m not monetized, my reward is seeing this stuff get used!
Thank you for your answer! I asked mainly because I would really like to make some of the 8-loop letterbraids with the patterns as shown in this photo. https://goo.gl/images/h4zPkS I’m especially interested in the green and white one on the left. Is there some way that a chart could be made and followed?
I also just want thank you for all the work you’ve put into this. I discovered your website two days ago and have already made nine braids of differing complexities. I’ve even made a barleycorn and tried a square braid pick-up pattern. Thank you for your help!
Hi again that was a fast turnaround! Those 8-loop “non-letterbraids” were what I taught at Braids 2016, I’m glad you like them! I have charts for all those patterns, but I’m not sure when I will get to a tutorial for them. So far in my current pick-up patterning series, I’ve covered square and flat 2-pass braids. Double braids/ Doug’s braid will be next – they are 4-pass (4-transfer) braids. My “non-letterbraid” of 8 loops has 6 loop transfers in each row, so it’s a step beyond double braids. Have you tried the 8 loop double braid yet?
Thank you! I just tried the 8-loop double braid as per your suggestion, and I like it. I tried to do the one loop wrong pattern, but I must have done something weird, because it turned out as an “edge” pattern with breaks and little arrows. I do hope you decide to teach those patterns, I would be happy to learn them. Thank you for your help!
Your description sounds just like what “one-loop-wrong” should look like in a double braid! It’s a variant of Edge. Wish I could see it! If you ever want to send me a photo, just email me on my contact form (under ‘About’ in header menu) and I’ll let you know how to send it. The wordpress contact form doesn’t allow attachments for security reasons. I am really impressed at your learning all those braids this fast btw!
I do love your tutorials
Thank you, Klaas!
Reblogged this on The Middlegate Key and commented:
check it out
Thanks, Middlegate Key! Much appreciated! (I had fun exploring various other links on your site, btw)
This is just wonderful! I havent tried it my self but I know your tutorials are the best! Bookmarked and I will soon start with following your instructions.
Thanks so much,
best regards,
Maarten
Hi Maarten, you’re welcome and thanks for the note!
Oooh, fun. So my question is why do the charts looks so jumbled up? Is there a pattern to them I am not seeing? For example, the chart for ‘U’ looks nothing like the finished letter in the braid. I am interested in creating some free form designs – is there any tip you can give to help me figure out where a turned loop will show up in the woven pattern? I plan on experimenting, but any advice would be appreciated.
Great video! Thank you so much for sharing your time and expertise. I find your tutorials so easy to follow and I’ve been having fun with them.
Hi Jen, Thanks! I’m so glad you’ve been using and liking the tutorials!
First of all, the letters display sideways on the chart, the way they show up on the braid itself – bottom edge of each letter on the left side of the braid. The reason that, even sideways, the charts still look somewhat jumbled is that they aren’t intended to show how the letters look, they just show which loop to turn. When you turn a loop to change the color, that change doesn’t necessarily show up in the braid exactly where you might expect, because of the slants of the threads. [edit: I explain this better in my new series on Pickup Patterning]
To see a little better how the pattern will look on the braid, you could rearrange the columns like this – left to right, across the chart:
LA, LTh, LD, LC – RC, RD, RTh, RA
[column headings 3,4,2,1 – 5,6,8,7]
You can plan patterns better in that format, but afterwards you might want re-draw the charts into Joy’s column order to braid from, so they will be easier to follow.
Reordering the columns this way will give a slightly better idea of how the charted image will look on the braid, but it still won’t be perfect. The real ‘pixels’ in the braid are short, zig-zagging slants that don’t line up in a row in the same way that graph paper squares line up neatly next to each other! So it’s good to be prepared for a certain amount of trial and error in planning / charting new designs.
Joy Boutrup’s letterbraid monograph shows graphs of the finished letter-shapes in which the cells are actually slanted like the real braid ‘pixels’, but the scale is small, and it’s not always easy to follow the true grain of a zig-zagging horizontal row for planning purposes. Copying and blowing them up might help.
Good luck! Please let me know how it goes!
I was wondering if putting the rows in order would help clarify, but when I tried it (quick and rough) it didn’t seem like I was on the right track. Thanks for the heads up!
Re the original order of the columns that you probably tried (1,2,3, etc rather than Joy’s reordering 4,3,1,2,6,5,7,8) — That order is exactly the order of the loop transfers you would use if you were turning loops WHILE transferring them (shown in Joy’s second set of charts). It requires a different order of doing the (same) moves. The first move would be to go through Lc and take Lb (original column 1), while choosing to turn or not turn the loop such that it ends up on its new finger with the upper color shown in column 1 of the chart.
When Joy analyzed the original charts, their column order seemed slightly strange to her if the charts were meant to be used like those of the 14-loop letterbraid – where any turns to the loops are all done on the fingers before you start doing the braiding moves. Why would the middle finger be listed in the first column, and the index finger the second? [these stated fingers apply to the two-braider method where each braider is only holding 5 loops spread across their two hands, not to my solo-braider adaptation above, in which the left braider’s 5 loops are all on my left hand and the right braider’s 5 loops are all on my right hand.] But interestingly, if the loops were meant to be turned while braiding, this ordering would make total sense. Could that just be a coincidence??? I don’t think so myself, I’ll bet whoever made the chart intended that you turn loops while braiding. But that’s not how I taught it above. This “turn first, then braid” method is easier to teach and learn…
Hi Jen, I don’t know if you are still interested in planning patterns for the Nun’s letterbraid? Gary Mitchell has an interactive pattern planner for the Nun’s letterbraid on his site now! You can use it to plan your own patterns and see what they will look like – in a simplified block form, but much more accurate than graph-paper squares. He tells me he’s also working on one for the 10-loop double braid that I teach on my blog .
See my new note with link in the Nun’s Letterbraid post. I would love to see any designs you end up braiding!
Happy New Year, and happy braiding/ planning!
–Ingrid