After my Nun’s Letterbraid tutorial, I really didn’t plan on posting any more how-to’s on pick-up patterning in loop braids… But Gary is just about forcing me to do it!
[Update – I just added a new tab “Pick-up” in the upper menu – pulls up all posts or tutorials related to pickup patterning.]
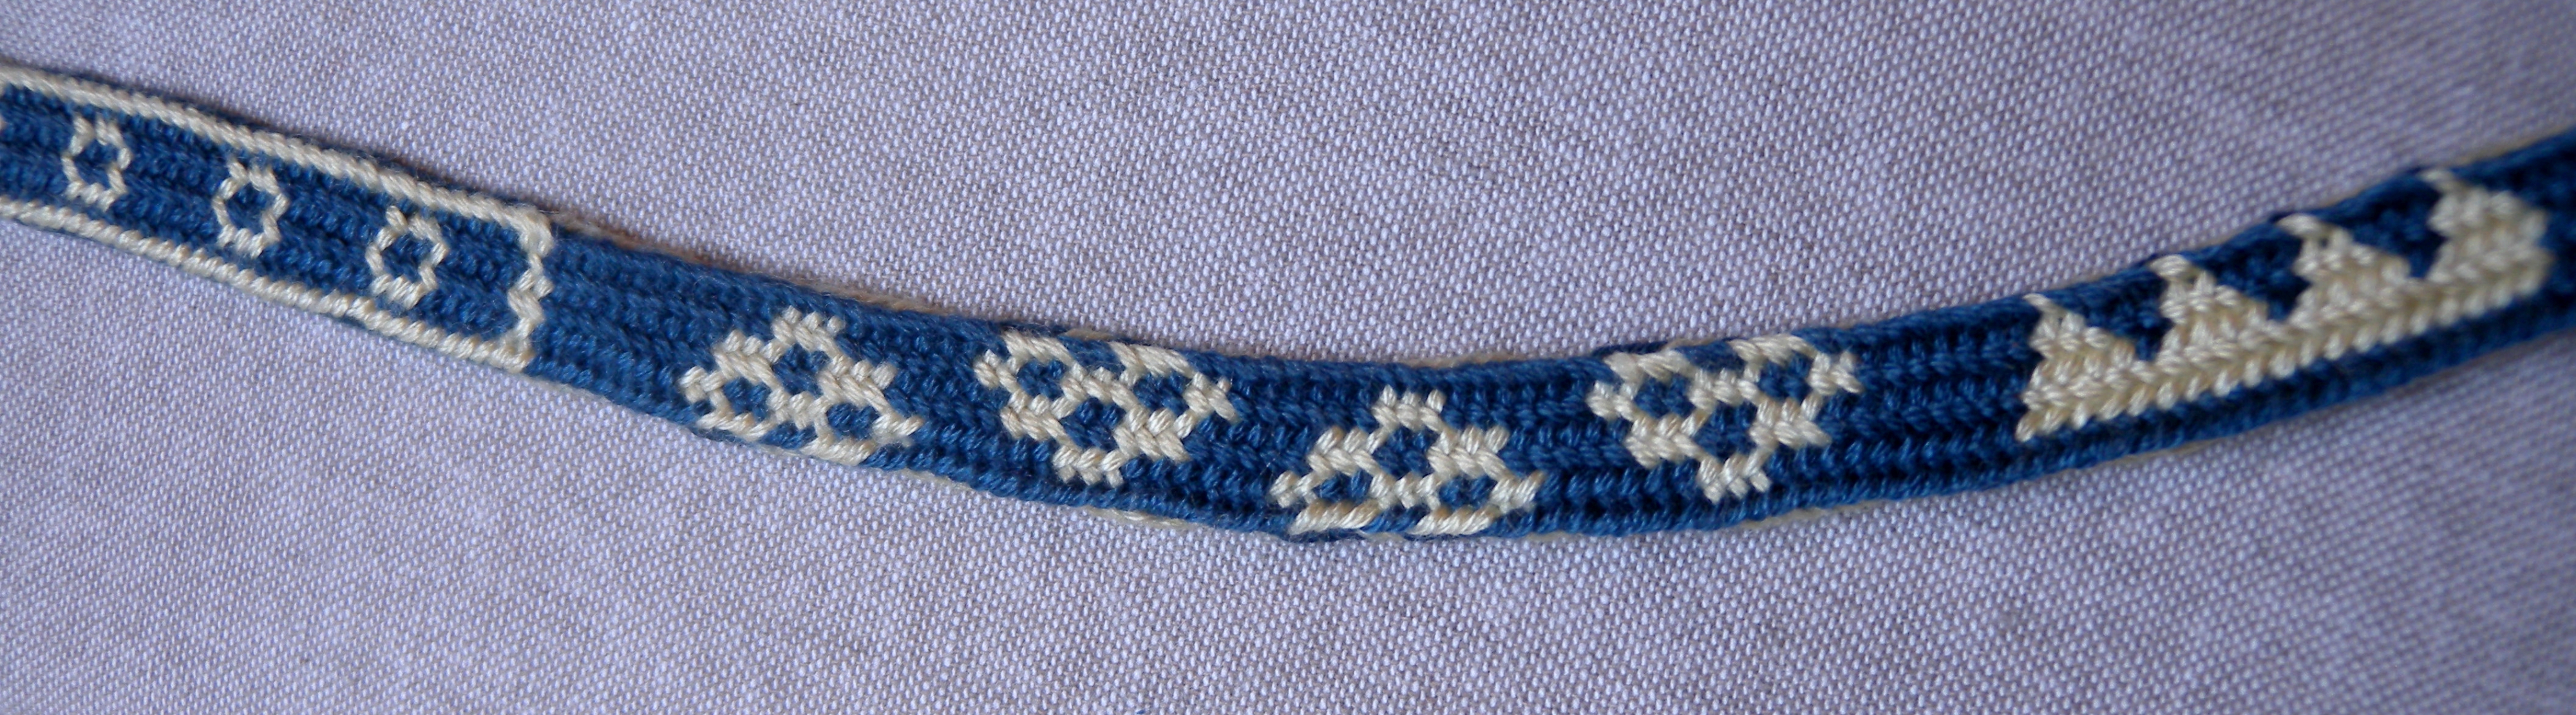
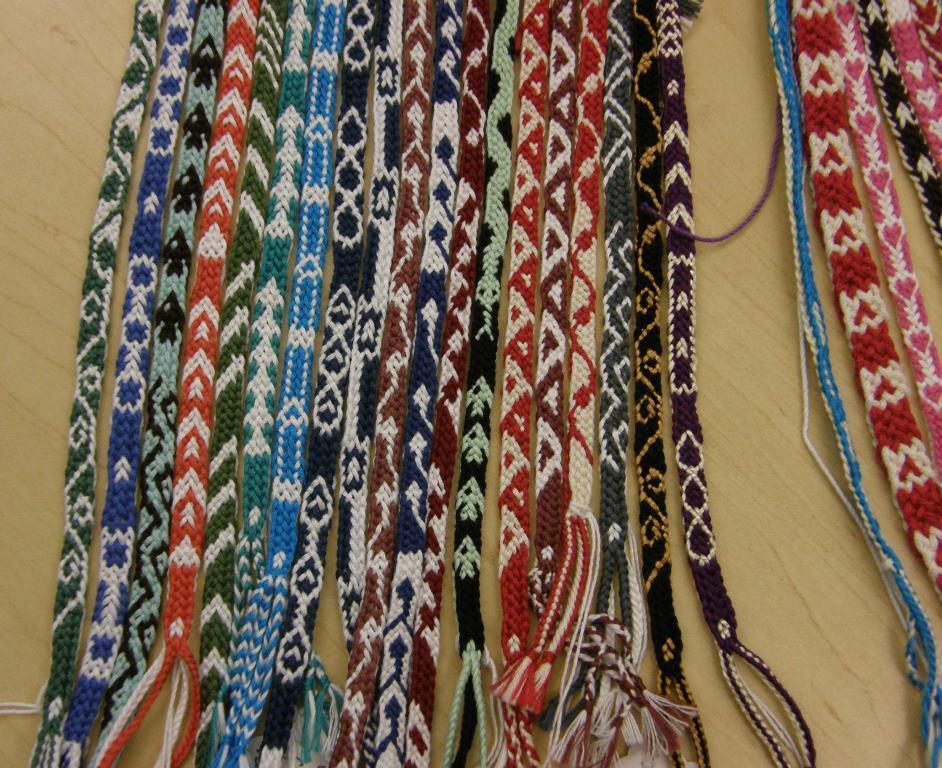
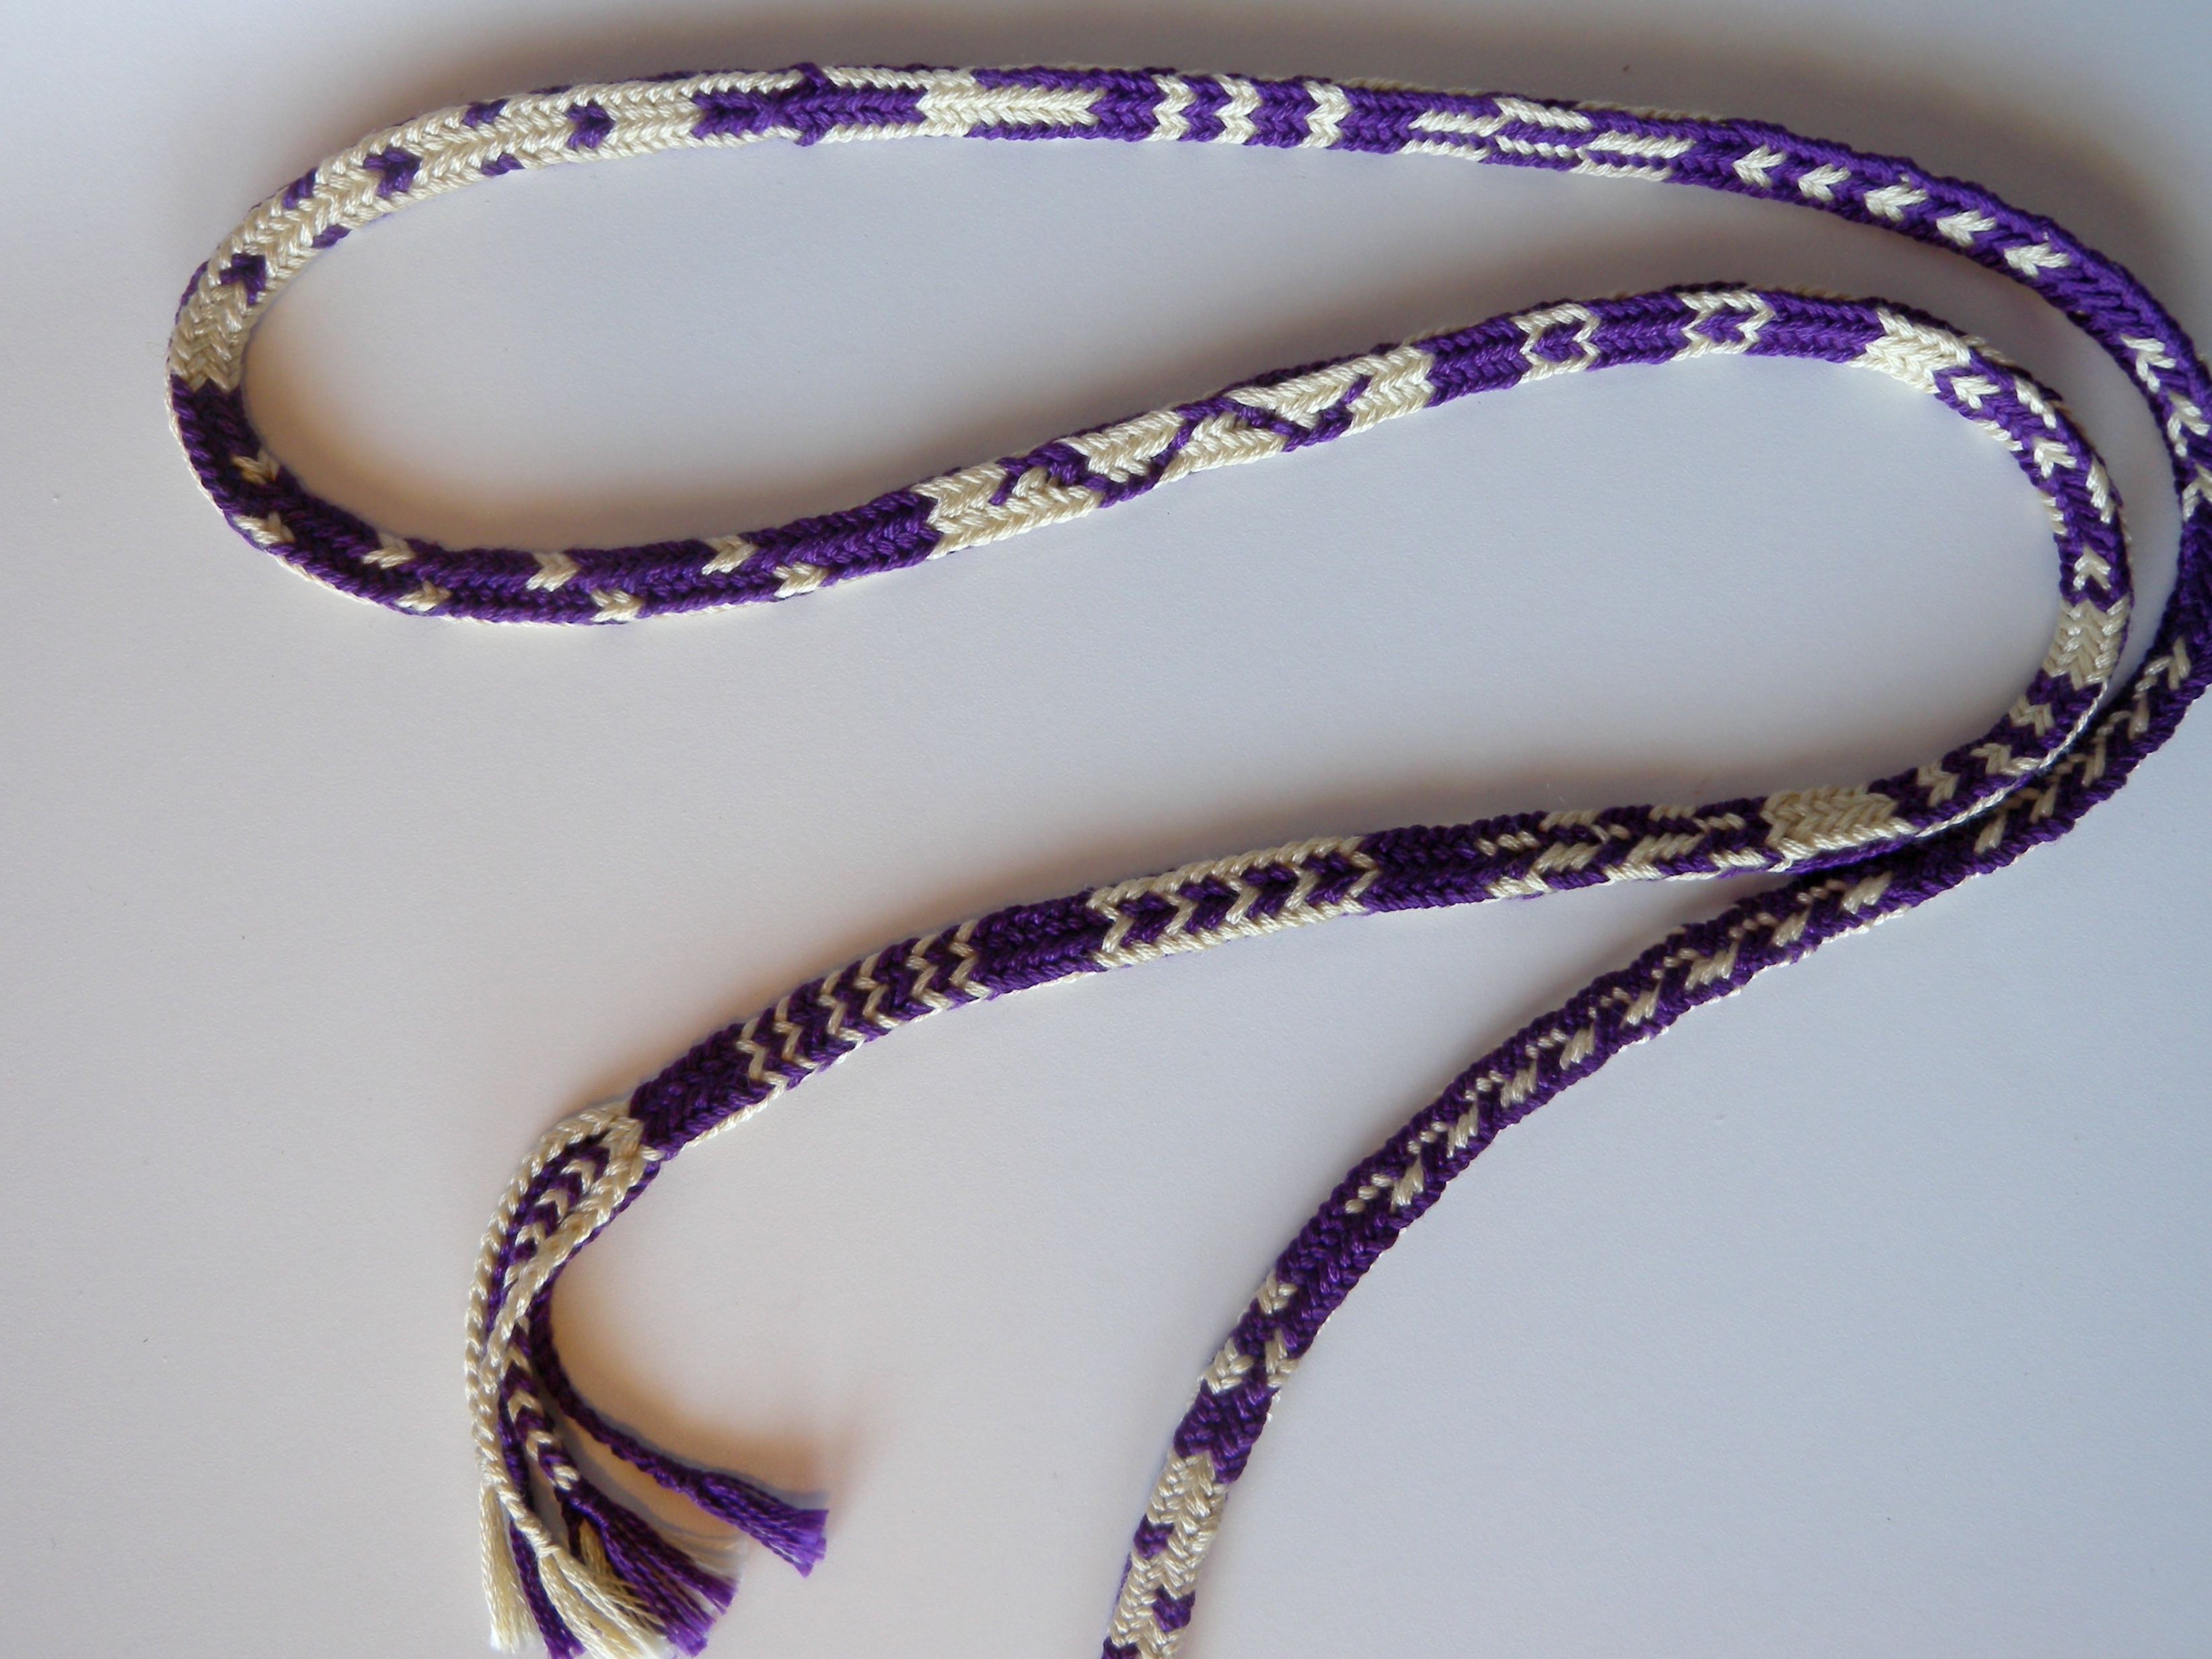
A few weeks ago, when I was working on the Triangle Braid tutorial, Gary Mitchell of the FingerTips site emailed me that he was developing an online interactive pick-up pattern planner for ‘Doug’s Braid’*!
Some ‘Doug’s braid’ pick-up patterns
Doug’s Braid is a very “do-able” braid. No thumbs, no doubled loops, similar moves to the 7-loop Spanish braid, and a very unusual and great-looking braid (rounded/ squarish, but twice as intricate as a Square braid). Having an interactive pick-up pattern planner available for it will make pick-up patterning very doable, as well!
Pick-up patterns are motifs and patterns that may require different moves from one row of braiding to another. Up to now, I’ve only talked about ‘complementary pick-up patterning’ in my posts on Letter braids. Letter Braids are extremely complicated braids for a solo braider, so you probably filed the topic away as “cool, but impossible,” and didn’t think much more about it.

18-loop letterbraid. The structure/ ‘architecture’ is like 4 square-type braids, or 2 double braids, connected side-by-side. (square-type = square, flat, or divided 2-transfer braids)
But pick-up patterning can be done in any two-layer loop braid! I’m talking: Square braids, Spanish braids, Doug’s braid, Double braids, Letterbraids.
In fact, if you’ve used bicolor loops for any of these braids, you’ve already used pick-up patterning with realizing it!

Bicolor 6-loop square braids with 2 ‘automatic’ patterns: Edge, and Alternating Stripes (fringe to a braided basket)
‘Automatic’ pick-up patterns
Your regular braiding moves automatically produce a pick-up pattern when you use bicolor loops in a two-layer braid!
Each time you turn a bicolor loop while transferring it, that loop’s two colors switch places between the upper and lower layers of the braid. The color from the lower layer of the braid is brought UP, while the opposite color from the upper layer is dropped DOWN.
That is the essence of ‘complementary pick-up patterning’ in both braiding and weaving. The top and bottom layers of the finished fabric have the same pattern, but with the two colors reversed.
Two 10-loop Double braids with ‘automatic’ bicolor patterns. Underside of each braid would show same patterns with colors reversed. Upper braid has solid rectangle braiding moves, lower braid has side-slit rectangle braiding moves. These patterns can also be made with 6 and 8-loop double braids. (A double braid’s structure is like two square-type braids connected side-by-side.)
While braiding with bicolor loops and creating an ‘automatic’ pick-up pattern, the braider just repeats the same exact pick-up sequence (the sequence of turned and not-turned loop transfers) in each row. So, row-by-row charts of the pick-up moves aren’t necessary. However, they do make it much easier to switch seamlessly between patterns.
‘Non-automatic’ pick-up patterns
Instead of turning loops automatically, you can also selectively turn or not turn the transferring loops in each row of braiding, to produce a bicolor pattern that does not have the exact same sequence of turned loops in each row. This is what the term pick-up usually implies, at least to me.
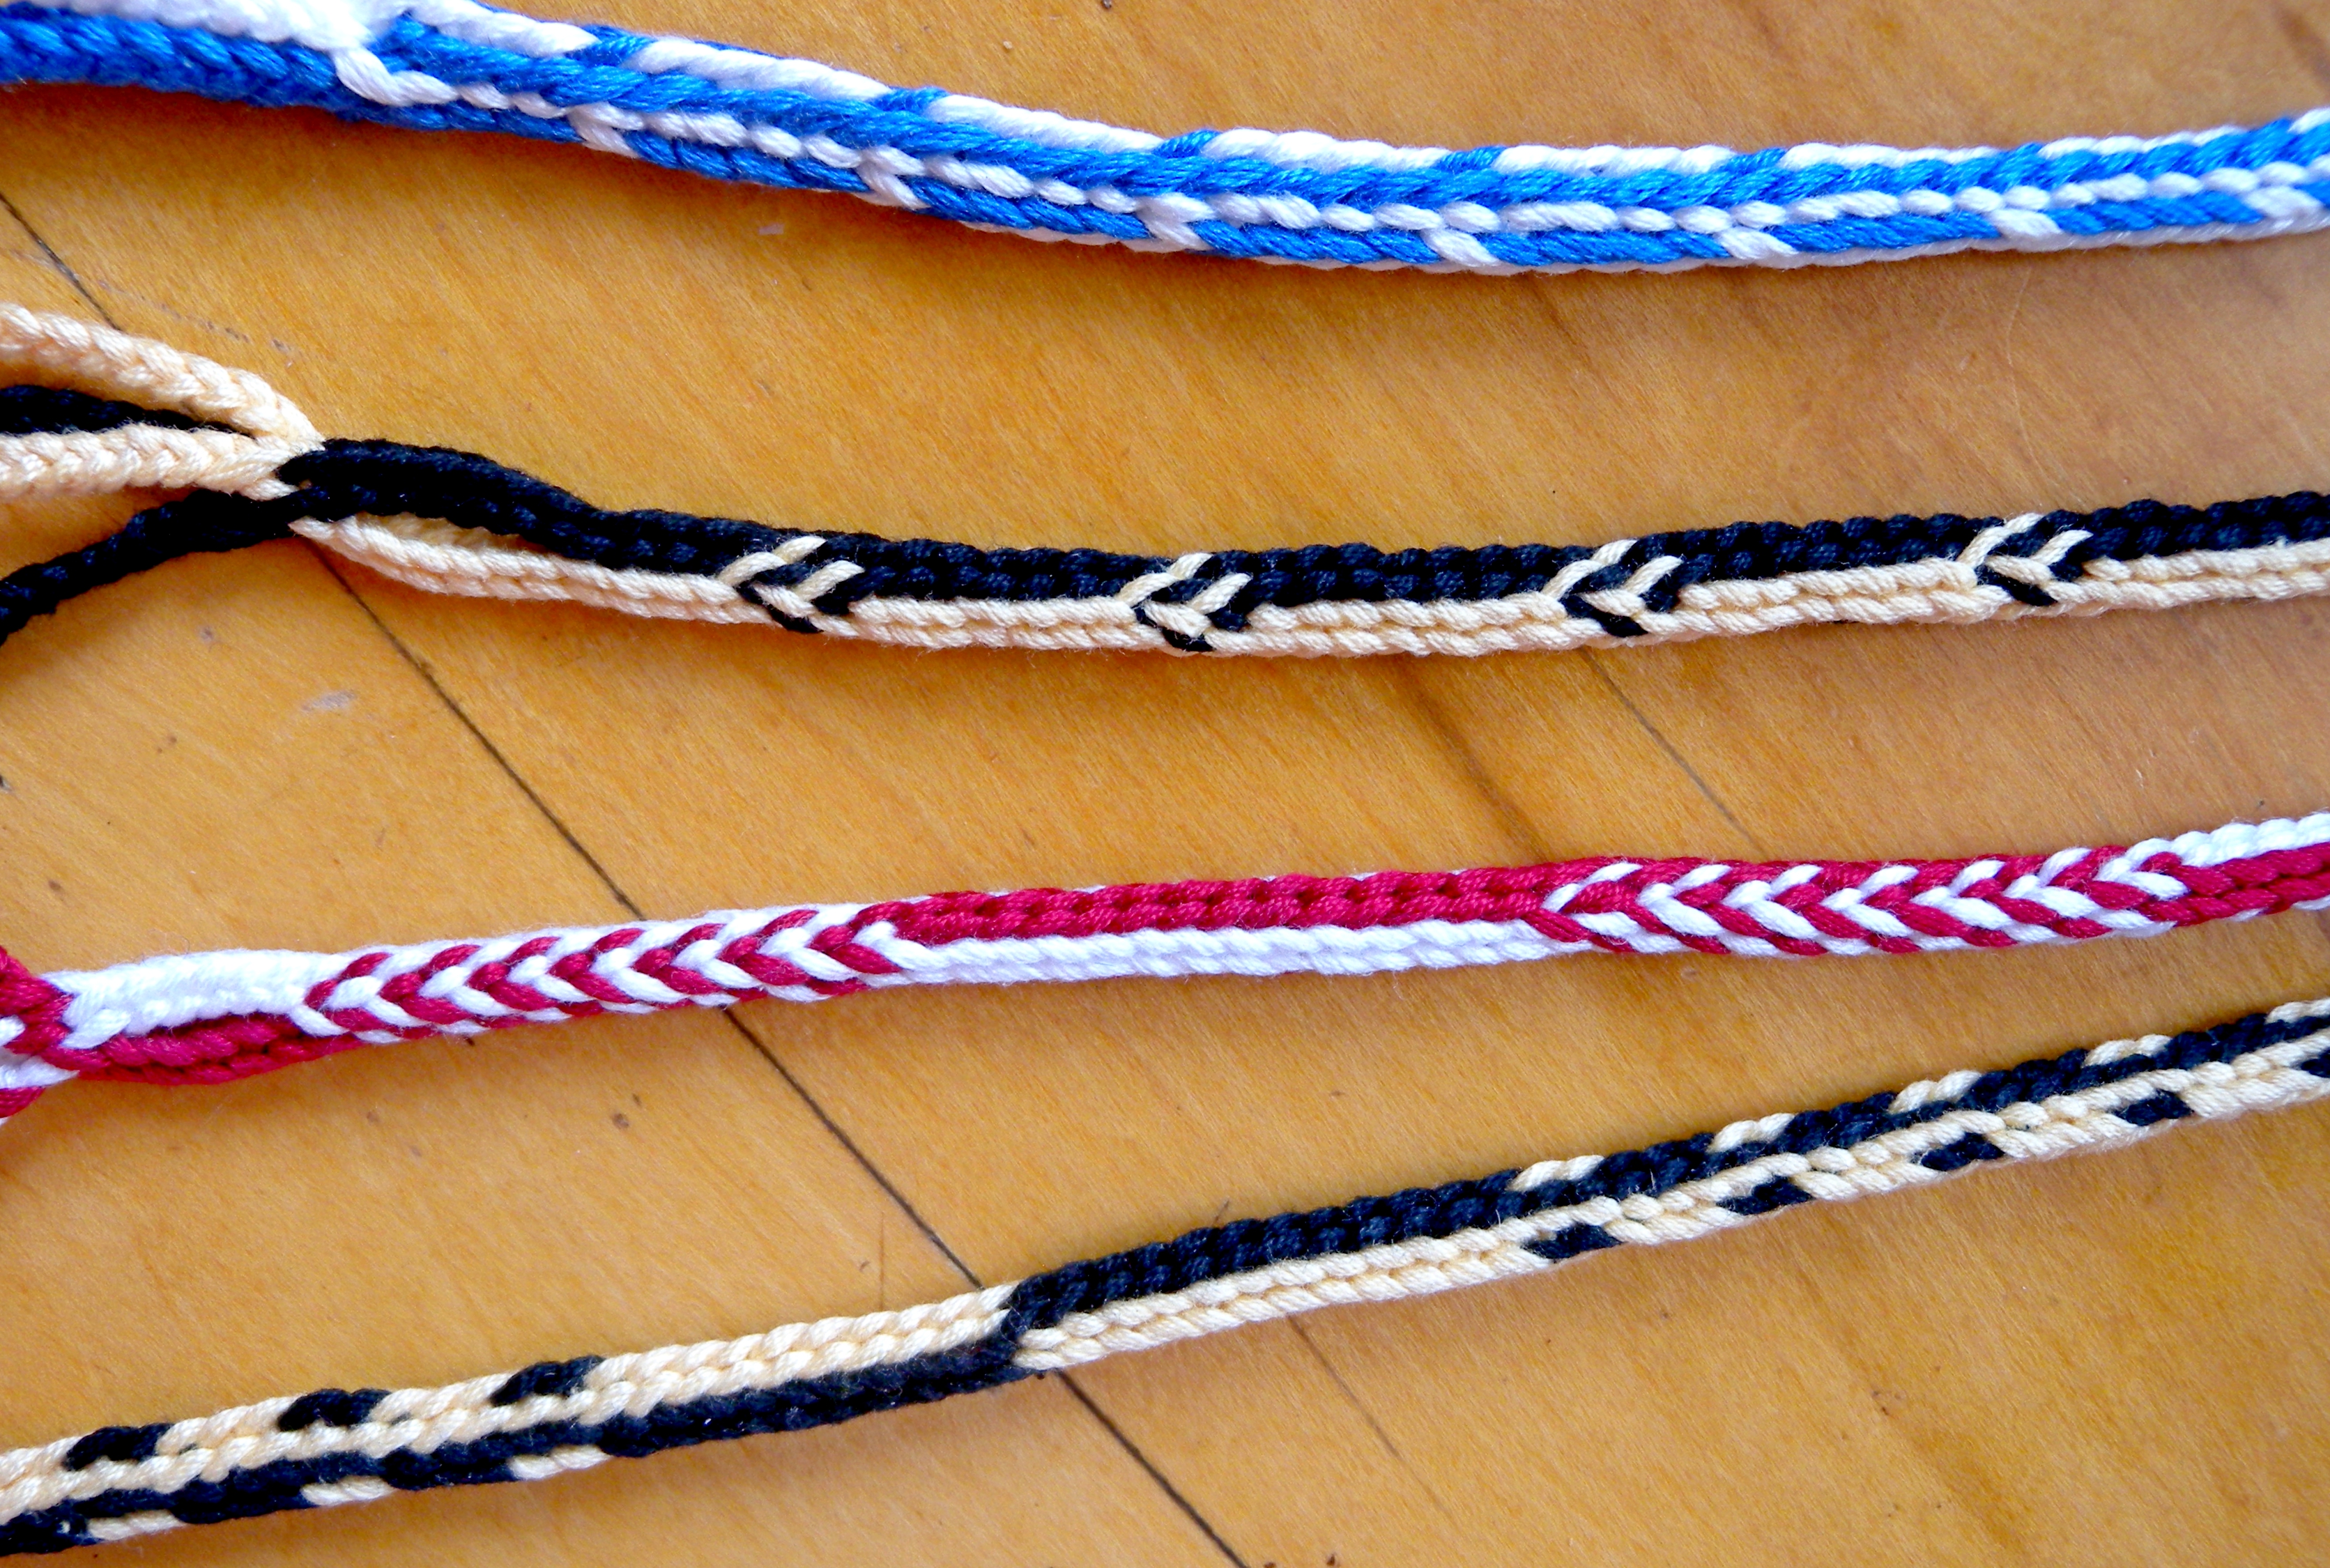
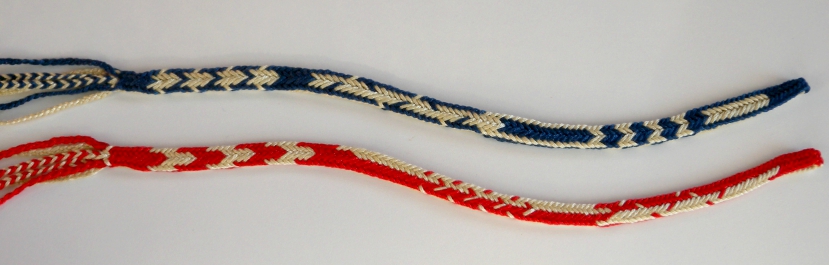
By “selectively” I don’t mean you have to make it up on the spot More likely you’ll be following a set of instructions that you or someone else already made up, and using them to select which loops to turn and which not to turn in each row of the motif. If the motif or pattern is a simple one – like the ones in the photo below – you can probably memorize the instructions fairly quickly, and/ or “read” the previously braided area rather than keep reading the instructions.

Three 5-loop braids with pick-up patterns. Even though these patterns are fairly simple, the sequence of turned and not-turned loops (reversed and unreversed) is not the same in every row of braiding. Each of these color-patterns does have a regularly repeating sequence of turned and straight loop transfers, but it is much longer than one row.
Pick-up charts:
A pick-up chart is a simple, visual way to display the instructions for each row of a pattern or motif.
Instead of listing start-of-braiding loop set-up positions, and a lot of confusing text about which loops to turn and which not to turn in each row of braiding, a pick-up chart simply shows “DARK” or “LIGHT” for the moves in each row of braiding.
Here’s the simplest possible chart – for square braid Edge pattern, an ‘automatic’ pattern that only has one charted row. For Edge, that same sequence of DARK and LIGHT repeats again and again in every row of braiding:
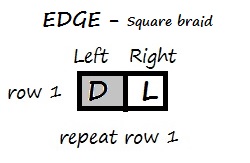
The two cells in the row stand for the two loop transfers in one row (cycle) of braiding. In a square braid, there is one transfer from the left hand loops, and one from the right hand loops. The dark cell on the left means: Transfer the left loop so that it ends up DARK-SHANK UP when it arrives onto the right hand. The light cell on the right means: Transfer the right loop so that it ends up LIGHT-SHANK UP when it arrives onto the left hand. Since only one row is shown in the chart, the braider just repeats that same row again and again to make the pattern.
Basically, that DARK or LIGHT cell tells the braider which shank of the bicolor loop should finish upward after the transfer is done. Following the chart will produce the desired pattern regardless of the order of darks and lights you start out with – no loop set-up configuration required. Of course, you don’t need this chart at all if you just start your braid with all light shanks up on the left hand, and all dark shanks up on the right hand. Then start braiding a square braid (turning every loop transfer) and Edge pattern will emerge automatically. But if you have been braiding a different bicolor-loop color pattern, and now want to switch seamlessly to the Edge pattern, this extremely simple chart (or memorizing it) comes in very handy!
The way this works in actual practice: Before braiding each ‘row’ (the left and right braiding moves), you check that row in the chart and see that the left loop transfer should finish ‘DARK up’. You’ll start making that braiding move while saying to yourself: “Dark up!” If you see that the loop you’re about to take already has its dark shank up, then – no turn! (take it without a turn/ open / unreversed) But if its light shank is up – turn it!
Note: in one row of braiding, the left “Dark” on the charted row might require turning the loop, whereas in the following row of braiding, that same left “Dark” might require NOT turning the loop, depending on what color arrangement you started with. For an ‘automatic’ pattern like Edge, it will only take a few rows of braiding before the loops all come into the correct up-down position for that pattern. After that, you don’t need the chart anymore – each transfer will require a turn, which is the normal square braid procedure.
It’s pretty easy to remember the instructions for both the left and the right transfer of this very simple chart, you can probably remind yourself: “DARK up, LIGHT up!” while making the left and the right loop transfers, without pausing to check the chart in between. And since the pattern chart only has one row, you’ve already memorized the whole chart!
With the exception of Edge Pattern, the charts for automatic patterns usually have the same number of rows as the number of loops in the braid. So the chart for a 5-loop ‘automatic’ pattern is usually 5 rows, 7 rows for a 7-loop pattern and so forth. After following those 5 or 7 charted rows, you can just braid with normal braiding moves for that braid, no chart needed. For a non-automatic/ “true” pick-up pattern motif, the number of charted rows depends on how long the desired motif is. In the letterbraid charts, the chart for the letter I is much shorter than the chart for the letter W (since the letters form sideways along the braid).
Some braids have more than two loop transfers in each row of braiding. Spanish braids, Doug’s Braid, Double Braids all have 4 loop transfers in each row of braiding. Charts for these braids would have 4 cells for DARK or LIGHT across each row of the chart.
Pattern complexity:
A square braid only has only two columns of slanted thread passages across the top (and bottom) surface of the braid. On graph paper that would be like planning a dark-light pattern using only two adjacent columns of squares.
So a square braid’s bicolor patterns – both “automatic” and “real” pick-up – are much simpler than those of the letterbraids (8 columns) or Spanish and Double braids (4 columns).

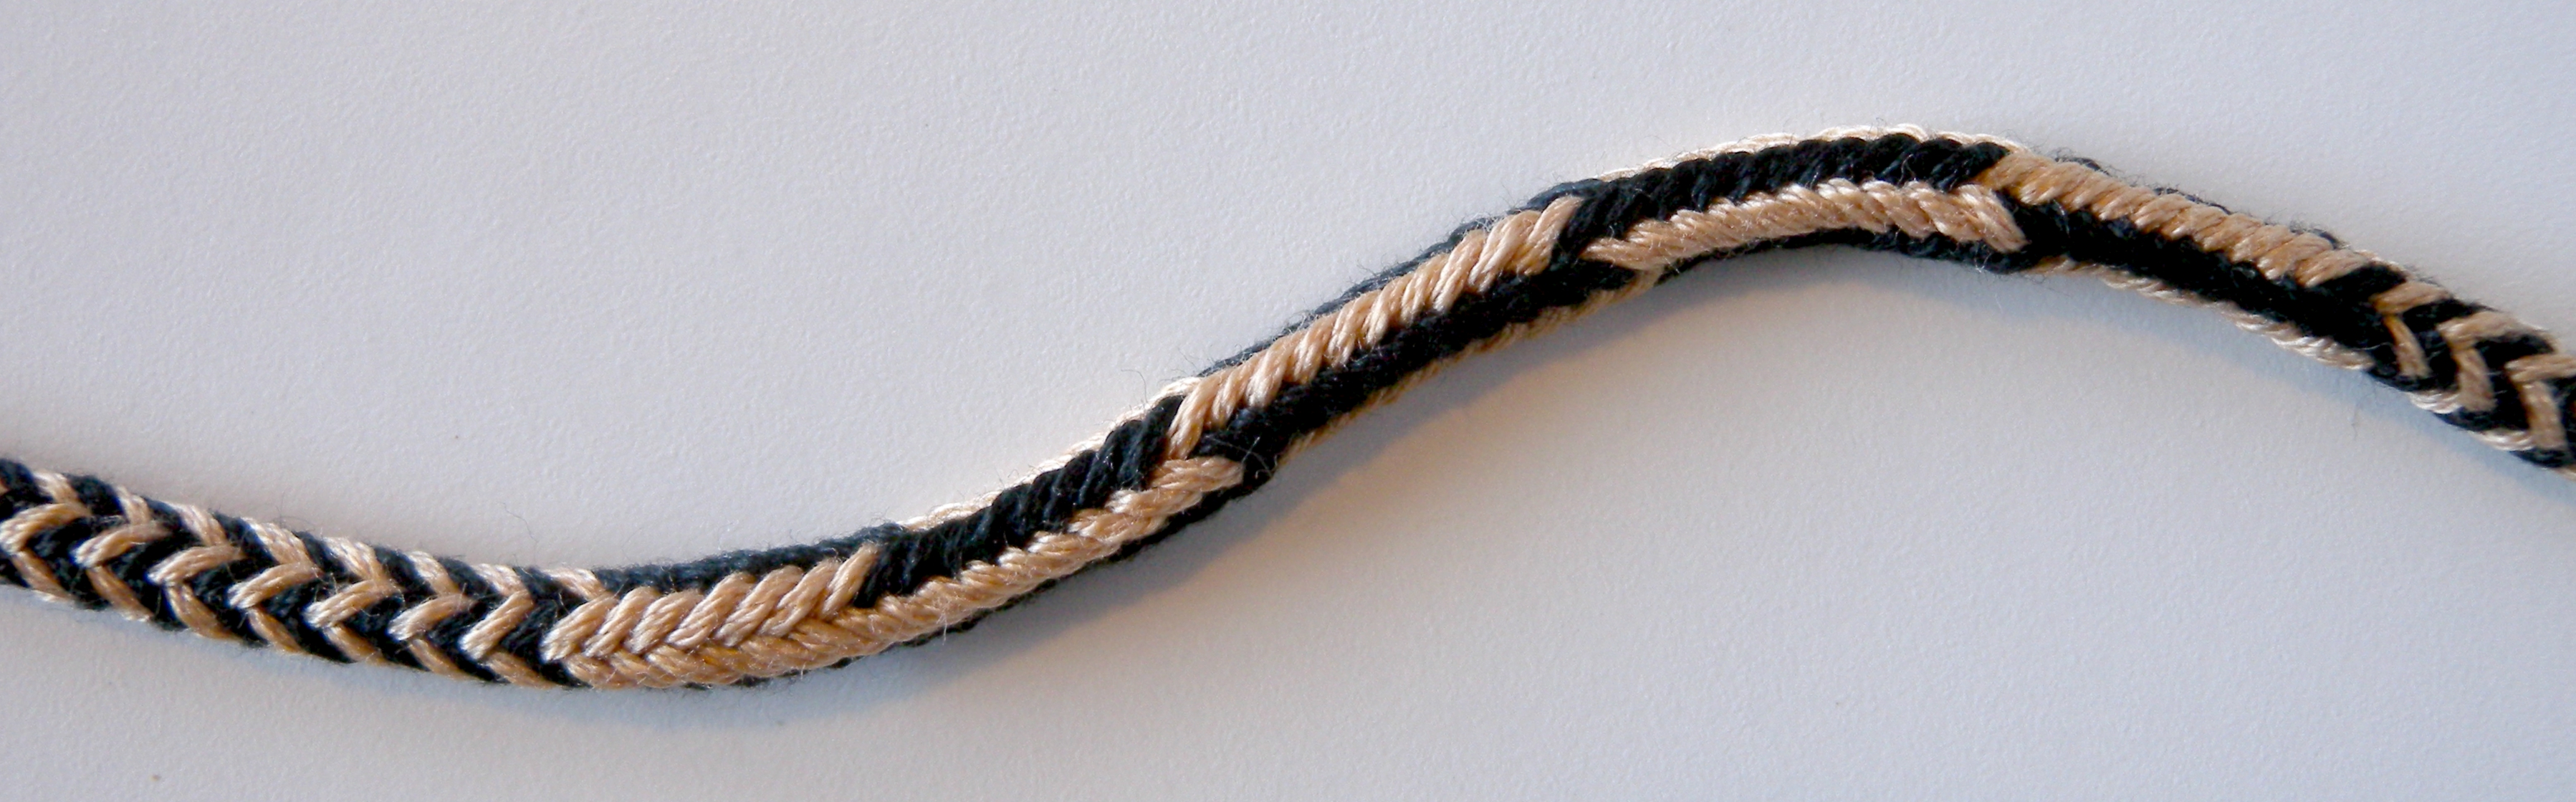
7-loop Square braid with pick-up patterns, showing the two ‘columns’ of the lower surface of the braid.
Of course, in real-braid-life, a square braid looks more complex than just two columns of graph paper!
When you look at a square braid, you usually see more than just one side of the braid. The opposite color pattern of the second layer of the braid comes into view as well, adding both depth and pattern complexity.
Square braid, pick-up used in transitioning between automatic patterns
At the other extreme, letter-braids have eight columns across the braid to plan color changes in. To a weaver, that might not seem like much, but it’s enough to plan any letter of the alphabet (sideways), as well as other fairly complex-looking designs. Remember, there’s no real limit to the length / number of rows in a braid’s pick-up pattern, only to its width.
18-loop letterbraid with pick-up patterns
The 18-loop letterbraid above is my own extrapolation of the traditional 14-loop letterbraid. It has a few more loops, but still only eight loop transfers and 8 lengthwise columns (in both the braid and a chart), like the traditional 10- and 14-loop letterbraids. As you can see, these 8 columns can display other designs than letter-shapes. The two patterns on the right are charted in the 17th C. 14-loop letterbraid manuscripts, the simpler one on the left is my own. The 8-loop braids below have only 6 loop transfers and 6 lengthwise columns, not quite enough for most letter-shapes, but enough to form a wide variety of patterns and motifs:
My 8-loop variation of the 10-loop letterbraids. I taught this braid and some of these designs in my class at Braids 2016. These patterns are planned on a grid of 6 columns across (like three 3-loop square braids side-by-side, or 1½ 5-loop spanish/double braids). Braids and designs by me, photo by Laverne Waddington
In between square braids and letterbraids are Doug’s braid, the 7-loop Spanish braid, and Double braids — all of them two-layer braids having 4 columns across for dark-light choices!
With 4 columns – and essentially an infinite number of rows – it becomes possible to design some quite distinctive patterns. You can also make small simple motifs, and separate them along the braid with long dark or light areas. This is a very different “look” from most braid patterns. The average braid doesn’t have long non-repeating areas.
10-loop Double braid pickup pattern sampler.
Designing patterns:
Square braids are minimal enough that it’s possible to design pickup patterns for them “on the fly”. Remembering them is another issue! Jotting down the darks and lights in chart form can be a great way to note down a nice square braid pattern.
Double braids, Spanish braids, Doug’s Braid pick-up patterns can also be designed by “trial-and-see-how-you-like-it”, but they are a little trickier to remember and jot down into chart form. And conversely, designing a charted pattern “on the chart” can be sort of like making a mosaic in the dark! It might turn out great as a braid, but is unlikely to look the way you imagined.
The problem with charts:
Unfortunately, the more complex the braid, the harder/ less intuitive it can be to plan designs for it, even in chart form.
Planning a charted pickup design for a braid is not as straightforward as planning a design on graph paper – partly because the elements are slanted lines rather than neat squares, but mostly because the ‘darks’ and ‘lights’ in a pick-up chart show where the color-changing moves occur, which may not be exactly where the color changes end up appearing in the braid itself.**
Even so simple a chart as the one-row chart for the square braid Edge Pattern doesn’t look exactly like the way the braid turns out.
This chart for making Edge has a DARK cell on the left, and a LIGHT cell on the right. If you braid according to this chart, however, the right column of the braid will be dark and the left column will be light – the exact opposite of what you probably expected from looking at the chart.
Interactive charting tools:
While it’s very possible to find great pick-up designs just by experimenting a bit, you can get a lot further a lot faster with a tiny bit of technology!
An interactive pick-up planner like the one Gary is making for Doug’s Braid is invaluable, because it will show both a pick-up chart of the DARK/ LIGHT moves that the braider must follow, and also a tiled representation of how that dark/light pattern will look in the braid – much better than graph paper, because the tiles slant like the actual thread passages in a braid. You ‘draw’ on the tiled braid image by clicking on tiles to color them in, while simultaneously, the pick-up chart updates to show how to create the pattern!
Ok, that’s it for this intro post on Pick-up patterning in loop braiding.
My next posts will be on how to use pickup techniques and charts in square braids and beyond…
Update: Part 2 is here! Learn how to do pick-up in a square braid!
Notes:
This post covers some of what I wrote about in my article for the Proceedings publication of the recent international Braids Conference – Braids 2016. In that article I also talked about the historical background of pick-up patterning in loop braiding, and the physical relationship between loop braiding and sprang, but I didn’t go into the details of how pickup charts work (as far as I remember! I haven’t actually looked at the article lately). I didn’t mention Doug’s Braid in that article – it hadn’t occurred to me back then to think of it as a vehicle for pick-up patterning! (See near top of my sidebar for more information about the 2016 Proceedings book: Braids, Bands, and Beyond, ed. by Robyn Spady)
*Doug’s Braid is a 7-loop round “Spanish” braid with an odd twist, invented by Douglas Grant. Its world introduction was here on my blog back in 2012 – I put up two tutorials for it and for several possible color patterns: Part I (text tutorial and instructions for several color patterns), and Part II (the video tutorial, and one more color-pattern).
Before Gary’s recent email, it had never even occurred to me to do pick-up patterning with Doug’s braid! – I guess because I think of it as round in shape rather than 2-layer. But structurally it really is a two-layer braid, so of course can be made with pick-up patterning.
**Why the pattern in the braid doesn’t look like the pattern of its pick-up chart:
Loops are only turned while being transferred through another loop or loops. So a color change from turning a bicolor loop will not actually show in the place where it was turned, because at that point in the braid, the newly turned loop is covered/ encased by the loop or loops it passes through. On each layer of the braid, each strand of the transferring loop is going “under 1” or “under 2” etc, depending on whether the structure is plain weave or twill.
The newly-swapped colors only become visible in a subsequent “stitch” – when that loop itself becomes an “around” loop, after another loop is passed through it. The move revealing the color-change might occur within the same row of braiding, but in some braids it might not happen until the following row of braiding moves.
That subsequent stitch (where the color change actually shows up) may also seem very displaced to one side or the other from the point where you turned the loop. Braiding strands travel steeply diagonally across the braid, and at cross purposes to each other, they don’t stay in straight vertical columns like the picked-up strands in a weaving. Both criss-crossing diagonal courses in a braid can have color-changes. In a (warp-faced) weaving, it’s only the vertical course – the warp strands – that are picked up, so the color-changes stay neatly in place relative to each other.
These loop braid pick-up charts are based on Joy Boutrup’s versions of the 17th C. letterbraid charts. Her main change was that she put the columns into the same left-right order as the fingers/loops on the two hands. This works well for following a chart to perform the braiding moves, and is a semi-accurate visual representation/ map of where the moves occur in the braid, but not necessarily of where the color changes actually show up. (Though better than the original order of the columns in the 17th C. charts)
Another complicating factor with charts:
The worked rows may not be straight across in the braid the way they look in a pickup chart. In a pick-up chart, a horizontal row simply represents one repetition of the braiding moves. But translated into the braid, those pickup moves may actually follow a steep V-shaped path, or many variations of a sawtooth path across the braid, depending on the order of the braiding moves. The strands in a braid all travel diagonally back and forth down the braid. But the interlacing movements that the braider performs may proceed diagonally or horizontally (or a mix of both) across the braid.
I gather that in Kumihimo braiding on a takadai (a kind of Japanese braiding table for making flat, wide braids), one working row of braiding typically follows the steep diagonal paths of 2 opposite strands halfway across the braid: from the left and right edges of the braid, down to the center of the braid – producing a long steep V-shaped fell (the bottom edge of the braided area). This is not always the case in loop braiding, especially in braids of several loop transfers.
With loops, that order of braiding is quite possible too, but other braiding strategies are just as convenient. For example, the braiding moves for one ‘row’ (one repetition of all the moves) might proceed more-or-less horizontally across the braid, in a ‘sawtooth’ manner, or perhaps a combination of one short steep diagonal and some horizontal sawtooths. Or in the steep downward V direction of a Takadai braid. The same ‘overs’ and ‘unders’ of the finished braid can be created in any of these ways. In any of these strategies, in each row of braiding one strand will leave the left edge, and one strand coming from the left will reach the center of the braid. However, these two might not be the same strand, as they always are in a typical Takadai braid.
This explains why a row of color changes that looks straight across (on this vertical/horizontal style of pickup chart) might come out steeply slanted in the actual braid. It also explains why a pick-up chart for a specific braid pattern might only work for ONE method of making that braid. While the exact same braid (and color pattern) could be made with possibly several other strategies/ order of braiding moves, those other strategies would require different pickup charts for the same pattern.
Because of this, you can’t tell which overs and unders were made in one row of work just by looking at a braid. The same exact braid can often be made with quite differently shaped working rows (what Joy Boutrup refers to as fells). Two “stitches” that appear to be horizontally side-by-side may have been made in the same row of braiding, or not. Depending on how the braid was made, specific color changes for the exact same design in the exact same (resulting) braid could be done in quite different rows of work, and so require very different charts.
So a charted pickup design is dependent on a specific sequence of braiding moves, since that order determines the rows of work – ie the fell shape. For example, on this blog I teach double braids with a certain order of moves for the 4 loop transfers. This isn’t the only possible order for those 4 transfers. A braider can make the same exact braid using a different order of these same 4 loop transfers. I sometimes do them in other orders, myself, if it seems more convenient.
However most charted pickup patterns only work for one particular order of moves. If you want to do those moves in a different order you would likely need to tweak and change the pickup chart in order to get the same pattern.
Update: Part 2 is here! Learn how to do pick-up in a square loop braid!
published 9/13/2017, last updated 7/6/2025
© 2017-2025 Ingrid Crickmore


I did not know this existed! Yay WordPress!
Thanks for a great post. 😉
Thanks for visiting!
Wow, just wow, Ingrid! Have been learning pick-up on the TakaDai, will have to give this a try, as well. This tutorial is so well written, thanks! Connie
Hi Connie, I’d love to see your takadai pickup braids! I was thinking of this post more as background for some pick-up tutorials, the tutorials will be coming soon (I hope)!
You are amazing Ingrid! I’m proud to know you!
💜
CR
>
aaaaw! thanks, CR you are so sweet!
oh this is exciting, thank you so much! i am having a lot of fun using up 8/2 and 16/2 cotton ends from other projects, figuring out these braids. retirement is a wonderful thing, when there’s this much fun stuff to learn about, and people on line to add the show-and-tell. thanks for the newsletter! kj
Thanks for your enthusiasm, and yay for retirement!