This is a how-to for changing between several easy bicolor patterns in a 6-loop square braid. I show charts below for switching between these patterns, as well as initial loop set-ups for starting a pattern without a chart. These patterns are regular, ‘automatic’ bicolor loop patterns, not complicated pick-up patterns. However, braiding smoothly from one of these color-patterns to another does require selective pick-up. (Pick-up is explained more fully in my previous post Pick-up 101.) At the bottom of the page I’ve posted 3 videos (on finishing both ends of the braid with a braided tassel; following a pattern chart to change patterns; and “turning twice” – a trick for avoiding a divided braid.
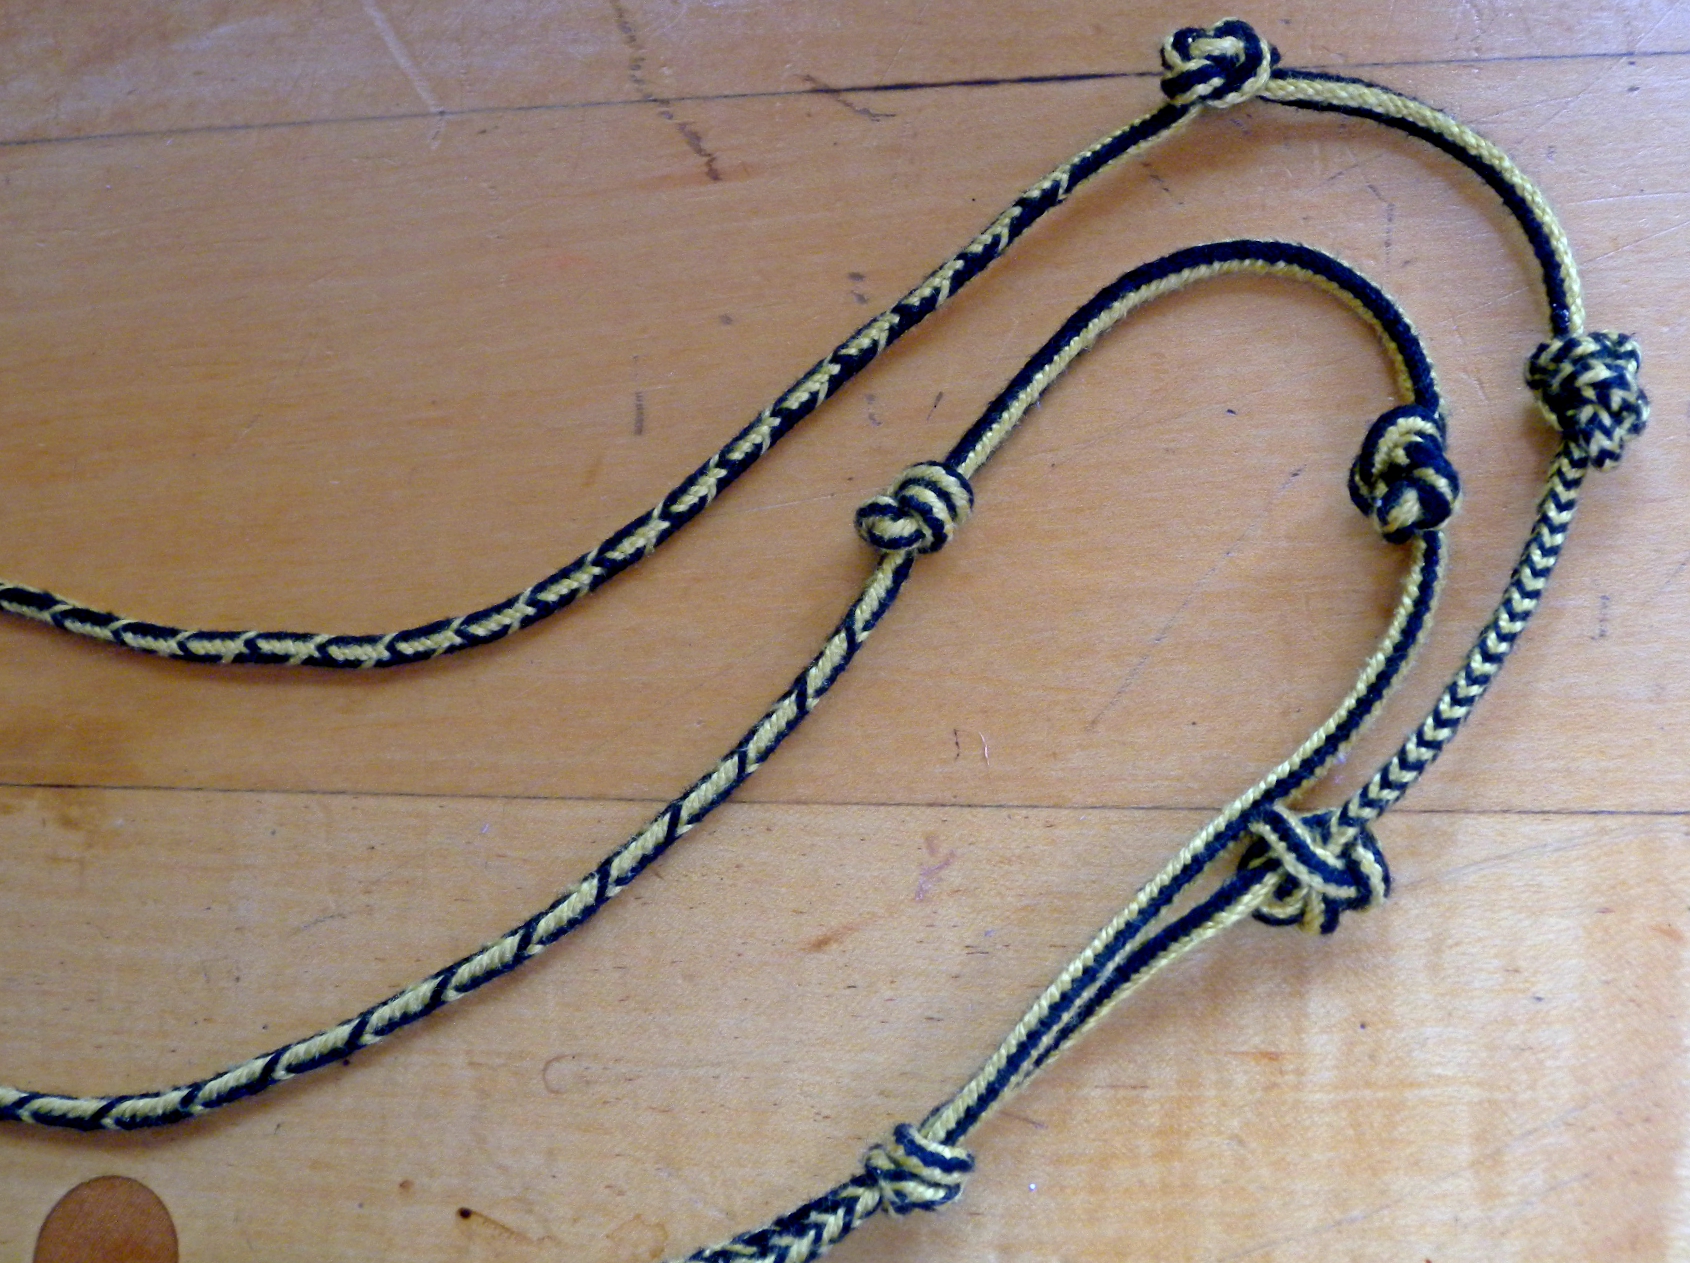
I’ve shown pics of the first braid before, in my Bicolor loop magic post years ago. (It’s a lanyard I made for a little pair of snips.)
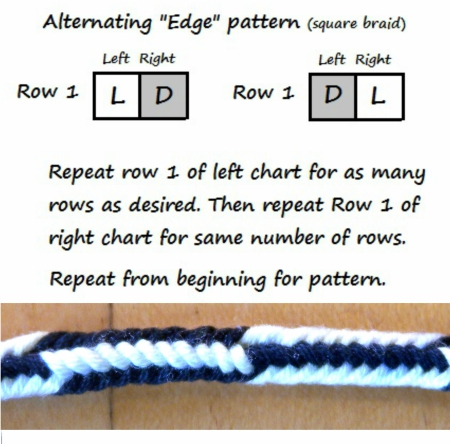
I tend to rely heavily on Edge pattern (lengthwise stripes) when I’m mixing it up with pattern changes in a square braid. Edge is a great separator between other patterns, and makes the whole braid calmer and easier to look at.
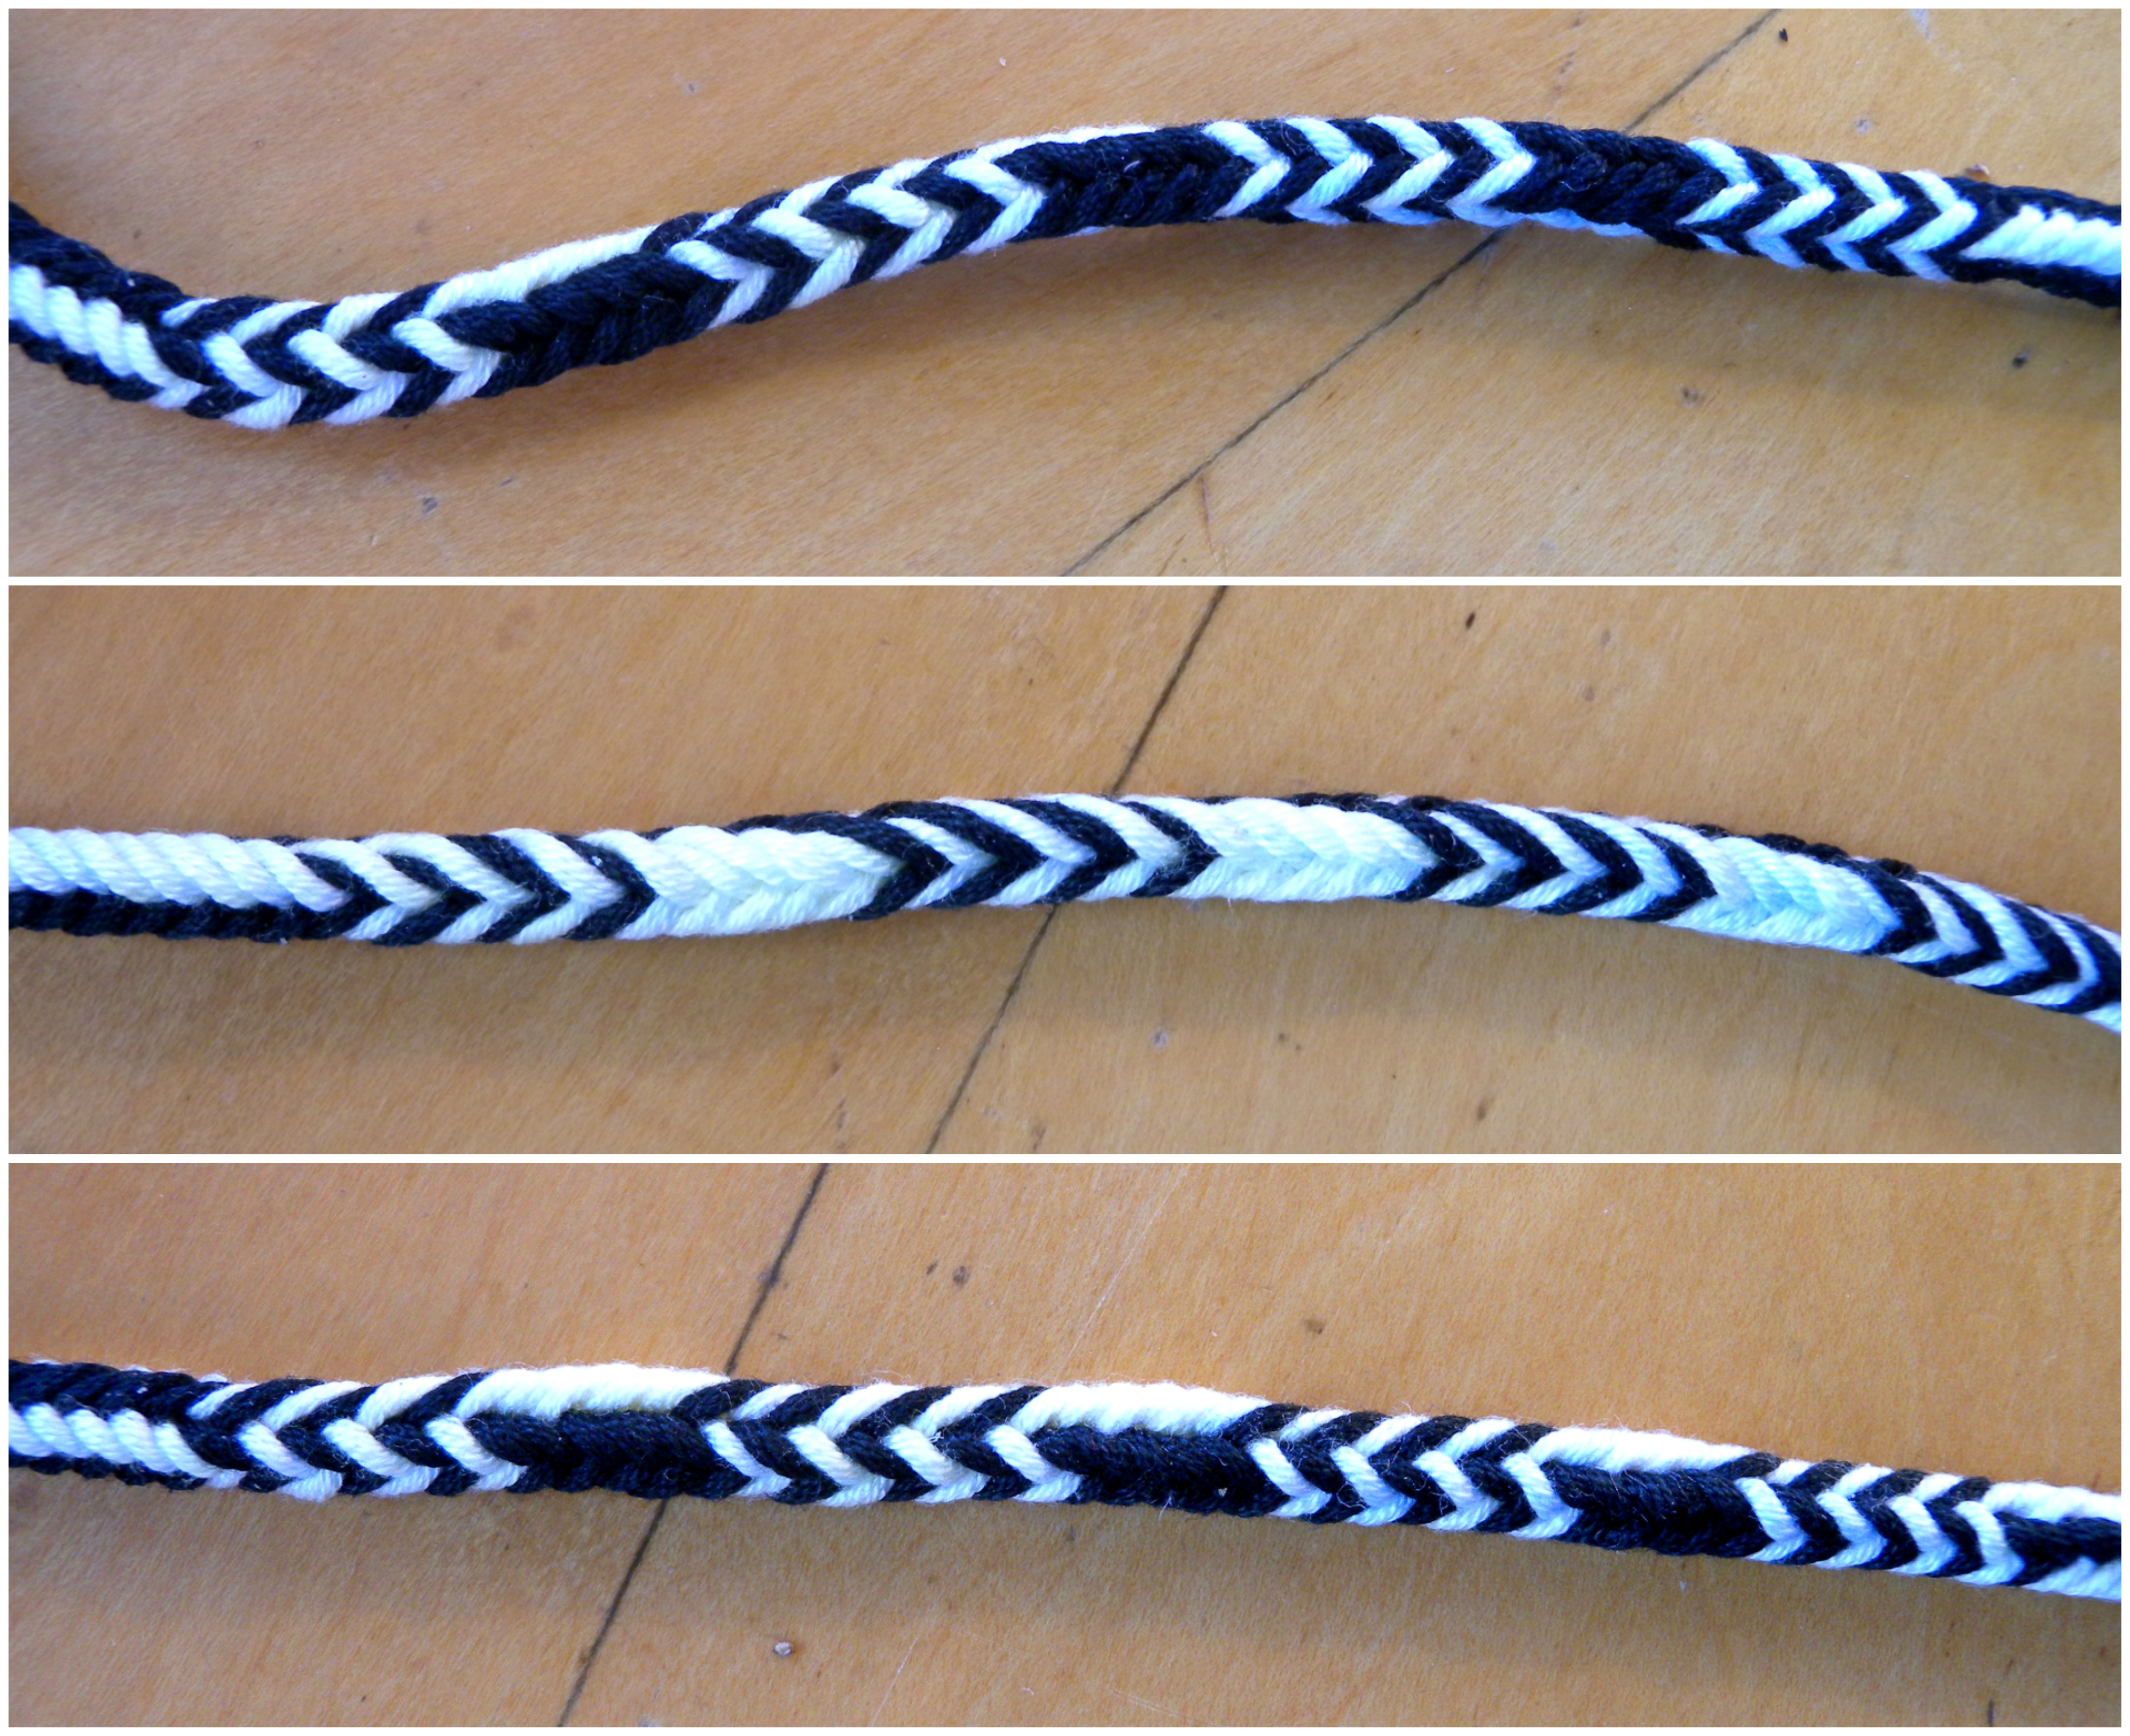
6-loop square braid, all loops bicolor black+gold, 3 ‘automatic’ pick-up patterns: One-Loop-Wrong, Edge, and Alternating Stripes.
Crowding a lot of patterns into one braid is a great way to practice the technique, and might make a good sampler braid for your own records, but the braid can end up looking rather jumbled and jarring. Pattern switches don’t “read” well if adjacent patterns are somewhat similar. Even you, the braider, might have a hard time later distinguishing where one pattern stops and the next one starts.
However pattern-switching can also allow you to create an overall braid pattern that is less crowded than your average loop braid pattern – see my section on combo-patterns.
I hope the various patterns in the sampler below are clear enough to distinguish, despite being so crowded and busy. The charts further down refer to these patterns:
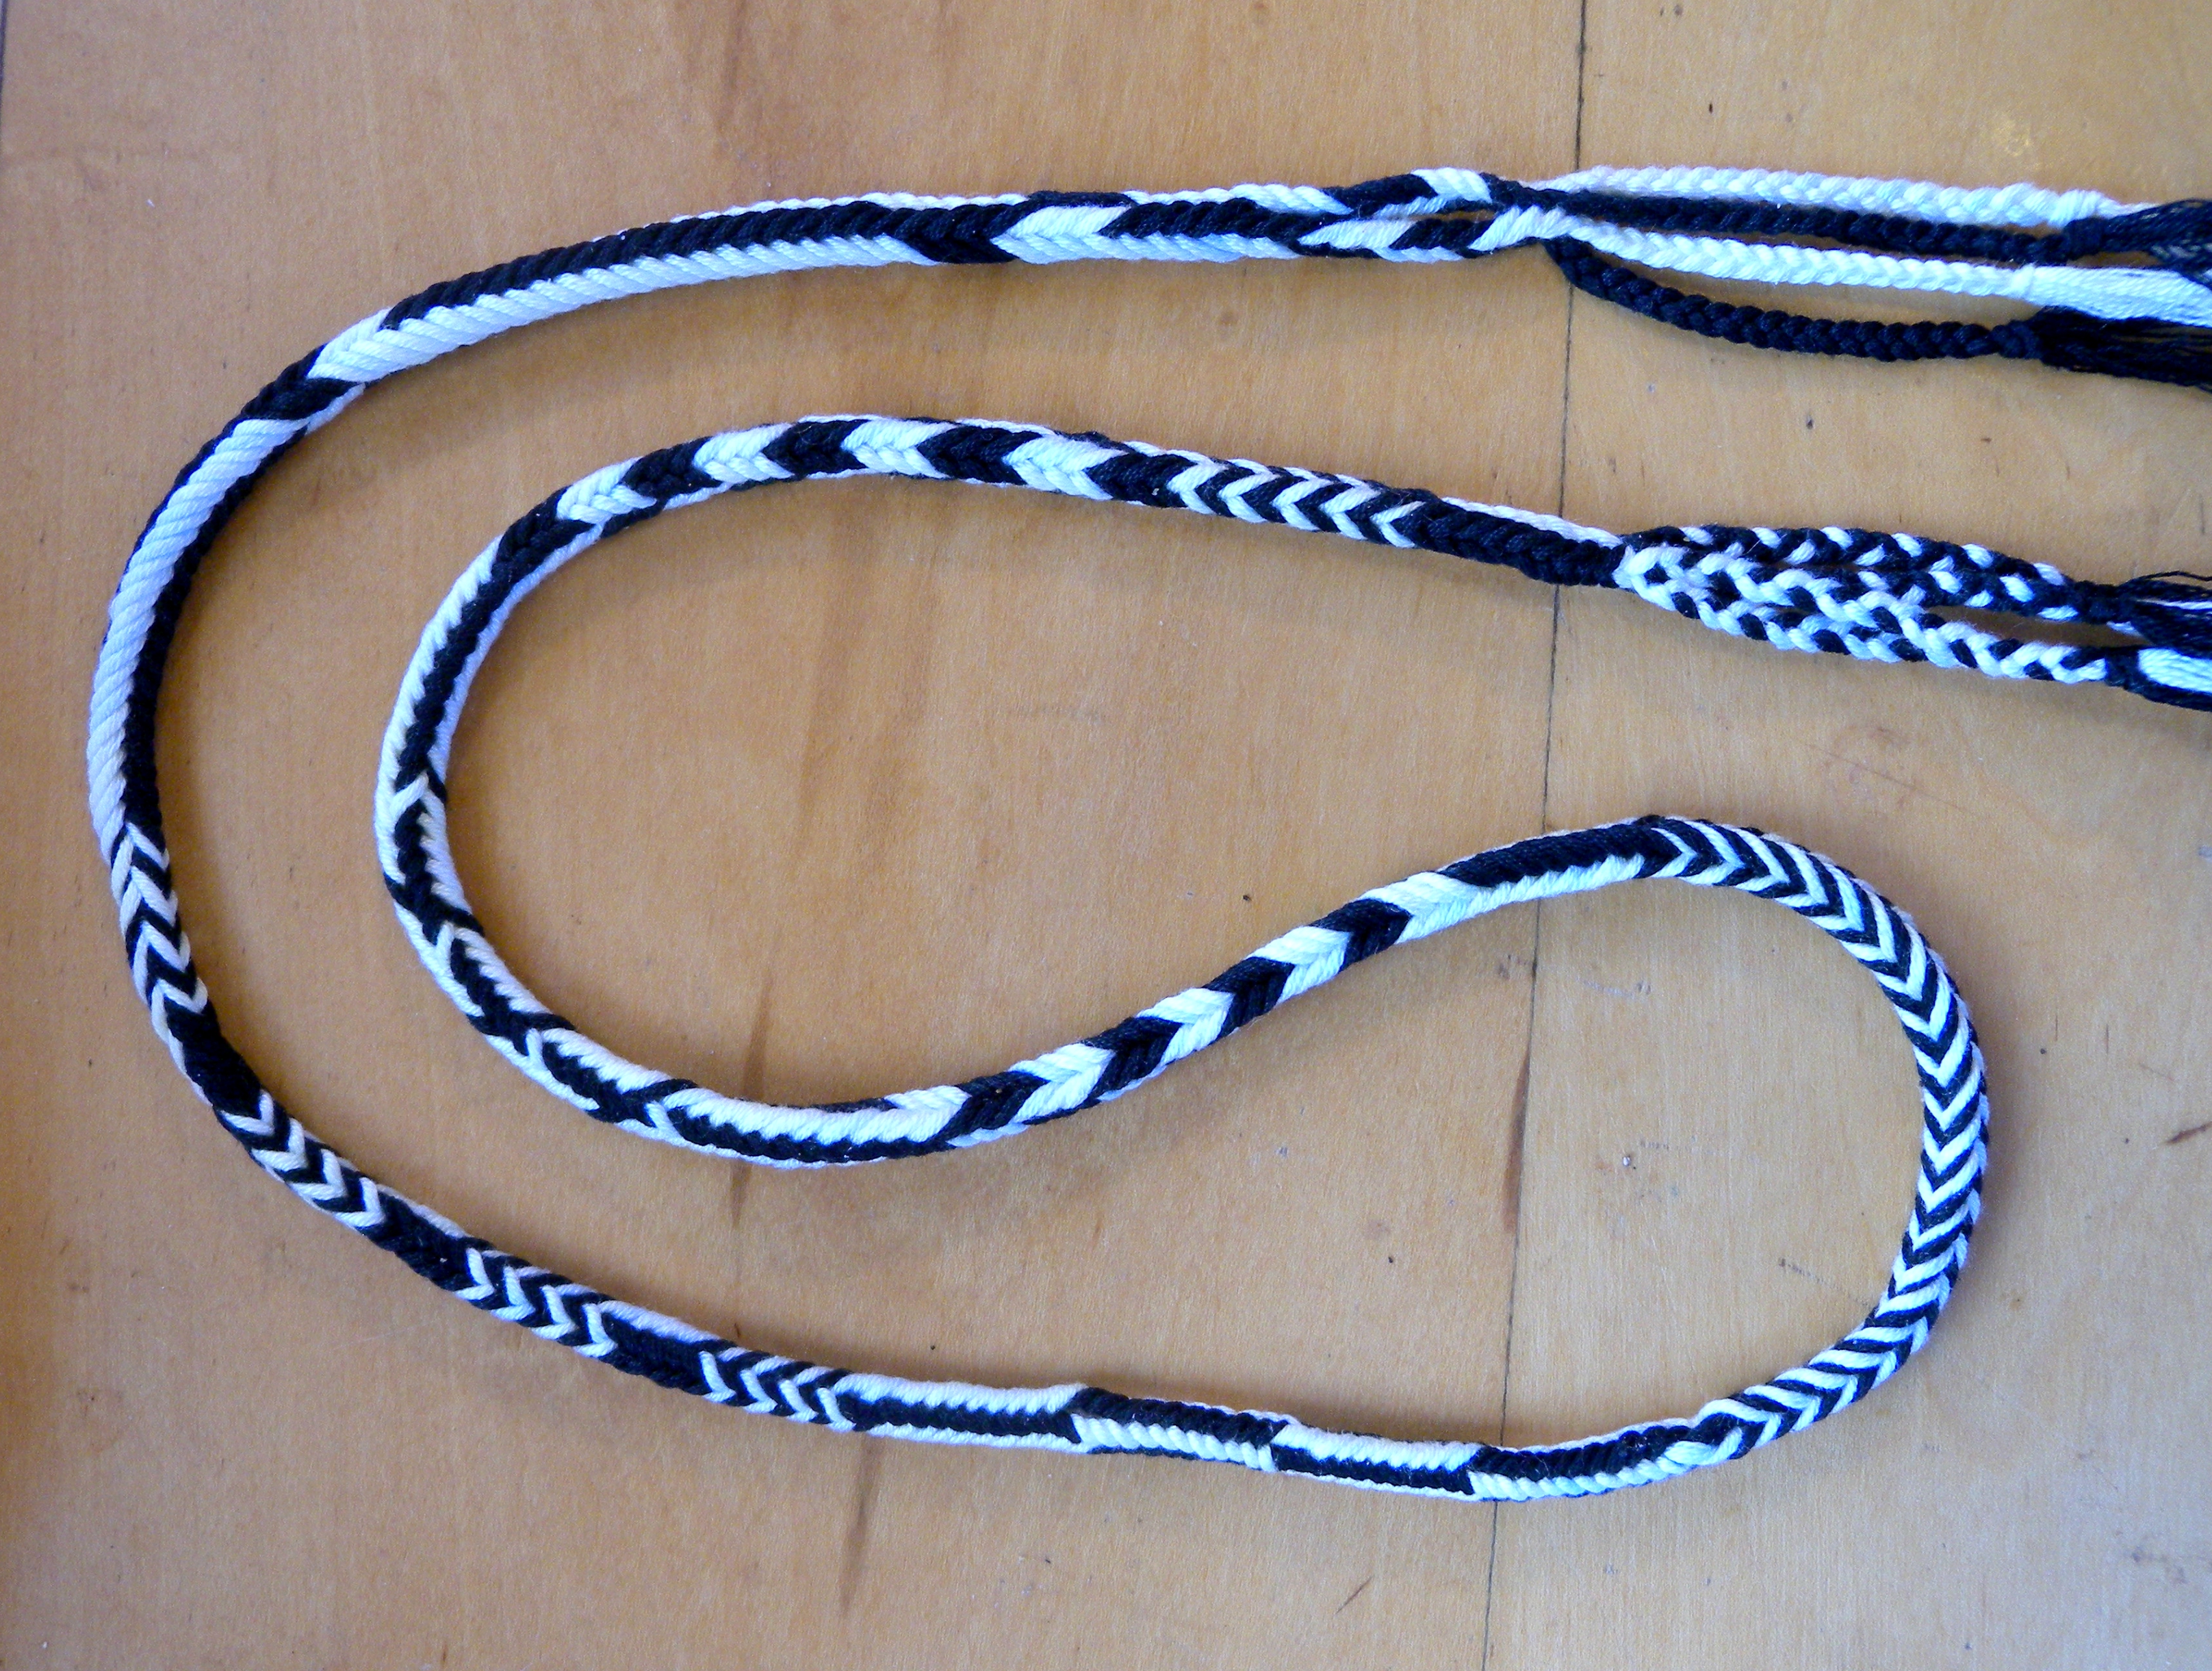
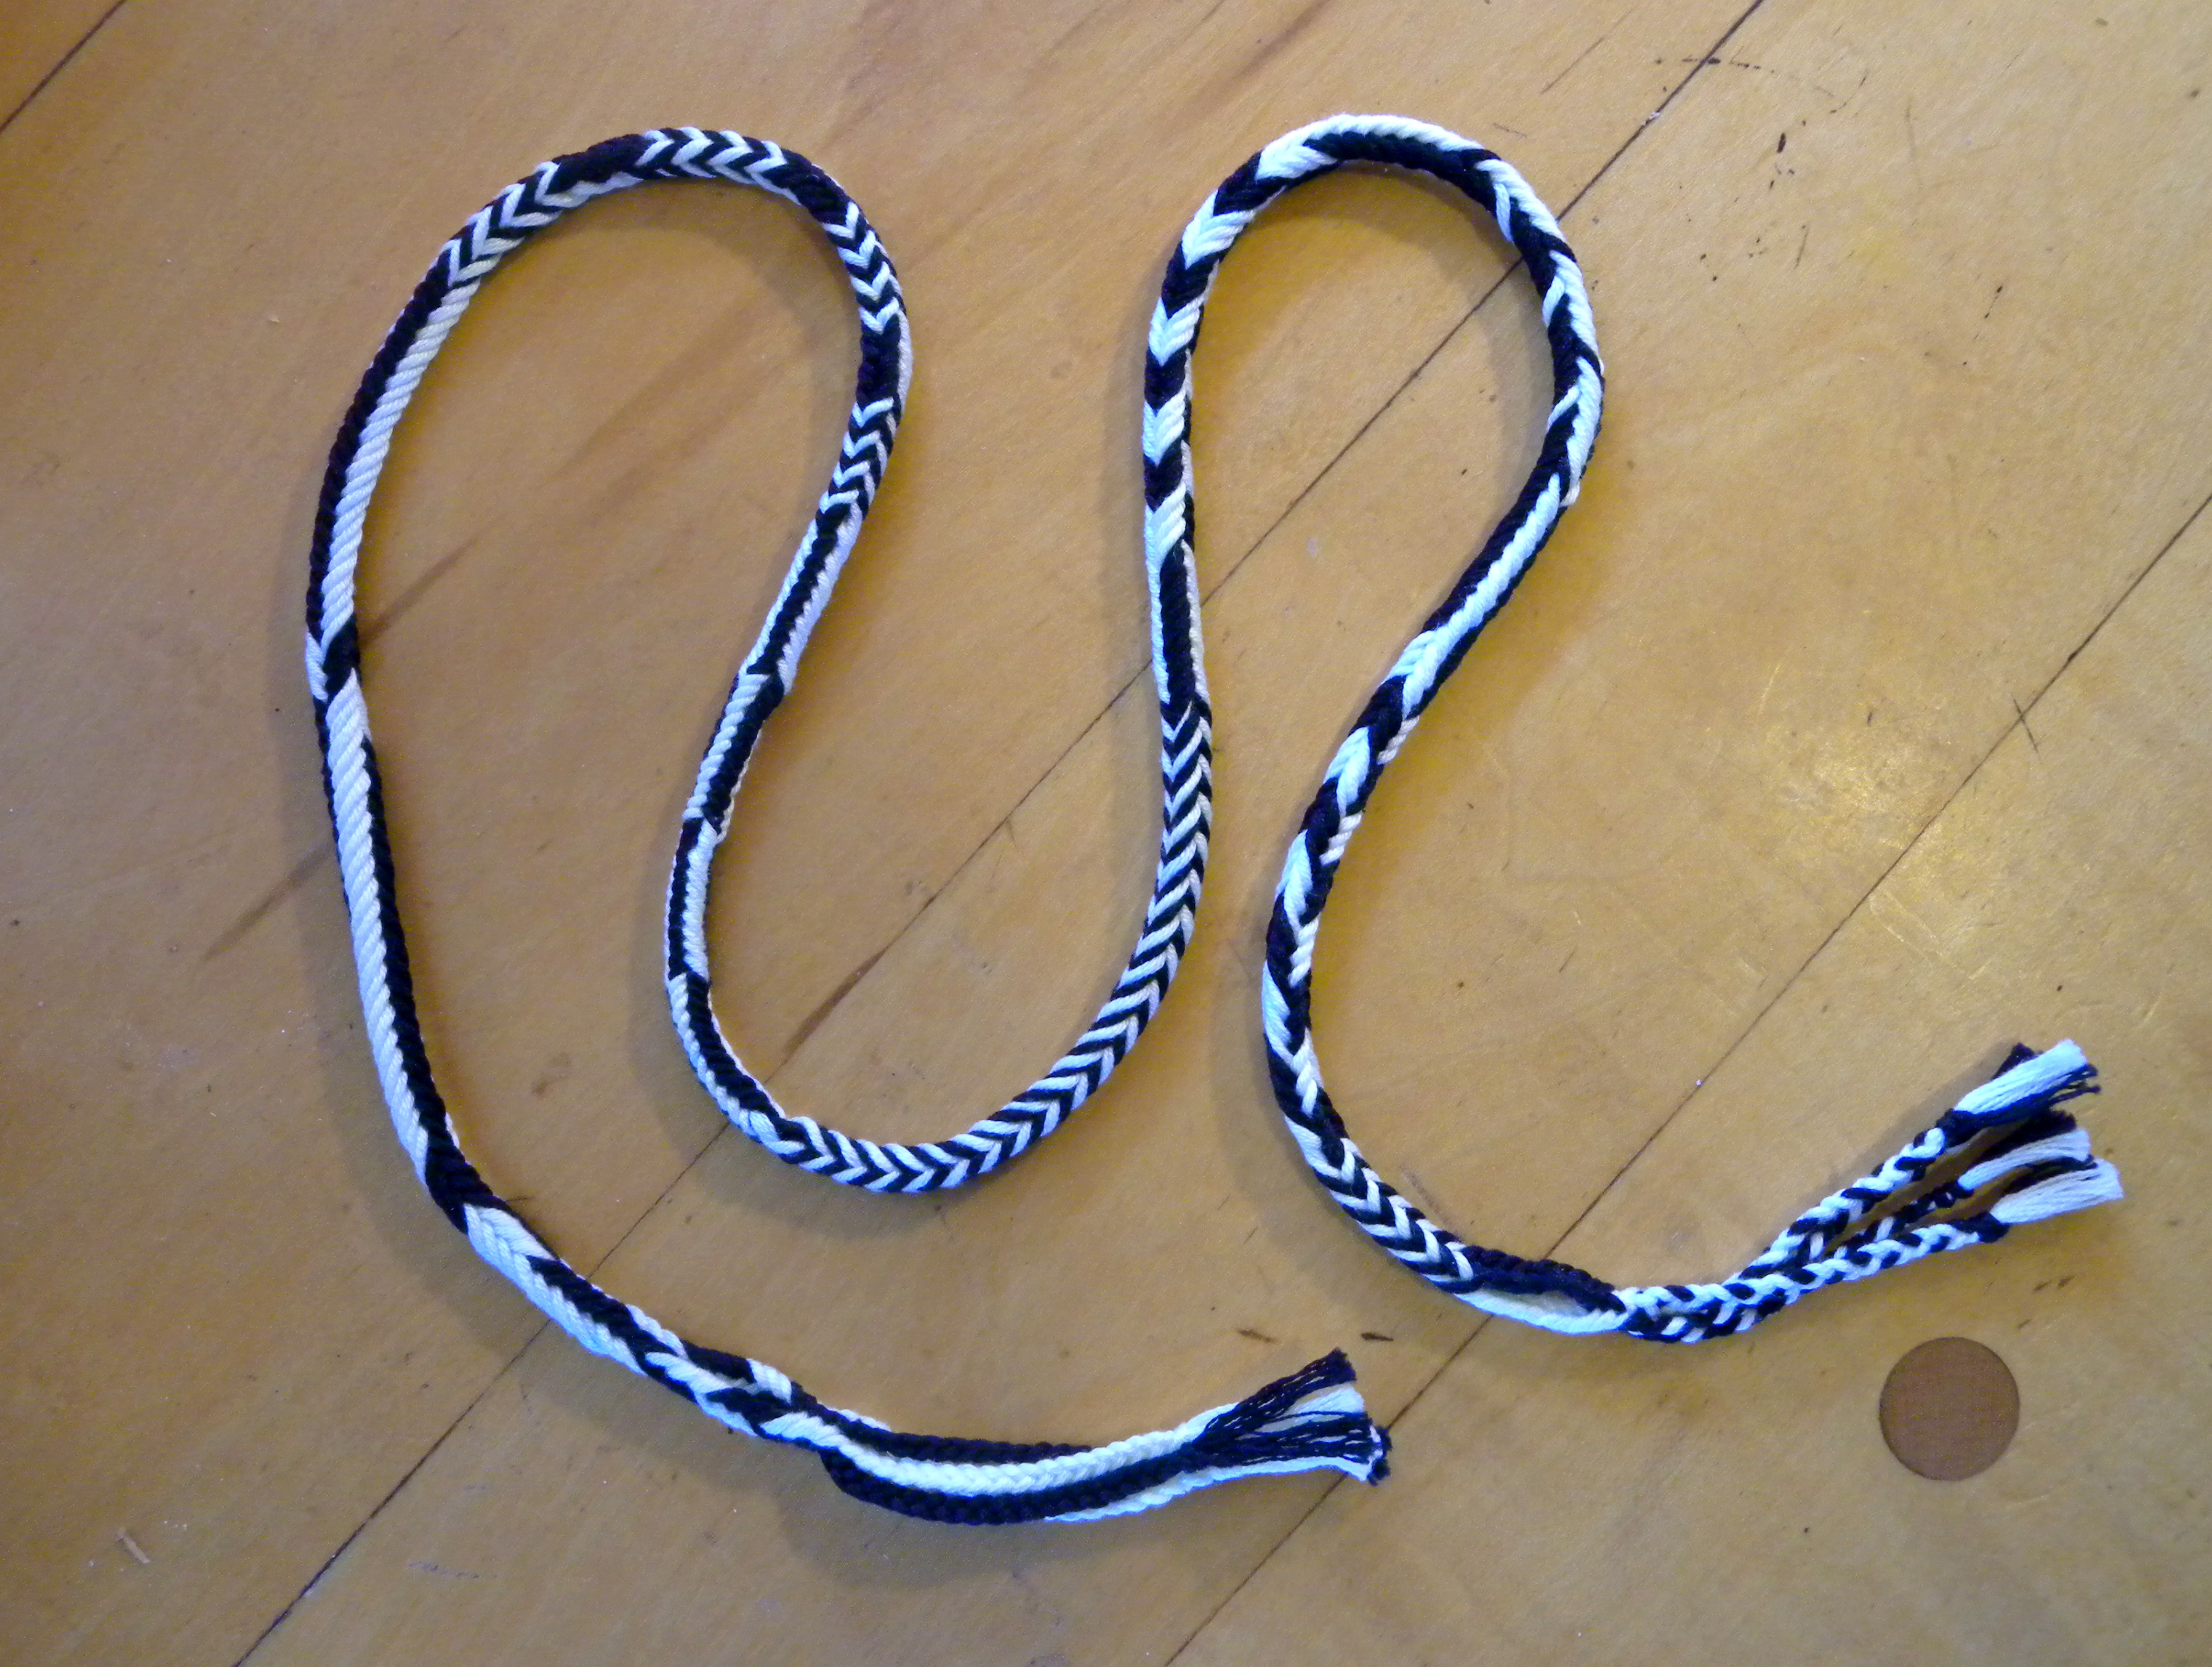
6-loop Bicolor pattern sampler – square and divided 6-loop braid
It’s probably only other braiders who will appreciate pattern-changing just for the sake of pattern-changing! Non-braiders don’t necessarily get that this is cool in and of itself. I remember a musician friend at camp pointing out a short section of a contrasting pattern I had artfully included near the end of a braid (I thought I was being artful partly because I hadn’t jammed a lot of pattern-changes into the braid!).
“What happened here??!” he teased me, pointing to that artful area, obviously assuming I hadn’t been paying attention to my braiding moves there. The possibility that it would look like a mistake had never occurred to me when I made the braid!
So one of the fun challenges after you learn how to switch between patterns, is figuring out how to make it look good. Maybe if I had made that little artful “mistake” two or three times evenly spaced apart, it would have looked like a design element rather than a glitch!
How to switch patterns:
To switch between “automatic” bicolor patterns in a square braid, you have to braid a few rows without turning certain loops, to get them into the new pattern’s dark-light arrangement. Don’t worry that your braid will divide or turn flat, this will be too few “no turns” for that. I made a video (bottom of this page) showing how to do this in case my descriptions aren’t clear enough.
You don’t actually have to follow a pick-up chart to switch patterns [click here*], but it makes it easier. Bear in mind that with a 6-loop square braid, you’ll only need to follow the chart for three rows of braiding, even if the chart itself is six rows long.
Voilà, after only 3 rows of braiding, the loops will be ‘set’ in the new pattern. From that point on, every loop transfer will require a turn, so you can ignore the chart and just braid with normal square braid moves.
Another benefit to having pickup charts for automatic patterns is that, using a chart, you can jump ‘cold’ into the beginning of a bicolor braid from an initial loop arrangement of “all dark shanks up” on your fingers.
This can be a nice way to start your braid. I often start braids with a simple, solid-colored braided loop at the top, and then segue into the main pattern when I join up the two parts of the loop into one braid (I demo this in my video).
[Text instructions for setting up the color patterns in this post without a chart are here in the footnotes.]
Pattern Charts Video 2 demos how to follow most or all of these charts.
Each D (dark) or L (light) in a charted row indicates one of the two loop transfers in that row of braiding. The left column is for the transferring loop held on the left hand (about to be transferred to the right hand). The right column represents the loop on the right hand that will be transferred to the left.
The letter D or L just tells you which of the loop’s two colors should end up in upper position after the loop transfer. First you check the chart to see which color is called for in the next loop transfer. Then you check the loop on your finger to see which color is uppermost already, so you can decide whether to turn it or not when you transfer it. (demoed in video).
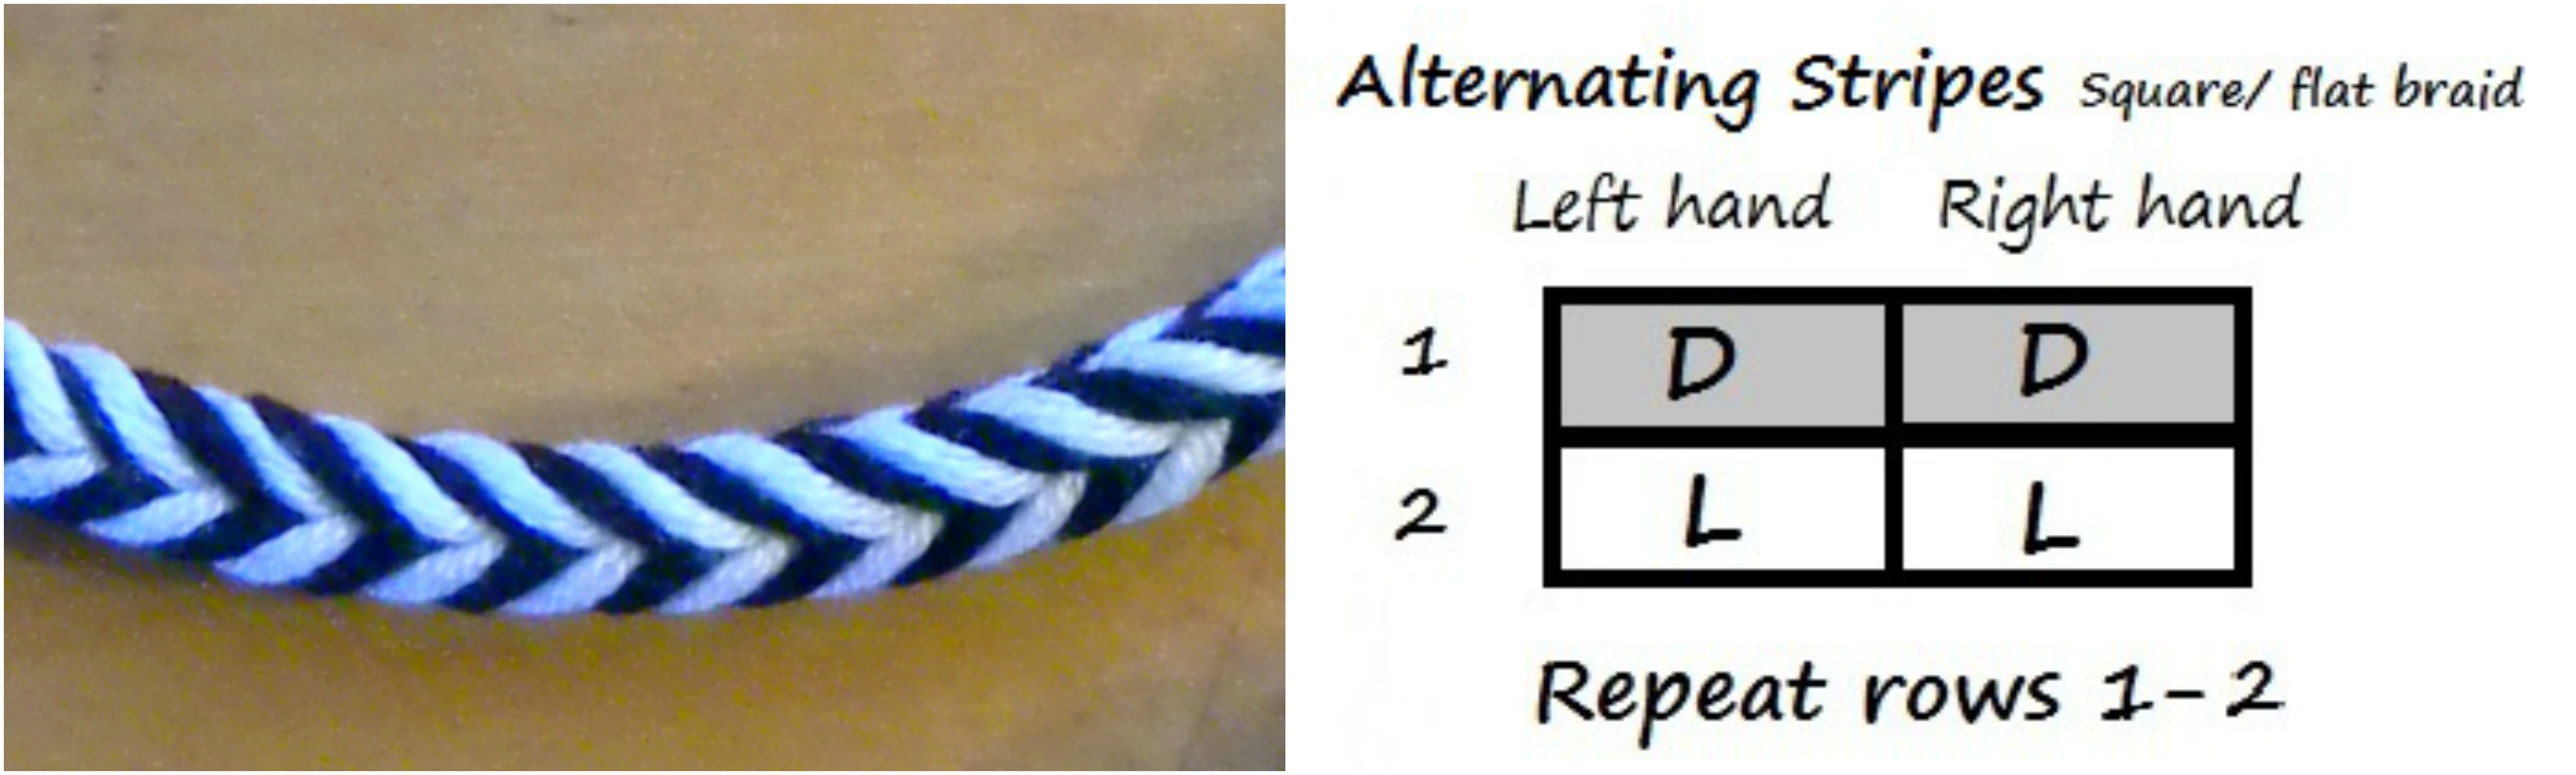
Edge pattern (loop set-up here)
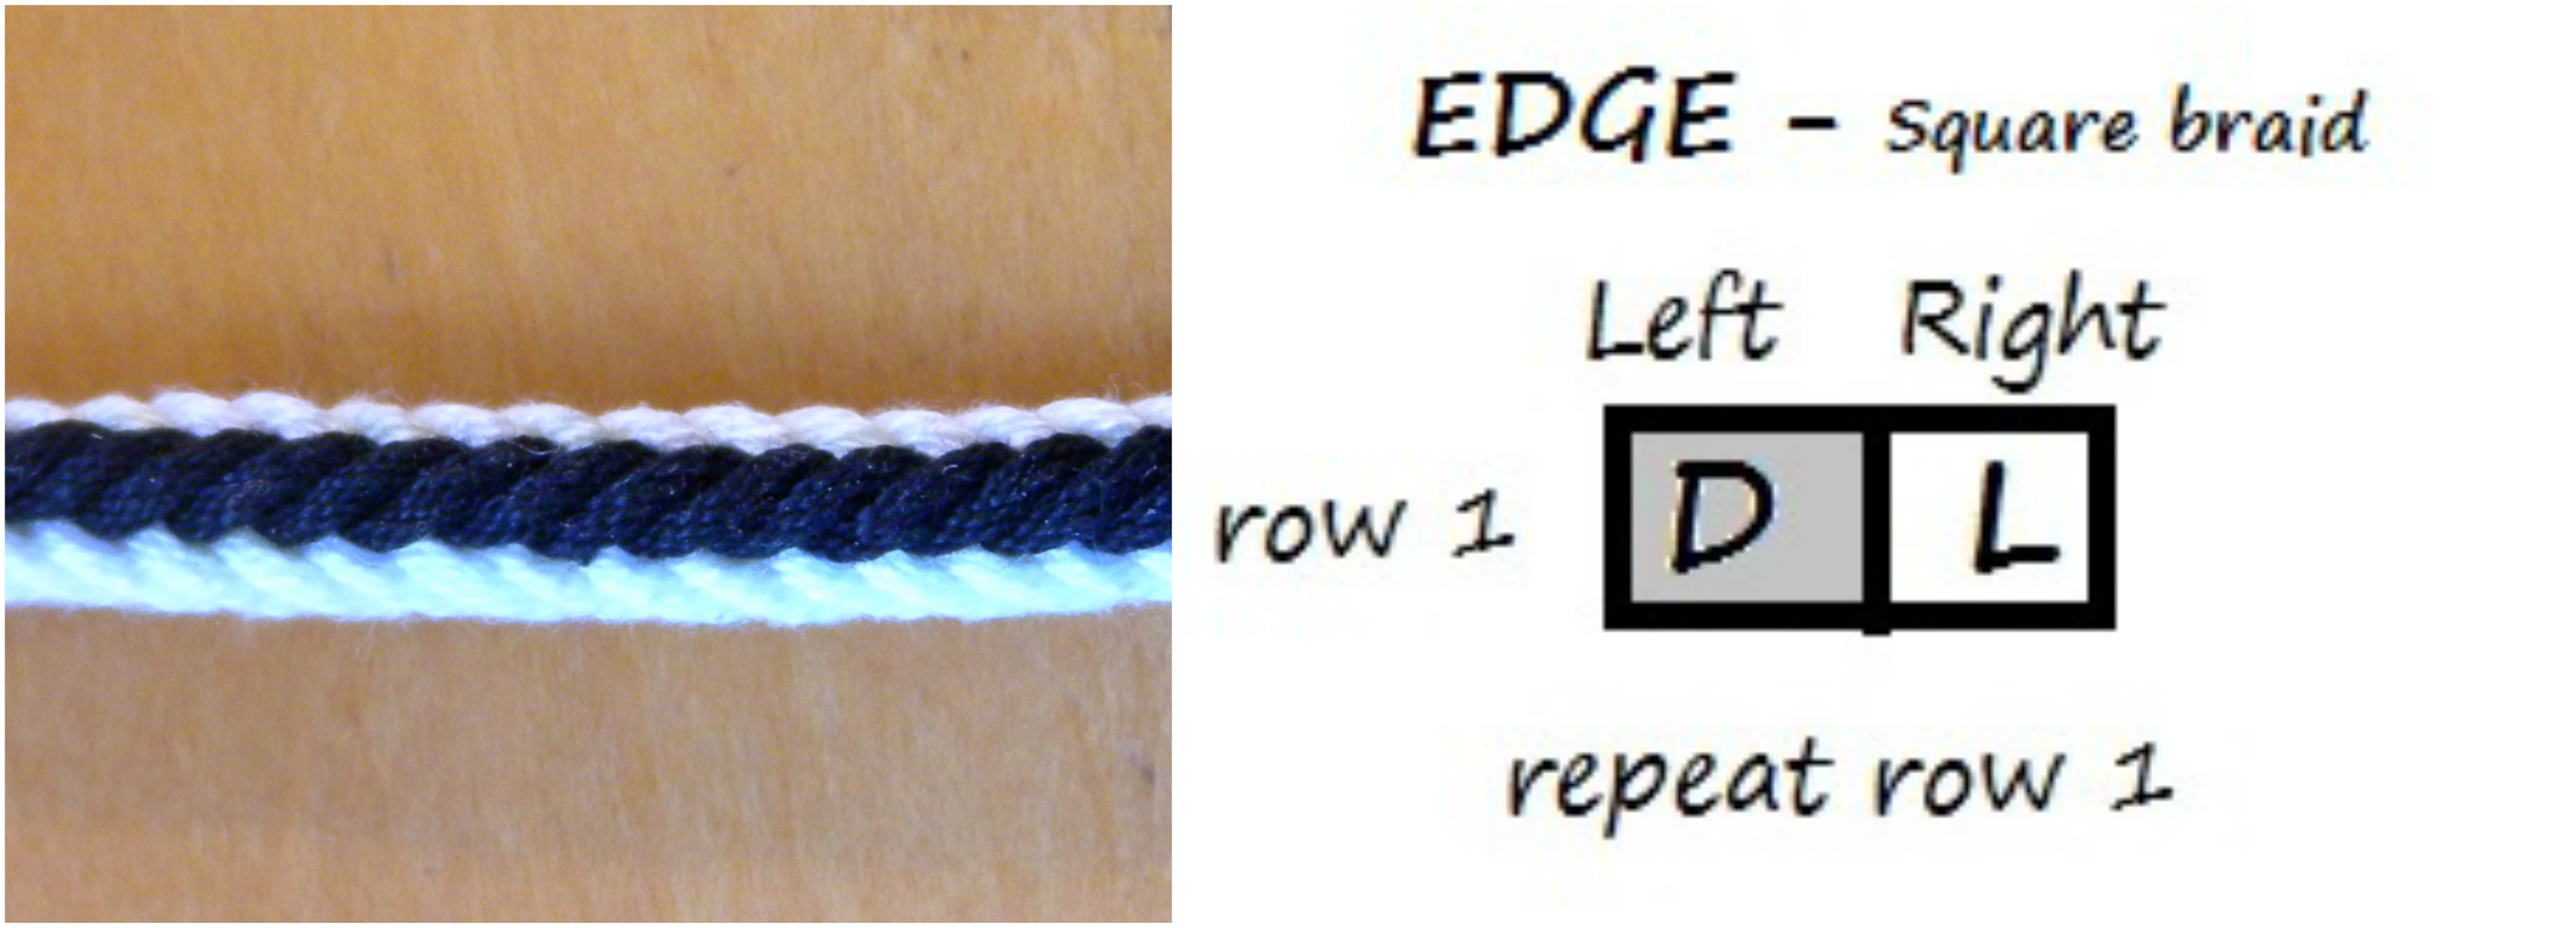
Edge pattern is the simplest possible chart – it only has one row. You braid that same row again and again to make the pattern. The braid will quickly resolve into a square braid, with the left hand holding all LIGHT shanks up, and right hand holding all DARK shanks up.
As always, pay attention to your loops for the first 3 rows of braiding! Those two instructions: “DARK” and “LIGHT” remain the same in each row, but the necessary moves for those colors might vary, depending on how your loops present themselves.
Even though this chart only has one row, you still need to carefully follow that row for the first 3 rows of braiding a 6-loop braid, if you are switching from another pattern. After that it will be automatic moves again – every transfer turned.
You’ll soon find that Edge is so easy to switch into that you really won’t need its chart after the first few times – another advantage to using Edge to separate other patterns!
Divided All-dark-up (or All-light up) pattern:
(Loop set-up here)
“All-dark-up” divided braid pattern (the loop area in the braid), side view. Like “Edge,” this pattern is also good for separating other square braid color patterns. See tip about “turning twice” to unite the two layers.
This all-dark or all-light ‘pattern’ has automatic divided braid moves (no turns) rather than square braid moves.
No chart needed! (a chart would just be all D’s, or all L’s.)
To start a braid with this pattern, start with all the loops dark-up (or all light-up), then use divided braiding moves (no turned loop transfers) to keep the same color up.
To switch to this pattern, just opt for DARK UP every time you transfer a loop. After all the dark shanks have turned uppermost, the braid will start to divide into 2 separate layers, so keep this section short if you don’t want a visible loop in your braid. If you want a longer all-dark or all-light section without an obvious loop forming in the braid, use the ‘turn twice’ strategy I describe in the footnotes (or consider using Edge pattern above instead).
This is the ‘blank slate’ pattern. I often start and end braids this way in forming a plain-colored loop at each end of a braid (demoed in video). In the too-busy black and white sampler braid, I also used this all-dark pattern between the short sections of Alternating Stripes.
Alternating Stripes (loop set-up here)
The mathematics of this pattern are really fascinating! [*more in footnotes]
If you follow this Alternating Stripes chart with 6 or 10 loops, the moves will become automatic square braid moves – both loop transfers turned – so your result will be a square braid of alternating stripes.
If you follow it with 4 or 8 loops, and start each row with an equal number of loops on each hand, the moves will become automatic divided braid moves: neither loop transfers turned. The result will be a divided braid – two small flat braids of alternating stripes.
However with 4 or 8 loops if you start each row of the chart at that point when the hands are holding an unequal number of loops, the result will be a square braid! As an alternative, you could redraw the chart so that the first row reads D–L and the second row is L–D, which accomplishes the same thing.
If you follow the chart with an odd number of loops, the moves will become automatic flat braid moves, so the braid will turn into a flat, wide braid of alternating stripes.
If you want an odd-number-of loops braid to stay square with this Alternating Stripes pattern, use the ‘turn twice’ strategy described in the footnotes to prevent the braid from splitting into two braids, or from “going flat.”
Dark-Light Alternations (loop set-up here)
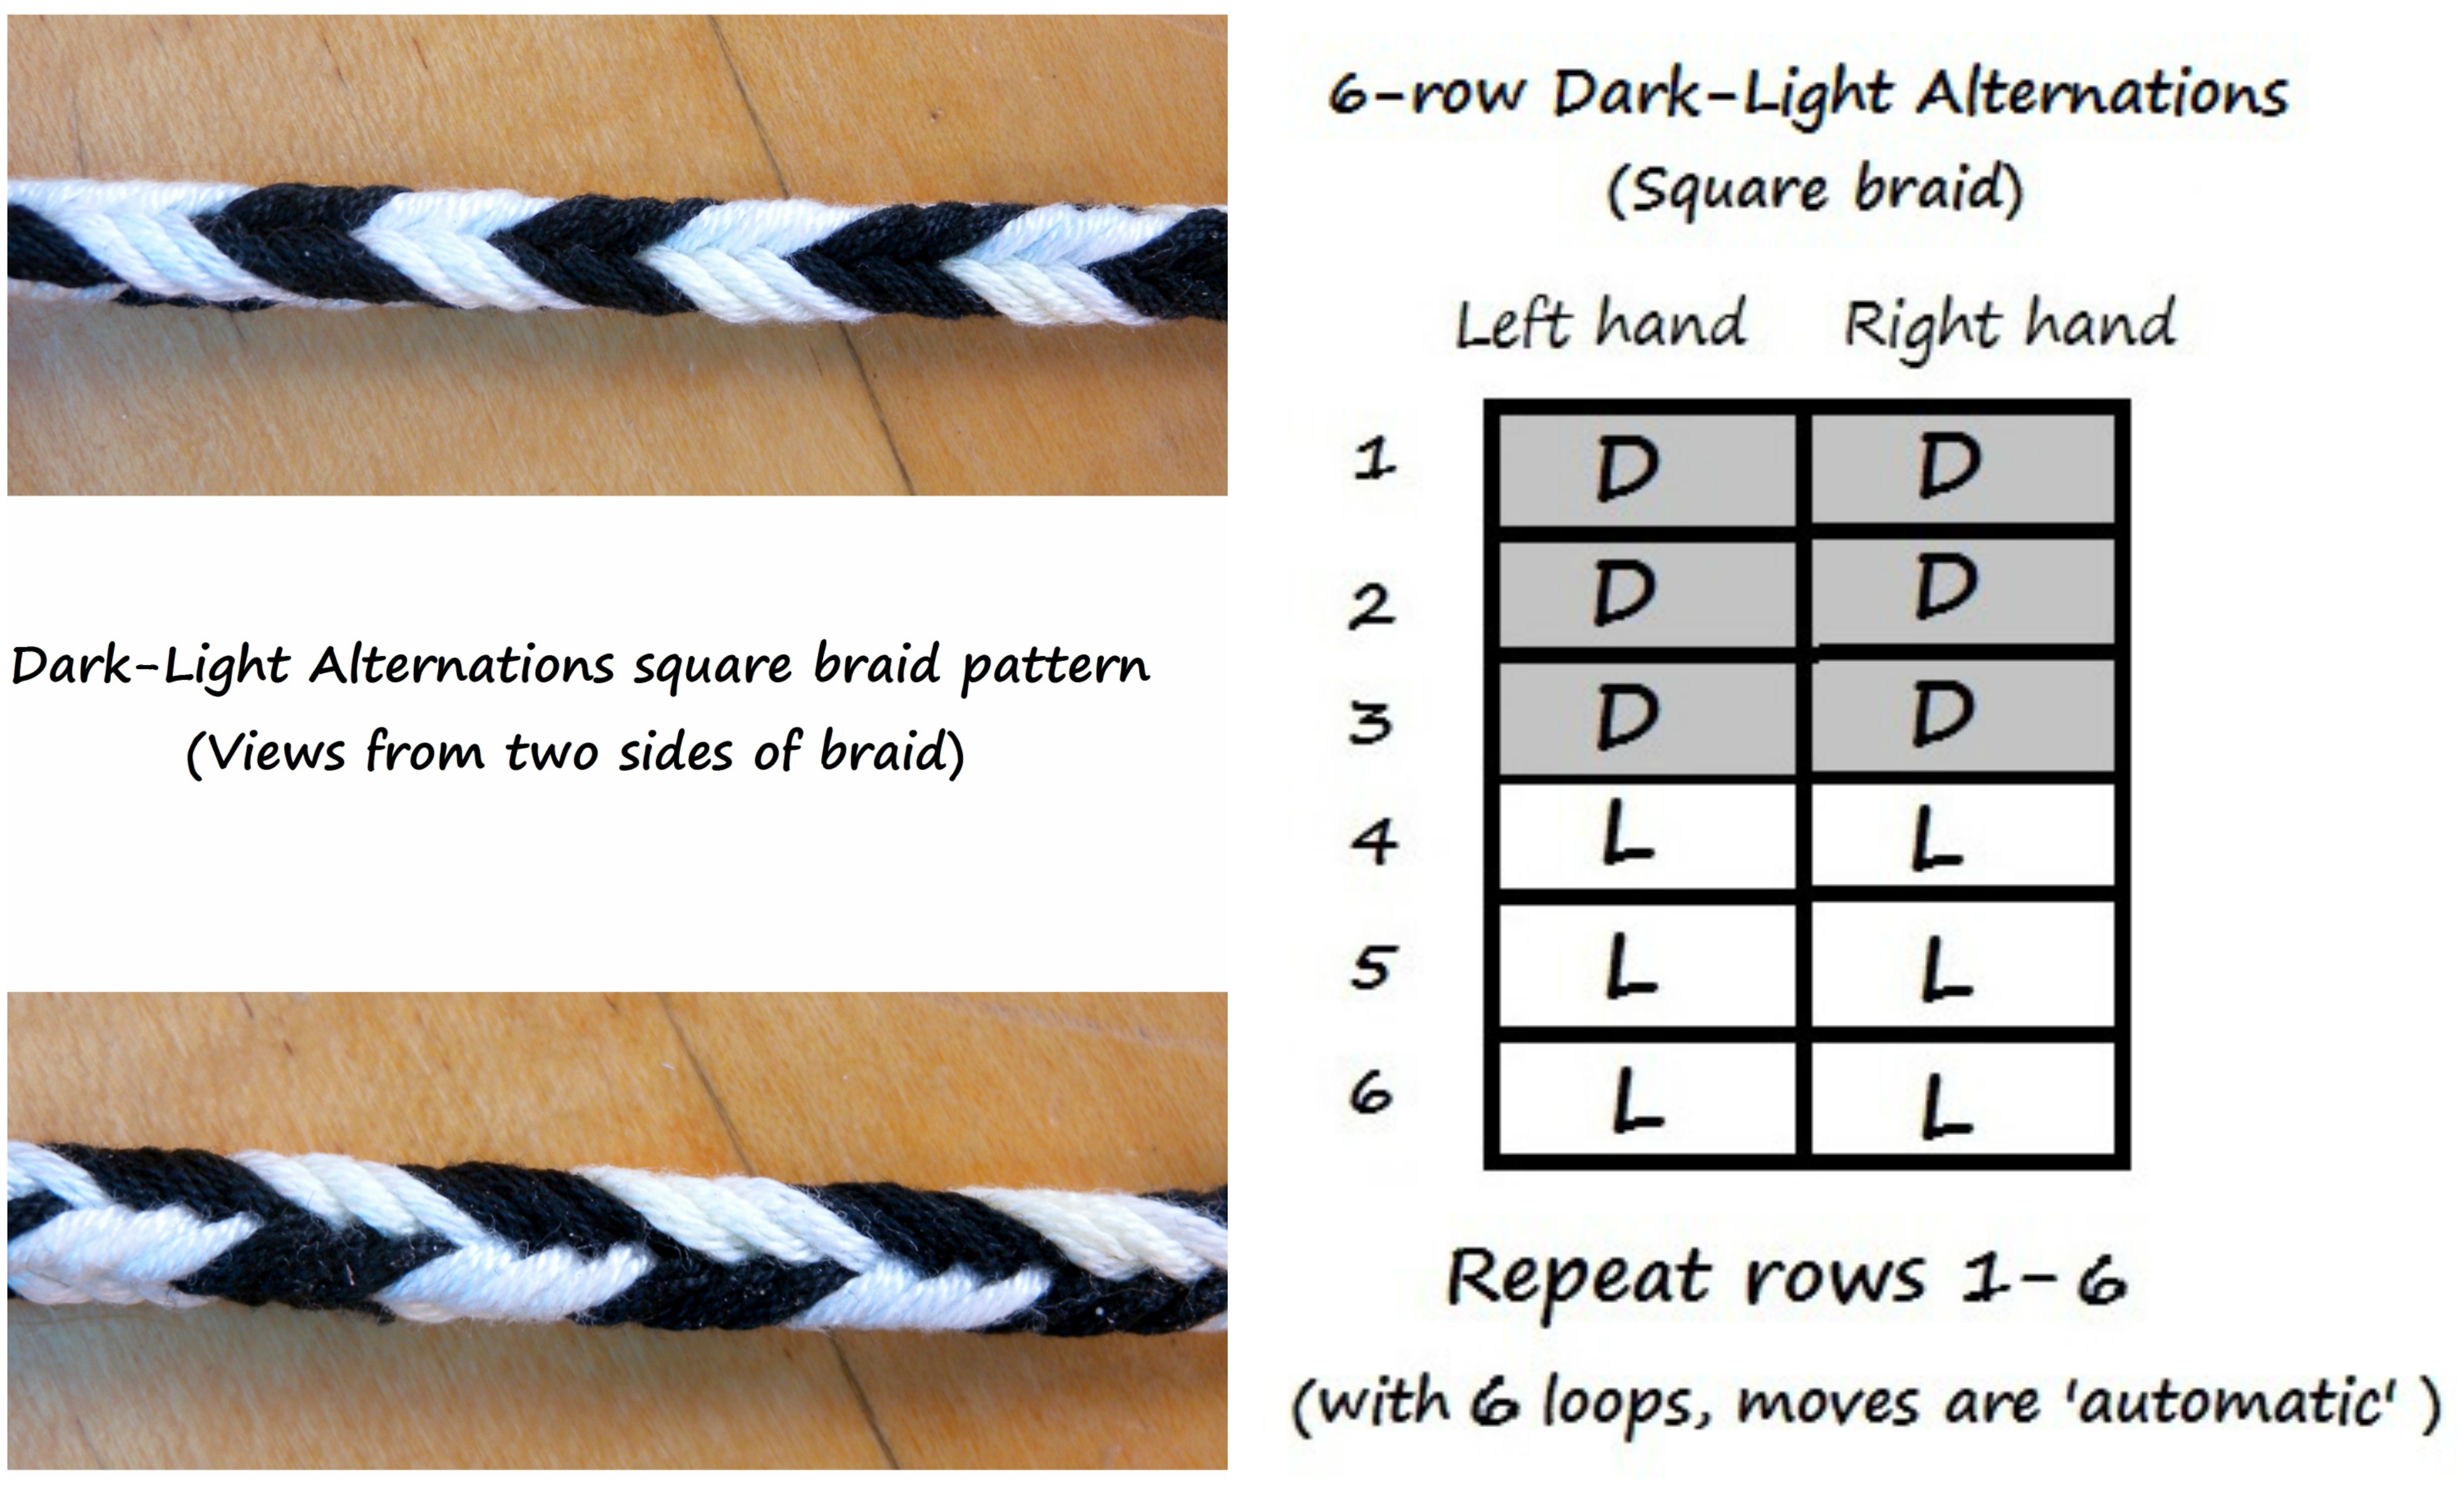
This might be the most common bicolor pattern, the one you normally make by starting with all your bicolor loops “dark-up” or all “light-up” on both hands, and then braiding a square braid.
It’s such an easy pattern to set up and braid that it might seem silly to make a chart for it! But if you’ve first been braiding Edge or Alternating Stripes, it isn’t all that simple to switch to this ‘simple’ pattern. Following the first 3 rows of this chart will put your loops into the correct positions for the new pattern — after that, following the chart will only require regular square braid moves (all transfers turned).
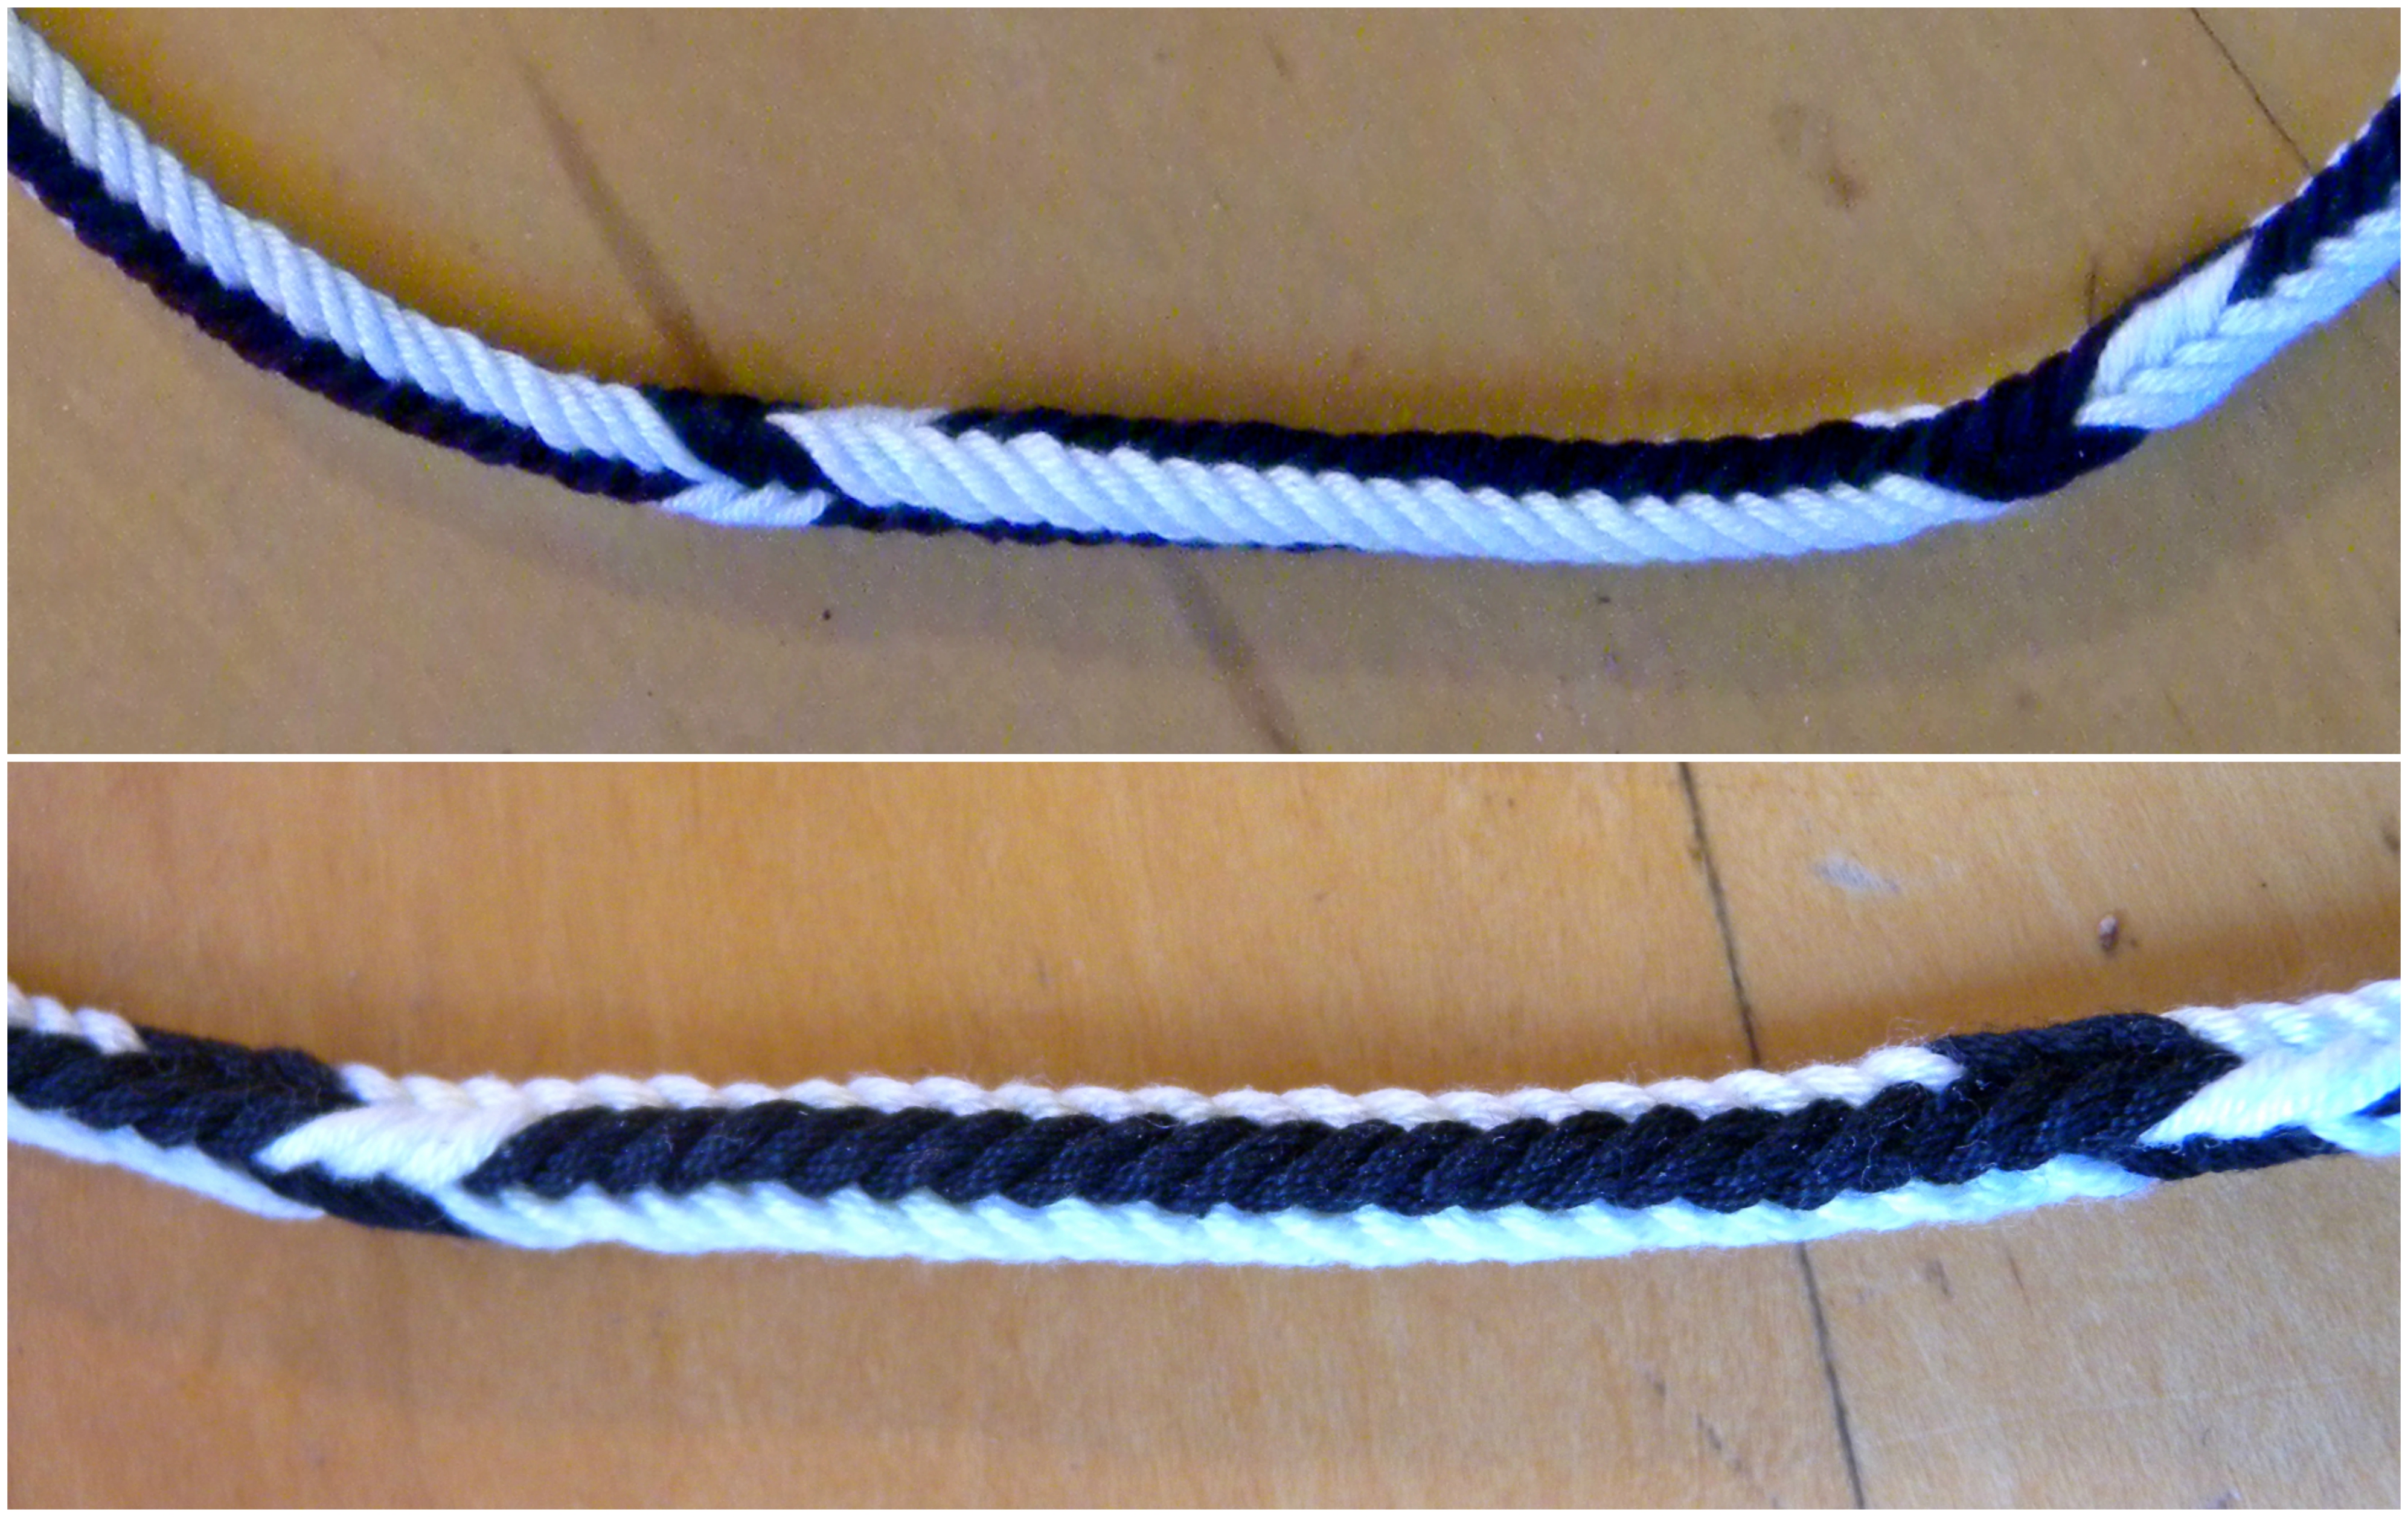
One-Loop-Wrong (loop set-up here)
(3 views of the same section)
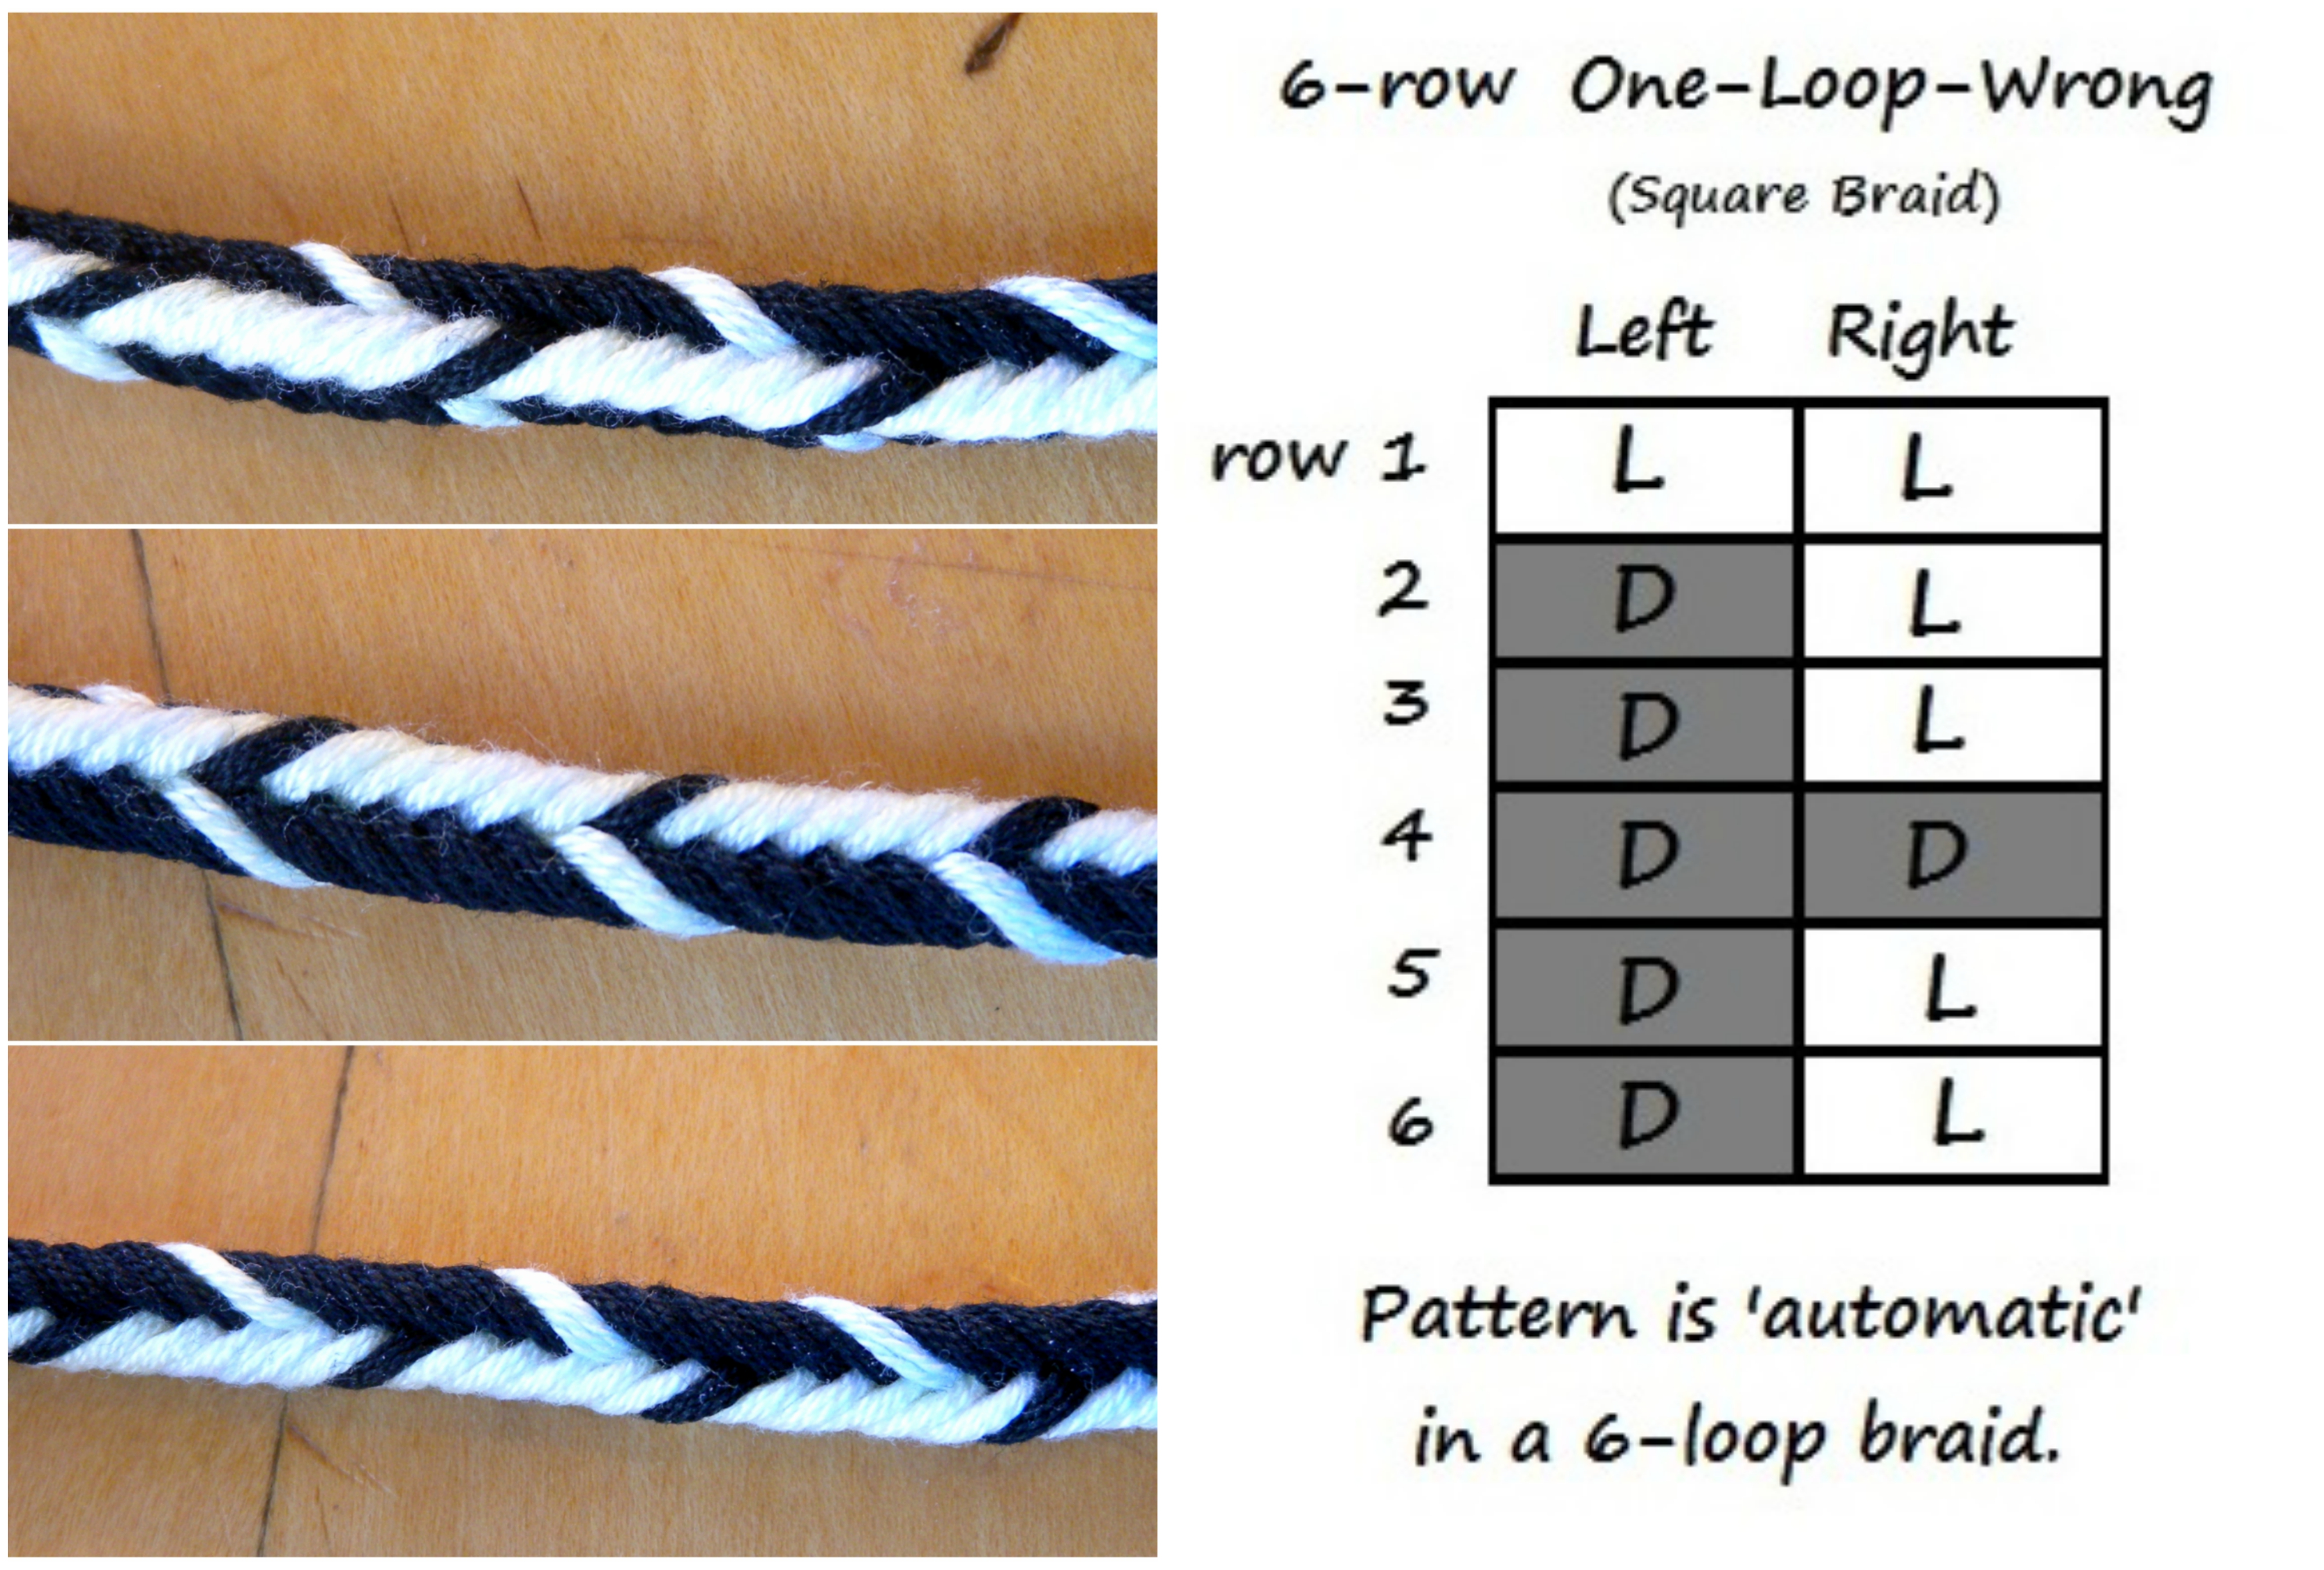
This pattern is like “Edge” but with one single loop contrary to all the other loops, hence the name.
Another way to switch to One-Loop-Wrong is to first switch to Edge pattern, and then transfer one loop ‘wrong’ – that is, without turning it.
Creating a pattern by combining two patterns:
If you are willing to count your rows, you can create a repeating braid pattern with a very long repeat simply by alternating regularly between two bicolor patterns. I did that with the two possible versions of Edge in my sampler braid:
Alternating Edge
In my sample braid, I alternately braided 11 rows of each chart of Edge.
I also braided a combination pattern using Alternating Stripes and (divided braid) All-dark-up:
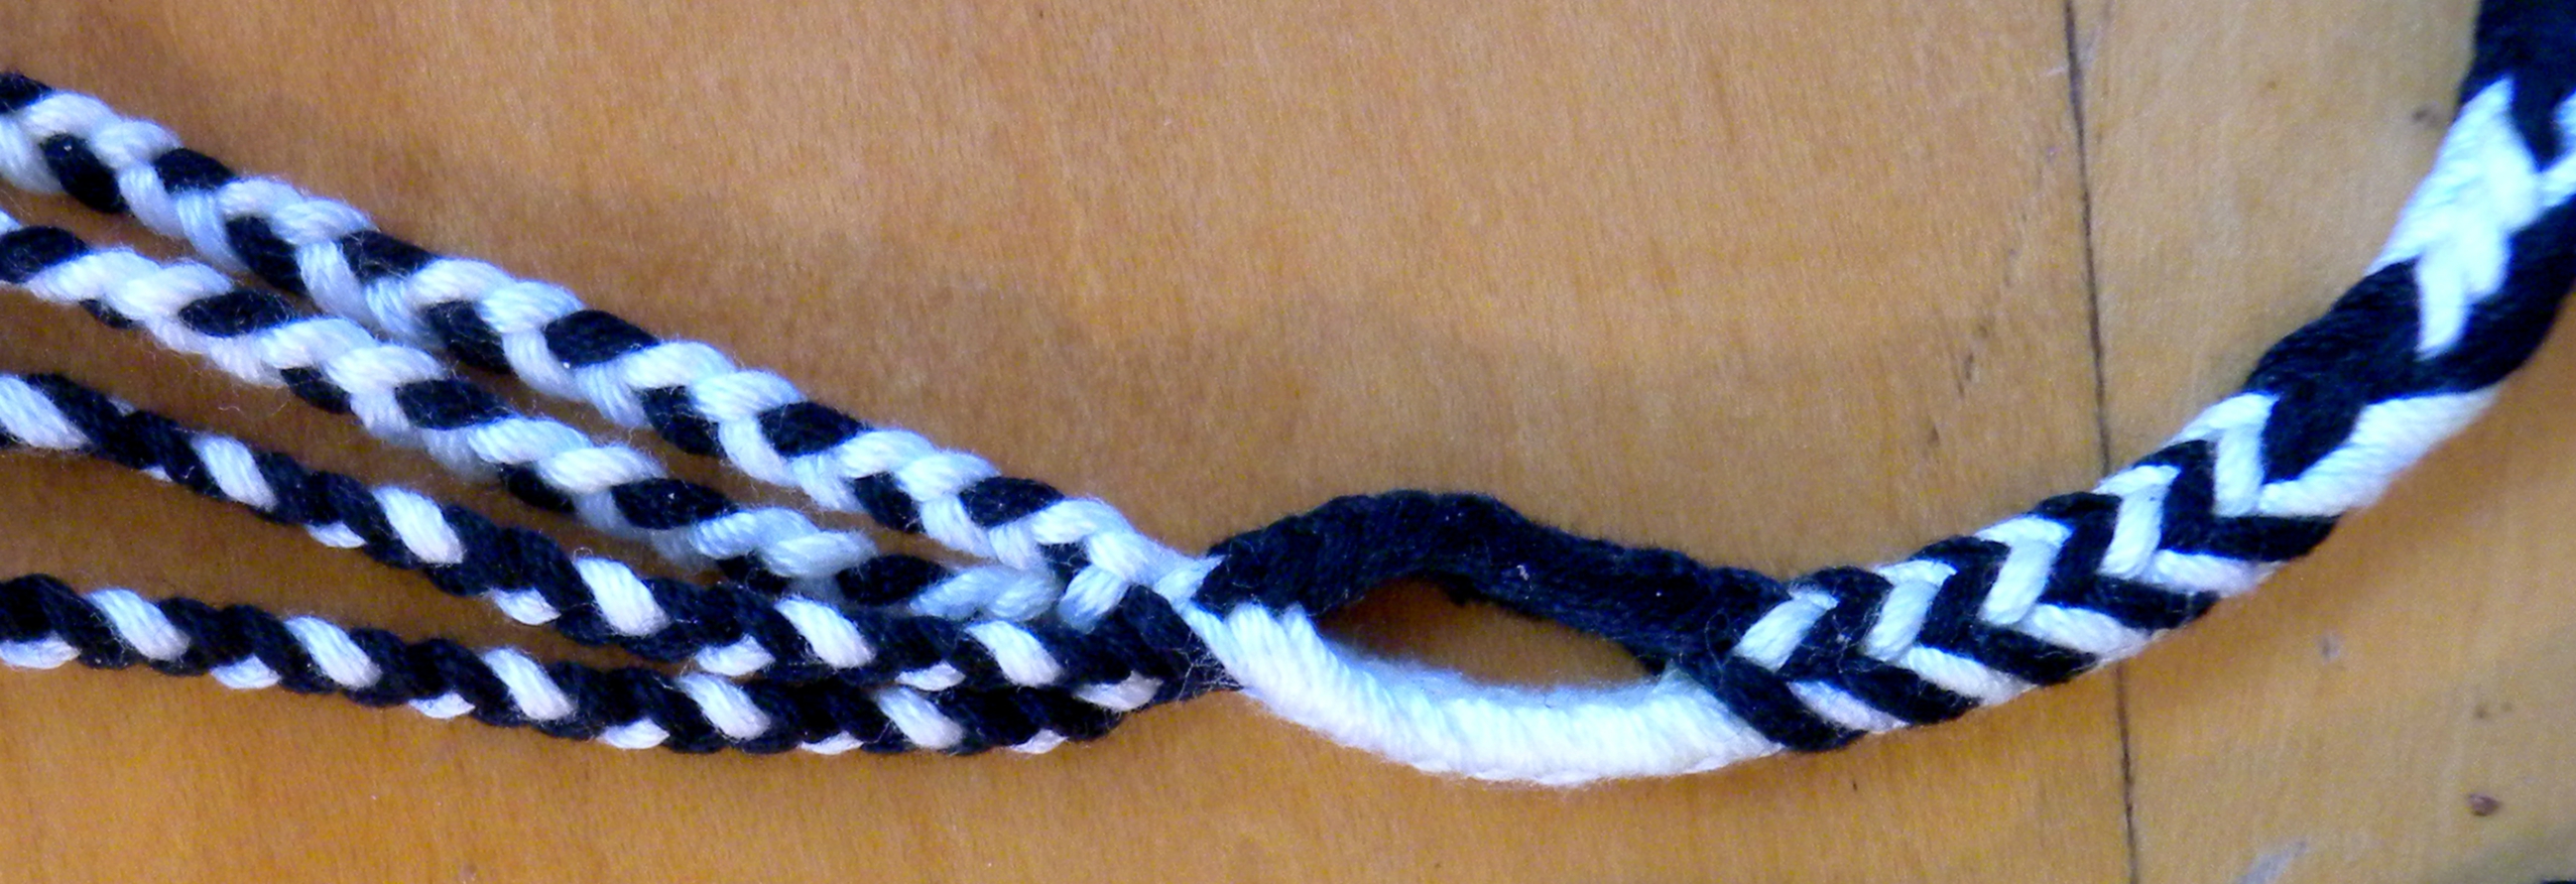
Combination pattern: “Alternating Stripes” alternating with “All-Dark-Up”. Three views from different sides of the same braid. Also very effective with Edge pattern substituted for All-Dark-Up – all four sides of an Edge pattern version would look very much like the bottom photo.
Another simple but effective combo is to alternate a long section of Edge pattern with a short section of a contrast pattern. Here I braided a long section of Edge and then one full pattern repeat of Dark-Light Alternations (6 rows) then another long section of Edge followed by one repeat of Dark-Light Alternations.
2 views of same braid section. Long Edge + 1 repeat of Dark-Light Alternations. Can be seen on far left portion of the sample braid below.
Combo pattern of Edge interrupted by Dark-Light Alternations is near left edge of photo.
Here in this jumbled sampler braid, these two repeats of the combo pattern probably don’t stand out as a “pattern”! But all by itself it can be a nice overall braid design. As can long sections of Edge broken up with short sections of Alternating Stripes.
Combo-patterns are fun and surprising in a braid (at least to braiders!). A normal braid’s pattern repeat is quite short – limited by the number of strands in the braid. But when you combine two patterns (in a two-layer bicolor-loop braid), the overall pattern repeat can be very long, especially if you use Edge or Alternating Stripes to stretch out the length of the pattern repeat. It’s a way to create an overall braid pattern with a lot of ‘breathing space’ compared to most braids, and to the ultra-busy sampler above.
Notes
6-loop braiding method
The braiding method for 6-loop square or flat braids is a combination, shown in two of my tutorials: 5-loop braiding moves for one hand, and 7-loop braiding moves for the other hand.
Start braiding with 3 loops on each hand. You’ll find that the first hand to take a loop will use the little finger and make 7-loop braiding moves, but the other hand can use its ring finger to take loops, and will make 5-loop braiding moves (for the whole length of the braid).
Click this link for my Bicolor Loops tutorial if you want to learn about setting up and braiding with bicolor loops (loops that are half one color, and half another color).
Turning twice as an alternative to not turning loops:
Square braids are so narrow, that repeatedly not turning loops might morph the braid’s shape more than you want.
This is more of an issue when braiding selective i.e. ‘real’ pick-up patterns than when simply switching between automatic square braid patterns, but it comes up in this tutorial because some of the patterns I used are not (necessarily) square braid patterns: All-Dark-Up is an automatic divided braid pattern, and Alternating Stripes is a square braid pattern with 6 loops, but becomes a flat braid pattern when braided with an odd number of loops.
You might even end up with a flat braid instead of a square one, or a totally divided braid (two separate little flat braids), or a braid that opens up first on one side and then the other as it begins to be flat, then switches to square, then back to flat on the other side, etc. (This can be a fun thing to experiment with btw!: Shape variation braids. Regularly alternating between 2 or 3 different braid shapes in fairly close sequence)
So if you want your braid to stay square, even though a particular braiding sequence has a lot of straight (open/ unreversed) transfers on one or both sides of the braid, try this:
Rather than NOT turning loops, turn them TWICE.
Yup, turning a loop twice – a 360° turn of the loop rather than a 180° turn – will result in the same color being uppermost as if you hadn’t turned it! Yet the braid will not divide/ open up at that point in braiding.
Tip: if it isn’t necessary, it’s probably better not to do it. Turning twice will prevent a square braid from dividing or “going flat”, but it also adds a slight thickening/ extra dimension to the braid at that point, and some “peek-around” on the edge of the color of the reverse side. If the required braiding moves only call for a few sequential rows of “no-turns,” it likely won’t be enough to affect the braid’s shape, in which case turning twice might cause more of a distortion than not turning.
Turning twice is demoed in my third video (bottom of page).
I show two alternative methods for doing it. That video also shows how I finish the top of a loop braid to match the end.
Set-up instructions for starting a braid with one these patterns (without using a chart):
This set-up info is what you need if you want to start a braid “in pattern,” rather than switch to the pattern from another one.
The instructions are for a “starting set-up” of the loops. You must arrange the bicolor loops into that particular dark-light order on your fingers before you start braiding, and braid using the given set of braiding moves. With bicolor loops, all the loops are of the same two colors, but some may be arranged dark shank uppermost on the finger, while others may be arranged with the light shank uppermost. In the set-up instructions below, “dark” is short for: “dark shank uppermost on finger”. If this isn’t clear, read and practice the short tutorial within Bicolor Loop Magic.
After the particular starting color-arrangement is set up, you then begin braiding with “automatic” braiding moves, repeating the same exact moves with each row (cycle) of braiding. Note: Except for Edge pattern, the loop arrangement you started with will change with each braiding move, until – after a set number of rows – the loops return to their original color set-up positions. This creates one full repeat of the pattern in the braid. Edge pattern has a 1-row pattern repeat – in Edge pattern, the loops essentially remain in the same color-arrangement throughout the braiding procedure.
Divided braid All Dark Up pattern:
I tend to start and end all my braids with this blank “pattern” for a braided loop at both ends of the braid. I also sometimes use a short section of it to separate/set off other patterns in a square braid. Here, the automatic braiding moves are “No turns in any loop transfers” rather than square braid moves. This causes the braid to divide into two separate layers.
If you want this “blank” pattern for a long braided section that doesn’t divide the braid, try the “turn twice” strategy, or consider using Edge pattern instead.
Any number of loops, all bicolor.
Start with all dark shanks up, on both hands.
Do “divided square braid” moves: All loops transferred “straight” (a.k.a. unreversed; no turns; open)
Square Braid Edge pattern:
any number of loops, all loops bicolor
[option 1] Left loops LIGHT shanks up; Right loops DARK shanks up
[option 2] Left loops DARK shanks up; Right loops LIGHT shanks up
Square braid One-Loop-Wrong pattern:
Any number of loops. Set up as for Edge pattern, then (on one hand only) turn one loop (any loop) to be in the opposite dark-light set-up from the other loops on that hand.
Square braid Alternating Stripes pattern:
6 or 10-loop version, all loops bicolor.
Same odd number of loops on each hand:
Dark, light, dark… Alternate the colors on neighboring fingers.
Note: the color arrangement on the fingers must be same on both hands
4 or 8-loop version of Alternating Stripes
Same even number of loops on each hand: Alternating colors D, L, D, L on one hand, and L, D, L, D on the other hand – Note: the color-arrangement on the fingers must be opposite on the two hands. If the left A-finger has dark-up, the right A-finger must have light-up.
For a 4- or 8-loop divided braid (2 separate braids, braided simultaneously) of Alternating Stripes you would set the loops up with matching loops on the two hands: D, L, D, L… in the same, matching order on both hands, and then braid without turning any loops. (I often use this pretty divided 4-loop pattern in making 2 zebra-striped ‘minibraids’ at the end of a braid.)
For a 6 or 10-loop divided braid of Alternating Stripes, the loops would be D–L–D… on one hand and L–D–L… on the other (no turned loop transfers).]
Square braid “Dark-Light Alternations” pattern:
Any number of loops, all loops bicolor
On both hands, all loops start with dark shanks in upper position.
OR, the opposite (all loops light shanks up)
Note: Most patterns have several possible initial loop set-up arrangements. (well, Edge only has two possibilities).
Above, I give the setup that seems the easiest to describe or to set up. For example, Dark-Light Alternations could be set up to start with any of the loop arrangements that the pattern rotates between as the loops move gradually from “all dark shanks up” to “all light shanks up” and back again. But those other loop arrangements take longer to describe, and are less simple to grasp than the all-light or all-dark-up instructions, plus would have to describe a specific number of loops, whereas “all-dark-up” can describe the start of this pattern for a braid of any number of loops. For more about how the arrangement of the loops on the fingers relates to the pattern in the braid, see my post on Pattern Planning.
Pattern-switching without a chart (square braids)
Fast and sloppy method: Turn over any loops on your fingers that are not already in the correct dark/light orientation for the new pattern (see pattern set-ups above). This works, but can leave a textural irregularity, or perhaps some longer floats of threads at the switching point between the two patterns. I never do this, so I actually don’t speak from experience! If you don’t want to bother with pick-up, this might work just fine (though not for flat braids, as it would tie the two layers together there, so the braid would not open out to be flat in that spot).
A smoother way to switch patterns is to braid your way into the next pattern, using a selective loop-turning strategy (“pick-up”):
Pick-up without a chart:
When you are ready to switch to the new pattern: Look at your loops, picture what their dark-light starting arrangement should be for the new pattern (described above), notice which loops are in the wrong dark-light setup currently (it should only be a few), ‘mark’ them mentally, and then keep braiding while tracking where those “wrong” loops are. Remember, all the loops move to new fingers as you braid, not just the transferring loop.
Each time one of those “wrong” loops comes up to be the next transferring loop, transfer it WITHOUT turning it JUST until each one of those few “wrong” loops has been corrected. For a square braid, it will only take a few rows of braiding to correct the few “wrong” loops, after which you will be turning all the loops again.
Tip: Don’t over-correct! Only correct those few loops that were wrong when you started the new pattern. Remember, after you start braiding, the darks and lights on the fingers won’t be in the starting arrangement anymore (except for Edge pattern). So don’t think all those loops are suddenly “wrong” on your fingers just because they aren’t in the starting dark-light arrangement after you’ve braided a row. For example, with the Dark-Light Alternations pattern, even the correct loops won’t be “all-dark-up” anymore after the first braiding move. One-by-one the loops gradually all turn light-up. They won’t be all-dark-up again until you’ve finished six rows (for a 6-loop braid). When you are first switching patterns, there is a natural tendency to forget this, and suddenly think a bunch of your ‘correct’ loops are ‘wrong’ just because they aren’t in the starting set-up position anymore.
Videos.
Video 1 – How to start this braid partway down (leaving an unbraided section at the very top to finish off later as a fringe of mini-braids), and begin braiding a braided loop section in the All-Dark-Up “blank slate” pattern.
Video 2 – How to follow a pick-up chart
Skip to 6min, 12sec to go straight to the point where I start demoing how to follow a pickup chart. (start video, then slide timeline ‘bubble’ under it to the right.)
Slow start where Video 1 left off, showing sample braid in notebook, setting up etc. I’ve already braided an All-Dark-Up braided loop for the top of the braid, I will now braid my way out of that pattern and into the first square braid pattern “Alternating Stripes” by following its pickup chart. This will join my braided loop into a unified braid.
Skip to 6min, 12sec to go straight to the point where I start demoing how to follow a pickup chart. (start video, then slide timeline ‘bubble’ under it to the right.)
I ended up demoing switching between most or all of the pattern charts of this tutorial, ending with a braided loop in a different divided braid pattern (left hand dark up; right hand light up), and finishing off with a tassel of 4 minibraids – braided with divided braiding, so only requiring two braiding procedures. (Sorry, I haven’t written out full video timelines for these videos yet, may add them later.)
Video 3 – Turning twice, and Finishing the top of the braid.
Skip to 3minutes, 31seconds to see 2 ways to Turn Twice, here while finishing off the start of the braid that was braided in video 1. (you can skip to 3:31 by starting the video; then dragging the little timeline bubble under it rightward to 3:31)
Skip to 3minutes, 31seconds to see 2 ways to accomplish the Turn Twice trick
Published Oct/3/2017, last updated Feb/1/2019
© 2017-2019 Ingrid Crickmore


Maravillosos trabajos!!!! Por favoooor!!!! le pido que haga un video con 6 bucles de las trenza planas con forma de w ya hice el intento pero no me salieron . Disculpe la molestia seguro explica muy bien, pero lamentablemente no hablo inglés y solo me guío por sus movientos en los videos. Muuuuchas gracias y espero que pueda hacerlo. Bendiciones
¡Lo siento! Este video no es exactamente para enseñar la trenza (como mis otros videos), este video enseña cómo usar y entender los gráficos. Creo que en este caso, las palabras son más importantes que en mis otros videos. Aquí en este tutorial del sitio web, utilizo los gráficos por primera vez para explicar cómo hacer patrones en las trenzas.
Pero con 6 bucles (bicolores) esta trenza con forma de W no es plana, es cuadrada más o menos. Solamente con un número impar de bucles (bicolores) es posible la trenza plana con el patrón W. Y tambien con 3 bucles negros y 3 bucles blancos, una trenza plana o cuadrada de W es posible (sin bucles bicolores). ¿Esta información le ayudará a hacer la trenza?
(por favor, disculpe el español de Google Translate! Lamentablemente, sólo hablo inglés)
¡Tal vez lo entendí mal!
Que página de este sitio web tiene la trenza que desea aprender?
¿Es aquí / de arriba? https://loopbraider.com/2017/10/03/pickup-2/
¿O aquí ?: https://loopbraider.com/2015/10/18/flat-6/
Muuuuuchas gracias por responder voy a ver de nuevo los videos y seguiré intentando. Y otra vez gracias le deseo lo mejor.