Pick-up patterning is the technique used in forming the motifs of the so-called letterbraids. Doug’s Braid is a great one to learn pick-up with before tackling letterbraids.
Doug’s Braid is a 7-loop, two-layer braid that I am somewhat crazy about. Even though it’s a 2-layer braid, it’s not flat. It can seem round to softly square, depending on the color-pattern. It’s one of my favorite braids – attractive and useful, an odd but easy method, as intricate as a ‘spanish’ or double-braid, and a very unusual structure. It makes a great-looking drawstring, necklace, bracelet, or cord for knotting.

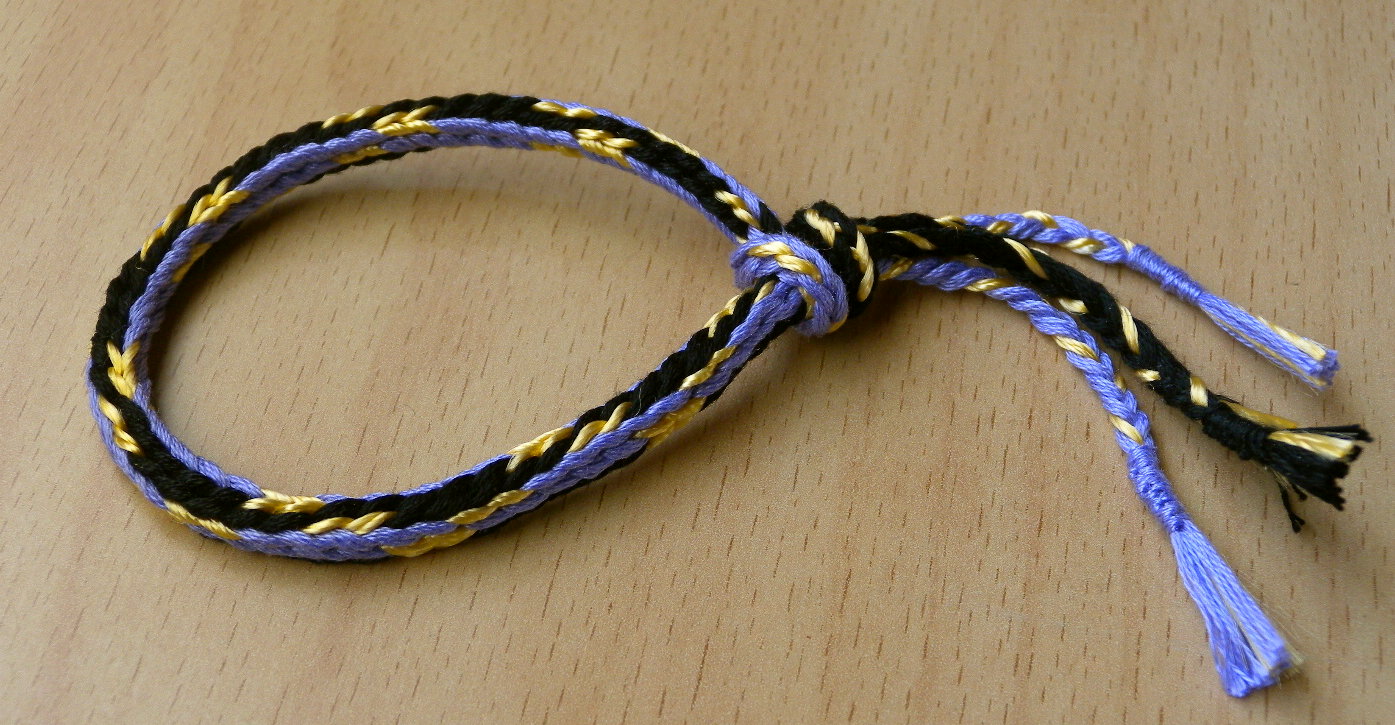
The photos above show two of my favorite Doug’s Braid color-patterns – I teach the upper pattern in the video tutorial for Doug’s Braid (I twisted the braid to show its roundness, the pattern doesn’t actually spiral). The lower pattern is in my text tutorial.
Now Gary Mitchell of the FingerTips braid planner site has created an online interactive pick-up pattern planner for Doug’s Braid! Pick-up patterns are two-color patterns that can be strikingly ‘non-braided’-looking. They are patterns that the braider can alter, or alternate between, within the same braid – patterns that might require different moves in successive rows of braiding. Which is why charts of the braiding moves are very helpful! That’s the topic of this post – how to plan and braid Doug’s Braid pick-up patterns, and how to use Gary Mitchell’s planner for this on FingerTips.
Simple, bold pickup patterns are better than complex patterns for Doug’s Braid. On a round braid the edges of the pattern recede and get obscured “around the curve.” A complicated design that looks great on the flat planner page won’t necessarily come across well in the actual braid.
The advantage of this roundness is that the pick-up pattern can be viewed ‘on edge’ – from the sides! It’s a very cool and unusual way to view a pick-up pattern. The three Doug’s Braids below were photographed in side-view. See how there’s a reverse-color ‘reflection’ of the same design above and below? That’s the essence of any pick-up pattern’s side-view.
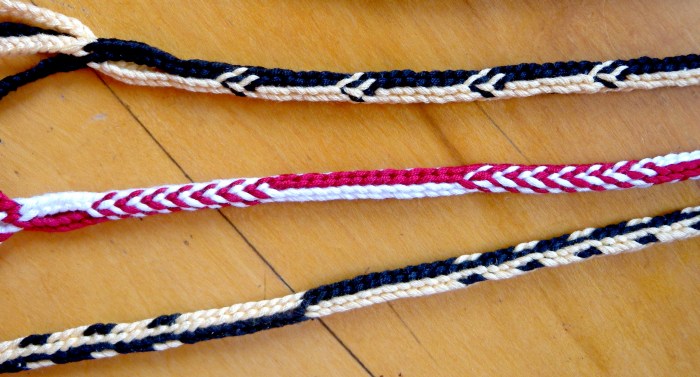
Some Doug’s Braid pick-up patterns, in side view. Their roundness is hard to see in a flat photo. If you look at the loop in the upper braid (left end), the split between the upper and lower layers of the braid emphasizes the braid’s roundness.
Most pick-up patterned braids and weavings are flat and wide, and their sides are just narrow knife-edges, not really ‘surfaces.’ If you look at one of those edges straight on, you might be able to make out that it has a skinny mirrored dark-light pattern from the opposite colors of the upper and lower surface of the textile – but on such a narrow surface that it barely qualifies as a pattern. But the sides of a Doug’s Braid are just as wide as any of its surfaces, so the mirrored patterning is very noticeable, and can sometimes be my favorite view of the pattern.
This post includes charts for several patterns I designed using Gary’s planner (including the 3 patterns in the photo above). I’ve added notes to them to point out key features that might be helpful. Below each chart I’ve included a link to its live planner page, where you can change the design by clicking on it, or click “RESET” to start from scratch with a blank planner page.
Learn the braid from my earlier tutorials, and practice with some “non-pickup” braids first. Pick-up charts are much easier to follow after your fingers have memorized the braiding moves. Doug’s Braid moves will seem strange at first, but (maybe because of that!) they are really fun to do once you get used to them.
I would love to see any Doug’s Braids you make from these patterns, or ones you come up with yourself using Gary’s planner, and I’m sure Gary would too! (my Contact form is under the “About” tab in upper menu).
Gary Mitchell’s new interactive pick-up planner for Doug’s Braid
The planner has two interactive charts. You can click on either one to change a ‘stitch’ from dark to light or vice versa. On the left is a slanted display chart that shows a tiled approximation of how the pattern looks – but note well!: this is a full 360° view around the braid, as if the braid were cut open lengthwise and spread flat. On the right is an upright pick-up chart for braiding from that shows the four moves (or “operations”) in each row of braiding.
Below is braid pattern #1 Two-row Dots. The planner image is a static screenshot, go to Gary’s live webpage for this chart to change it, switch the darks and lights, etc. (Notice that any design you create has its own URL – this is a very useful feature!)
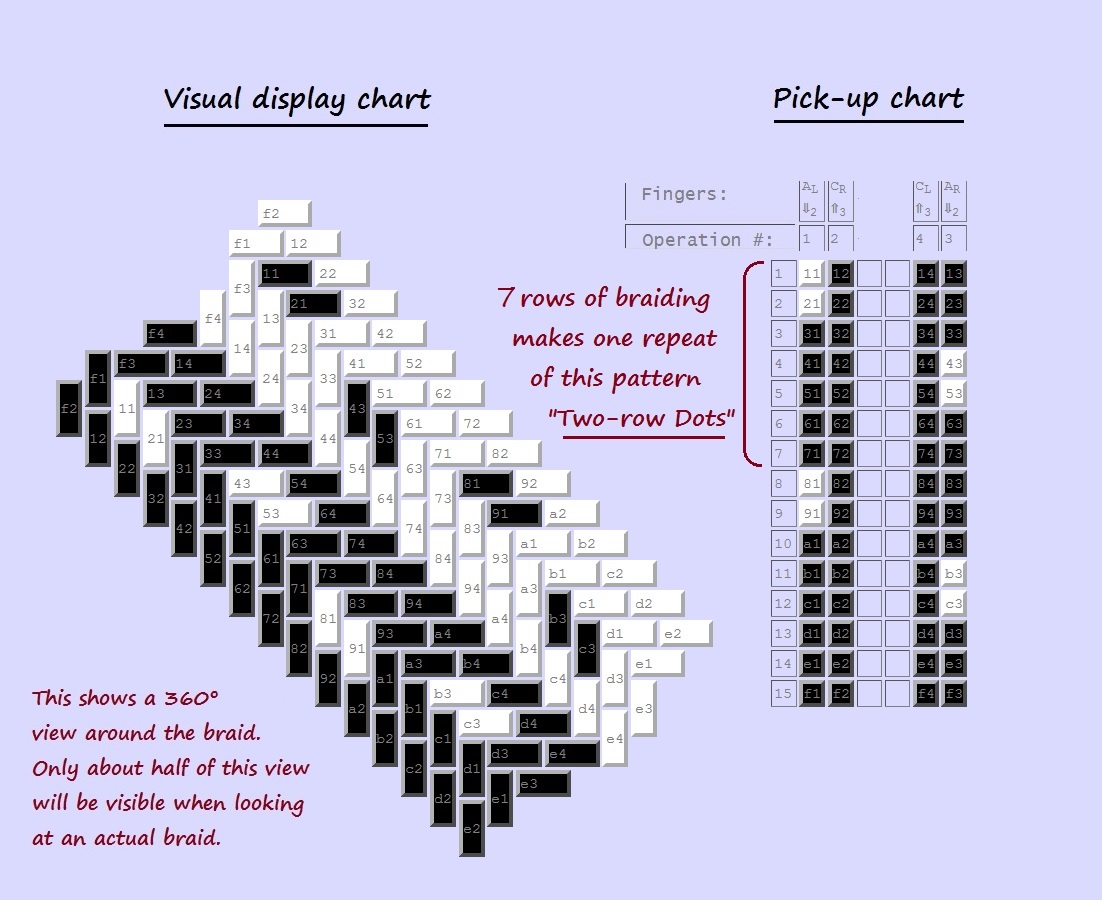
Chart 1 Two-row Dots. Keep repeating rows 1-7 in the Pick-up Chart to braid this pattern. Click here to go to live chart in separate tab.
The slanted display chart (left side of image above):
The slanted display chart on the left gives a tiled approximation of what the pattern will look like. This chart is probably the one you’ll prefer to play on when designing patterns.
Because of this braid’s round shape with no single main side, Gary chose a full 360° view – opened and spread out flat – for this tiled display of the braid appearance. So don’t get carried away the way I did when you first see that immensely wide-looking blank ‘canvas’ for planning patterns! Only about half that width will be visible from any view of the finished braid.
To visualize the “top” of the braid, look at the left of the slanted display (the darker section in the example above), and block out the lighter section. To visualize the “underside”, look at the right half (here, the lighter section).
To visualize the RIGHT SIDE surface of the braid, look at only the center of the display chart – where the dark and light halves meet – and try to ignore both edges of the chart, since they won’t be visible from the side. Those two outer edges of the chart actually represent the LEFT SIDE surface of the braid – imagine those edges taped together as if forming a tube. Where the taped edges meet would be the center of the left side surface of the braid. Btw, unlike the top and bottom surfaces, the patterns on the left and right sides of the braid don’t have to be similar – see charts 4 and 5 below!
When you click on any tile, two tiles will change colors in the slanted display chart – one on the upper surface, as well as its mirror-image tile on the lower surface. (Pick-up 101 explains why pick-up patterned braids show the same design – in opposite colors – on their upper and lower surfaces.)
Pick-up chart of the braiding moves:
The straight up-and-down chart on the right side of the page is the Pick-up chart. This is the chart you follow while braiding to create the pattern. I demo how to follow a pick-up chart in the videos in Rock Your Square Braid (also described in Pick-up 101).
Rows: Each row represents one repetition of the four main moves (“operations”). A row includes all the moves, after which they all repeat in the next row of the chart.
Columns:
The rows are divided into 4 columns – one for each of the 4 loop-transferring moves of this braid.
Operations column heading: Doug’s Braid has 4 loop-transferring moves (“operations”) that are done in a certain order. The columns are numbered at the top in the order in which these moves are done: Left-to-right on the left side, and in the opposite direction – right-to-left – on the right side.
Fingers column heading: You can ignore the “fingers” heading to the columns – if you’ve memorized the moves, you will already know which fingers are involved in each of the 4 moves.
The dark or light color of a cell refers to the color of the upper shank of the loop being transferred in that move.
Dark vs. Light: A dark cell means: In this move, transfer the bicolor loop so DARK finishes on top. A light cell means: In this move, transfer the loop so LIGHT finishes on top. Whether you turn the loop or not depends on which of the two colors is already uppermost before you move the loop. The chart doesn’t tell you this – you must look at the loop to determine whether to turn it or not.
Tips for planning patterns and following a pick-up chart:
(Click links to read full tip)
IMPORTANT! Follow the right half of the pick-up chart “backward” (right-to-left)!
Avoid designing in the top row of the slanted chart, and the bottom row of the pick-up chart.
Designing, ‘tweaking,’ and saving patterns
Sample Pattern Planner Charts: (I don’t yet have braid photos for each pattern – will add at some point!)
What’s with the smaller green & yellow chart on the far right of the planner pages below? – Ignore it for now! Gary added that auxiliary chart more recently. It provides some extra but non-essential information (explained here).
What are those mysterious numbers on the tiles? – You can ignore those, too. They really aren’t necessary for planning or braiding patterns. They can be helpful if you want to know exactly which tiles in the display chart are the result of a particular move in the the pick-up chart. (explained here).
Chart 2 Encircling Chevrons 2 (above). Click here to open live chart for Encircling Chevrons 2 in a separate tab.


Chart 3 Emblem 1 (above), photo above chart. Click here to open interactive chart for Emblem 1 in a separate tab.
Chart 4 Emblems + Chevrons (above). Right side of the braid has the same emblem-design as the previous pattern, left side has little chevrons. Click here to open live planner for Emblems + Chevrons in a separate tab.
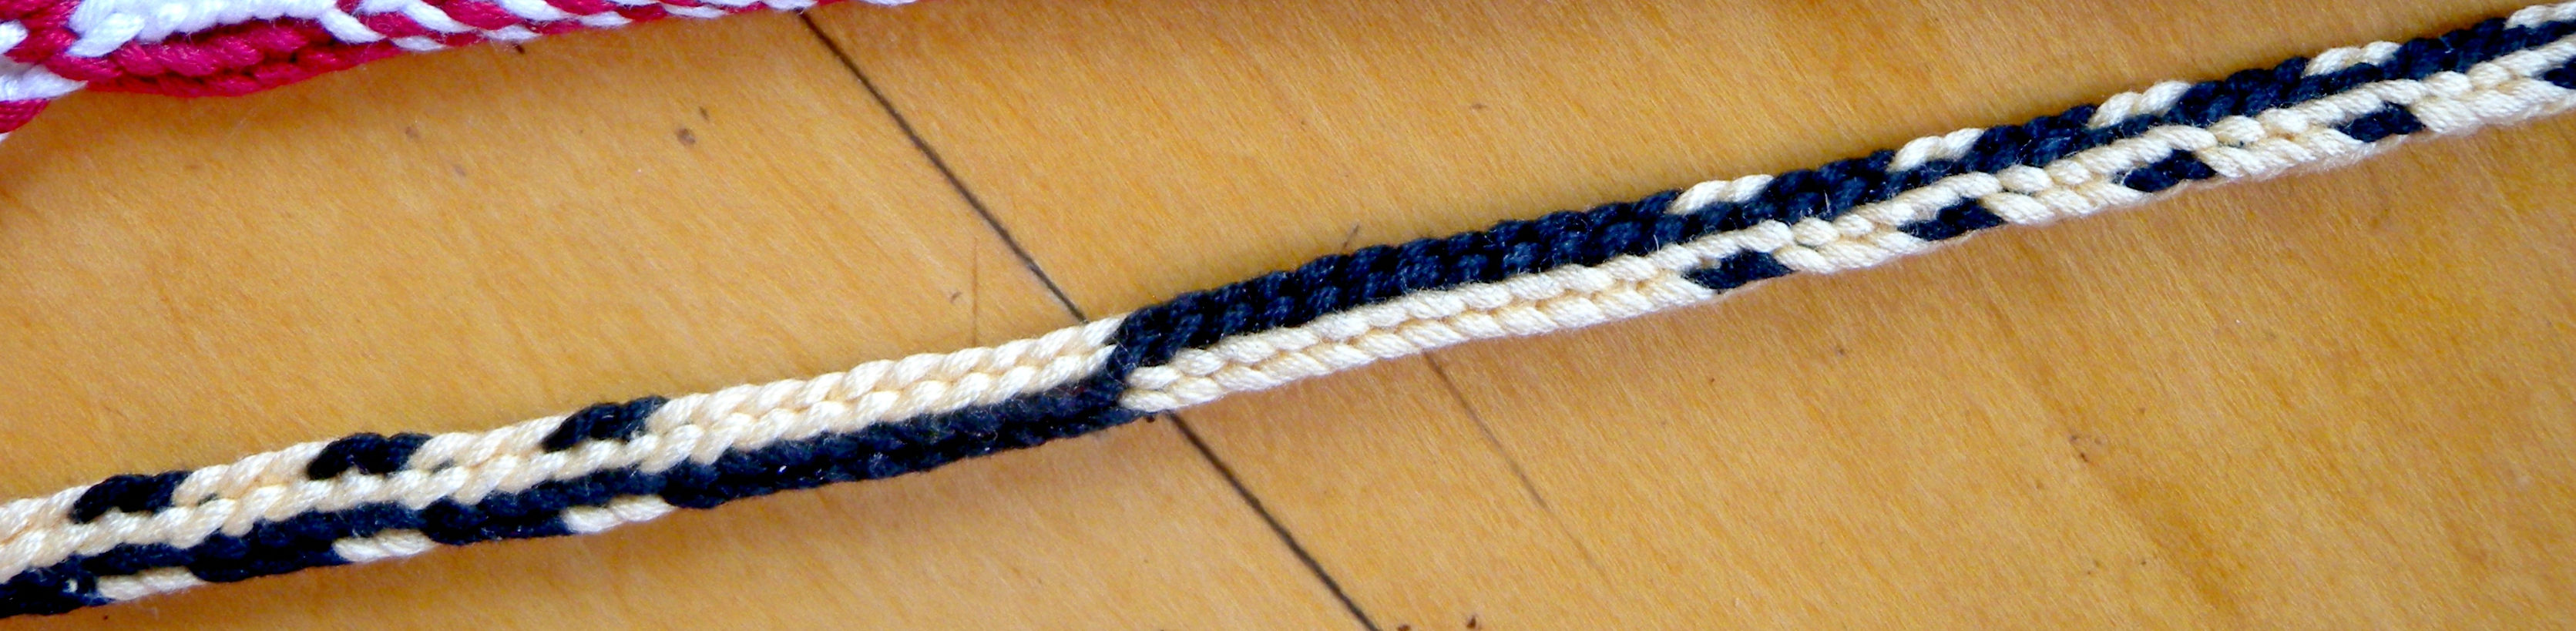
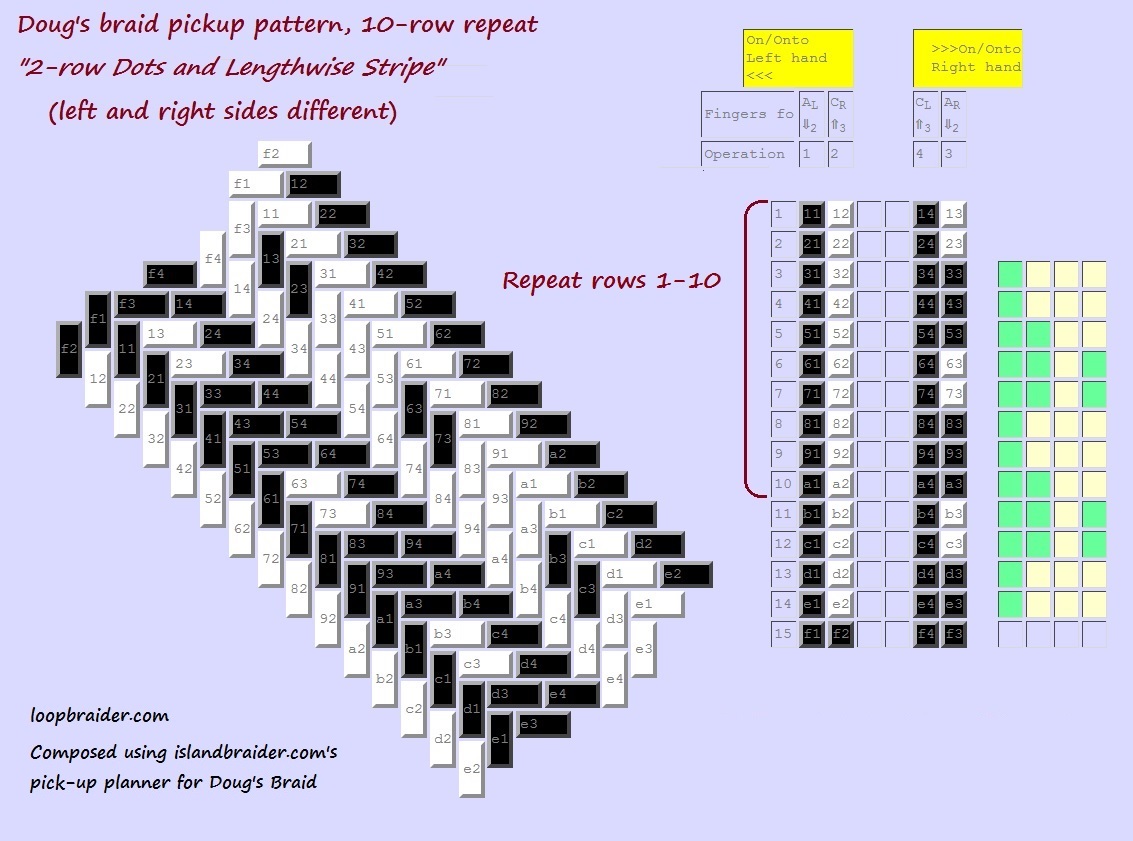
Chart 5 2-row Dots & Stripe (above). Click here to open interactive planner page for 2-row Dots & Stripe in separate tab.
The sample braid in the photo above the chart shows both the right and the left sides of the charted pattern – the dotted section alternating with the plain black-white stripe section. To braid it, I used 2 pickup charts: the one above, and a mirror-image version of the pickup chart (left and right reversed). Halfway along the braid, I also reversed the darks and lights of the pattern. That does not require making a new chart from scratch. There’s a “reverse colors” button near the bottom of the live planner page. Click it to switch all the lights and darks of the pattern.
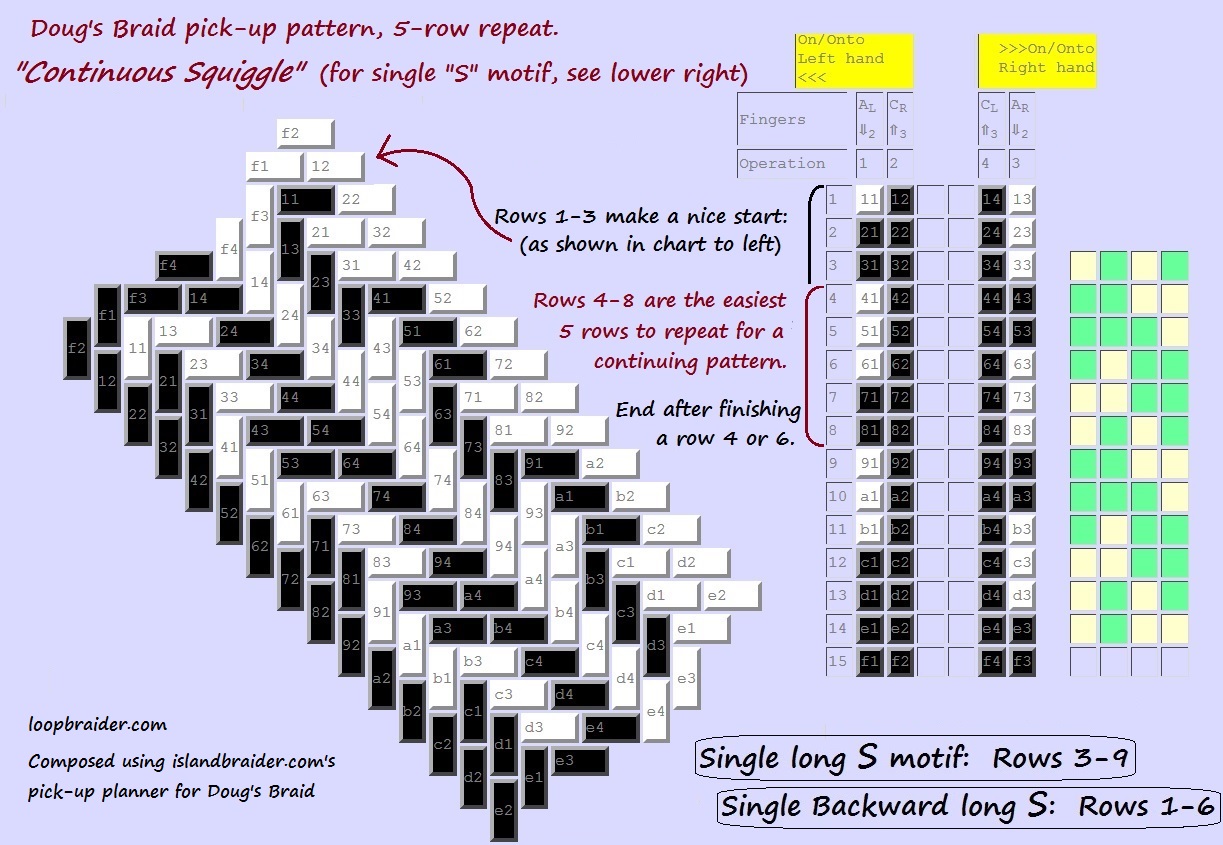
Chart 6 Continuous Squiggle (above). Click here to open interactive chart for Continuous Squiggle in separate tab.
This chart can also be used to make a single long “S” or “Backward S” motif, see note in bottom right corner of chart. The screenshot is overly-crowded with my notes, sorry! You can simply ignore all of them except the MAIN red bracket showing the pattern repeat rows to follow. Everything else is “extra”, just suggestions or further possibilities.
(Two super-easy pattern charts follow the Notes section below.)
Notes:
*Doug’s Braid is a 4-transfer, two-layer braid like double braids and Spanish braids. It was invented or discovered by Douglas Grant, who shared it with me in 2011, and allowed me to share it here on this blog in 2012. Doug’s own name for this braid is the Spiaggian Eagle braid, after a particular eagle-like color pattern for it, and in honor of his shire in the Society for Creative Anachronism (SCA).
*What’s the difference between Gary Mitchell’s older pattern planner for the 7-loop Spanish braid and this planner for Doug’s Braid?
Gary Mitchell’s first pattern-planner was for a different braid (the 7-loop Spanish braid), and it was a different type of planner. I made two posts about it back in 2012 – one post on designing with the planner and one post on how to follow the planner in braiding.
That planner is for planning automatic braid patterns, not pick-up patterns. Automatic pattern-planners don’t include a pick-up chart of the braiding moves. The braiding moves are identical in each row, turns and all, so they don’t require a chart.
With a planner for automatic patterns, a click on a single tile results in many tiles switching color up and down the braid. That’s because each click changes the color of a whole strand wherever it appears in the braid, rather than just changing the color of one ‘stitch’ of the braid. To braid the pattern, you arrange the colors of the loops in a certain order on your fingers before you start braiding. Then you use identical braiding moves in every row. (more in footnote)
Whereas in a pick-up planner, a click on one cell of the planner only changes the color of that single stitch (on both the front and back of the braid, so one click makes two tiles in the display chart change color). A pick-up pattern is planned stitch-by-stitch – the pattern doesn’t automatically repeat itself down the chart. You, the designer, must plan the repetition (if any) that you want for the pattern.
Gary Mitchell has added pattern planners for many braids to his FingerTips site over the last several years, btw. He even has an automatic-type pattern planner for Doug’s Braid, so I probably should be comparing that planner to this new one! But I am more familiar with his first planner – the one for the 7-loop Spanish Braid – and readers here may be too, since I made two posts about it back then (click links at the beginning of this section).
Planning Patterns and Following a Pick-up Chart: (Full tips)
Follow the right half of the chart “backward” (right-to-left)!
For braids like this that have more than two loop transfers, you don’t necessarily read the pick-up chart rows from left-to-right, the way you read a sentence. You follow each row in the same directional order that you do the braiding moves. In this braid (like most), you do the moves of the left and right hands in mirror-image, so that’s also how you follow the pick-up chart. The left and right halves of the chart are followed in opposite directions, like the braiding moves of the left and right hands.
Notice the numbers in the column headings across the top of the chart: 1,2 – 4,3. This refers to the 1st, 2nd, 4th, 3rd loop transfers. Each column is for one of the four loop transfers. Only the first two columns are numbered left-to-right, the way we read a sentence. Those first two loop transfers in Doug’s Braid both end on the left hand, and they do follow each other left-to-right. But the next two columns on the right side of the chart are followed mirror-image in the opposite direction: right-to-left.
That’s the order to read and follow the right half of the chart: from right edge inward, right-to-left. Check the furthest right column (column 3) before making the 3rd transfer, and then check the inner right column (column 4) for making the 4th/last transfer.
Avoid designing in the top row of the slanted chart, and the bottom row (row 15) of the pick-up chart. Clicking on row 15 of the pickup chart will change the TOP row of the slanted display chart – which will probably mar the pattern you have been planning. And vice versa – if you click on the uppermost tiles in the slanted display chart, those color-changes won’t be reflected in the top row of the pick-up chart, they will be hidden at the bottom of the pickup chart, in row 15 (labeled “f” on the tiles). This an artificial result of the circular way the planner functions, so it’s best to just ignore those two rows.
To plan a pattern longer than 14 rows: Use one planner page to chart the first 14 rows of the pattern, and another planner page to chart the remaining rows. Don’t use row 15 (no “f” tiles).
Find the pattern repeat in the pickup chart:
The ‘pattern repeat’ is the smallest number of rows that contain one full repetition of the pattern. Those rows are really the full chart of the pattern – the rest of the rows shown in the planner’s pick-up chart are superfluous, and may cause problems if you braid from them, if they only constitute a partial repeat of the pattern.
On all these sample charts, I’ve marked the basic pattern repeat with a red bracket to make it easier to see which rows I need to follow in braiding. When I finish braiding the final row of a bracketed section, I start again at the first row of the bracketed section. I ignore the other rows that may show in the chart.
The reason I fill in more rows than just the basic pattern repeat is because that displays a longer stretch of the pattern on the slanted display chart. That gives me a better idea of what the pattern will look like in the finished braid..
When you design your own repeating pattern, you have to figure out the basic pattern repeat rows so you know exactly which rows to repeat when braiding. The planner can’t do this for you. It’s usually not a good idea to braid following the whole length of the pickup chart all the way to the bottom row, and then start again at the top, unless your pattern repeat happens to be exactly 15 rows long. The bottom row is likely only partway through a repeat. In that case your braid would have a jarring discontinuity in the pattern each time you repeat from the top of the chart.
After you figure out which rows constitute one full repeat, you might want to print or jot down the pattern, and mark the repeat with a pen, or simply cut any superfluous rows off the chart.
If you do braid straight from an on-screen planner image, be sure to mentally mark the pattern repeat, and remember to only braid those same rows again and again, ignoring the rest of the rows.
Note: If your pattern is a regularly repeating motif with, say, two rows of ‘space’ between each motif, remember to include those two rows of space as part of the pattern repeat.
Designing, ‘tweaking,’ and saving patterns
Tip 1: Simple, bold designs are better than complex ones for Doug’s Braid (just my personal impression after planning quite a few fancy-looking designs that looked great on the chart, but didn’t come across in the braid).
Tip 2: The display chart that you plan on just gives an approximation of how the design will look. You’ll still need to give any design a test-run to see how it really turns out in a braid. You may love how it turns out, or you may want to tweak the design some more and try it again. I think I usually do this at least once per pattern, and sometimes more, before I find one I like. Look at the actual braid and imagine what changes might make it look better. (More ‘space’ between certain elements? Thicker or thinner lines? Pruning away some of the design? Or maybe braiding it differently – with thicker or thinner thread, different colors, tighter or looser tension?)
Tip 3: Once you’ve found a pattern you like, save the chart! Otherwise you’ll have to start designing from scratch the next time you want to braid it. You can also save a link to any chart, since each design has its own individual URL. This means you can save a link to any design, and share it easily as well. (see footnote re Pinterest)
Be sure to enable “print background color” if you print out a chart. You don’t have to print in color, grayscale works fine. But the background must print darker than white, or the light-colored tiles won’t show clearly. To enable Print Background in my browser [firefox], I go to File > Page Setup, to find the Print background option. That option is not under Print or Printer properties where I first assumed it would be.
But you don’t have to print it out to have a paper copy of the pickup chart. It’s not hard to jot down a pickup chart onto a piece of paper. It doesn’t require graph paper or even super-neatness:
![]()
All you need to jot down are four columns, and the rows of the pattern repeat. It’s not even necessary to color in the dark cells right away, just D and L for Dark and Light is good enough for a record. (I always darken the D cells before I braid from a chart, though – makes it much easier to follow.) I’ve also been saving patterns as screen shots in my computer files. And since each pattern has its own URL/ web address, you can also bookmark it, or copy and save the url.
Ending a pattern: If you want to segue immediately from one pattern to another, pick which row you would like to ‘finish’ on, and on the very next row, start following the chart for the new pattern.
(Btw, when you finish braiding a row, you may not see its pattern in the braid immediately, but it really is there! It will become apparent after the subsequent row is finished.)
If you would like some space in between the two patterns, or before finishing the very end of the braid: Pick which row of the pattern you want to end on, and immediately after that row, start making all your transfers “dark up” – or start making them all “light up” depending on whether you want a dark or a light space. After the desired number of ‘blank’ rows, start following the chart for your next pattern, if any.
You’ll see that on some of my charts, I say: “End after a row X” (say, row 4). This just means that to me, that row makes a good-looking point to end the pattern (after braiding as many repetitions of the pattern as you want). This is just a suggestion, though! You can end a pattern wherever you want. The only really important notation on my charts is the bracket showing the pattern repeat. Those rows on the pattern repeat are the only rows to follow when braiding more than one repetition of the pattern.
My charts sometimes show a few extra rows at the top, before the pattern repeat bracket. Those extra “beginning rows” are also only a suggestion – if to me the pattern seems to look better if I start the braid partway through the repeat. Sort of an intro to the pattern, then after that I follow the pattern repeat in braiding the rest of the way down the braid. Not mandatory, you can begin right at the beginning of the bracketed pattern repeat.
Turn twice or not?
Doug’s Braid has 4 places for turns in each row of braiding, so most patterns will likely have enough turns to hold the braid together. So, even if a row of braiding calls for no turns at all, I usually choose not to turn the loops, rather than turn any of them twice (see Rock Your Square Braid or Flat Braid Pick-up on turning twice as an alternative to not turning a loop).
Use your own discretion on this. A completely divided braid is possible with some patterns – if so, the green-and-yellow auxiliary chart over on the right will be all-yellow after its first row (see following note). If you do decide to do some double-turns: It looks better to turn the two ‘inner’ transfers twice (2nd and 4th transfers) than to turn the two ‘outer’ transfers twice (1st and 3rd transfers). Turning twice on the outer transfers makes a more obvious distortion to the braid’s pattern.
See note below about the supplemental green and yellow chart Gary has added to his planner – it is very useful for seeing how connected the two layers of any pattern will be.
The auxiliary green and yellow chart on the far right of Gary’s planner page:
The green and yellow chart shows which transfers will require a turn (shown in green), and which require no turn (yellow). Notice that the green and yellow rows only begin at the 3rd row of braiding, not the 1st row! Actually, you should ignore that first green/yellow row – it may not be correct. The planner cannot accurately predict the necessary turns for the very first three rows of braiding a pattern – the turns in the first three rows of braiding depend on how your loops were arranged when you started. The loops may not be “set” into the pattern until after the third row of braiding.
I don’t recommend braiding directly from this green and yellow chart!
In general, it’s much safer to follow the true pick-up chart. If you blindly follow the green and yellow chart’s “turn/ no turn” directions, any mistake you make will then proliferate down the braid like a virus, infecting the whole pattern. Whereas if you make a mistake in following the pick-up chart, it will just be a single mistake. As long as you follow the pick-up chart correctly afterwards, the pattern will re-emerge – that single mistake won’t proliferate automatically down the braid.
However, the green/yellow chart is very helpful for other reasons. For one thing, it can warn you ahead of braiding if a pattern will have so many yellow ‘no turns’ that the braid would divide into 2 separate layers. In that case, you might choose to change the pattern a bit – often just adding or subtracting one row to the basic pattern repeat will solve the problem. Or alternatively, you might plan to do some double-turns here and there to hold the two layers together (see “turning twice” in Rock Your Square Braid and Flat Braid Pick-up, and see the section just above this one for which loops to turn twice for the least distortion of the pattern.)
The yellow and green chart can also alert you that a particular pattern has very repetitive, easily memorizable moves – like Chart 7 below – or even that it’s a completely ‘automatic’ pattern with the exact same sequence of yellow and green boxes in every row – like Chart 8 further down. In that case you probably won’t even need to refer to a pick-up chart after the first few rows of braiding. Once the loops are “in pattern,” the turning sequence will be the same in every row.

Chart 7 (above). Click here to go to the pattern’s live webpage in a separate tab.
Red & white braid in photo above chart shows the chevron pattern of one of the two sides. Between the two chevron sections is an example of the “plain” opposite side of the braid, which comes out as a dark and a light lengthwise stripe.
This is a very simple pick-up pattern – the actual chart is only 2 rows long (see red bracket), and the braiding moves are very repetitive and easy to memorize. The rest of the rows in the pickup chart are just repeats of those two rows – good for displaying a nice long section of braid in the slanted display chart, but superfluous for a pick-up chart. The green and yellow chart to the right of the pickup chart shows that the turning sequence will have two alternating rows. So this braid pattern will be very easy to memorize while braiding. The green and yellow chart also shows that the two layers of the braid will be well connected – lots of green squares indicate lots of turns.
Below is the pick-up chart for a fully ‘automatic’ Doug’s Braid pattern. Like the pattern above, this pick-up chart is also just two rows long. But once this pattern is established, each row will have the same exact braiding moves, as shown in the green and yellow chart: Turn, turn, turn, straight (for the 1st, 2nd, 3rd and 4th braiding moves). This makes it a regular, “automatic” braid, but it is not the standard Doug’s Braid my tutorials teach. This one has a different sequence of turns. This turning sequence results in a braid-shape that I call “half-hollow” for lack of a better term. (It doesn’t look much different from a standard Doug’s Braid, but the right half of the braid is hollow).
Chart 8 (above). Click here to open interactive planner page for Alternate Encircling Chevrons in another tab.
Numbers on the tiles
These numbers are not necessary for either planning or braiding, so it’s fine to ignore them. But they do convey information that may occasionally be useful. Each tile is labeled first with the number of its row in the pick-up chart (1-9, or a,b,c,d,e,f standing for rows 10, 11, 12, 13, 14, 15).
The second number in the label indicates which of the four loop transfers created that ‘stitch:’ 1, 2, 3, or 4.
So the label 51 doesn’t mean fifty-one — it means 5th row, 1st transfer. B3 means 11th row, 3rd transfer. This is helpful if you want to know which tiles/stitches in the display chart are made in, say, the third row of braiding. (The rows of work are only obvious in the pickup chart, not in the slanted display chart, or in the braid itself for that matter).
Please let me know if you try Doug’s Braid pick-up! I’d love to know how it goes, see any photos you’d like to share, and hear if anything here needs clarification or correcting.
*Gary Mitchell’s non-pick-up planners:
(This information is not relevant to the planners in this article, but to the older, NON-pickup planners on Gary Mitchell’s FingerTips site.) After creating a pattern on a non-pickup planner, you then place the loops onto your fingers in accordance with the loop color set-up arrangement shown in the lower left corner of the planner page, under the display chart. Fingers/loop positions are represented by 4 stacked positions (representing index – little finger in descending order). There’s a Left column for the fingers of the left hand, and a Right column for the right hand. Each loop is represented by a pair of tiles (upper and lower shanks of the loop). A loop may be single-color – indicated by two same-color tiles, one above the other, or bicolor – indicated by two different-color tiles: an upper color and a lower color. (Gary’s planners are not able to plan more than two colors, but you can certainly use more than two colors for a non-pickup pattern – try varying just the ‘dark’ colors to include more than one dark color when loading loops onto to your fingers per the chrt’s instructions.) After loading the loops onto the fingers in the order shown in the loop set-up area, you then braid using the same moves in each row of braiding. There are a finite number of possible 2-color patterns (close to 600 for the 7-loop Spanish Braid), and every possible pattern has its own 3-digit ID number rather than its own url. To retrieve a pattern, you enter its ID number into the planner’s homepage/landing page.
*Pinterest: Unfortunately, you can’t save a design onto a Pinterest board directly from the FingerTips website, because the interactive charts are not “images” they are formulas (or something!). Any live chart you save to a Pinterest board will just default to a link to the FingerTips site, not to a particular design. You can work around this very laboriously: Take a screenshot of your charted design, save it somewhere, then upload that saved image to your Pinterest board, and separately copy and paste the url of the particular pattern (on the FingerTips site) into the ‘link’ section in the editing module of the Pin. That does work – the pin will then function as a direct link to the planner for that particular pattern.
The charts I show in this post are static images that can be saved on Pinterest. They will link back to this post, not to the FingerTips website.
Posted Jan 10, 2019
Updated Jan 25, 2019
© 2019 Ingrid Crickmore
See full copyright restrictions and permissions at the bottom of the sidebar of each page of this website.
Btw, my copyright protects only the content of my site – meaning my text, images, and videos. Any braids you make using my instructions are wholly yours, and may be marketed and sold (using your own words and images). Regarding teaching: It’ll probably be fine, but please check out my FAQ’s here before using any direct content of my site to teach loop braiding. Of course, it’s perfectly ok to teach what you’ve learned here if you are using your own words and images.


