A more recent post has a video for learning this braid, and a new color pattern for it, but this original post has the text instructions , and includes more color pattern set-ups (listed just below the text instructions). I ramble on about the structure of Doug’s Braid at the end of this post. In January 2019 I posted a Pick-up pattern tutorial for Doug’s Braid.
Over 6 months ago Douglas Grant sent me instructions for a braid he had come up with. I meant to try it right away, but somehow it’s taken me this long to get around to it. I’m glad I finally did!

(1) Spiaggian Eagle braid, invented/ discovered/ and color-pattern designed by Douglas Grant.
The braid is an unusual variation of a 7-loop spanish braid, with extra twists that cause the braid’s shape to end up firmly rounded rather than rectangular in cross-section. In some color patterns, the braid looks more square than round.
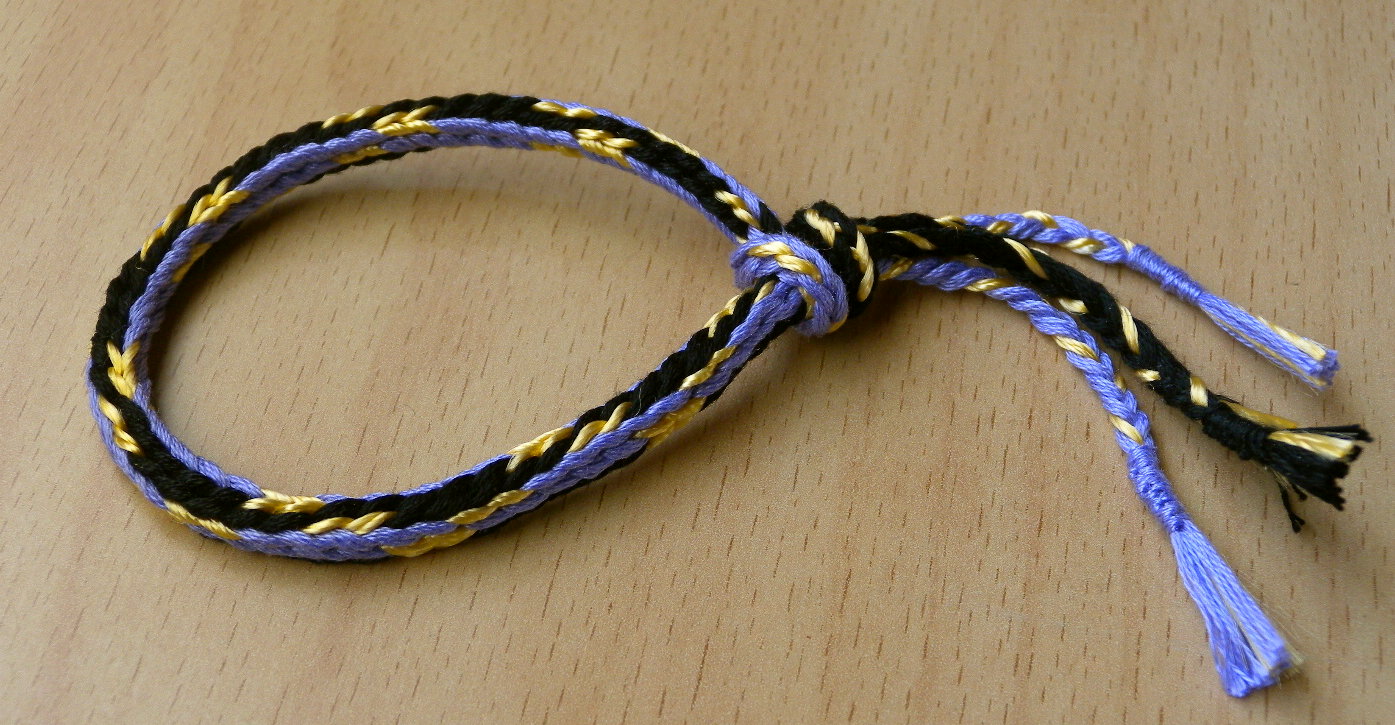
(2) Same braid structure, different colors: 5 bicolor loops + 2 single-color loops. Doubled embroidery floss and rayon thread. (The adjustable closure knot is taught here.)
This braid was a big surprise to me! First because it would never have occurred to me to try making the loop transfers this way, and secondly, because instead of being “wonky,” the result is wonderful!

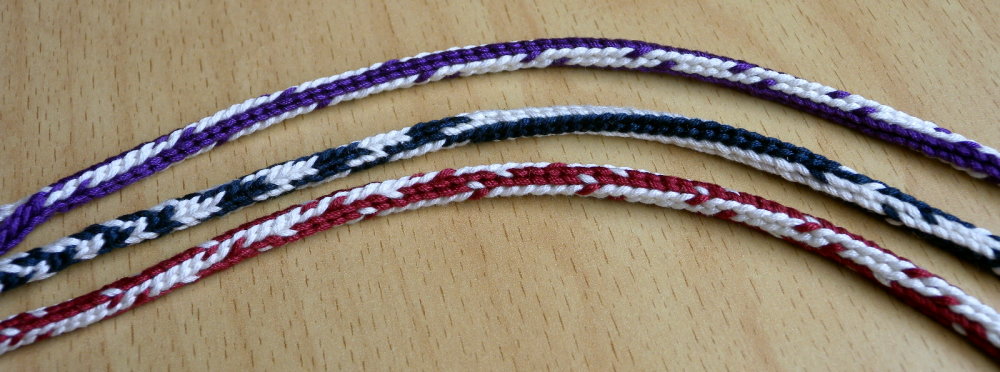
(3) Both braids made with embroidery floss. Upper braid with doubled strands, lower braid with single strands.
None of the several “normal” shape-variations that can be made with the 7-loop spanish braid are round or square.* Apparently, the twists in Doug’s variation add bulk to the center of the braid, without causing any obvious surface irregularity. Without the twists/linkings, this braid would be rectangular in cross-section, with a slight groove into each of the two edges.
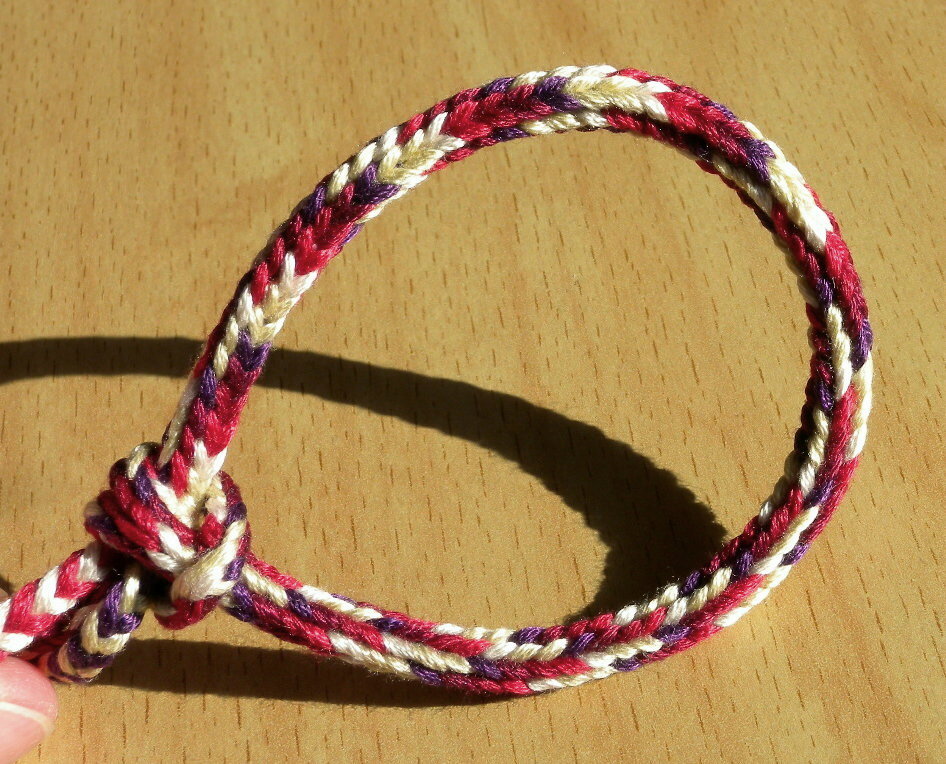
Doug’s Braid bracelet. Shades of red, embroidery floss.
Doug did not intentionally base his braid on the spanish braid. He makes the braid with quite a different order of operations than the braid in my tutorial for the 7-loop spanish braid. He just came up with it, somehow. This is a little bit mind-boggling! Spanish braids are twice as complex as a square braid. (They have 4 loop transfers per braiding cycle as opposed to two.) They are not a type of braid I would expect someone to just “come up with!”
(5) Bicolor variations on Doug’s braid: Upper braid 6 bicolor loops, 1 single-color purple loop. Lower 2 braids have 7 bicolor loops. Lowest has the “one-loop-wrong” pattern. Middle braid has various patterns, including “Edge.” (Click here for the color set-ups.) Cotton yarn (elann.com “Lara”)
Doug calls the color-pattern of the white/purple/black braid in the first photo the Spiaggian Eagle braid, based on the eagle-like shape of the white areas, and the name of his shire in the SCA. SCA stands for Society for Creative Anachronism, an international Medieval-period reenactment society—this is probably the main group promoting and practicing loop braiding today, at least in the Western hemisphere.**
I’ve noticed a similar eagle-like pattern in other spanish and double braids.*** See the first braid (black, orange, gold) in the upper right in the photo below, also the flat version of this braid in the center—eighth from the upper right. These are 8-loop double braids, but 7-loop spanish braids are very similar. (If you click on the photo to enlarge it, the eagle motifs will be more visible.)
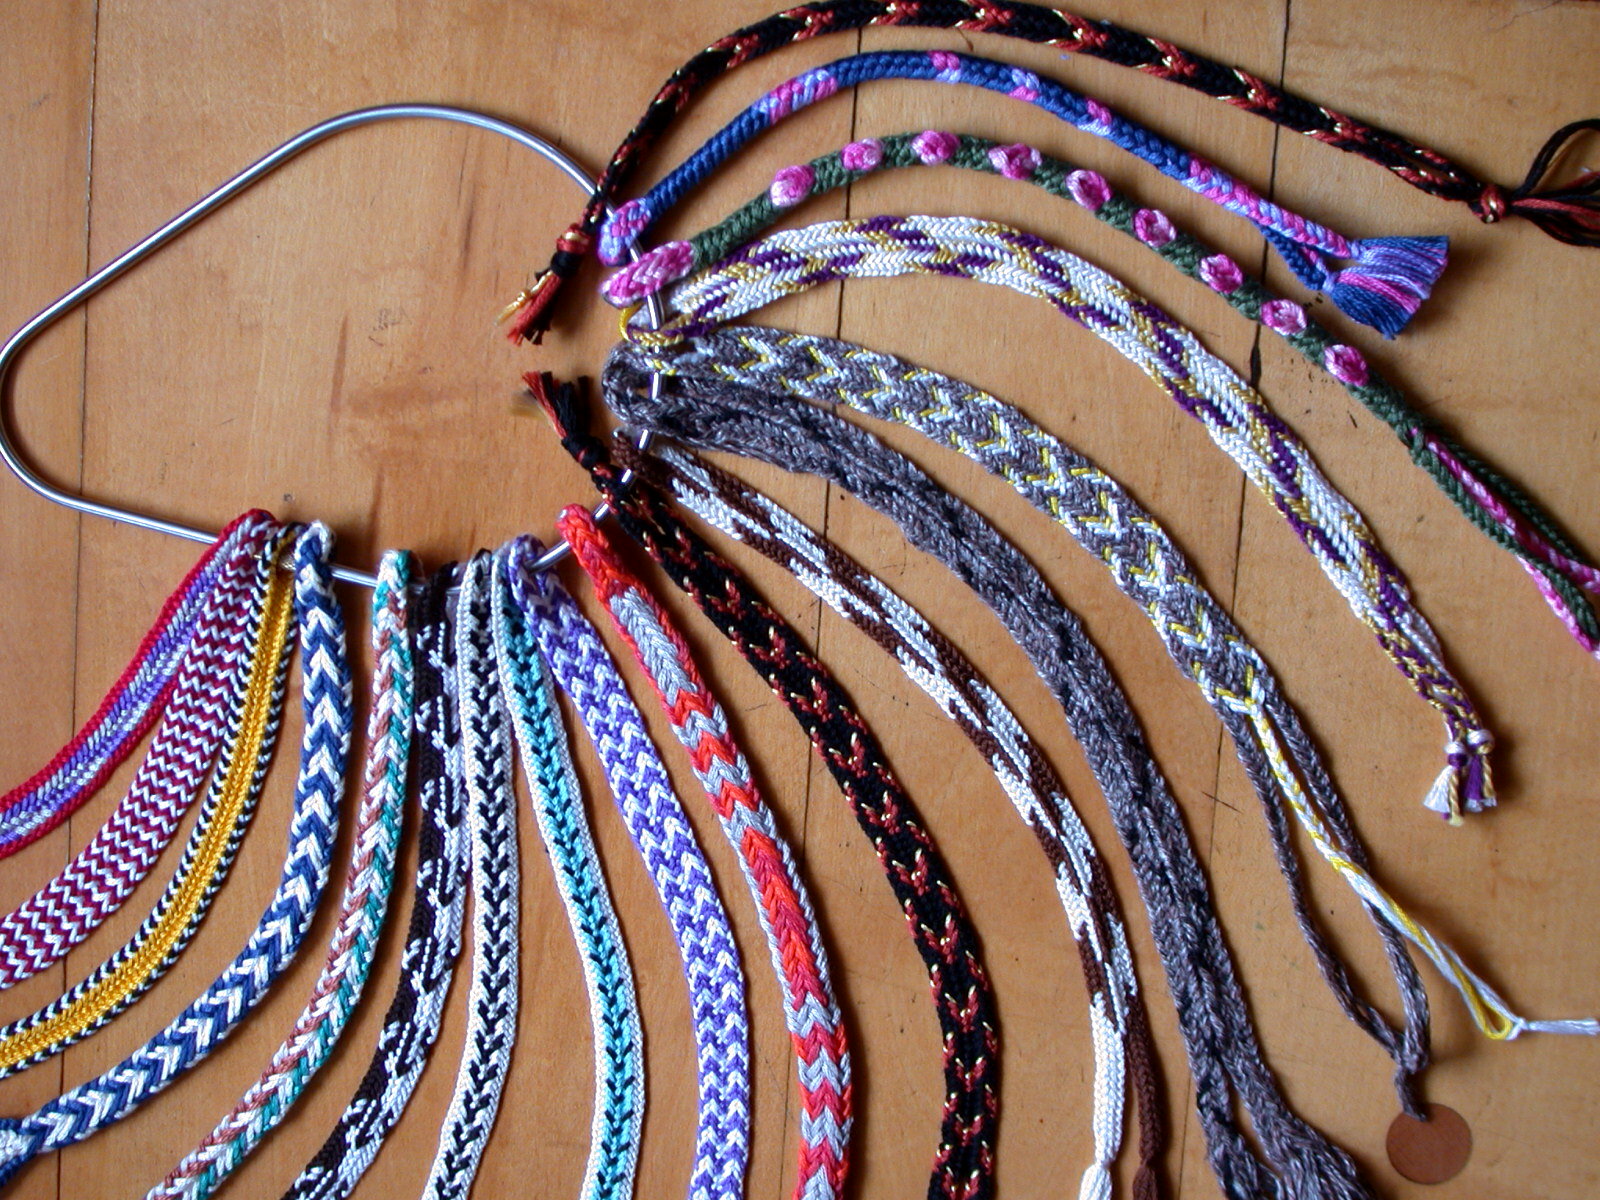
Not Doug’s Braids – these are 8-loop double braids, some with eagle-like designs.
Doug uses slightly different braiding moves, but the exact same braid can be made by following the written directions in my earlier tutorial for the 7-loop spanish braid, with one basic change:
In each loop transfer, the transferred loop is pulled through one more loop than the directions in my earlier tutorial called for. (This is what causes the unusual twisting/ linking of loops within the braid.)
Text instructions follow for the way I make Doug’s braid. I now also have a Doug’s Braid video tutorial in a more recent post.
Learn 5-loop and 7-loop square braids before this one. The 7-loop Spanish braid has very similar braiding moves.
——-Doug’s Braid, my method——-
Click link to jump to Doug’s preferred method.
Fingers: A=index B=middle C=ring D=little
Start with the left hand’s 3 loops on A, B, C-fingers. No loop on D.
The right hand holds 4 loops, one each on A, B, C, D.
1st loop transfer:
Right A-finger goes through left C and B and takes left A (with no turn/open/ unreversed) and places it onto left D. Then the left B-loop shifts up to the A-finger, leaving B free of loops.
2nd loop transfer:
Left B reaches through neighboring C and D, and through the right hand’s D-loop, to take C of the right hand (with a turn/ reversed/ crossed). Right D then shifts up to the empty C-finger.
Tighten loops.
3rd loop transfer:
Left A-finger goes through right C and B and takes right A (with no turn/open/ unreversed) and places it onto right D. Then the right B-loop shifts up to the A-finger, leaving B free of loops.
4th loop transfer:
Right B reaches through neighboring C and D, and through the left hand’s D-loop, to take C of the left hand (with a turn/ reversed/ crossed). Left D then shifts up to the empty C-finger.
Tighten loops.
One braiding cycle done.
Note 1: Shifts should not be aided by the other hand—when a loop is shifted, or “walks,” the finger next to it is simply inserted and the original finger is removed.
Note 2: An almost identical braid can also be made by turning/reversing ALL the transfers. With bicolor loops, turning all the transfers will give very different pattern results than those that I describe here (including some pretty ones!). With single-color loops, the color patterns aren’t affected by whether or not the loops are turned.
———Planning the color sequence———
If you want a particular order of colors in your braid, here’s the order you must set them up on the fingers before braiding. It’s an odd one, because on each hand it starts with the ring (c) finger, and the subsequent order is not at all straightforward.
After planning your braid’s color-sequence, follow this order in setting the colors onto your fingers:
L (Left) hand
1. Lc – Ring finger
2. La – Index
3. Lb – Middle
R (Right) hand
4. Rc – Ring
5. Rd – Little finger
6. Ra – Index
7. Rb – Middle
After this, the sequence down the braid will repeat – the next loop will be #1 on the Left C finger again.
So, if you want a light-to-dark sequence of all blue loops, you would set the loops up from light-to-dark, following the above sequence. Loop #1 – lightest blue – on the Left C (ring) finger, and Loop #7 – darkest blue – on the Right B (middle) finger.
As you can see from this sequence, loop colors that are next to each other in the braid aren’t always on neighboring fingers. (see my Color Pattern-Planning post for more about color sequencing.)
———Color Patterns———
Fingers: A=index B=middle C=ring D=little
Spiaggian Eagle pattern
(first photo in post):
3 white loops, 2 purple, 2 black
Order is 3 White, Purple, Black, Purple, Black.
Left: A,B,C all white
Right: A purple, B black, C purple, D black
Reds and white Eagle pattern
Upper braid – Dark-to-light red/purple gradation
3 white loops, and a dark-to-light gradation of 4 red loops of different shades. Again, it’s simplest to start the sequence with the 3 white loops so you can load them all together onto the Left hand.
Left: A,B,C all white
Right: (reds) A next-to-lightest, B lightest, C darkest, D next-to-darkest (for a dark-to-light gradation in braid)
Bicolor patterns:
Edge pattern (lengthwise Black and White striping, mid-right section of middle braid)
7 Bicolor loops of Black/White—Each loop has one black and one white shank.
Set the White shanks in upper position on one hand.
Set the Black shanks in upper position on the other hand.
One-Loop-Wrong pattern (lowest braid, red and white):
Set the loops up like Edge pattern above, but on just one hand place one loop in the opposite orientation from the other loops of that hand.
Thorns pattern (Upper braid): 6 bicolor purple/white loops + 1 single-color purple loop.
Put the 1 single-color purple loop on any finger.
Set up the bicolor loops like the Edge pattern.
(purple up on one hand; white up on the other hand)
Purple, Black and Gold bracelet pattern:
5 bicolor Purple/Black loops, and 2 single-color Gold loops.
Set Gold loops on La and Lb (left index and middle)
Set up Bicolor loops on the rest of fingers, as for Edge pattern
(Black up on one hand; Purple up on the other hand)
The 2 gold loops could actually start out on any two fingers that follow each other in the sequence given above for this braid. So they could be placed on Lc and La. Or they could be on Rb and Lc, or on Ra and Rb, etc.
(Braid in photo above was made with purple and black cotton yarn, about the weight/ thickness of doubled embroidery floss; and shiny gold rayon yarn, unknown brand. Other braids were all-cotton, embroidery floss and/or heavier cotton yarn.)
Note: Bicolor patterns will be thrown off if you make a mistake in turning loops. Patterns with only single-colored loops will not be thrown off—a mistake in turning or not turning a loop will not affect the color-pattern if there are no bicolor loops.
[Next I want to try the last pattern with just one gold loop, and also with 3 in a row—I think they might all look quite different!]
—————Notes—————
*Spanish braids are essentially reduced double braids, and there is one other double braid variation that is round, but it looks totally different. And it doesn’t turn out well with fewer than 8 loops. That one is a double tube in shape—like one thin, flat braided tube surrounding another one. (2nd and 3rd braids from the upper right in a photo further up showing several braids on a large ring.)
**Loop braiding as an unbroken tradition is still turning up in parts of Asia and the South Pacific, as well as in South America – which is part of the Western hemisphere, come to think of it. See L-MBRIC for references. In Europe and North America it’s mostly a revived technique—recently resurrected from 15th and 17th C. English loop braiding manuscripts.
*** Doug’s eagle forms in the opposite direction from the eagles on my double braids. That’s because his braid, like the 7-loop spanish braid of my earlier post, grows on a VV-shaped fell, whereas I tend to make my double braids on an AA-shaped fell. Either way is possible. The resulting braids come out “upside-down” from each other.
————Doug’s method————
Doug’s method for doing the loop transfers is very different—or rather, mine is very different from his! If you don’t like using your middle finger to fetch loops, you might prefer his way. It involves holding two loops on the middle finger, though, so one difficulty is substituted for another one.
These moves might seem quite different from my method (above), but they accomplish the same interlacing of loops:
Start with 3 loops on the right hand on B, C and D-fingers. No loop on A.
The left hand holds 4 loops, one each on A, B, C, D.
1st loop transfer:
Right A reaches OVER (not through) the right B-loop, then through right C and D, and through the left hand’s D-loop as well, to take C of the left hand (with a turn/ reversed/ crossed).
Left D then shifts up to the empty C-finger.
Tighten loops.
2nd loop transfer:
Move left A-loop onto left B, above the loop already there (i.e. put it closer to the tip of the finger).
Right A goes through left C and upper loop on B, takes lower B-loop through both loops and places it on left D (with no turn/ unreversed).
3rd loop transfer:
Left A reaches OVER (not through) left B, then through left C and D, and through the right hand’s D-loop as well, to take C of the right hand (with a turn/ reversed/ crossed).
Right D then shifts up to the empty C-finger.
Tighten loops.
4th loop transfer:
Move right A-loop onto right B, above the loop already there.
Left A goes through right C and upper loop on B, takes lower B-loop through both loops and places it on right D (with no turn/ unreversed).
One braiding cycle done.
Note 1: Shifts should not be aided by the other hand—when a loop is shifted, or “walks,” the finger next to it is simply inserted and the original finger is removed.
Note 2: Doug reports that taking the lower B-loop through the upper one gets very easy with practice. He says it helps to slightly relax the tension of the loops just before pulling it through. He also inserts the neighboring A-finger (of the same hand) into the upper B-loop—holding the upper B-loop around both B and A, while the lower B-loop is pulled through—after which the helper-A-finger is removed. This ensures that the upper B-loop doesn’t “come with.”
Note 3: An almost identical braid can also be made by turning/reversing ALL the transfers. With bicolor loops, turning all the transfers will give very different pattern results than those that I describe here (including some pretty ones!). With single-color loops, the color patterns aren’t affected by whether or not the loops are turned.
When following Doug’s method, you need to set the colors onto the fingers in a different order than the one I showed above (the A and B loops are switched in the two methods). For Doug’s version the loop sequence on the fingers is:
1. Lc
2. Ld
3. Lb
4. La
5. Rc
6. Rd
7. Rb (followed by Lc, Ld, Lb, …)
See my color pattern notes above. Just be sure to load the colors onto the fingers by following the order I show here (A and B colors switched) if you are using Doug’s method. (If 3 loops of one color are to be together, it’s most straightforward to start with them all on the right hand—that way you won’t need to think about their order on that hand.)
——-[Obsessive structural musings beyond this point!]——-
I haven’t seen other loop braids in which loops link around other loops in this way. You can see the linking—at the end of every cycle a middle finger (B) loop of one hand is linked around the ring finger (C) loop of the other hand up at the fell –the base– of the braid. That ring-finger loop is actually following the middle-finger loop it is linked around—it will be the next loop to come over to the other hand, by which time it will also be linked around the next loop in the braid sequence.
The linking occurs because in each loop transfer, the taken loop is pulled through the loop that ‘ought’ to have been taken. At the beginning of each cycle, the loop that is “next-in-line” to travel over to the other hand is the D loop, but instead the operator finger reaches through that D-loop and takes the loop just beyond it – the C loop. Those two loops end up linked together rather than traveling in straight (diagonal) paths down the braid.
This is different from the ‘regular’ kind of linking in a braid, in which strands that would normally cross each other, are instead linked around each other, in order to send each one back in the opposite direction. (This is done for its color-effects – I did it a lot in the orange, yellow, and brown braid in my right sidebar. →)
In Doug’s braid, though, all the strands keep traveling across the whole braid, and the linking has no real effect on the color-distribution, only on the slants of the thread passages in half of the columns/ridges. The linking in this braid doesn’t connect two loops that are at the same level, it links loops vertically, to the preceding and following loop, in a continuous chain of linked loops. It almost reminds me of a vertical column of knit stitches. (The column in which a ‘run’ can occur.)
At this point in the braid, two sequential and parallel strands—like two parallel weft threads in a weaving—are linked around each other, rather than moving only in parallel the way they would in a normal braid. This verges on being knotting or looping rather than braiding! Apparently these links create a thickening in the braid where they line up, resulting in a round braid rather than a thick, flat one. I wonder if this is so different that Noémi Speiser would be amused (or horrified!) that I’ve been calling the braid a “spanish” braid!
You can see one slight oddness in the surface structure.
Like the 7-loop spanish braid, Doug’s braid has 8 lengthwise columns, or ridges, of slanting threads (rather than the 4 of a basic square or flat braid). In all these other braids, the direction of each column’s slants alternates around the braid, creating zigzagging passages: /\/\/\/\. But in Doug’s braid, the slants of adjacent columns do not alternate in every column—instead each pair of adjacent columns has the same slant, so the slants of the thread passages in the eight lengthwise columns look like this (around the braid): //\\//\\. This creates interesting color-patterns in the finished braid.
Last updated Jan 17, 2019
© 2012–2019 Ingrid Crickmore
See full copyright restrictions and permissions at the bottom of the sidebar (if you are on a small screen device, the ‘sidebar’ may appear somewhere other than at the side of the screen).


