Here’s a tutorial for a very non-traditional 12-loop “Odd” braid with an unusual number of loop-transfers: Five!
It has the same (in general) 2/2-twill type of interlacing as a 5-loop square braid and a 10-loop double braid, because each loop is always transferred through two other loops.
To make it as a team braid, the right braider would hold 5 loops and do regular square braid moves: two loop transfers in every ‘row’ of braiding.
But the left braider would braid something very odd: a “Square-and-a-Half” braid. That is, a wider-than-square braid of 7 loops and three loop-transfers – one more loop transfer than a square braid. Three loop transfers means that the braiding moves are different on the left and right hands, another odd thing about the braid. Text instructions for two different ways to make the fun Square-and-a-Half braid are here, further down this page.
Ok, back to the larger 12-loop “Odd” braid: if you add the square-and-a-half braid to a regular square braid – side-by-side – together into one braid, they become a 5-transfer braid of 10 ridges, with a fell shape of N (square-and-a-half) + V (square braid) = NV. Totally odd! If made by a solo braider, this larger braid also requires different braiding moves on the right and left hands – like its little sister the 7-loop Square-and-a-half braid.
Braiding it by myself, I hold seven loops on the left hand, and five loops on the the right – demoed in the video below. An obvious question might be “Why not go for 7 loops and three loop transfers on both hands? The more loops the better, right?”
You could use this 7-loop strategy on both hands and make some nice braids. But what I’m interested in is the odd number of transfers, because if you use bicolor loops, and turn all the loop transfers, you can get some really fun and asymmetrical color-patterns.
Above is a video tutorial for my solo-braider strategy for this braid. It can also be made by two braiders working together, one braiding a 5-loop square braid, and the other braiding a 7-loop square-and-a-half braid.*
So far, I think this is my only video that demos an outside-around move with finger-held loops – it’s in the first loop transfer, where I lift the innermost 2 loops of the left little finger over/ around the outermost loop. I use this type of move for any braid in which I’m holding two or more loops on the thumb or little finger, and I want the outermost loop to be transferred INWARD, through the neighboring loop or loops on that same finger. (In this case, the actual “transferring” loop is not itself physically lifted and moved! Instead, the two loops it moves through are lifted and moved around the transferring loop.)
Corrections to video:
1. After the 3rd loop transfer (to the thumb) I repeatedly refer to an upper SHANK as the “upper LOOP”, sorry! There’s only one loop, with two shanks, an upper shank and a lower shank.
2. In the video I say that there are 12 cycles to one pattern-repeat, but actually that’s a half-repeat – with bicolor loops, a full pattern-repeat for this braid takes 24 cycles. The half-repeat is a good point to check the loops, though, because they should all be back on the fingers where they started, though with the opposite shank colors upward.
Braid samples
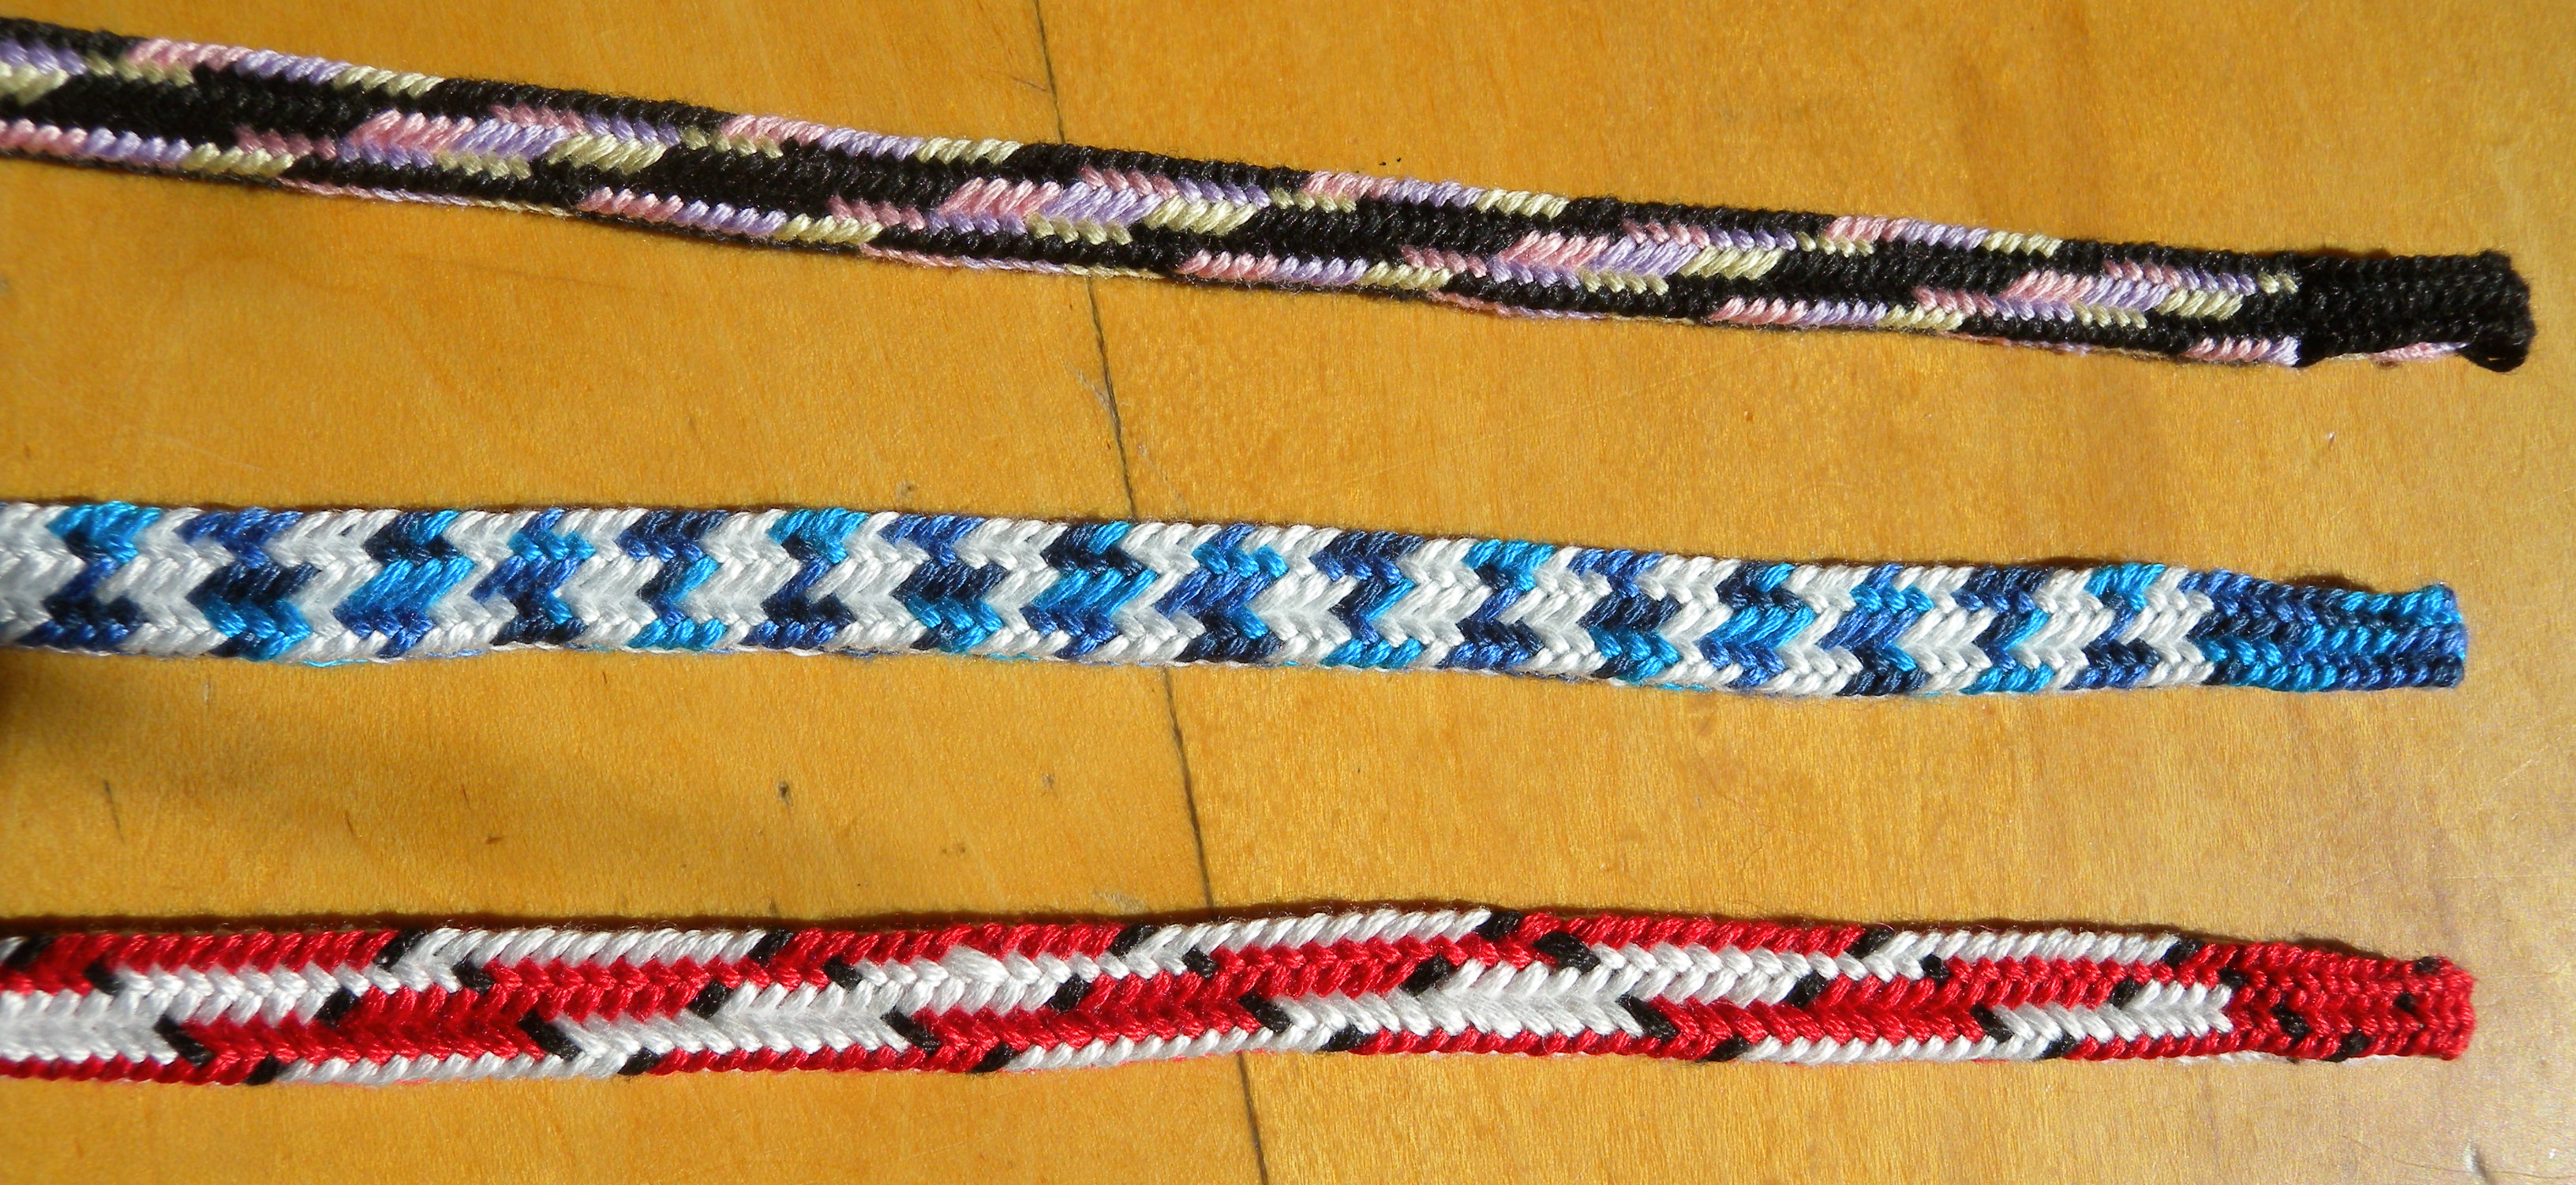
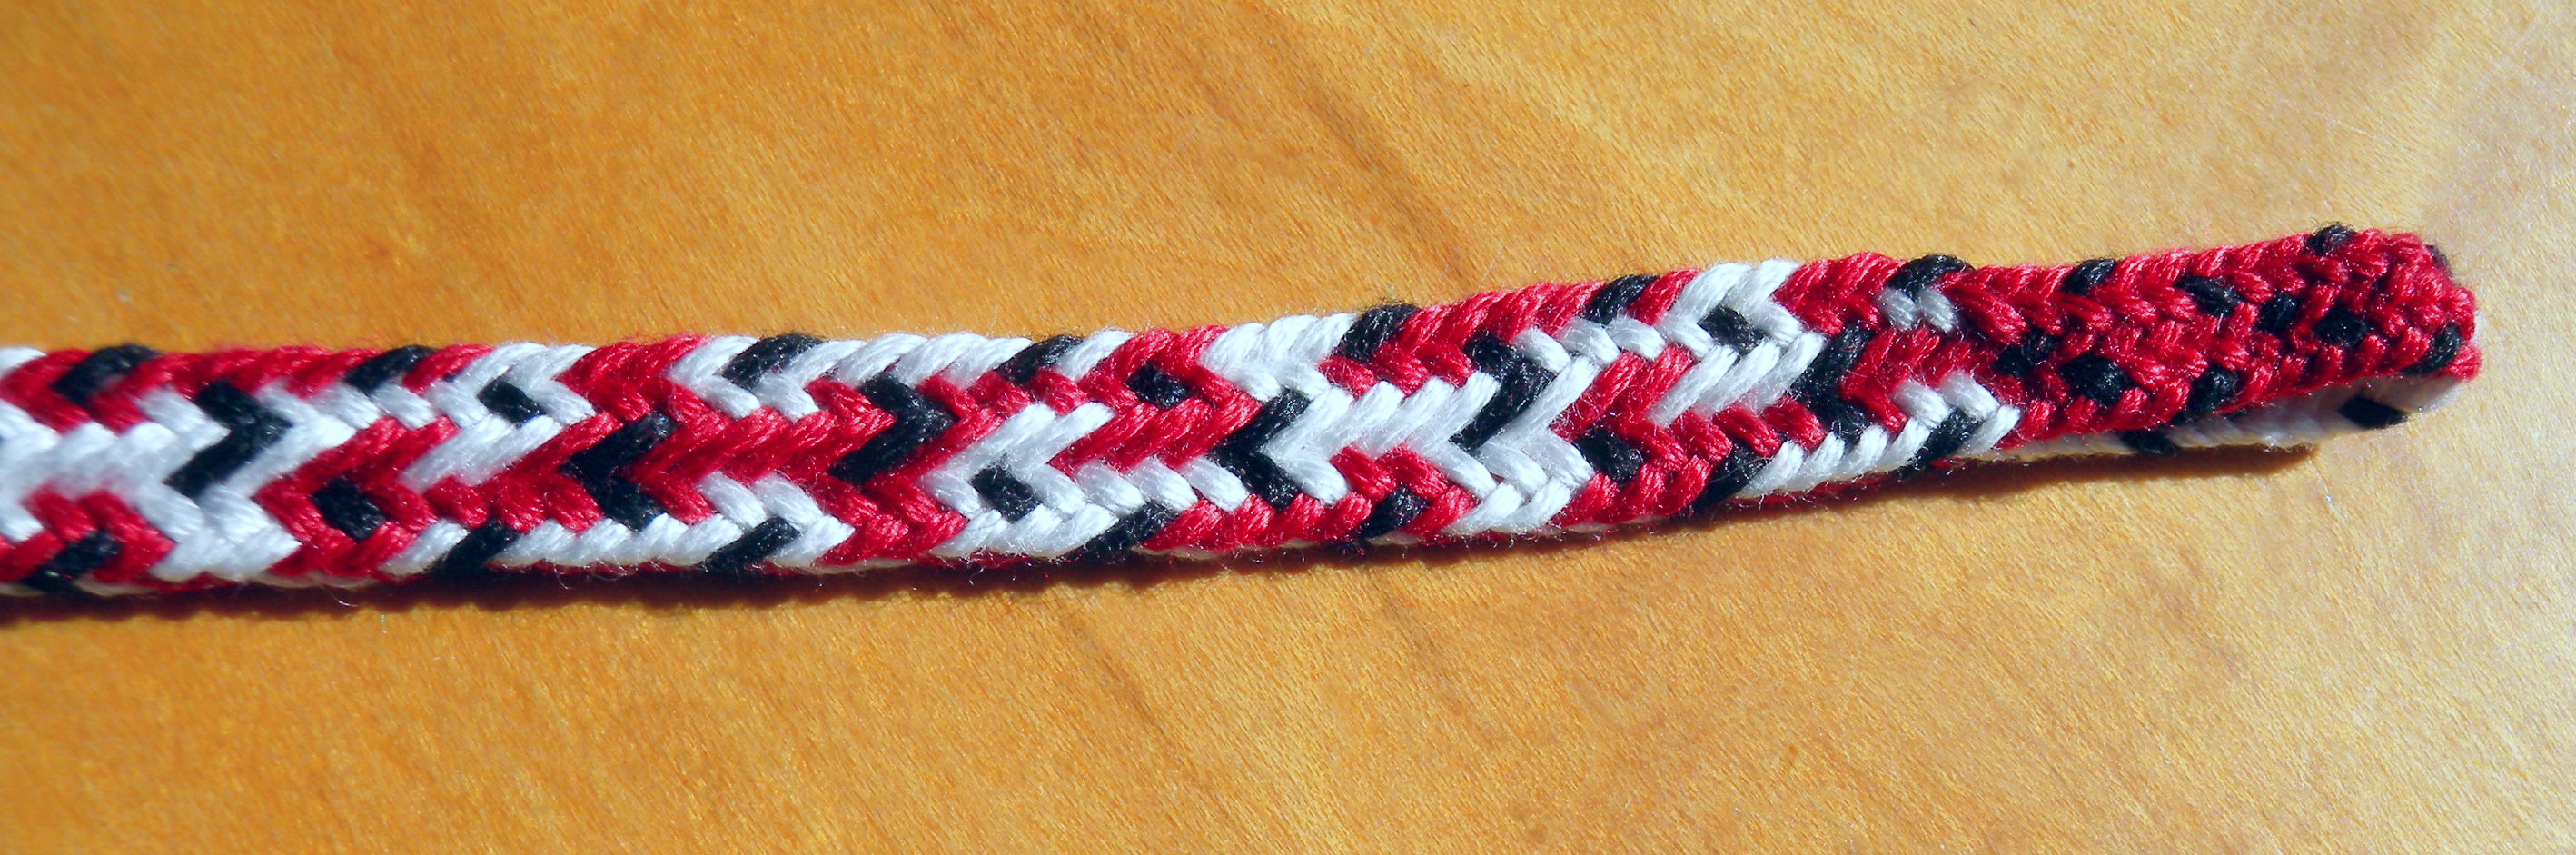
12-loop 5-transfer braids, “solid rectangle” variation (all loops are turned when transferred). Top two braids have all bicolor loops. Lowest braid has 11 red/white bicolor loops, and one all-black loop.
(Set-up instructions for the 3 color-patterns shown above follow the endnotes.)
Cross-section diagrams:

Noémi Speiser’s track-plan system. Idealized cross-sections of both component braids on left, and of the combined braid on right. Track-plans are also like flow charts of the over-under pathway(s) taken by the strands in a braid.
Another solid-rectangle 5-transfer braid. This busier color-pattern was the result of a mistake in loading the loops on my fingers for a different pattern. 10 bicolor red/white loops and two all-black loops.
Structural variations:
To get asymmetrical bicolor-loop color patterns doesn’t actually require turning all the loop transfers, just an odd number of them. So braid shape variations other than the solid rectangle braid can result in ‘regular’, more symmetrical braid patterns if an even number of transfers are turned, but asymmetrical patterns if an odd number are turned, as in the Side-Slit examples below. The Side-slit braid variation requires 3 turned transfers (in the center of the braid), and 2 straight (unreversed/open) transfers – one on each edge of the braid.

Side-slit shape variation of the 5-transfer braid. 3 turned loop transfers, and 2 straight loop transfers – one at each edge of the braid.

Track-plan diagram: cross-section of the Side-slit variation braids above
The component Square-and-a-half braid has some fun asymmetrical patterns, too:

7-loop Square-And-a-Half braids of 3 loop transfers, several shape and color-pattern variations (instructions here). Right braid made with doubled strands of embroidery floss, all other braids single strands.
Aside from the more familiar example of flat braids, I first stumbled onto this type of asymmetrical color-pattern back when I was experimenting with double braid variations. Double braids have 4 loop transfers in each cycle, or row, of braiding. At least 3 possible double braids require an odd number of turned loop transfers: the Flat double braid, the Half-hollow double braid, and the Single Side-slit double braid. (I teach the last two in my article on Double Braids in the Braids 2012 Conference Proceedings book Threads That Move, see photos from article below, and links to sites that carry the Proceedings book in sidebar.) The latter two double braids require 3 turned loop transfers and a single straight loop transfer. Because of that ‘oddness,’ their bicolor-loop color-patterns are very asymmetrical, with pattern repeats that are twice as long as those of a solid rectangle double braid (20 cycles rather than 10 for a 10-loop braid):

10-loop, 4-transfer Double braids with 3 turned loop transfers – Single Side-slit shape.

10-loop, 4-transfer Double braids of 3 turned loop transfers – Half-hollow shape. (Strands That Move article on double braids).
The brown-and-white color-pattern above reminds me of random cow-skin blotches! The blotches actually do repeat eventually, but the pattern repeat is twice as long as that of a double braid having an even number of turned loop transfers.
“Regular”, symmetrical patterns for the 12-loop “Odd” braid:
The “Odd” 5-transfer braid can have symmetrical bicolor-loop color patterns if you turn an even number of the total 5 transfers.
Edge pattern (lengthwise stripes of color down the braid ridges) is only possible in braids that have an even number of turned loop transfers. You can’t braid an Edge pattern if you turn all the loop transfers in my 5-transfer “Odd” braid. But you can get an edge pattern if you don’t turn one of the transfers:

12-loop braid of 5 loop transfers and two different structures: Top half is the Single Side-slit shape, and bottom half is the Central-tube shape. Both have 4 turned loop-transfers and one straight (open) transfer. Both can be made with an “Edge” pattern of lengthwise striping.
The shadow under this braid makes it hard to tell that the top half of the braid has a wider black edge along the left side than along the right. (Visible if you click to enlarge the photo twice.)
The top half of the braid has a “Single Side-slit” structure – four turned loop transfers, and the leftmost transfer straight (no turn/ open/ unreversed). That’s the edge of the braid with a shallow slit into it, dividing the upper and lower layers of the braid. That black edge is wider than the black edge on the right side of the braid. So the braid has an asymmetrical shape (one edge slit, the other solid), but can have symmetrical bicolor loop color-patterns – the evenly alternating blue-gold horizontal stripes for example, and an ‘Edge’ pattern. Neither are possible if all 5 transfers are turned.
The lower part of the braid was braided also with four turned transfers, but here the single straight transfer is at dead center of the braid, creating a narrow hollow area down the middle of the braid. Its ‘Edge’ pattern has equally-narrow black edges. And in this case the structure is symmetrical too, since the straight transfer happens in the exact center of the braid.

Update – I forgot to include the following shape variation when I first posted, adding it now (7-7-19):
Below are a couple of samples of the 2-Tubes shape variation. This braid has a symmetrical shape, like the central-tube variation above, but has an odd number of turned loop transfers, so tends to have asymmetrical bicolor loop color-patterns:
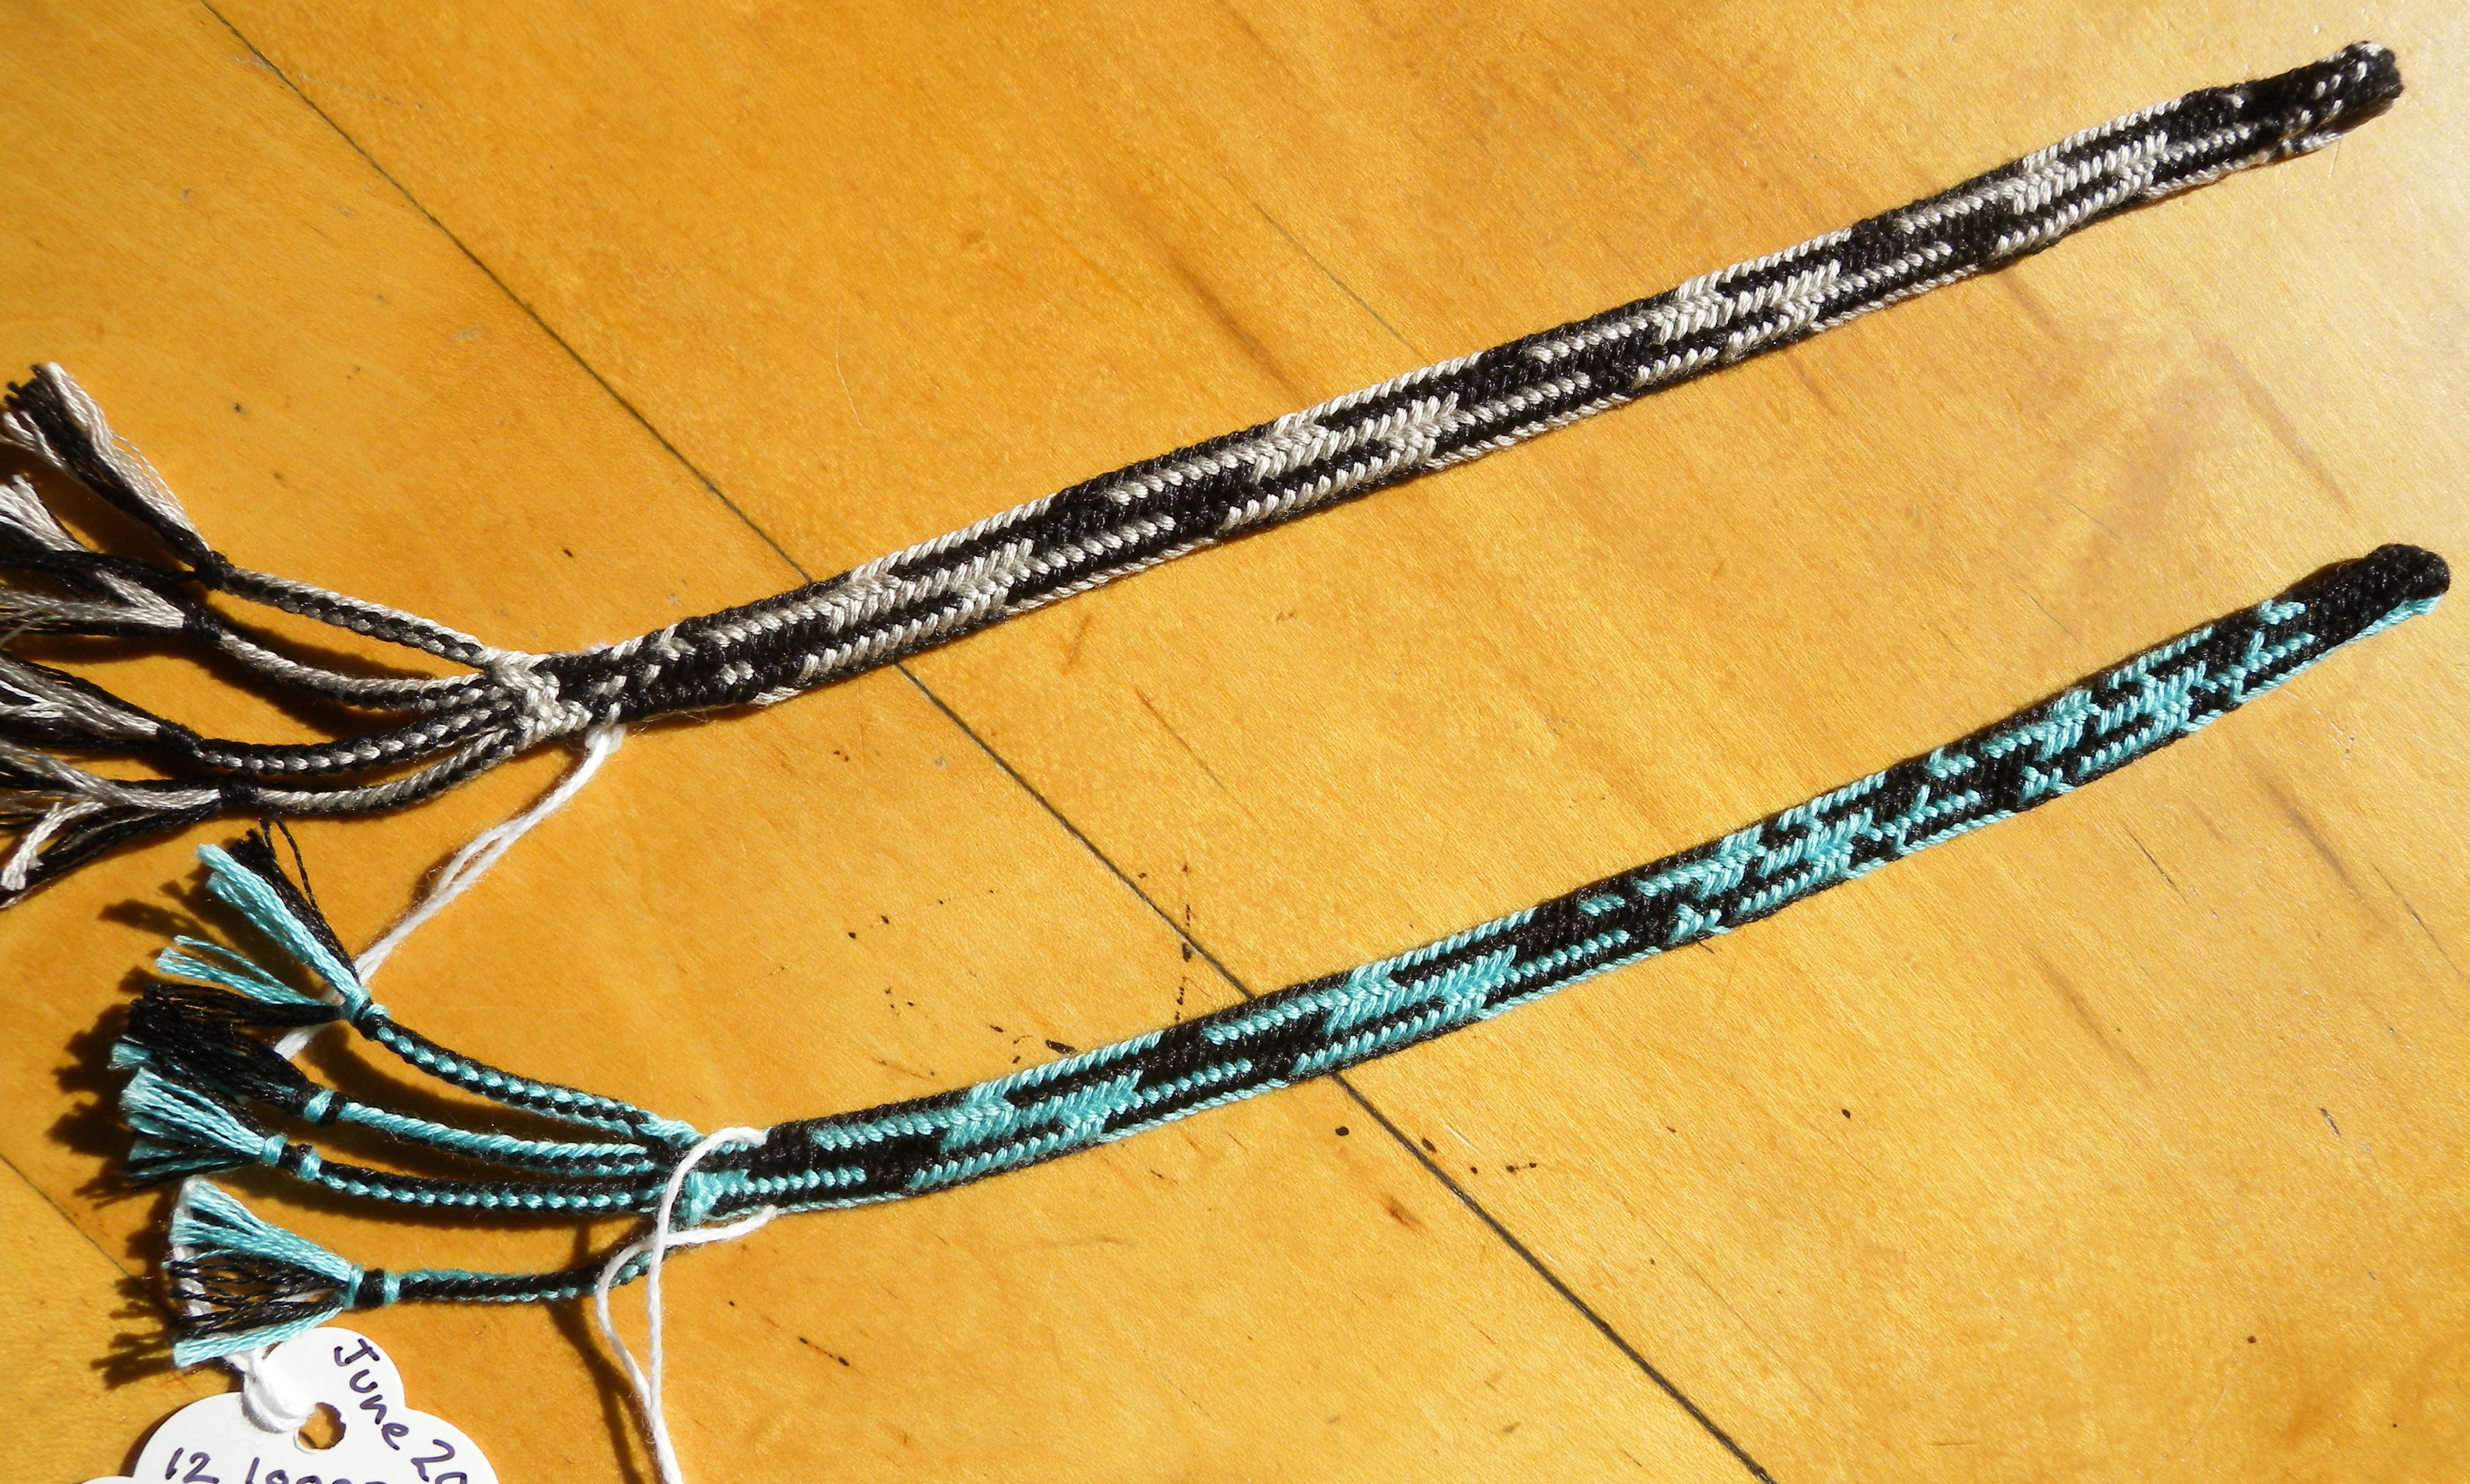
Two-tubes shape variation of the 5-transfer braid. Two narrow hollow areas, one on each side of center of braid. Odd number of turned loop transfers.
I’ve only braided these two samples of this braid so far. The first pattern in the blue and black sample started with all dark shanks upward on the fingers. I vaguely expected an asymmetrical ‘blotches’ pattern, but instead got a much busier one. I then switched to this braid’s version of the Broken Edge pattern (longest possible stretch of darks or lights in each braid column). The black and gray sample is also this “Broken Edge” pattern.

Track-plan diagram of the Two-Tubes variation braids above. The upper and lower layers of the braid are connected at the sides and in the center. There are 2 hollow areas through the braid, one on each side of the mid-line.
End notes:
All these 5-transfer braids are 2/2 twill (more or less), like a 5-loop square braid or 10-loop double braid, because transferred loops are always pulled through 2 adjacent loops. (Some of the twill ridges can actually end up having a span of 3 or 1 due to factors I don’t want to get into here!)
You can also make 5-transfer braids with fewer loops, by pulling some or all of the transfers through only 1 loop, for either a plain-weave, or a mixed plain-weave and twill 5-transfer braid (like my 6 and 8-loop double braids).
I’m sure there are several other possible ways to do the braiding moves. I gravitated to this configuration of moves because it recycles some of my letterbraid strategies for the left hand loops. The right hand moves are the way I usually undo double braids (in the reverse order, though).
7-loop Square-And-a-Half braids of 3 loop transfers, several shape and color-pattern variations. Right braid made with doubled strands of embroidery floss, all other braids single strands.
7-loop Square-and-a-Half braid:
Either on its own, or if one braider of a team will be braiding this braid, there are a few different ways to make the 7-loop, 3-transfer “Square-and-a-half” braid. Text directions for 2 different ways below.
Note: For either method, left and right hands do very different moves.
The first method requires holding a loop with the left thumb. The second method doesn’t require using either thumb, but instead the left ring finger has to do a rather convoluted move.
R = right; L = left
th(umb), a, b, c, d = thumb, index, middle, ring, little fingers
Ra = right index finger, or the loop on the right index.
1st method (using left thumb):
7 loops: Lthumb, a, b, c, d; Ra, b
3 Loop transfers:
1. Rc (fetcher finger) thru Ld and Lc, takes Lb. (Lc and d shift up one position)
Tighten.
2. Ra is the new fetcher – it will move the Left b loop to Left thumb: Ra goes (from above the loop) thru Lthumb and La, to take Lb through them, and temporarily hold it. Lthumb and La shift down one position, making room on Lthumb. Then Ra places the taken loop onto Lthumb. (No tightening move)
[fetching finger must go through Lth and La “from behind” the loop as in Slentre and A-fell braiding. See this exact move in the 12-loop video above at 5:00 min.s into the video (in that braid it’s the 3rd loop transfer).]
3. Ld goes thru Rc and Rb, takes Ra. (Rc and Rb shift up one position).
Tighten.
For a solid rectangle braid, turn the loop each time you transfer it.
2nd method (no thumbs needed):
The first two loop transfers are somewhat similar to the Spanish 7-loop braid. Here, though, loops are always transferred through two adjacent loops, never through just one.
The tricky move is the second loop transfer, which has to be done by the left ring finger (not the middle finger as in the 7-loop Spanish braid) reaching through the little-finger loops of both hands, to fetch the right hand’s ring finger loop.
7 loops: La, b, c; Ra, b, c, d
3 Loop transfers:
1. Right A is fetcher. Ra thru Left c, b, takes La, places it on Ld.
Lb, c shift up one position, vacating Lc (ring finger) to be next fetching finger.
2. Lc thru Ld, Rd, takes Rc.
Rd shifts up to Rc.
Tighten.
3. Left A is fetcher. La thru Right A and Rb (from above and thru the back of the loops as in A-fell braiding), takes Rc and temporarily holds it.
Ra, b shift down one position.
La places taken loop onto Ra.
Tighten.
Note: These braids could also be made with the opposite direction of moves, in the same way that you would unbraid the braid I teach here. But if I wanted to braid in that “backwards” direction solo for the 12-loop braid, I might try to work out another way to hold the loops than having three on the left little finger. It’s not as convenient to unbraid in that configuration as it is to braid.
12-loop solid-rectangle patterns: “Stairstep Edge”, “Blue Blotches”, “Stairstep Edge with Contrast Black Loop” (Solid-rectangle = all transfers turned.)
Th, A, B, C, D, = Thumb, Index, Middle, Ring, Little fingers
Dlo, Dmid, Dhi = Low, Mid, High loop positions on little finger (left hand only)
~Note: in the set-ups below “Black/pink” after a particular finger means black shank UP and pink shank DOWN.
First color-pattern: “Stairstep Edge” in black and pastels
[or substitute white for all the pastels]
12 bicolor loops of black and pastel (4 Yellow, 4 Purple, 4 Pink)
(Ignore the two columns of numbers in parentheses below! They are not necessary for loading these patterns. They might be helpful when planning your own color-patterns. Explained at the bottom of the page.)
Left hand:
Th – Black/pink
A – Black/pink
B – Black/pink
C – Pink/ black
Dlo – Purple/black
Dmid – Purple/black
Dhi – Yellow/black
(5) (11)
(4) (10)
(3) (9)
(6) (12)
(2) (8)
(1) (7)
(7) (1)
Right hand:
Th – Black/yellow
A – Black/purple
B – Yellow/ black
C – Yellow/ black
D – Purple/ black
(10) (4)
(11) (5)
(9) (3)
(8) (2)
(12) (6)
2nd Color-pattern: “Blotches”
I used 3 shades of blue, but this pattern also looks very striking with just white and dark blue – more graphic and bold.
12 bicolor loops
4 Blue/white; 4 Turquoise/white; 4 Navy/white
Left hand:
Th – Blue/ White
A — Blue/ White
B — Blue/ White
C — Blue/ White
Dlo — Navy/ White
Dmid – Navy/ White
Dhi — Turquoise/White
Right hand:
Th – Turq/White
A — Navy/ White
B — Turq/White
C — Turq/White
D — Navy/ White
3rd color-pattern: “Stairstep Edge + Black contrast loop”
11 bicolor loops of Red/ white
1 single-color loop of all-Black
Left hand:
Th – Red/white
A — Red/white
B — Red/white
C — White/ red
Dlo — White/ red
Dmid – White/ red
Dhi — Black loop
Right hand:
Th – Red/white
A — Red/white
B — White/ red
C — White/ red
D — White/ red
Numbers in parentheses: In the first color pattern above, both two columns of numbers in parentheses (on the right of the loop set-up) indicate the order in which loops are moved – the loop sequence in this particular braiding method. This order is helpful to know if you want to set up your own color-patterns. The sequence in both columns is exactly the same – the only difference between the two columns is in which loop is considered to be #1 in the sequence.
Left column of numbers in parentheses
The left column of numbers shows the most straightforward way to present the loop/ color sequence. Loop/ color #1 is the Left D-mid loop (middle loop of the three on the left little finger), which will be the first loop to move over to the other hand in each cycle of braiding. Loops are numbered in the order they will move over to the other hand, which is also the order their colors will appear in the braid down each of the lengthwise columns (‘ridges’) of the braid.
This order is circular, and could actually start with the loop on any particular finger, but for convenience I usually consider Loop/ color #1 to be the first loop that will move from the left hand to the right hand. That way, all the loop colors of one hand will be listed first, followed by all the loops colors of the other hand. That’s the most straightforward way to load the colors onto your hands – all the loops of one hand first, followed by all the loops of the other hand. It’s easier to load a bunch of different colors in the right order if you can load the colors onto one hand first, followed by the other hand.
Loop #2 (the left D-low loop) will be the NEXT loop that will move from the left to the right hand. By the time it does that it will have reached the Left D-mid position, but at the start of braiding it’s on left D-low.
The loops will all follow each other in this circular and repeating order shown in the first column of parentheses, so that is the order that the braid’s color sequence must follow. (This is the same order for all the shape variations of this braid, not just the solid rectangle.)
With a braid of only single color loops, you could load your desired color-order of loops onto the fingers in this circular order starting at any finger, and get the same resulting color-pattern.
Bicolor Loops:
In setting up with bicolor loops, even though the physical loop order on the fingers is the same as with single-color loops, there are really twice the number of strands to plan. Every finger carries one light and one dark shank. For a particular bicolor pattern, the ‘ups’ and ‘downs’ of the dark/light shanks must be carefully arranged at the start of braiding.
In the Stairstep or Broken Edge pattern, all 12 dark shanks follow each other in the braid down each column, followed by all 12 light shanks. This striking and simple-looking braided color pattern does not have a simple-looking set-up arrangement! You must start braiding with the loops on certain fingers dark-up and the loops of other fingers light-up, in a different arrangement on the two hands.
To me, the simplest set-up for Stairstep/ Broken Edge is the Dark – Light arrangement I itemized above in the color set-ups. (Other set-ups are possible but are even more complicated.)
Right column of numbers in parentheses = Same circular sequence as left column, but color #1 of the color pattern is loaded onto the LD-high loop. (Best way to set up Bicolor-Loop patterns of more than 2 colors for the Solid Rectangle shape)
The dark and light shanks must also be in the up/down arrangement given in the set-ups above.
The right column is numbered in the same circular order as the left column, but loop #1 is shown as the Left D-high loop, which means loop # 2 is on the other hand: Right C).
Reason for starting sequence in this weird place!:
For bicolor patterns in more than two colors, this starting point for the color sequence is helpful if you want the light (or dark) bicolors to be in a particular color-order.
In my first color pattern above, the black bicolor shanks can obviously be in any order amongst themselves as they are all black. But the pastel bicolor shanks show up in the braid in a particular order – 4 yellows, followed by 4 purples, and then 4 pinks. I had to load the pastel colors in the order shown. To me, Color #1 of the lights was the light yellow on my Left D-high finger, so that’s how I listed it, followed by the loop on my Right C finger, since that’s the next loop-color in the braid.
1. Two-color Stairstep/ Broken Edge pattern: 12 dark strands followed by 12 light strands down each lengthwise ridge (column) of the braid.
For this braid’s solid rectangle shape, I find that the simplest set-up arrangement for the “Broken/ Stairstep Edge” pattern is to start with the dark and light shanks in the up/down positions given above.
2. Stairstep Edge in more than two colors: Same dark-light up/down starting set-up above.
The first light-colored shank that will appear in the braid (after all the blacks) will be the light shank that starts in Left D-high position. (shown as #1 in the right column of parentheses)
That will be the first pastel strand to appear in every braid column immediately following each long stretch of black. The next light color following it down each column will be the one on Right C, etc etc.
If I hadn’t bothered to follow that order in setting up the pastel colors on my fingers, it wouldn’t have changed the overall dark-light pattern, it would just mix up the order of the pastel colors within the pattern.
But if I changed the starting Up/down arrangement of the bicolor dark and light shanks, that would likely make a dramatic difference to the color pattern. The larger dark-light pattern would probably be completely altered (maybe with a wonderful result!).
Like Edge-pattern in more symmetrical braids, the “Broken/Stairstep Edge” pattern is a great starting point for coming up with other color patterns.
Posted July 2, 2019
Last updated June 24, 2023
© 2019-2023 Ingrid Crickmore


I can’t wait to try this at our next braiding meet up!
Me too! How’d you like my track plan diagrams?!