How the order of the loops on your fingers relates to the color order in your braid!
[Jump to loop/color order for square and flat braids here; Spanish 7-loop braid here; 8-loop double braid here.]
The color set-ups for all braids in photos below are given here.
The last part of this post is a section on color ideas — a few tips and strategies for coming up with effective color combinations for braids.
It’s really fun to try out different color patterns in a braid! A little 7-year old at one of our regular music campouts used to spend hours at our camp every day making 3-loop braids, and for each one the color combination was a big deal—she would pick it out quickly, but then dwell on, admire, and talk about it before, during and after the braiding process.
This was very funny to listen to, because it was essentially just like many of my own (more interior!) monologues when I’m braiding…

Just to be perfectly clear – it’s not at all necessary to plan your color-patterns! Randomness often works even better than planning. You can get great braided patterns just by picking out some colors and loading them on your fingers in random order. But if you decide you love that pattern and want to make it again, this post will also explain how you can do that.
Typical 5-loop square braid, flat braid, and 3/4-flat braid color patterns:
(Learn the braiding moves here. Set-up instructions for these color patterns are here.).
Below are some 5-loop braids, in three color groups.
The 3 braids on the left have pink, gray, white, and black single-color loops: a square braid, a flat braid, and a 3/4-flat braid. All three were set up with the same color-order of loops on fingers at the start of braiding. You can count that color-order down any of the lengthwise columns of the first three braids (click to enlarge photo) : pink, pink, gray, white, black. (It doesn’t actually matter which color you start with. It’s a circular, repeating order, so you could also describe it as pink, gray, white, black, pink – or you could start with the white or the gray loop.) This is also the order in which the colors rotated onto each finger as I braided. To get this color order in the braid, I followed a particular color-order when mounting the loops on my fingers at the start of braiding, whether by chance or on purpose.
The middle two braids are a square and a flat braid made with bicolor loops—each loop having one blue and one yellow shank, same starting set-up of colors for both braids.
The three braids on the right are square, flat, and 3/4-flat. All were made with 4 bicolor loops of orange+white, plus one single-color black loop, and all three started with the same initial color arrangement on the hands.

The braids in the photo are of 5 loops, but square and flat braids of more loops have similarly ‘shaped’ patterns – just more strands (and therefore more potential colors) to each repeat of the the color-pattern. More loops do create the potential for more variations of these patterns – see the photos further down of some 7-loop square and flat braids.
A square braid of single-color loops will show chevron patterns on the two sides, and alternating “zigs,” for lack of a better term, on the top and bottom surfaces. See chevrons on pink square braid (a side surface), black zigs on orange square braid (bottom surface – on the sides of the braid each zig meets another zig and forms a chevron). Each chevron is formed from the two shanks of one loop, where they cross each other at the side of the braid. Yes, you heard that right – the two parts of a loop aren’t next to each other in a braid! They move in opposite (rotational) directions around the braid, crossing each other on each side.
In a braid of all bicolor loops, like the middle blue and gold braids, the two shanks of a single loop are different colors, so they don’t create a chevron where they cross each other on the two sides of the braid. You can mix single-color and bicolor loops. The next three orange-white-black braids have four bicolor loops of orange+white, and one contrast single-color loop – a black loop. The square orange-white braid has black chevrons nicely spaced out on a background of black and orange. (Sadly the black chevrons don’t show here because the photo is of a the bottom surface of braid, and the chevrons are on the two side surfaces, so all we get to see are zigs.)
On a flat braid of single-color loops (like all the loops in the flat pink braid, and the one single-color black loop in the flat orange and white braid), there are central chevrons, and slanting ‘zig’ lines on the outer edges. On one surface of a flat braid the central chevrons point down: v (pink braid). On the other surface the chevrons point up: ∧ (orange braid).
If the colors of a flat braid happen to be arranged just so on the fingers, the center chevron and outer zigs can line up to form a W (or upside-down-W) across the braid. You can also plan that outcome! Looking at the flat pink braid above, I think I can see that if I braid this again, but substitute a black loop instead of the gray loop – placing it on the same finger that I had placed the gray loop – the braid would have regularly occurring black M-shapes across the braid (W’s on the reverse side). You can try that pattern yourself by following the set-up instructions for this pink braid, but substitute a second black loop for the gray loop. The resulting fully-flat braid should have black W’s across it. A 3/4-flat version of the braid would have sloping black lines with a “zig” at one end (a nice pattern as well).
3/4-flat braids (3rd from left, and last braid on right) are missing one central column (also known as a ridge in braid terminology) of the fully flat braid, so only half of the chevron is visible, just one ‘zig’. The missing column/ridge is actually there, but it’s hidden underneath the single visible center column. This makes the braid thicker in the middle, a nice firm lozenge-shape in cross-section. This shape makes a nice cord as an alternative to a square braid. That hidden column also makes a big difference to the color pattern. A fully-flat color-pattern with single-color loops has left-right symmetry, whereas the 3/4-flat version does not: compare the flat vs. 3/4-flat pink braids. The 3/4-flat braid asymmetry is also due to the left and right sides ‘skewing’ up and down from each other when the two central columns compress together.
The 3/4-flat variation is a very common outcome when braiding a flat 5-loop braid. It’s harder to get a 3/4 flat braid with 7 loops or more – if your 7-loop flat braids consistently turn out 3/4 flat it basically means you are braiding too tightly! I give two sure-fire tips for how to purposely achieve a 3/4-flat or fully-flat braid in Pick-Up 3 – Flat Braids.
Bicolor loops allow for a lot of color patterns, too many to show here. The blue-gold square braid shows a bicolor pattern called ‘Edge’ and the orange-white-black square braid is basically the Edge pattern too, but with a contrast black loop swimming through it. I love these long stretches of two contrasting “plain” colors! Very different from most braid patterns made with single color loops – unless you make a whole braid in one color. The exact same bicolor loops in those braids could also form much busier patterns, depending on how you arrange the loops on your fingers at the start of braiding. See my Bicolor Loop Tutorial, Flat Braid Zig-zag Patterns, and my series on Pick-up Patterning in loop braiding for more ideas for bicolor loops.
Counting the pattern-repeat:
In a 5-loop braid, each loop will return to the finger it started on after 5 braiding cycles.
A cycle, or “row” of braiding is one repetition of all the braiding moves on both hands. So 5 full cycles of braiding include 10 loop-transfers – 5 on the right alternating with 5 on the left.
As a general rule (with some exceptions), those 5 rows / cycles of braiding create one full pattern-repeat in a 5-loop braid – after which the same sequence of colors will repeat itself down the braid.
In the pink braids above left, you can count this 5-strand color-pattern repeat down any of the vertical columns. (Click the photo to enlarge it and see the individual strands.)
Bicolor loops are a different case—i.e. where two yarn colors are tied together into one loop. The color pattern of the bicolor blue-yellow square braid above has a one-row (one-cycle) repeat. That’s because after each row of braiding, the colors are back in the same arrangement on all the fingers. The fingers are holding different loops than they held in the previous row of braiding, but the loops are of the same exact colors as the loops that were there before, making a very short pattern repeat.
However, the flat blue-gold braid beside it – made with the same starting set-up of bicolor loops – has a pattern repeat twice as long as most 5 loop braids: 10 full braiding cycles (20 loop-transfers) before the same colors show up back in the same place on the fingers (and in the braid). So do the two rightmost orange/white/black braids.(here’s why*)
You’ll see the color-pattern repeat itself very clearly if you make a braid of 4 dark loops and one bright contrast-color loop. Watching that one contrast-color loop make its way around all your fingers, and back and forth in the braid, will give you a good feel for what’s going on when you braid. It also makes a nice braid pattern. You might try it with a shiny contrast yarn of a completely different type of yarn. Or maybe a contrast-color yarn that’s thicker than the other yarns – that can make a very interesting textural-patterned braid! A recently discovered 17th C. loop-braiding manuscript called “The Nun’s Book” describes a thick-thin 6-loop square braid – the Rose Breed – in which the (3?) rosebud-colored loops were thicker than the ‘stem’-colored loops, so together they swelled out from the ‘stem’ of the braid, forming a ‘rosebud’. (that link should take you to a different page – a footnote in my 5-loop braid tutorial).
Seven-loop braids (tutorial here; color-pattern set-up instructions here.)
These usually have a 7-cycle pattern repeat (7 cycles = 14 loop transfers).
Most of the wool braids below are 7-loop square or flat braids, made out of fairly thin weaving yarn. Being wool, they are already fuzzy, which is not helping the bad photo!
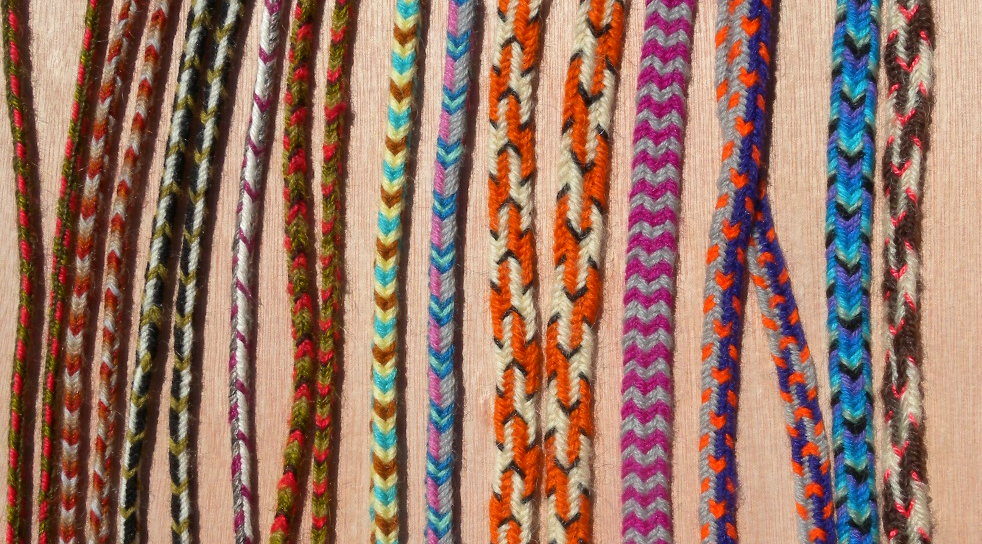
A few of these braids have all single-color loops, but most have a mix of bicolor and single-color loops.
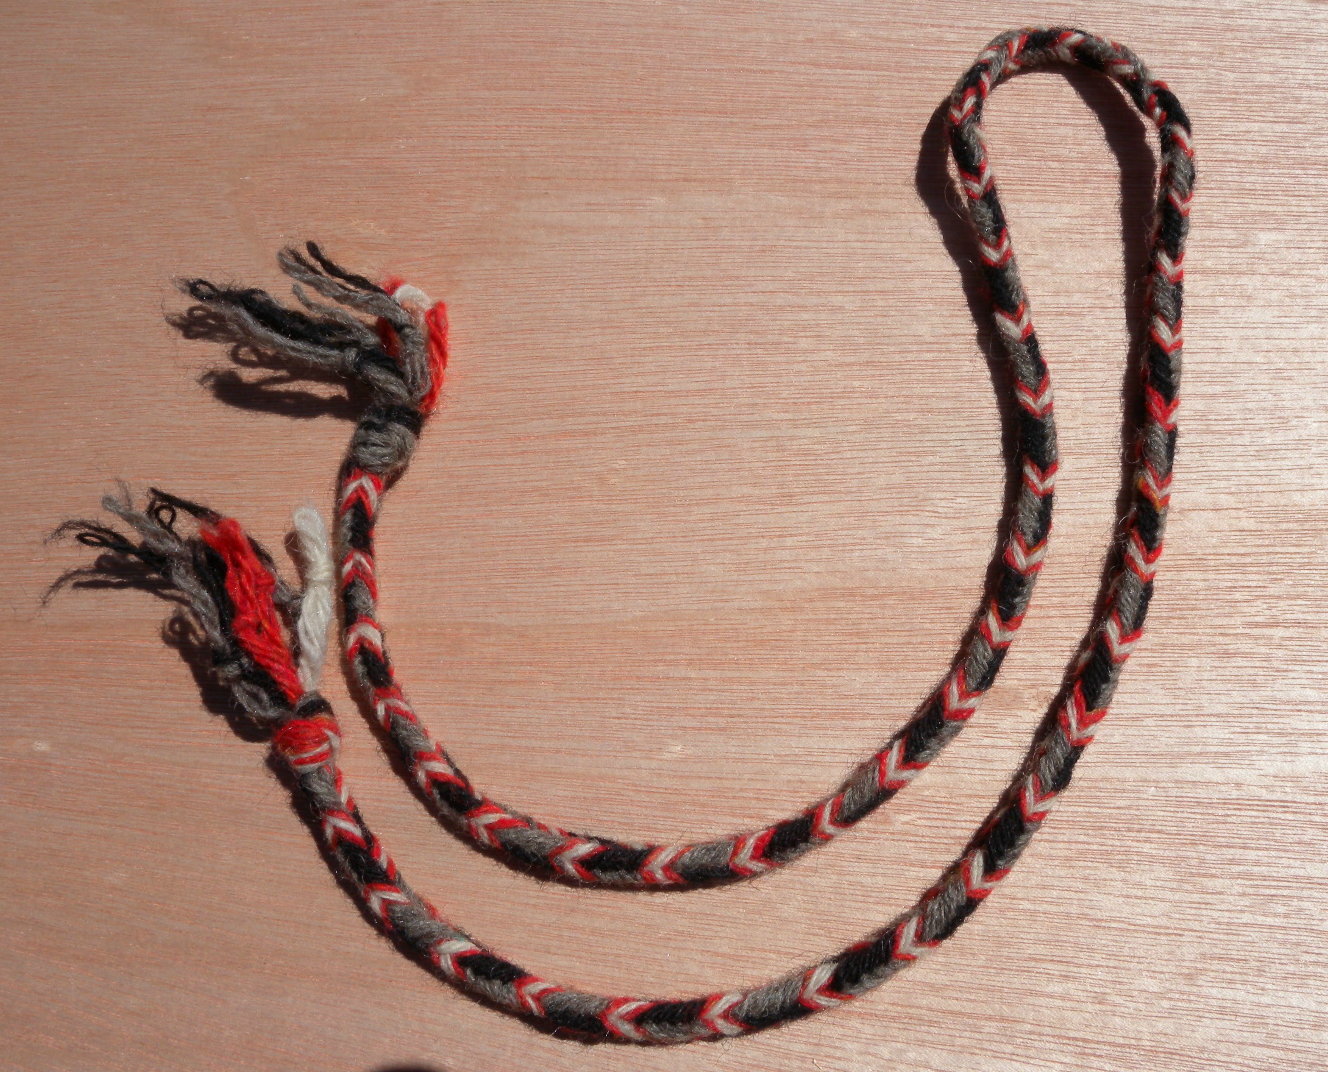
Below is a humble little wool square braid with different colors, but almost the same pattern of chevrons + lengthwise stripes as the center-left blue/pink/gray braid in the photo above. The only difference is that the lengthwise black and gray stripes in this braid switch sides in each pattern-repeat section (the first video in my Bracelets with Chevrons tutorial shows how to do that).
Reproducing a braid’s pattern
It can be fun to set loop colors up on your fingers at random to make a braid, but if you like that random braid pattern and you want to reproduce it later, or maybe try it with different colors, you have to know how to set the colors up in the right order on your fingers to get that particular order of colors in the braid.
Take notes!
The most direct way is to make a note to yourself of the color order on your fingers each time you make a braid. Even if you forgot to do this at the beginning of a braid, you can still do it while you’re in progress, once you see that it’s going to be an interesting color pattern. Wait til you finish a full row/ cycle of braiding, and are about to start on the next one. Holding the loops carefully, jot down which loops are on which fingers:
7 loops, Square braid
Left: A white, B white, C white, D black
Right: A red, B red, C black
(For any bicolor loops be sure to also note down which of the two colors is in upper position on the finger.)
See my diagram for the finger codes A, B, C, D.
That’s all there is to it—after you finish braiding you can add the date and a note to remind yourself which braid this was. If you want to be super-thorough, make a short sample of it and tape or sew it to your note. You might even decide to keep a sample book of your favorite braid patterns.
You might wonder why the colors you see on your fingers seem to be in a different order than you remember starting out with. Even though the circular order among the loops stays the same as you braid, they shift onto different fingers with each cycle of braiding. Any of those arrangements of loops on the fingers at the start of a braiding cycle can serve as the starting set-up for your braid’s pattern.
For example, below is another possible set-up for the exact same braid pattern I just notated above. This set-up is a simpler to write down, and probably easier to set up on the fingers as well:
L: A black, B red, C red, D black
R: A, B, C all white
The lower of the 2 braids below is how this 7-loop pattern turns out when braided as a square braid. This is one of my favorite square braid patterns. It looks great from all sides, has a very heraldic parti-colored look to the other sides – I should have twisted the braid slightly so the photo would show the top as well as the side view:

Above it is a 9-loop square braid with a similar color pattern, though more white than red. (two more white loops than the 7-loop braid.)
But what if you forgot to note down the loop set-up and you have a braid with a great color pattern that you’d like to make again?
Or what if you have an idea for a color pattern that you haven’t tried yet, and don’t have instructions for?
How to set up a particular color-pattern ‘from scratch’:
You already know that a square braid of single-color loops will have chevrons on 2 surfaces and “zigs” on the other 2 surfaces.
Now, suppose that you want to line up very close shades of blue for these chevrons, from light to dark, so the colors seem to meld together. Or maybe you are actually looking at such a braid of light-to-dark blues (7 different shades in a 7-loop braid) and want to reproduce it.
Instead of looking at the whole braid, look at just one of its vertical columns. The order of the colors down the column is the same order that the colors will move onto each finger as you braid. (You can track that sequence when braiding by following the order of the colors as they move off the left hand onto the right hand.)
Here is how that color-order should be mounted on the fingers for 5 and 7-loop square and flat braids:
Loop #1: Left index-finger (A-finger). This will be the first loop to move from the left to the right hand.
Loop #2: Left middle-finger (B-finger). This will be the next loop to “jump off” the A-finger over to the other hand. In the finished braid, this color will always come immediately after the color of loop #1.
Loop #3: Left ring-finger (C-finger). This will be the third loop to leave the left hand’s A-finger and jump over to the right hand.
Loop #4: Loop number 4 will either be on the left little finger (D-finger) – or, if the left D-finger has no loop, #4 will be on the right hand’s index-finger (A-finger). Even though it’s currently on the right hand! – By the time its turn to make that jump comes round, it will be back on the left hand’s A-finger.
#5, 6, 7 follow in the same manner: B, C, (D) of the right hand. And again, the right hand’s lowest loop will be followed by the left hand’s index / A loop—loop #1.
Finger codes: A=index, B=middle, C=ring, D=little finger
Loop sequence for a 5 to 7-loop square or flat braid:
Left A, B, C, (D), followed by Right A, B, C, (D)
This will be followed in the braid by Left A, B, C etc.
(keeps repeating down the braid)
9 and 11-loop braids’ loop sequence:
Left: Thumb, A, B, C, D, (D-high)
followed by: Right Thumb, A, B, C, D, (D-high)
In these square or flat (square-type) braids, the lowest loop of one hand is always followed by the highest loop of the other hand (‘lowest’ = toward the little finger, ‘highest’ = toward the thumb). That’s the order the loops follow each other as they circulate around the fingers, and it’s also how they line up in each column of the braid itself.
If you know the color-order you want in your braid, follow the sequence above to place the loops onto your fingers at the start of braiding. In each column of your braid, the colors will follow each other in that order.
Say you want to set up for a 7-loop braid of light-to-dark blues:
Put the lightest blue loop on the left index, or A-finger.
Then keep loading slightly darker loops onto B, then C, and then D.
The next-darker blue loop goes on the right hand’s A-finger.
You might keep going with darker blues all the way to a midnight blue on the last loop.
Or you might want to make the last loop or two a contrast color like gold or red…Or maybe you want a gradation of 4 light-to-dark blues followed by a gradation of 3 light-to-dark yellows… etc etc!
Once you know the loop sequence on your fingers, you can plan any color sequence you want. Also, you can look at a braid you’ve already made, and probably be able to figure out how to reproduce it—just count the colors down any of the 4 vertical columns (ridges) of the braid, and then mount those loops onto your fingers in the order I show above.
(Planning gets more complicated when you use bicolor loops. A bicolor loop’s two colors will ‘switch’ whenever that loop is turned. This creates more possibilities as well as potential surprises! My more recent Flat Braid Zig-zag Patterns gives tips on how to plan and set up bicolor loop patterns in flat braids.)
Square braids made the ‘other’ ways (taking loops with the index finger, rather than the ring or little finger):
For A-fell and Slentre square and flat braids, it’s the opposite order: D, C, B, A of one hand, followed by D, C, B, A of the other hand. For planning purposes that doesn’t make a big difference. If you used the V-fell order to set up an A-fell braid, the color pattern would just map onto the braid heading UP the braid instead of down the braid.
Double braids (2-worker braids), and other braids with more than 2 loop transfers per braiding cycle, do not necessarily rotate around the fingers in either the A or the V-fell order. The 7-loop Spanish braid of some of my earlier posts, for example has a very different order.
To plan a particular color-pattern for a braid, it’s very helpful if you can first find or figure out the order of the loop movements in that braid.
That’s the order that the loops all rotate onto any one finger, or most visibly, the order in which they will move from one hand to the other. Each of the loops will follow each other and make that “jump” across from left to right in the same, constantly repeating order, even the loops that are currently already on the right hand.
Here’s the color / loop sequence for the 7-loop Spanish braid (as taught on this blog—if you do the loop transfers in a different order than I do, the color sequence will probably be different, too.) This 7-loop braid is the component braid of the 14-loop Letter braid:
Click link to see a hand diagram of the finger codes A, B, C, D.
L = left; R = right.
Loop order for the Spanish braid of 7 loops:
Left d (little finger!), a, b; then Right d, c, a, b
If you wanted to set up a loop sequence of light-to-dark shades of blue as a color-pattern for this braid, you would follow the sequence above when placing the loops on your fingers at the start of braiding. So you would put the lightest blue on Left d, and then progressively darker and darker loops on La, b, and Right d, c, a, b.
It might seem strange to set your first loop on a little finger (D-finger). In fact, you don’t actually have to put it on the d-finger. Since the order is circular, really any finger can hold the 1st loop (the lightest-blue loop). But if you do start with it on one of the other fingers, the color order of the subsequent loops might seem even more confusing!
Here’s how the loops have to be arranged (in increasingly dark shades of blue) if you were to put your first (lightest blue) loop on the Left index/A-finger (the first loop that you’ll transfer, but not the first loop that will go over to the other hand):
Left a (lightest), Left b;
Right d, Right c, Right a, Right b;
Left d (darkest)
For light-to-dark blues in your braid, if you decided to place the lightest blue on Left A at the start of braiding, your left hand would be holding the first two (lightest) loops of the sequence, along with the last and darkest loop! To me it seems more intuitive at the beginning of braiding to mount the first 3 loops of the sequence together on one hand, and the last 4 loops together on the other hand. That’s the first order I suggested. That way, the first loop to move to the left hand will be loop #1 in the color sequence – the lightest blue loop.
Sometimes I do find it easiest to place loop #1 of my color-sequence onto the Left A finger for this braid – specifically, when I use bicolor loops in making a flat braid (of ‘regular’ turned loop transfers). In that case I always place loop #1 of the color-sequence onto the finger where it will be transferred with a turn. All the loops will get a half-turn as they leave that finger, so one-by-one over the rest of the pattern repeat all the bicolor loops will turn over there, and their other shanks will begin to show up in the braid. The way I braid a flat version of the 7-loop Spanish braid, only the loop on the left A finger is turned, so that’s where I place the first loop in my planned color sequence. Bicolor loops always make color-planning more complicated! [Update – I just posted a how-to for bicolor loop flat braid patterns: Flat Braid Zig-Zag Patterns
Color / loop sequence for an 8-loop double braid—as taught on my blog:
[Note: again, this is a circular, repeating order, so any loop can theoretically be considered “first.” In braiding a flat double braid with any bicolor loops, it would be easier to set up the loops such that the first loop in the color order is on the RIGHT RING FINGER – Rc, because in the first row of braiding, the loop on Rc will get shifted to the middle finger and end up being the first loop to be turned.]
1st: Lb (middle finger loop is first!),
2nd: a (index),
3rd: c (ring finger),
4th: d (little finger);
Followed by the same order of loops on the other hand:
5th, 6th, 7th, and 8th: Rb, a, c, d (middle, index, ring, little finger).
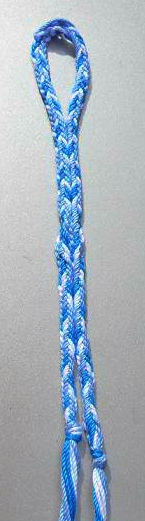
To illustrate the order listed above, here is Dan Gaiser’s photo of his 8-loop flat double braid bookmark, showing two different patterns, that he kindly allowed me to share.
Here’s Dan’s note:
I started out with solid color loops, alternating blue, white, blue, white on one hand and all light blue-grey on the other. Somewhere along the way the order got switched and the whites were together. The accident made a nice braid.
Accidents make the best patterns! I like both patterns, though in these fairly close colors, the pattern with both whites together works much better. But Dan’s first pattern is a nice one too, where the darker blue section is outlined with white.
You can find the color-order in the braid by focusing on just one of the lengthwise columns of slanting threads, and following the colors down that column.
Even though Dan started by setting up the loops in alternating blue-white-blue-white order across his left fingers, the order in which he braided those loops follows the sequence I listed above, so in the braid the color order is:
White, blue, blue, white; followed by the 4 blue-gray threads that started on the right hand, [repeat]
You can just barely make out this order in the upper half of the braid, by looking along any vertical column of slanting threads – though with these close colors it’s a little hard to distinguish them in this photo. To set this pattern up, you would place the loops onto the fingers according to the loop order I showed above (at the start of this section):
1st white loop on the left middle finger, the next color – blue – on the index finger, the next color – 2nd blue – on the ring finger, and the 4th color – another white – on the little finger. (Comes out looking blue, white, blue, white across the left fingers.)
Followed by the 4 blue-grey loops, all on the right hand. Since the right loops are all the same color, their order on the fingers doesn’t matter, but if you did need to consider it, the order is the same as on the left hand – middle finger loop shows up first in the braid, followed by index loop, etc.
In actual practice, when I am loading loops onto the fingers, I find it easiest to physically load the index loop first, then the middle, ring, little fingers. But prior to loading, I plan which colors to put on which fingers, and I bear in mind that in the actual braid, the Left index loop (A) will follow the left middle finger loop (Left B, in bold below), and will be followed in turn by the left ring finger loop (left C) and then the left little finger loop (left D), then by the loop on the Right middle finger, index, ring, little etc. etc. :
1) Starting set-up for Dan’s first pattern:
Left: A blue, B white, C blue, D white
Right: A, B, C, D blue-grey
As noted above, the finger-order on the left hand looks like alternating blue, white, blue, white. But in the braid the order will be white, blue, blue, white followed by four blue-grays, because the B-loop gets braided before the A-loop. B is the first loop that will go over to the other hand, to be followed in the next successive cycle by the current A-loop (which by then will have moved to the B-finger), followed by the C-loop, followed by the D-loop, followed by the B-loop of the other hand, etc etc.
This one (Dan’s first pattern) might not show up well with these close colors, but if you substituted, say black, for that stretch of all blue-gray, it might make a great color-pattern! In each column, the wider blue section would be ‘outlined’ with white, followed and set off by a longer, contrasting black section. (or maybe red, dark orange, etc – a color that would stand out as significantly darker than white, and different from blue.)
2) Starting set-up for Dan’s second pattern:
Left: A and B blue, C and D white
Right: A, B, C, D: blue-grey
Here, the two whites are together and the two blues are together (both on the fingers and in the braid) so they stand out more boldly, as you can see in Dan’s braid.
3) For an alternating blue-white-blue-white pattern (“zebra stripes”), followed by a blue-grey section:
(not shown in photo)
Left: A white, B blue, C blue, D white
Right: A, B, C, D blue-grey
Like Dan’s first pattern, this ‘zebra-stripe’ zig-zag pattern might stand out more clearly if you substituted a more contrasting color for the blue-gray. Or else perhaps two different colors for the blue-white zebra stripes – say gold and black? Gold and black might have plenty of contrast to stand out from the blue-gray section.
Thanks for sharing the braid, Dan!
Color ideas
Value (dark or light) contrasts
Braids are SMALL (in width) compared to other textiles, or paintings, clothing etc. Because of this, two colors that are close in value (meaning just as light or dark as each other – say, pink and light blue) don’t usually contrast much in a braid, even if they are very different colors. Even a light color and a medium color, or a dark and a medium color might not have enough contrast for a braid pattern to stand out clearly.
On the other hand, a braid with subtle, hard-to-distinguish colors can be very beautiful! But it may initially surprise or disappoint you if you were expecting that the pink and light blue you used would stand out separately in your braid. Or that a cool braid pattern would stand out in a light green and medium blue braid.
When I started braiding, I quickly fell into a pattern – or maybe a rut! – of always using two or more colors with a lot of contrast in value (very dark with very light), so the color-pattern would stand out clearly. What always seemed like a sure-fire combo was black, white, and a nice clear or bright color that contrasted well with both black and white.
“Clashing” colors
Another color habit of mine is to lean toward using colors that are somewhat opposites on the color wheel. These are called complementary colors for some reason, even though they actually clash. Complementary colors can be jarring, especially on a larger scale—like clothes combinations, or decor. But braids are small! To me, gold or yellow is a great contrast in a dark burgundy or purple braid, for instance. (I’m kind of a nut for gold, actually—a shiny gold rayon can be a great contrast in a dark cotton braid of almost any color.)
Examples of complementary or near-complementary color-contrasts are:
wines-to-purples + yellows-golds-oranges
wines-to-purples + yellows-to-greens
reds + greens
oranges + blues-turquoise-greens.
Again, if the two complementary colors will be next to each other in the braid, it might be good if one of them is dark, while the other is light in value. Remember that a change in lightness/darkness sometimes makes the name of the color change, without much rhyme or reason. Think “pink” compared to “red”, for example. (In English, the color pink happens to have a different name than red, but it’s in the red family of colors in exactly the same way that “light blue” is in the blue family without a separate name.) A pale pink can be a great contrast against a dark green… opposites on the color wheel, and opposites in value.
In braids of seven or more loops, I like to use two complementary colors that are rather close in value, but separated and set off by black, or white, or even black and white (you can see some examples in my Bracelet with chevrons post and my Color-linking post, among others).
Colors that “go together”
This usually implies colors that are closer on the color-wheel, like red and purple, or blue and green, etc. These are usually considered safer, more soothing color combinations. Combining very close colors like blue and blue-green can result in beautiful shimmery effects in a braid, where you don’t see a distinct pattern, but the colors kind of glow and fade in and out from each other. If you want the pattern to stand out more visibly, try using one very dark and one very light version of the two close colors – say dark purple and light pink.
Look around! (especially at small things)
My tried-and-true color strategies work, but I sometimes get tired of them. It’s always fun to break a color-habit and try something new, even though there’s usually a cost of a few duds to every winner…
Maybe it would be more creative to look for new color combinations in nature, or art, but with braids a really good way to get new color ideas is to look at other braiders’ and weavers’ braids! (Or similarly small-scale things in nature? – maybe caterpillars? flowers on a stem?) I know this sounds shamefully unoriginal, but actually I think it jolts me out of my ruts and opens my eyes to new possibilities.
I have gotten a lot of ideas for color combinations from other braiders, including first-time braiders using yarn and colors I had provided—but putting them together in ways that never occurred to me.
I tend to assume that it just doesn’t work to use all close shades or values in a braid. Or to use a lot different colors in one braid…
Then along comes someone who puts together a wild rainbow braid and lo and behold it looks great! Or someone who puts some very similar colors together and gets a shimmery, subtle braid like nothing I’ve made before. Or simply combines two colors I never thought of using together before.
Making a braid for someone whose favorite color is one you rarely use yourself is one way to stretch your color-appreciation. I’ve been participating in the Braid Society’s swaps and other activities—these sometimes have a color theme. “Black and white”/ “citrus”/ “just white”/ “rainbow girl” have been some recent color themes. Some of these have been a real stretch for me, yet ended up giving me new color ideas that I’ve used again and again.
Try an ‘ugly’ color (or not!)
Janis Saunders of BraidersHand and WeaversHand reminded me last month of a really good way to expand your color range: Try using a color that you think you hate. A color that you judge as ugly by itself can sometimes be fantastic in combination with another color or colors. (Try a pukey green with a contrasting pink – or if you tend to be anti-pink: an icky pink with a nice green.) I have some rather weird colors of embroidery floss from ordering them online based on unreliable color swatches – it’s always fun to find a good color combination that includes one of my ‘ugly duckling’ colors.
Low-contrast color combinations
One of the things that I’ve been noticing lately in other people’s braids is how gorgeous a braid can be with subtle, close colors that merge together. Here’s an example:

It’s a kumihimo braid, not loop-braided, but that has nothing to do with why the colors work so well—that’s due to the aesthetic of the braider. The knotted finishings are beautiful, too.

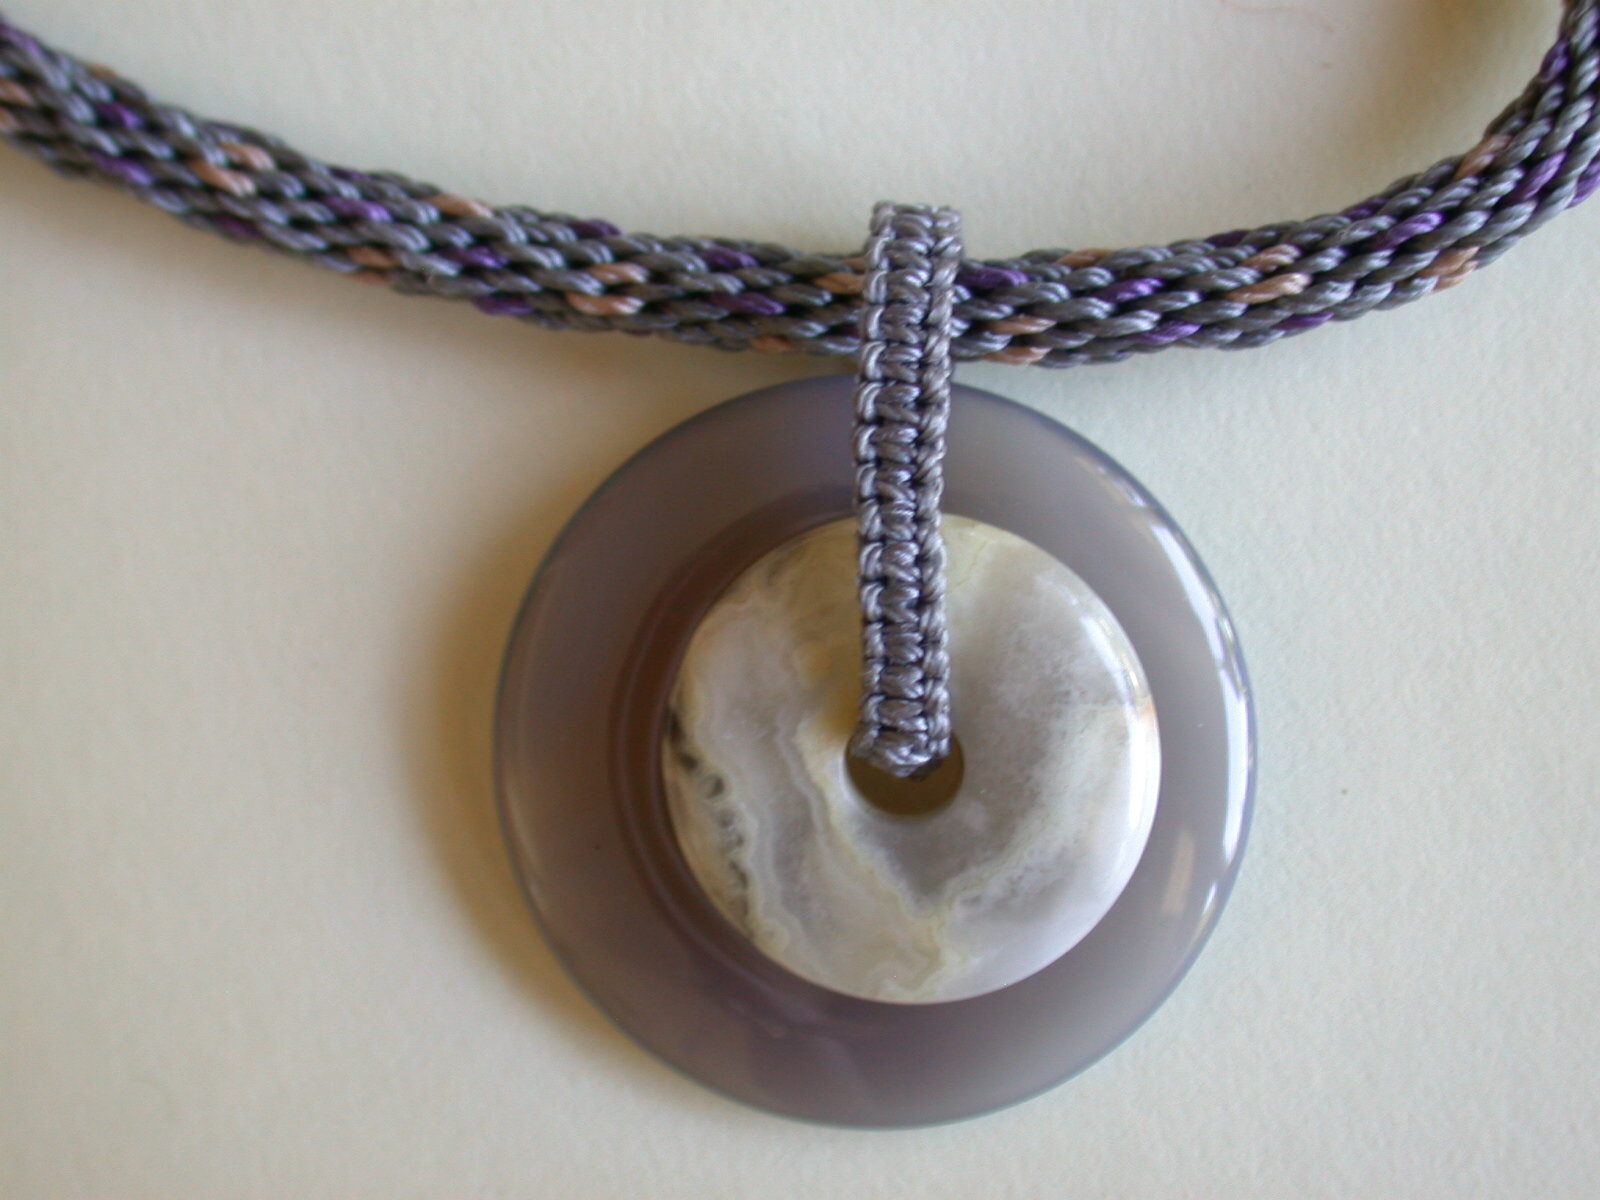
These photos make me want to take a new look at my braiding materials and see if I can come up with some subtle color combos!
It might seem strange to suggest this in a post about color patterns, but it can also be very interesting to make a braid in one solid color. Particularly if it’s a lightish color, you’ll really notice the texture of the braid structure, and of the type of yarn or thread you use.
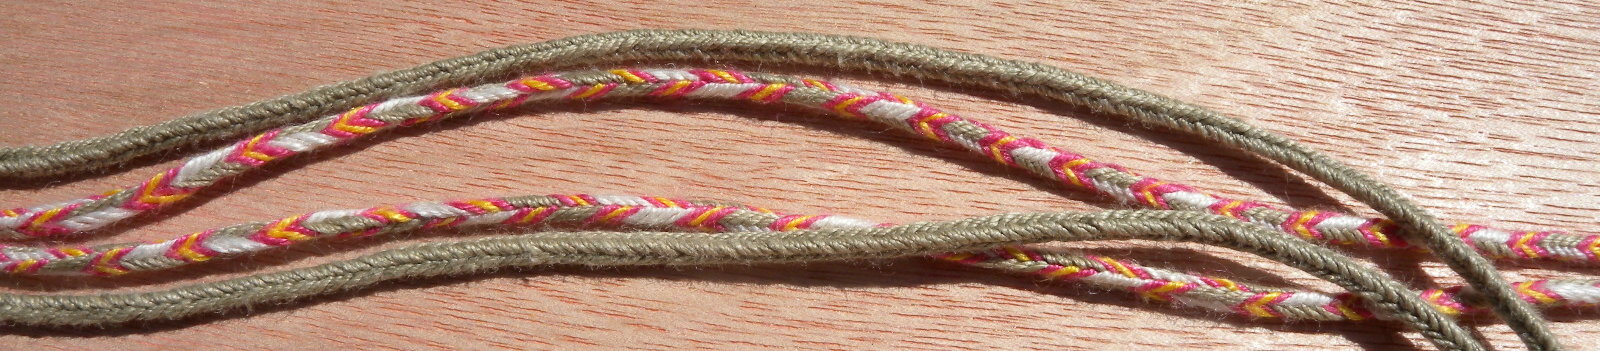
Both these braids are well-worn hat-strings, made out of linen thread. The tan color is a linen shoemaker’s thread, the other colors I acquired who knows where – probably weaving or embroidery threads originally (all these threads are finer than embroidery floss, but much thicker than sewing thread). I love the way linen braids feel! They are almost like quicksilver, incredibly light and supple. They are stiff before you wash them, though with a nice springiness. But after you wash them (or wear them a long time), they become amazingly fluid – drapey but lively. It doesn’t come across well in this photo, but I also love the tan/ dull brownish color of the shoemaker thread. I think it may be the natural color of the linen. It sometimes looks brownish, sometimes greenish, and has a subtle luster. Linen is totally alive, much more sensuous to me than silk. Hemp is similar – rougher-looking but has a wonderful bounce and softness after being washed. Btw, always pretest or prewash dyed linen before braiding with it! I usually just go ahead and prewash dyed linen thread or yarn after cutting it and before braiding (esp reds and purples) so it won’t bleed later and discolor the braid.
Simple contrasts
Another fun thing to try is an almost-one color braid with just one contrast-color loop. Or maybe one loop that is bicolor—with one shank the same color as the rest of the braid, and a contrast color for the other shank. In the same vein, if I’ve been making a lot of braids with bright colors it’s nice to shift gears and make some with just 2 natural, undyed-looking colors—a light and a dark shade.
I’d love to have a bigger gallery of color ideas for braids from readers. If you have links or pictures you’d like to share, please leave a note.
Notes:
* For this type of flat bicolor braid, it takes 10 whole cycles (20 loop transfers), for the bicolor loops to return to the same fingers with the original shank-color facing up—the first time around the loop will come back to its starting position finger with the opposite shank-color facing up.
posted Aug/9/2011, last updated Dec/30/2022
© 2011–2022 Ingrid Crickmore
See full copyright restrictions and permissions at the bottom of the sidebar (if you are on a small screen device, the ‘sidebar’ may appear somewhere other than at the side of the screen). Photos of braids made by others may not be shared in any way without explicit permission from the maker of the braid. Photos of my own braids, and of other content of this website may be shared in limited and specific ways, see full copyright.


Pingback: Different Color Braid Hair
Where do you get you linen thread, or what type is it? I have only ever used cotton embroidery floss but I love the look of the linen braids you have made.
Hi Sarah, thank you! I don’t have a regular source for linen, just pick it up here and there–does anyone else have a good source??? I got some rolls of colored linen weaving yarn on sale from WEBS (online yarn store) years ago but they may have stopped carrying that brand now. Some of my linen is old stock shoe thread in very plain colors. There is linen thread made for lace and embroidery, but I can’t remember the brand names, and my internet connection is very slow on the road here so I can’t look them up easily. You’ll also have to research a little to find out the size/ thickness you want if you are ordering online.
If you are into historical re-creating, linen was used a lot in Europe in past centuries–wool and linen were probably used more often for braiding than silk was, even though the few surviving examples are mostly silk. (that’s just because precious items were more likely to be protected and preserved, not because they were more common.)
Good luck, and let me know if you find a good current source of linen braiding thread!
Hi, Im so very interested in the briding book, how can I lay my hands on it?
And thank you further on for your exiting writing.
sidsel, hannover
Hi Sidsel,
You’re welcome! Which braiding book do you mean? I’ve mentioned books by others in various parts of my blog… Hover on my “About Loop Braiding” menu tab up top and then click on “Old English Pattern Books for Loop Braiding” in the drop-down menu– it discusses 6 publications. Or in that same drop-down, click on “17th C. Letterbraids”–that discusses one of the 6 in depth.
Another good book is Tak V Bowes, Departed.
I haven’t published any books myself, though I have one article in the book from the last international Braids conference (Braids 2012, Manchester England). That book is a compendium of articles from each of the teachers and presenters at the conference. There is information about it at the top of my right sidebar. Is that the one you mean?
Good luck, I hope this helps!
Dear Ingrid, I meant the “Threads that move”, but thank you for letting me look at the other Titels. Its not easy putting ones hands on nomore published books; I finally deceided to buy a book from Peter Collingwood – and then he had just died! The huge work on the old patterns sounds very exciting, but thats what I thought when I finally held Peter Collingwoods book in my hands. Now I know, that I need clear instructons first, scientific writing then. Threads that move makes me very awake, it contains various subjects of interest. How can I buy it?
braided greatings, sidsel
Hi Sidsel,
I don’t sell it myself. The Braid Society used to,
but I just noticed that the “from U.K. and Europe” link in my sidebar (near top of the sidebar) for purchasing the book isn’t working anymore, maybe the Braid Society doesn’t have any more copies.Update: the link seems to be working again. I’m not sure how long the Braid Society will keep this book in stock but so far they still seem to have it (as of Aug 2015)Click on “from U.S.A.” — that will take you to BraidersHand in the U.S.-they still have the book listed. The Braid Society published the book and I believe the proceeds are being used to fund the next international Braids convention, which will be in Seattle, USA in 2016, so it’s a very good cause!
I have tried to join the Loop Braiding Yahoo group a week ago and now can not find the link to the group. I am loving Loop Braiding and would love to be able to find more info on this art. I followed a link from Backstrap Weavers, which I have been a member of for several years now; and am soooo glad that I did.
Thank you so much for teaching such a wonderful art!
Hi Elizabeth, Here’s the link to the Braids and Bands yahoo group:
http://uk.groups.yahoo.com/group/braids_and_bands/
My blog’s list of braiding links in the right sidebar is a good place to look for other info on loop braiding, esp. the first few sites listed. Some of the other sites are about other types of braiding. The Braids_and_Bands yahoo list is also listed there, in case you want to find it again.
I have 2 separate lists of links in the sidebar, btw — Braiding links, and Textile craft links…not enough in either of them, but a good place to start!
Dear Ingrid,
I´m so pleased with all your tutorials!
I must have found you while searching for “slentre”. My mother had a book of viking-silverworks, which showed the ways of slentre, ie loopbraiding, and this set me off trying ( slentre has a differnt holding of the loops)
I do slentre with pupils at school, they love it, braiding is so much harder, leaving you with all the tails and ends.
It is so good, to read and hear you, just dooing these things because its good to do them, no commercials, it realy makes me believe in us again.
Love, sidsel from Denmark, living in Germany
Hi Sidsel, thank you so much for your nice note! I have been away from my computer for a month, just returned home, so sorry to reply this late.
I’m glad to hear you are teaching loop braiding to your pupils, you are helping to keep the tradition alive!
Happy braiding!
–Ingrid (in California, USA)
I started out with solid color loop alternating blue, white, blue, white on one hand and all light blue/grey on the other. Somewhere along the way the order got switched and the white where together. The accident made a nice braid. https://sphotos-a.xx.fbcdn.net/hphotos-ash4/375645_523020771091560_81571509_n.jpg
Dan
Hi Dan, thanks for another great example!
Hello Ingrid,
Your braids are absolutely beautiful. Love your website. I’ve always wanted to learn and find your tutmy first finger braiding
Thank you, and happy braiding!