Yes! Another color-pattern post! See note below the chart for the braiding method for 6-loop flat braids. The chart below just describes how to set up your colors prior to braiding, in order to get these particular color patterns.
Six-loop braids have some awesome color-pattern possibilities that are not possible with 7-loop braids. That’s because certain color patterns can only be braided with an even number of loops…Like stacked W-patterns in flat braids, for example.
6-loop flat braid color patterns # 1, 2, 3, 4, 5, 6, 7, 8, 9, 10.
In the chart I show a thumbnail photo for each color pattern. Some patterns have photos of more than one braid—the upper braid is always the one in my setup instructions. Any others are alternate “colorways” of the same pattern.
Any of these set-ups for 6-loop flat braids can also be used to make a 6-loop square braid. The color pattern may turn out quite differently when braided as a square braid—especially if the set-up includes any bicolor loops.
If you are setting up to braid any pattern that includes bicolor loops, be sure to double-check before starting to braid to make sure that the bicolor loops’ upper and lower colors are correctly arranged. In my set-up instructions, the upper color for any bicolor loop is underlined. That color should be uppermost on the finger, and the other color should be in lower position on the finger.
A= index, B= middle, C= ring finger
Braiding method:
Flat braid: Like a square braid, except that you only turn left loops when transferring, and never turn right loops. (See note below chart for links to the two necessary tutorials.)
| 6FL-1. Zebra-stripes | ||
 |
6 loops: 3 black loops; 3 white loops | |
| Left hand: A black B white C black |
Right hand: A white B black C white |
|
| Note: This type of color-pattern can be made with any even number of loops (2-loop braids, 4 loops, 6, 8, etc) See photo in footnotes below of a 4-loop example in red and white. | ||
| 6FL-2. “Lace Piole” of 6 loops | ||
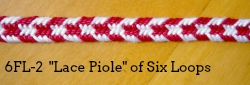 |
6 loops: 3 white loops, 3 red loops | |
| Left hand: A white B white C white |
Right hand: A red B red C red |
|
| Note: An 8-loop flat braid called Lace Piole is described in 15th C loop braiding manuscripts. This 6-loop version has the same color pattern. | ||
| 6FL-3. Three W’s |
||
 |
6 loops: 2 black loops; 2 white loops; 2 orange loops | |
| Left hand: A black B white C orange |
Right hand: A black B white C orange |
|
| Notes: 1.The thumbnail photo braids show three color variations of the same “3 W’s” pattern. See Hannah’s version in my footnotes below chart. 2. See a square braid version of the uppermost braid in footnotes below chart. | ||
| 6FL-4. Thick-thin W’s | ||
 |
6 loops: 4 brown loops; 2 pink loops | |
| Left hand: A brown B brown C pink |
Right hand: A brown B brown C pink |
|
| Note: This pattern is a 6-loop semi-close version of the 8-loop braid called Lace Daunce or Lace Dawns in the Medieval loop braiding manuscripts. | ||
| 6FL-5. Piole + W. | ||
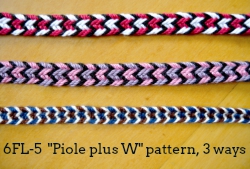 |
6 loops: 2 red loops; 2 white loops; 2 black loops. | |
| Left hand: A red B red C black |
Right hand: A white B white C black |
|
| Notes: 1. This makes a great square braid color-pattern, too. 2. In the lowest two braids, the 2 “piole” colors have much less contrast than in the top braid. The lowest braid’s “W” color is white. Its two “piole” colors (dark navy and dark brown) are very close in value. This makes the pattern start to look more like #4—thick/thin W’s. | ||
| 6FL-6. Bordered Chevrons | ||
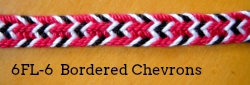 |
6 loops: 3 red loops; 2 white loops; 1 black loop | |
| Left hand: A white B black C white |
Right hand: A red B red C red |
|
| Note: A very similar color pattern can be made with 7 loops—just add one more red loop (onto the D finger of either hand.) | ||
| 6FL-7. Busy Stripes | ||
 |
6 loops: 3 white loops; 2 red loops; 1 black loop | |
| Left hand: A white B black C white |
Right hand: A red B white C red |
|
| Note: This pattern is very close to the first one (zebra stripes). It’s like a red and white Zebra Stripe with one black contrast loop taking the place of one of the red loops. In the lower braid, I used a thicker thread for the contrast loop (in this color version, black and red are the main colors, with white as the contrast color). | ||
| 6FL-8. Bicolor zebra-stripe 1 | ||
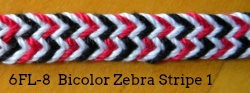 |
6 loops: 3 white loops; 3 black/red bicolor loops | |
| Left hand: A black/ red bicolor (black up) B white C red/ black bicolor (red up) |
Right hand: A white B black/ red bicolor (black up) C white |
|
| Note: The only set-up difference between this pattern and the following one is in the upper-lower orientation of the three bicolor loops. | ||
| 6FL-9. Bicolor zebra-stripe 2 | ||
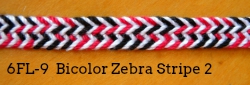 |
6 loops: 3 white loops; 3 black/red bicolor loops | |
| Left hand: A black/ red bicolor (black up) B white C black/ red bicolor (black up) |
Right hand: A white B red/ black bicolor (red up) C white |
|
| Note: This set-up makes one of my favorite 6-loop square braid color-patterns — in a square braid the colors line up quite differently than than they do here. | ||
| 6FL-10. Thick bicolor + thin W (for lack of a better name!) | ||
 |
6 loops: 4 blue/ navy bicolor loops; 2 white loops | |
| Left hand: A blue/ navy bicolor (blue up) B blue/ navy bicolor (blue up) C white |
Right hand: A navy/ blue bicolor (navy up) B navy/ blue bicolor (navy up) C white |
|
| Notes: 1. The square braid version of this set-up is even nicer IMO—it has lengthwise stripes in two colors, interrupted by white wraparound W’s. 2. The example braid with wilder colors was done with bicolor loops in several colors and shades rather than just two. (oranges + dark greens; reds + dark blues). | ||
Notes and tips:
6-loop braiding method
The braiding method for 6-loop square or flat braids is a combination, shown in two of my tutorials: 5-loop braiding moves for one hand, and 7-loop braiding moves for the other hand.
Start braiding with 3 loops on each hand. The first hand to take a loop will be making 7-loop braiding moves, and the other hand will be making 5-loop braiding moves for the whole length of the braid. (Remember to turn loops on one side but not on the other when making a flat braid!)
Click this link for my Bicolor Loops tutorial if you want to learn about setting up and braiding with bicolor loops (loops that are half one color, and half another color).
A step toward 7-loop braids
When I first learned 7-loop square braids, I found the shifting move between the ring and little fingers very difficult. Some people have no or little trouble learning this, but to others it can feel almost impossible at first.
I was very determined, and after a few days’ practice, it was no longer a problem. But it might have been easier if I had learned this 6-loop braid first.
In this 6-loop braid one of the two hands performs 7-loop braiding moves—the first hand to start braiding. The other hand just does 5-loop braiding moves.
This can make the 6-loop braid an easier, gentler way to get used to 7-loop moves, one hand at a time… Start with 3 loops on each hand, and do the first braiding move with either the right or the left hand—whichever one you want to use for the 7-loop braiding moves. The other hand can take it easy with 5-loop moves. (and learn by watching! I think this really does happen to some degree).
Six-loop square or flat braids might feel a little odd to braid at first, because the two hands hold different numbers of loops. You start out with three loops on each hand, but after the first move you’ll find yourself holding two loops on the left hand, and four loops on the right. That alternation will keep repeating for the whole length of the braid. One hand will alternately hold 3 loops and 2 loops, while the other hand will alternate between 3 loops and 4 loops. This type of imbalance is true for any even-number-of-loops square and flat braid. (try the 4-loop braid below and you’ll see what I mean!)
Four-loop “Zebra Stripe” flat braid:

Start with two loops on each hand–A red, B white. The two ending “braidlets” are two-loop braids in this same “zebra-stripe” color alternation. Each braidlet was made from one white and one red loop. However I could have gotten the same effect from braiding a four-loop divided braid. (Wool weaving yarn).
The power of 6, SQUARED:
If you use these same flat-braid color setups listed above, but then braid square braids instead of flat ones, you may like the result! Fold a flat braid in half lengthwise to see how it would look as a square braid. (This doesn’t work for flat braids with bicolor loops, though—those patterns will change when braided “square” vs “flat”.)
W- designs will become V-shapes encircling the square braid, or maybe “wraparound W’s” would be a better way to describe it. Here’s an example of #3 – 3 W’s braided as a square braid — notice how each color segment seems to encircle the braid (zigzag fashion), without crossing any of the other colors:

3-W’s braided as a square braid, same yarn and colors as in the flat braid example in the chart
I haven’t yet braided up any other 6-loop square braid examples for this post, but take it from me that the following setups are definitely worth trying as square braids, and probably any of the others as well:
#5, Piol + W looks fantastic as a square braid. (The red/white/black version is uber-heraldic!) Can’t go wrong with this as a square braid.
#6, Bordered Chevrons also makes a great square braid. This pattern isn’t only for even #’s of loops, it works well as a full 7-loop braid as well (either square or flat). Just add one more red loop (onto one of the D-fingers).
#9, Bicolor Zebra-stripe 2: this color set-up makes one of my favorite 6-loop square braid color-patterns…Quite different-looking than the flat version because of the bicolor loops.
#10 Thick Bicolor + thin W: Fantastic as a square braid! The navy and blue areas should end up like bicolor “Edge” lengthwise stripes up and down the braid, interrupted by thin “wraparound” W’s.
Update: Ricky just sent me these photos!—he was the first blog reader I heard from who had tried my tutorials, back before I had figured out how to make videos for them—and he’s still braiding! Here are some of his beautiful 6-loop flat braids, pattern #2 (6-loop Piole):

Ricky’s 6-loop ‘Lace Piole’ bracelets (pattern 6FL-2)
(I use black and white all the time for braids, but have never thought of combining bright red with natural-looking gray, wow! I will definitely be shamelessly copying that color combination in the future!)
Here’s one of Ricky’s signature lush greenery shots of a black and white braid that has both the “lace Piole of 6 loops” pattern, and the “Zebra Stripes” pattern:

Ricky’s 6-loop “lace Piole” + “Zebra Stripes” braid
A great shot of a beautiful braid! Thanks for sending these, Ricky!
Here’s a picture of the braid that gave me the idea of making a post on 6-loop flat braid color-patterns. Hannah had learned flat and square three-loop braids from me back in summer 2014 (when she was 9), and she came back to camp this summer wearing this bracelet–a six-loop flat braid with the “3-W’s” pattern. :

Hannah’s “Three W’s” bracelet
Hannah had seen five-loop braiding the previous summer, but certainly not six-loop, and not this color-pattern, either. She came up with both on her own at home.
When I stared at her braid, Hannah told me how the colors had been set up on her fingers to make it! Yup: “Purple, turquoise, navy — matching fingers on both hands.” Um. Just saying–well, let’s put it this way: none of the adults I’ve taught at camp has ever shown up the next year able to tell me the order of the colors on their fingers for any of the braids they’ve made! (I teach more adults there than kids — this is a camp where grownups come to hang out, play music together, and act like children! Of course there are always some real kids there as well, since camping in a big field by a river is pretty fun regardless of whatever the boring grownups happen to be doing…)
Reeling from that, I also had to do a double-take to check out how perfectly aligned the W’s in her braid had come out. Not to make any of us adult braiders feel bad, but this isn’t always the case with those somewhat pesky W’s. They don’t always turn out this well for me unless I do a little extra fussing that I know Hannah does not bother with. See my TMI tips below. Or instead of reading those tips, just braid like Hannah and her friends: with a light, effortless touch, no fussing and no overtightening!
W or a slanted line?
Those W-shapes can often come out more like slanted lines across the braid than true W’s.
Slanted lines can look fine, too! But if you want W’s, and it’s not coming out that way, there are ways to tweak your braid while you are braiding to make sure they start out and stay as W’s.
Most important is to braid a fully-flat braid, not an overly-tightened “3/4”-flat braid. Each of the four “legs” of the W displays in a separate lengthwise column of the braid. If you braid too tightly one of those columns disappears — well, really it gets compacted behind another column, so it doesn’t show. You will only see three columns of slanted threads in the braid (braiding expert Noemi Speiser calls those columns “ridges”). That doesn’t leave enough columns to display M or W motifs. If that’s what is happening in your flat braids, read below:
A fully-flat braid almost always braids folded – folded the way a book is closed. After the braid is done, you open it up—unfold it—into a flat, ribbon-like shape. But while you are braiding, it should not look flat, it should either look about the same as a square braid, or else sort of cupped into a sideways “U” shape.
Make sure your braid is braiding in this folded shape early on in the process.
If it already looks flattish – as flat as it’s ever going to be – early on in the braiding procedure, you are probably making the 3/4-flat version of a flat braid. It’s hard to ‘correct’ this compacted “3/4-flat braid” shape after it has started. Even braiding more loosely won’t fix it. With each braiding move, the threads will tend to conform to the shape that has already been established above them, and settle into that 3/4-flat shape. It’s a nice shape, slightly thicker in the middle and with distinctive asymmetrical color patterns. But if you want a wider, fully-flat braid, try my tips below.
Tip #1: Don’t start out by hanging your loops from a knot or bunched area at the top, using a thread to hang it, the way I show in my beginning tutorials! (Sorry!) That type of start increases the chances of getting a compacted flat braid, even if you are not braiding too tightly. It took me a long time to discover that, since I never start my own braids that way. (Now that I know this, if I want to make that 3/4-flat braid shape I always start braiding by hanging my loops from a starting knot or other constriction.)
Instead, suspend the loops from the attachment in such a way that they aren’t constricted and can’t rotate or spin easily. Try using no header string – just placing the knot on top of the bar of the C-clamp, and letting the loops hang around the bar. After you finish the braid and take it off the bar, there will be a loose unbraided area between the knot and the start of the braid. Just undo the knot and retie it a bit further down.
Tip #2: When tightening, extend the loops widely – very widely – on only the RIGHT side, and only after the LEFT hand has taken a loop. Keep those left loops tautly in front of you, while stretching only the right loops out to the side, and even further – away from you towards the top of your braid. (the right hand will be holding fewer loops than the left). This is the main tightening move, and it will be a very lop-sided stretch! All the way out and more on the right, and no spread on the left.
Then, after the next transfer – after the RIGHT hand takes a loop, spread both hands apart to tighten, but only a very short distance apart, not widely at all. This is not the main tightening move, it’s only a token spread.
This means a different tightening move for every other loop transfer! But it has great results for a flat braid. When I’ve taught this in beginning loop braiding classes all the participants were able to do it, and to make ‘fully flat’ flat braids, which had never happened before.
(This assumes that you are turning only the loop on the left index finger, the way I do – obviously you can also make a flat braid in the mirror-image opposite direction).
I explain this in more detail, and show pics of how a flat braid should look before and after ‘unfolding’ it, in Flat Braid Pick-up Patterning
Keeping the W’s straight:
Even when you braid a “fully flat” braid of four columns, the W-pattern can still sometimes morph into what looks like trailing diagonal lines instead of W’s.
To guard against that happening, pause regularly while braiding to check how the braid looks on its slitted edge—the edge that’s really the two edges of the flat braid, one on top of the other. You’ll have to lean over to the right of the braid and look at that edge, or else tip your loops so that edge of the braid turns upward and you can look at it straight on.
You are checking to make sure that the color pattern matches evenly on either side of the slit.
Say you are braiding black M-shapes (the W’s will look like M’s on that outer, folded-around side of the braid): The two “feet” of those M’s should meet at the same level on either side of the slit in your braid, as if they are trying to meet and form a V together. If they are level with each other, good! But if one side of the V is higher than the other, fix it NOW to get them even with each other.
This might mean using your hands to do something extra up at the base of the braid: to tighten up, say, JUST the layer above the slit–OR the layer below the slit to get the two black ends of the M’s to match. Try not to drop your loops while you are doing this (push them down close to your knuckles first)
After that keep checking as you braid, and try to adjust your regular tightening moves so that the M-motifs stay even and don’t start to slant.
(This is only a potential issue with flat braids—it doesn’t apply to the square-braid versions of W-patterns.)
Btw, if you braid the way I teach here, the W’s look like M’s on the back/ outside of the braid, and W’s on the inside—the side that shows later on when you open your braid.
Yarn:
Most of the sample braids in these photos were made with a 3-ply crochet cotton called Aunt Lydia’s Fashion Crochet, size 3. This size 3 has a somewhat softer twist than most crochet cottons, which makes it pack together well in a braid. It’s about twice as thick as embroidery floss. It doesn’t come in many colors–no real orange for example, so the orange I used in pattern #3 (Three W’s) was another type of yarn entirely—an old roll of some kind of weaving cotton. Links to yarn sources, and more yarn suggestions can be found in my 3-loop braid tutorial, below the pdf window.
Many other kinds of yarn or thread would work well, too. I used wool for the 4-loop example braid in the photo above. You can also get great effects by mixing different types of yarn or thread. One or a few shiny silk or rayon loops can be a great contrast in a braid that is mostly non-shiny cotton or wool.
A peek ahead: My next post might be on Slentre braiding…Thanks to Gary Mitchell, I’ve learned something very cool about Slentre (palms-down) braiding that I never realized before! After thinking for all these years that Slentre is a much more limited loop braiding method than A-fell or V-fell, I found out that it has a big advantage over both of them when it comes to at least one particular type of loop braid… (with some great color-patterns!)
last updated May 13, 2018
© 2015-2018 Ingrid Crickmore
See complete copyright restrictions and permissions at the bottom of the sidebar on every page of this site.
(If you are using a small-screen devise, the “sidebar” may display somewhere other than at the side of the screen.)
Any braids you make using my tutorials are wholly yours, may be marketed and sold. Copyright applies to my words, videos, and images on this site.


Hola!!!!! muchísimas gracias hice lo que me dijo y POR FIN!!!! ya me salió. GRACIAS 1000!!!!
Hi! I love these braids so much! I used to do them a lot when I was a teenager, but I had forgotten – until I found your page 🙂
I have a question though: I want to create a one of these for Pride. It’s not the actual rainbow flag, but another one with 5 different colors. Now obviously I can just use the colors to make a standard 5-loop braid (and I have), but is there any way to put the colors in the order they have in the flag – like the ones in this post? I’ve looked, but it doesn’t seem like I can exchange the colors to mine, since most of them only use 2-4 colors…
Can you help me?
I hope Ingrid doesn’t mind if I answer… check the color linking tut. If you replace black in the first video with bicolor loops you should get five stripes. Learned the linking technique just for that purpose too, but since my pride bracelet has a black border, the bicolor thing is just a guess.
Oh, that’s a good idea!
I think I need to practice a bit to perfect the flat braid first, but I’ll report back when I get a chance to try it out 😉
Hi Bat thanx for answering! I’ve been gone on a camping trip the last two weeks, nice easy van-camping but no good internet connection… That’s a really good suggestion to do color-linking with bicolor loops to get those rainbow colors.
@ Sofia, I’m really glad you brought this up! someone else asked me about rainbow pride patterns recently and I meant to try some out but then forgot all about it…Anyway, if what you want is five different colors of W’s going down the braid like the “3 W’s” pattern above, then no, you couldn’t do that in this particular braid. It takes a 10-loop version of this braid in order to have 5 colors of W’s. The method for that is halfway between a 9-loop braid and an 11-loop braid.
As Bat said, if you would like to have separate lengthwise stripes / columns of colors, you could have up to 5 or more if you used bicolor loops and color-linking moves. My 7-loop color-linking post shows how to link colors for lengthwise stripes. Or if you’ve learned double braids, the flat variation of a double braid can have up to eight or more columns of different colors. The long photo of a braid higher up in my sidebar is a flat double braid with columns of colors in some places–with bicolor loops those columns could all be different colors. You can make double braids with 6 or 8 loops, doesn’t have to be ten.
If you don’t need to have the colors in separate columns, you could just have five colors following each other nested into a lengthwise zigzag that crosses itself…hmm because of crossing itself, the pattern would probably would end up looking more plaid-like than zigzag.
To get the colors into a particular order in that plaid or crisscrossing zigzag design, you would start with that order on your fingers: Left to right on the left hand, followed by RIGHT to left on the right hand. (there’s more on this in my post on planning color patterns).
–ok, now I have to try out some of these rainbow ideas!
Could you do a video on #5? I am a rather visual learner.. I think I understand what you are doing but I have doubts that I fully understand.
Hi Shawn,
Thanks so much for checking out my site! I do have a video for the braiding method elsewhere on my blog. (The chart above with braid #5 just shows how to set up the colors on the fingers, it doesn’t teach how to make the braid).
The braiding method is covered in my video for 7-loop square and flat braids: Continue Here: 7-loop square and flat braids.
Have you followed that video yet? When you do, I can email you to answer any questions about this six-loop flat version, and give you a more detailed description of the color info for #5 or any of the other ones. If you contact me on my email contact form (also nested under “ABOUT” at the right of my top menu), I can email you privately.
Thanks so much! I got out some supersaver yarn of all things and just went for it after watching a number of your videos. and I am happy to announce that I got it and I made a few mistakes. However, I know what my mistakes were and how to avoid them next time which I think is important. Looking forward to trying more. Thank you so much for this site and the youtube channel.
Congratulations! (figuring out mistakes is the best way to learn anything, btw!)
Happy braiding!
The red and grey braid reminds me of a bright yellow and grey braid I made. In heraldic terms, it looked like gold and silver, which you should never put together (metals go with colours, and colours with metals, for more contrast and visibility). What my braid REALLY looked like, though, was trim for a medieval safety vest.
I should get back to learning how to make more braids, but thee re are so many hobbies… Plus I suffer from ADOS: Attention DeficOh Shiny!
Thanks for the tip on heraldic color combinations! Yup, shine is definitely distracting–I just acquired some braiding thread wrapped in (shh! r-e-a-l g-o-l-d !!!) that’s distracting me like crazy…
Hello Ingrid,
I’ve been trying these 6-loop braids and the results are delightful!
Thank you.
All the best,
Europa C-D
Hi Europa, it’s nice to hear from you! I’m so glad you liked the braids!
Happy braiding,
Ingrid
These are awesome! Thanks for sharing. I can’t wait to give them a try. Julie
Hi Julie, you’re welcome and thanks for the note, I hope you have fun with the braids!